
Popular categories
Looking for a yarn?


Comments / Questions (170)
![]() Ragnhild Jønsberg wrote:
Ragnhild Jønsberg wrote:
Jeg sliter med å starte. Får det ikke til å stemme med at det skal økes ved merkene. Er merkene riktig i oppskriften.
26.11.2014 - 00:08DROPS Design answered:
Hej Ragnhild, Du kan prøve at tegne først, så er det lettere at se at mærkerne deler stykkerne op i hver raglanovergang. God fornøjelse!
26.11.2014 - 15:12
![]() Kathy A wrote:
Kathy A wrote:
One more question on row 40 on chart A.5. It calls for a 3-stitch cable twist right after the first stitch and right before the last stitch. But row 40 is a wrong side row, and all other cable twists in the pattern are done on the right side. Should the twists be done instead on row 41?
22.11.2014 - 21:22DROPS Design answered:
Dear Kathy A, Diagram will be checked - we'll come back to you as soon as possible. Thank you in advance for your patience. Happy knitting!
24.11.2014 - 10:36
![]() Kathy A wrote:
Kathy A wrote:
I do agree that the instructions are not clear at all, although I think I have figured it out. I have a question--in the lower body where A.4 and A.5 are worked side by side, instructions provide "when A.4 and A.5 have been worked vertically...." place marker and knit lower rib. However, A.4 is 54 rows and A.5 is 64 rows. I assume I should continue cable twist every 6 rows for the last 10 rows of A.4 but clarification in pattern would be helpful.
20.11.2014 - 02:27DROPS Design answered:
Dear Kathy, you are correct, continue working the 12 sts in A.4 as before until A.5 has been worked. Happy knitting!
20.11.2014 - 10:03
![]() Marina wrote:
Marina wrote:
Hallo Ich versteh die zunahmen mit 1-4 x nicht Sind die zunahmen innerhalb vom Raglan oder außerhalb wie bei den zunahmen? Und wann muss ich damit beginnen nach den kompletten Raglanärmel Zunahmen oder werenddessen Grüße
10.11.2014 - 12:07DROPS Design answered:
Liebe Marina, ist es möglich, dass Sie Ihre Frage nich zu Ende formuliert haben? Soviel vorab: Sie stricken die Jacke von oben nach unten und nehmen an den 4 Raglanlinien zu. Wir weisen aber darauf hin, dass das Modell eher für erfahrene Strickerinnen geeinget ist und nicht ganz einfach nachzuarbeiten.
12.01.2015 - 08:27
![]() Rohrich wrote:
Rohrich wrote:
Bonjour, Je fais un blocage : Page 3, Point fantaisie : tricoter le motil sur les devants et le dos ainsi ......augmentations suivantes. Je vous remercie d'avance pour votre réponse. Cordialement. Nadine Rohrich.
08.11.2014 - 17:25DROPS Design answered:
Chère Mme Rohrich, les augmentations des raglans vont se tricoter différemment en fonction de la pièce : celles des devants et du dos se tricoteront de la même façon (les 6 premières augm. comme les 6 m de A.2, puis à l'env, puis de nouveau comme A.2 ..) - celles des manches se tricotent en jersey env. Bon tricot!
10.11.2014 - 09:12
![]() Mariann Rasmussen wrote:
Mariann Rasmussen wrote:
Strikker model 156-4 mønstret står meget blandet skal være meget vågen. Er kommet til ind og udtagninger og hvad er et parti?
11.10.2014 - 14:03DROPS Design answered:
Hej Mariann, Ja det er ikke den letteste jakke at strikke :) Man skulle kunne sige at hvert parti = hver stykke (som gentages...) Spørg også gerne i butikken hvor du har købt garnet! God fornøjelse!
17.10.2014 - 15:44
![]() Jo Janssenvdrijt wrote:
Jo Janssenvdrijt wrote:
Ik heb mijn breiwerk 6x uitgehaald en nu weet ik pas hoe het moet na veel tellen en denken ik vind dat het verkeerd uitgelegd word maar nu lukt het
03.10.2014 - 20:43
![]() Jo Janssenvdrijt wrote:
Jo Janssenvdrijt wrote:
Is er iemand die mij kan vertellen hoe ik na de eerste naald van het patroon verder moet breien ik heb vanalles geprobeert ik kom er niet uit
01.10.2014 - 19:35DROPS Design answered:
Hoi Jo. Brei je maat L, dan heb je 136 st na de 3 ribbels en het meerderen. Vervolgens brei je: 5 st in ribbelst, 1 av, 2 r (= voorbies), 13 av, A.1, plaats 1e markeerder, A.2, 2 av, A.2, 2 av, A.1, plaats 2e markeerder, A.2, 1 av, A.3, 1 av, A.1, plaats 3e markeerder, A.2, 2 av, A.2, 2 av, A.1, plaats 4e markeerder, A.2, 13 av, 2 r, 1 av, 5 st in ribbelst (= voorbies). Meerder volgens de aanwijzigingen en brei de nieuwe st ook volgens de aanwijzigingen.
02.10.2014 - 17:10
![]() Sande wrote:
Sande wrote:
Hei, tarvitsisin apua raglanlisäyksiin. Miten saan mallineuleen eli palmikot lisäyskohtaan? Merkkien molemmin puolin langankierrot, kaksi peräkkäinkö? ja aluksi lisäykset sekä nurjalla että oikealla puolella? ja kun silmukoita on lisättynä 6 etu ja takakpl puolella aloitetaan palmikko? Kiitos jos joku auttaa ja vääntää rautalangasta! t,sanna
01.10.2014 - 07:47DROPS Design answered:
Lisäykset tehdään raglanlinjan eli: A.1/A.2, merkki, A.2/A.1 molemmin puolin. Eli teet jokaisen 4 raglanlinjan molemmin puolin yhden langankierron. Tee lisäykset ensin sekä työn oikealla että nurjalla puolella ja aloita palmikot, kun olet lisännyt 6 silmukkaa jokaisen raglanlinjan kohdalle.
07.10.2014 - 16:26
![]() Jo Janssen wrote:
Jo Janssen wrote:
Waarom is het patroon va de tekening anders als de beschrijving van het patroon
29.09.2014 - 13:50DROPS Design answered:
Hoi Jo. Zie mijn reacties hieronder.
29.09.2014 - 14:04
|
||||||||||||||||||||||||||||
Alana Cardigan#alanacardigan |
||||||||||||||||||||||||||||
 |
 |
|||||||||||||||||||||||||||
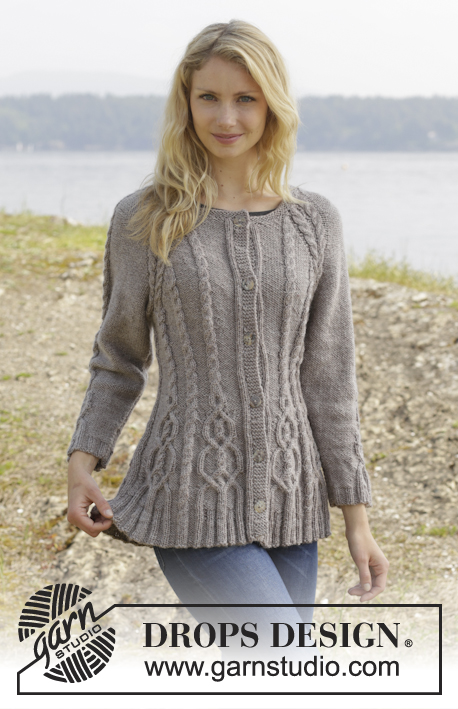
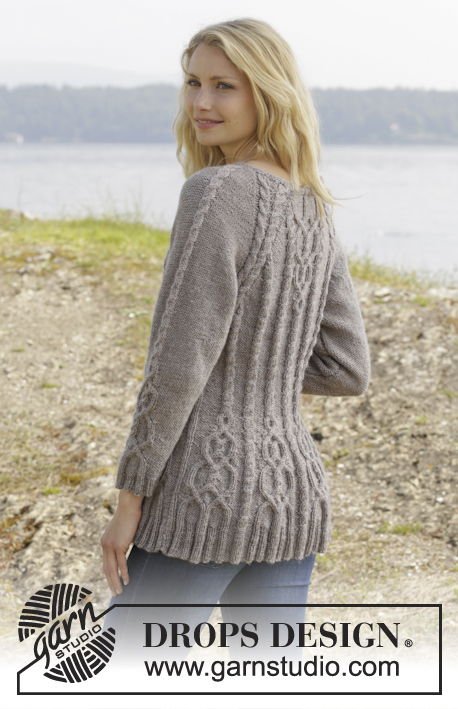
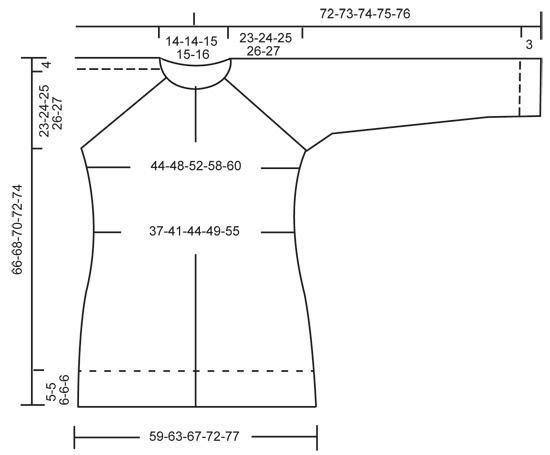
Knitted DROPS jacket with cables and raglan, worked top down in ”Karisma”. Size S-XXL
DROPS 156-4 |
||||||||||||||||||||||||||||
|
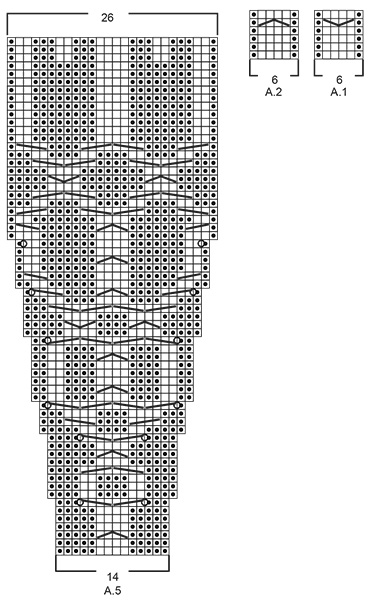
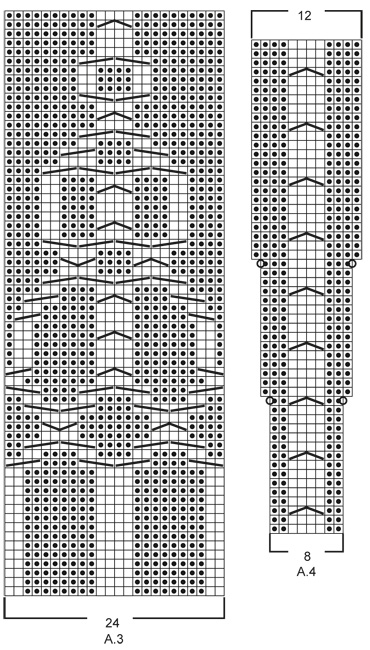
GARTER ST (back and forth on needle): K all rows. 1 ridge = K2 rows. PATTERN: See diagrams A.1 - A.5. The diagrams show all rows in pattern seen from RS. RAGLAN: Inc on each side of raglan sts (A.1/A.2, marker, A.2/A.1) by making 1 YO = 8 inc on row. On next row work YOs twisted to avoid holes. Then work the new sts P on sleeves (seen from RS), and on front and back piece work the new sts in to pattern as explained below. DECREASE TIP (applies to sleeves): Dec on each side of marker as follows: Work until 3 sts remain before marker, P 2 tog, P 2, P 2 tog = 2 sts dec. INCREASE TIP: All inc are done from RS. Inc 1 st by making a YO. On next row K YOs twisted, i.e. work in the back loop of st instead of front to avoid holes. P the new sts (seen from RS). KNITTING TIP: For every 10th row work short rows over the 5 sts in garter st in bands as follows (beg from RS): K 5 band sts, turn piece, tighten yarn and K back, turn piece and work as before over all sts, turn piece, K 5 band sts in garter st, turn piece, tighten yarn and K back. That way the ridges in band will not contract as much. BUTTONHOLES: Dec for buttonholes on right band. 1 buttonhole = K tog third and fourth st from edge and make 1 YO. Dec for buttonholes when piece measures: SIZE S: 2, 12, 22, 32, 42 and 52 cm / ¾",4 ¾",8 ¾",12½",16½",20½" SIZE M: 2, 12, 22, 32, 42 and 52 cm / ¾",4 ¾",8 ¾",12½",16½",20½" SIZE L: 2, 11, 20, 29, 38, 47 and 56 cm / ¾",4½",8",11½",15",18½",22" SIZE XL: 2, 11, 20, 29, 38, 47 and 56 cm / ¾",4½",8",11½",15",18½",22" SIZE XXL: 2, 11, 20, 29, 38, 47, 56 and 65 cm / ¾",4½",8",11½",15",18½",22",25½ ---------------------------------------------------------- JACKET: Worked back and forth, top down on circular needle to make room for all the sts. YOKE: Cast on 108-108-113-113-117 sts on circular needle size 4 mm / US 6 with Karisma. Work 3 ridges in GARTER ST - see explanation above. K next row AT THE SAME TIME inc 24-24-23-23-27 sts evenly = 132-132-136-136-144 sts. Remember BUTTONHOLES - see explanation above. Now work as follows from RS: 5 sts in garter st, P 1, K 2 (= band), P 12-12-13-13-15, A.1, insert 1st marker, A.2, P 2, A.2, P 2, A.1, insert 2nd marker, A.2, P 0-0-1-1-3, A.3, P 0-0-1-1-3, A.1, insert 3rd marker, A.2, P 2, A.2, P 2, A.1, insert 4th marker, A.2, P 12-12-13-13-15, K 2, P 1, 5 sts in garter st (= band) – READ KNITTING TIP! READ ALL OF THE FOLLOWING SECTION BEFORE CONTINUING! REMEMBER THE GAUGE! On next row from RS beg inc for RAGLAN – see explanation above, AT THE SAME TIME work pattern as follows: RAGLAN: Repeat inc every row 0-2-10-20-20 times in total. Then inc on every other row (i.e. on every row from RS) 23-32-30-26-27 times and in every 3rd row 6-0-0-0-0 times = 364-404-456-504-520 sts. PATTERN: Work pattern on body as follows (P the inc sts on sleeves): Work the first 6 sts inc in A.2, then P next 8-9-7-8-8 inc sts, work the next 6 inc sts in A.2, P the next 8-9-7-8-8 inc sts. NOTE: (Size M-L-XL-XXL): When A.3 has been worked 1 time vertically, continue with A.2 over cable and P (seen from RS) the remaining sts from A.3 until start of body. S/M: Then inc as before on sleeve and inc inside A.1/A.2 (i.e. between A.1 and A.2, towards marker for raglan) on front and back piece 1-4 more times. P the new sts. L/XL/XXL: Continue with A.2 over the next 6 inc sts, P the next 7-8-8 inc sts, then inc as before on sleeve and inc inside A.1/A.2 (i.e. between A.1 and A.2, towards marker for raglan) on front and back piece 1-4-5 more times. P the last 1-4-5 inc sts. Piece now measures 27-28-29-30-31 cm / 10½"-11"-11½"-11¾"-12¼" from shoulder. Now work as follows from WS: Work 55-60-67-73-76 sts (= right front piece), slip the next 80-90-102-114-116 sts on a stitch holder for sleeve, cast on 12 new sts under sleeve, insert a blue marker in the middle of these new sts (= side), work the next 94-104-118-130-136 m (= back piece), slip the next 80-90-102-114-116 sts on a stitch holder for sleeve, cast on 12 new sts under sleeve, insert a blue marker in the middle of these new sts (= side), work the remaining 55-60-67-73-76 sts (= left front piece). There are now 228-248-276-300-312 sts on needle. NOW MEASURE THE PIECE FROM HERE. BODY: There are now 106-116-130-142-148 sts for back piece and 61-66-73-79-82 sts for each front piece. Then continue pattern as follows from RS: S/M: 5 sts in garter st, P 1, K 2 (= band), P 12-12, A.2, insert a marker, P 8-9, A.2, insert a marker, P 8-9, A.1, P 7-7, A.2 0-1 time in width, P 7-7, A.2, P 8-9, insert a marker, A.2, P 8-9, insert a marker, A.2, P 9-9, A.2, P 9-9, A.2, insert a marker, P 8-9, A.2, insert a marker, P 8-9, A.1, P 7-7, A.2 0-1 time in width, P 7-7, A.2, P 8-9, insert a marker, A.2, P 8-9, insert a marker, A.2, P 12-12, K 2, P 1, 5 sts in garter st. L/XL/XXL: 5 sts in garter st, P 1, K 2 (= band), P 13-14-15, A.2, insert a marker, P 7-8-8, A.2, insert a marker, P 7-8-8, A.2, insert a marker, P 7-8-8, A.1, P 4-6-5, A.2 1-1-2 times in width, P 4-6-5, A.2, P 7-8-8, insert a marker, A.2, P 7-8-8, insert a marker, A.2, P 7-8-8, insert a marker, A.2, P 10-11-12, A.2, P 10-11-12, A.2, insert a marker, P 7-8-8, A.2, insert a marker, P 7-8-8, A.2, insert a marker, P 7-8-8, A.1, P 4-6-5, A.2 1-1-2 times in width, P 4-6-5, A.2, P 7-8-8, insert a marker, A.2, P 7-8-8, insert a marker, A.2, P 7-8-8, insert a marker, A.2, P 13-14-15, K 2, P 1, 5 sts in garter st. READ THE NEXT 2 SECTIONS BEFORE CONTINUING! Now dec and inc at the same time as follows: DECREASE: Dec differently as follows: Dec 1 st by P 2 tog towards the bands mid front, repeat dec every 1½-1½-1½-2-2 cm / ½"-½"-½"-¾"-¾" 5-5-4-4-5 more times. AT THE SAME TIME dec 1 st on each side of the middle cable on back piece. Repeat dec every 2-2-1½-1½-1½ cm / ¾"-¾"-½"-½"-½" 3-3-4-4-6 more times. AT THE SAME TIME dec 1 st towards cable in every P section with marker in (= 8-8-12-12-12 markers). Repeat dec every 3-2½-5-4-4 cm / 1⅛"-⅞"-2"-1½"-1½" 2-3-1-2-2 more times. INCREASE (towards the sides): When piece measures 3 cm / 1", inc along the cable towards the sleeve (i.e. cable from raglan) in P section towards the sides – READ INCREASE TIP! Inc 4 sts on row. Repeat inc every 1½-1½-2½-1½-1 cm / ½"-½"-⅞"-½"-⅜" 3-4-2-4-10 more times. When all dec and inc are done, 200-216-244-264-294 sts remain. When piece measures 11-12-12-13-14 cm / 4½"-4¾"-4¾"-5"-5½", work pattern as follows: 5 sts in garter st, P 1, K 2 (= band), P 2-2-4-4-5, A.5, A.4, A.5, A.4 0-0-1-1-1 time, P 7-8-6-11-15, A.2 0-1-1-1-2 times in width, P 7-8-6-11-15, A.4 0-0-1-1-1 time in width, * A.5, A.4 *, repeat from *-* 2-2-3-3-3 more times in width, A.5 1-1-0-0-0 times in width, P 7-8-6-11-15, A.2 0-1-1-1-2 times in width, P 7-8-6-11-15, A.4 0-0-1-1-1 time in width, A.5, A.4, A.5, P 2-2-4-4-5, K 2, P 1, 5 sts in garter st (= band). NOTE: Adjust the first cable in A.4 and A.5 to get a nice transition between diagrams. Continue with pattern and inc according to diagram. When A.4 and A.5 have been worked vertically and piece measures approx. 33-34-34-35-35 cm / 13"-13½"-13½"-13¾"-13¾", there are 316-332-376-396-426 sts on needle. Insert a marker here. NOW MEASURE THE PIECE FROM HERE. Now work rib inside 8 band sts in each side of piece as follows: S/M: * Work K over K and P over P until 7-11 sts remain before the blue marker in the side, P 2, K 2, P 3-4 *, repeat from *-* 1 more time and continue with K over K and P over P until band sts. L/XL/XXL: * Work K over K and P over P until 8-14-21 sts remain before the blue marker in the side, K 2-2-2, P 3-4-3, K 0-2-2, P 0-3-3, K 0-0-2, P 0-0-3 *, repeat from *-* 1 more time and continue with K over K and P over P until band sts. When rib has been worked for 2 cm / ¾" from marker, inc by making 1 YO before first P st in every P section. READ INCREASE TIP! When rib has been worked for 5-5-6-6-6 cm / 2"-2"-2½"-2½"-2½", bind off with K over K and P over P. SLEEVES: Slip the 80-90-102-114-116 sts from stitch holder back on circular needle. Work 1 row over all sts and cast on 12 new sts at the end of row = 92-102-114-126-128 sts. Insert a marker in the middle of the new sts (i.e. 6 sts on each side of marker). NOW MEASURE THE PIECE FROM HERE. Then work sleeve in the round on circular needle/double pointed needles. Continue the middle cable on sleeve as before but work P over cables in raglan. On 2nd round beg dec on each side of marker - READ DECREASE TIP. Repeat dec every other round 6 more times = 78-88-100-112-114 sts. Then dec 1 st on each side of marker every 2-1½-1-1-1 cm / ¾"-½"-⅜"-⅜"-⅜" 13-17-22-27-27 times = 52-54-56-58-60 sts. AT THE SAME TIME when piece measures 15 cm / 6", work A.5 over cable in the middle of sleeve - adjust the first cable in A.5 to get a nice transition between diagrams. NOTE: Do not inc in A.5 on sleeve, i.e. do not work YOs in diagram. When A.5 is finished and sleeve measures 37 cm / 14½", work rib as follows from marker at beg of round: P 0-0-1-2-3, K 1-2-2-2-2, P 3, K 2. P 3, K 2, P 2, continue rib as on last row in A.5 (= 26 sts), P 2, K 2, P 3, K 2, P 3, K 1-2-2-2-2, P 0-0-1-2-3. Continue like this for 3 cm / 1", bind off with K over K and P over P. ASSEMBLY: Sew the holes under the sleeves. Sew the buttons on to left band. |
||||||||||||||||||||||||||||
Diagram explanations |
||||||||||||||||||||||||||||
|
||||||||||||||||||||||||||||
 |
||||||||||||||||||||||||||||
 |
||||||||||||||||||||||||||||
 |
||||||||||||||||||||||||||||
Have you finished this pattern?Tag your pictures with #dropspattern #alanacardigan or submit them to the #dropsfan gallery. Do you need help with this pattern?You'll find 25 tutorial videos, a Comments/Questions area and more by visiting the pattern on garnstudio.com. © 1982-2026 DROPS Design A/S. We reserve all rights. This document, including all its sub-sections, has copyrights. Read more about what you can do with our patterns at the bottom of each pattern on our site. |
||||||||||||||||||||||||||||


With over 40 years in knitting and crochet design, DROPS Design offers one of the most extensive collections of free patterns on the internet - translated to 17 languages. As of today we count 324 catalogs and 12290 patterns - 12280 of which are translated into English (US/in).
We work hard to bring you the best knitting and crochet have to offer, inspiration and advice as well as great quality yarns at incredible prices! Would you like to use our patterns for other than personal use? You can read what you are allowed to do in the Copyright text at the bottom of all our patterns. Happy crafting!
Post a comment to pattern DROPS 156-4
We would love to hear what you have to say about this pattern!
If you want to leave a question, please make sure you select the correct category in the form below, to speed up the answering process. Required fields are marked *.