
Popular categories
Looking for a yarn?


Comments / Questions (33)
![]() Sylvie wrote:
Sylvie wrote:
Je trouve ce poncho à capuche joli mais je ne le ferais pas à cause de la laine qui est trop grosse. J'aurais tant aimé le même modèle en fil C.
03.09.2025 - 10:36DROPS Design answered:
Bonjour Sylvie, retrouvez ici les modèles avec une tension de 17-16 mailles et là ceux avec une tension de 19-18 mailles, que vous pouvez tricoter avec un fil du groupe C. Utilisez le convertisseur si besoin pour recalculer la quantité nécessaire. Bon tricot!
03.09.2025 - 16:10
![]() Colleen wrote:
Colleen wrote:
Hello, I am on the row after the first set of increases. I have 56 stitches in total. I did a garter stitch in the first three band stitches, then I worked the next seven stitches in the stocking stitch. The next instruction is to “insert marker in the next stitch”. Can you please provide instructions on how to insert the marker in the next stitch? If I simply place the marker between the stitches the count is off so I must be doing something wrong. Thank you for your help.
27.11.2024 - 06:10DROPS Design answered:
Hi Colleen, You insert the marker in the stitch itself - in the loop on the needle - then work this stitch in stocking stitch. Continue following the instructions for stocking stitch and inserting the other markers, also in stitches not between stitches, before ending the row with 3 garter stitches. Happy knitting!
27.11.2024 - 06:44
![]() Maj-Britt Björnsson wrote:
Maj-Britt Björnsson wrote:
Hej!\\r\\nNär jag börjar sticka i mönster A1 huvan efter de två varven rätstickning. Måste jag då på de aviga varven räkna om mönstret? Eftersom det är sett från rätsidan. Blir rätsidan på tredje varvet? Mvh Maj-Britt
13.09.2024 - 17:08DROPS Design answered:
Hei Maj-Britt. Når du skal strikk mønstret frem og tilbake blir 1.-3.-5.-7.-9. fra retten og 2.-4.-6.-8.-10. fra vrangen, og fra vrangen leser du diagrammet fra venstre mot høyre og følger diagramforklaringen fra vrangen. mvh DROPS Design
16.09.2024 - 13:44
![]() Karine LIN-SI wrote:
Karine LIN-SI wrote:
Bonjour. La partie concernant les AUG°1 sont obscures : "Tricoter jusqu'à ce qu'il reste 1 m avant la m avec le marqueur, (lequel) 1 jeté, 3 m end et 1 jeté. Répéter aux 3 m restantes avec 1 marqueur sur le même rang/tour. (cette partie n'est pas claire), à quel endroit faut-il placer le marqueur ? Exemple : 3 m. bordure devant - combien de jersey tricoter avant marqueur et avant de faire le jeté. Merci d'avance
11.11.2023 - 23:00DROPS Design answered:
Bonjour Mme Lin-Si, dans les explications, il est indiqué de placer des marqueurs, puis d' augmenter de chaque côté des mailles avec un marqueur – VOIR AUGMENTATIONS 1, vous allez donc suivre cette indication pour augmenter à chacun des marqueurs que vous aurez mis en place. Autrement dit, vous augmentez 1 maille de part et d'autre des 3 mailles (avec un marqueur au milieu de ces 3 mailles) à chaque marqueur, soit 8 mailles à chaque fois: 1 jeté, 3 mailles endroit (la maille avec le marqueur est celle du milieu), 1 jeté. Bon tricot!
13.11.2023 - 07:53
![]() Zuzana wrote:
Zuzana wrote:
Ďakujem za pekný model. Veľmi sa mi páči. Škoda, že tu nie je fotka, ako by mala sedieť kapuca, keď je dolu. Je ťažká a ťahá dozadu. Má to tak byť?
22.10.2022 - 09:07
![]() Raffaella wrote:
Raffaella wrote:
Modello fantastico, ho realizzato la taglia S con i ferri n 7 per la mia nipotina ed è diventato davvero magnifico! Grazie mille, siete fantastici! Se volete vedere le foto, ditemi dove inviarle :-) Cordiali saluti Raffaella
31.01.2021 - 11:06
![]() Elisabeth K wrote:
Elisabeth K wrote:
Bonjour, Je suis arrivée au moment où je passe au tricot en rond : donc je tricote un dernier rang envers (rang retour) et je repars dans le même sens pour fermer le cercle ; c'est là que j'ai un problème, car au bout du 2e tour je m'aperçois que mon ouvrage se présente en jersey envers et non endroit ! Que dois-je faire pour y remédier, svp ? Est-ce que je dois terminer le tricot à plat au bout du rang endroit et là former le rond ? Merci de votre aide.
21.09.2020 - 18:14DROPS Design answered:
Bonjour Elisabeth K, vous pouvez joindre en rond à la fin d'un rang sur l'endroit afin de continuer en rond, toujours sur l'endroit et d'avoir donc le côté jersey endroit face à vous. Bon tricot!
22.09.2020 - 11:16
![]() Elena wrote:
Elena wrote:
Per la tg M "3 m per il bordo davanti a punto legaccio, 6m a maglia rasata, inserire il 1° segno nella m successiva, 6 m a maglia rasata, inserire il 2° segno nella m successiva, 18m a maglia rasata, inserire il 3° segno nella m successiva, 6 m a maglia rasata, inserire il 4° segno nella m successiva, 6 m a maglia rasata, 3 m per il bordo davanti a punto legaccio "=48m totale Ma devono essere 52! dove sta l'errore?
01.12.2019 - 23:06DROPS Design answered:
Buongiorno Elena. Nel conteggio delle maglie, vanno contate anche le quattro maglie con i segni. Queste maglie vengono lavorate anch’esse a maglia rasata. Buon lavoro!
02.12.2019 - 09:45
![]() Rosa Griselda Gutiérrez Villa wrote:
Rosa Griselda Gutiérrez Villa wrote:
Patrón No. ee-51 hola! Estoy tratando de hacer esta capa en talla s pero no entiendo. Tengo 66 pts. Las disminuciones cuando explican que son 22,22,20(2pts menos)20,18,18(4 pts menos )hasta ahí creo entender. Pero después dan cifras de 44,44,46,48,48? De dónde salen estos puntos. Gracias! Saludos desde México
18.09.2018 - 20:02DROPS Design answered:
Hola Rosa, como el patrón es sólo uno para todas las tallas, los números seguidos de guiones son el correspondiente a cada talla: 22 (talla S)- 22 (talla M)- 20 (talla L) - 20 (talla XL) etc. Por lo tanto, a los 66 puntos iniciales se le disminuyen 22 puntos en el caso de la talla S y por lo tanto quedan 66-22 = 44 puntos en la talla S.
29.09.2018 - 20:06
![]() Anna Sofie wrote:
Anna Sofie wrote:
Är det så att utsidorna på huvan ska läggas mot varandra, och sedan sys ihop på insidan så att sömmen hamnar mitt över hjässan och ner i nacken? Verkar vara enda sättet, tycker jag :-)
20.12.2017 - 12:01DROPS Design answered:
Hej Anna Sofie, Ja precis, men sy gärna från rätsidan :)
20.12.2017 - 14:26
|
|||||||
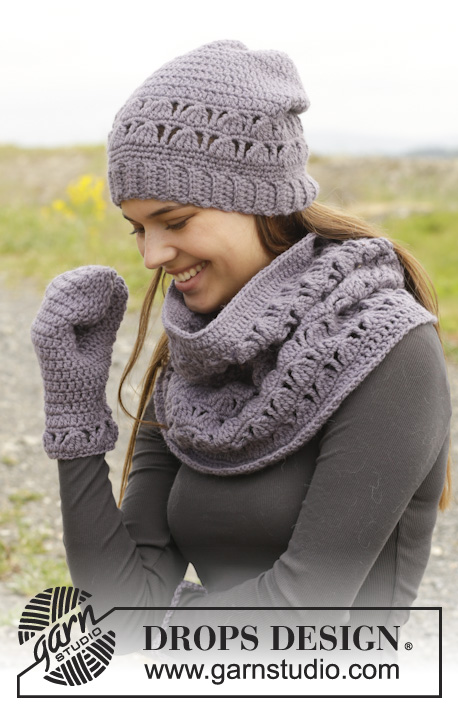
November#novemberponcho |
|||||||
|
|
|||||||
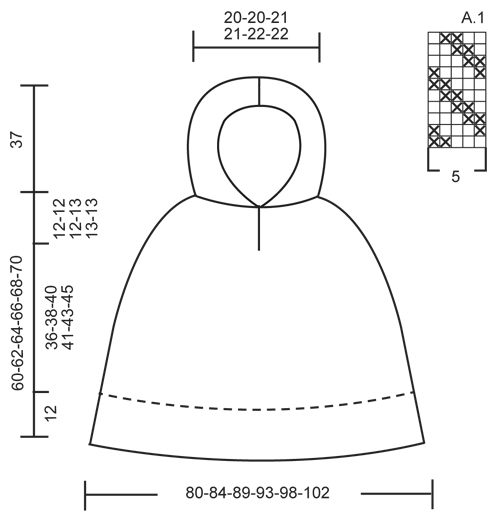
Knitted DROPS poncho with hood and vent, worked top down in ”Snow”. Size S-XXXL.
DROPS 158-32 |
|||||||
|
GARTER ST (in the round on circular needle): * K 1 round and P 1 round *, repeat from *-*. 1 ridge = 2 rounds. GARTER ST (back and forth on needle): K all rows. 1 ridge = K2 rows. PATTERN: See diagram A.1. Diagram shows all rows seen from RS. INCREASE TIP 1: All inc are done from RS. Inc 8 sts in total on every row/round with inc. Work until 1 st remains before st with marker, 1 YO, K 3 and 1 YO. Repeat at the remaining 3 sts with markers on row/round. On next row K/P YO twisted (i.e. work in back loop of st instead of front) to avoid holes. INCREASE TIP 2: Inc as follows before 1st and 3rd marker: Work until 1 st before marker, 1 YO. Inc as follows after 2nd and 4th marker: Work until marker, K 1, 1 YO. On next round K YOs twisted (i.e. work in back loop of st instead of front) to avoid holes. ---------------------------------------------------------- PONCHO: The piece is worked top down. Beg with the hood. Then work upper part of poncho back and forth until vent is done. Then work in the round. Cast on 66 sts in all sizes on circular needle size 8 mm / US 11 with Snow. Work 1 ridge in GARTER ST back and forth - see explanation above! Then work as follows from RS: 3 edge sts in garter st, PATTERN A.1 (= 5 sts) over the next 60 sts, 3 edge sts in garter st. Continue back and forth the same way. REMEMBER THE GAUGE! When piece measures 34 cm / 13½", work 1 ridge while AT THE SAME TIME dec 22-22-20-20-18-18 sts evenly = 44-44-46-46-48-48 sts remain. Then work 2 ridges more AT THE SAME TIME inc 8-8-9-10-8-8 sts evenly on last row from RS = 52-52-55-56-56-56 sts. Insert a marker here. NOW MEASURE THE PIECE FROM HERE. Then work as follows: 3 band sts in garter st, 6-6-7-7-7-7 sts in stockinette st, insert 1st marker in next st, 6 sts in stockinette st, insert 2nd marker in next st, 18-18-19-20-20-20 sts in stockinette st, insert 3rd marker in next st, 6 sts in stockinette st, insert 4th marker in next st, 6-6-7-7-7-7 sts in stockinette st, 3 band sts in garter st. P 1 row. Continue like this, AT THE SAME TIME on next row from RS beg inc on each side of sts with markers – READ INCREASE TIP 1! Repeat the same inc every other row 6-7-8-8-9-9 more times, every 4th row/round 2-2-2-3-3-4 times and every 6th round 6-6-6-6-6-7 times = 172-180-191-200-208-224 sts. AT THE SAME TIME when piece measures 12-12-12-13-13-13 cm / 4¾"-4¾"-4¾"-5⅛"-5⅛"-5⅛", work piece in the round as follows: 3 sts in GARTER ST in the round on circular needle – see explanation above, stockinette st until 3 sts remain, 3 sts in garter st. Continue like this until 2 ridges have been worked over the 6 sts at the vent. Then work piece in stockinette st over all sts. Continue with 6 rounds in stockinette st. Now inc 0-1-1-1-1-0 sts at every marker – Read INCREASE TIP 2. (= 0-4-4-4-4-0 inc on round) = 172-184-195-204-212-224 sts When piece measures 45-47-49-51-53-55 cm / 17¾"-18½"-19¼"-20"-21"-21½", inc 3-1-0-1-3-1 st evenly on round = 175-185-195-205-215-225 sts. Continue with pattern A.1 over all sts on round. Continue to work pattern for 10 cm / 4". Work 2 ridges and loosely bind off. ASSEMBLY: Fold hood and sew cast-on edge neatly tog st by st. Fasten off. |
|||||||
Diagram explanations |
|||||||
|
|||||||
 |
|||||||
Have you finished this pattern?Tag your pictures with #dropspattern #novemberponcho or submit them to the #dropsfan gallery. Do you need help with this pattern?You'll find 19 tutorial videos, a Comments/Questions area and more by visiting the pattern on garnstudio.com. © 1982-2026 DROPS Design A/S. We reserve all rights. This document, including all its sub-sections, has copyrights. Read more about what you can do with our patterns at the bottom of each pattern on our site. |
|||||||


With over 40 years in knitting and crochet design, DROPS Design offers one of the most extensive collections of free patterns on the internet - translated to 17 languages. As of today we count 325 catalogs and 12298 patterns - 12288 of which are translated into English (US/in).
We work hard to bring you the best knitting and crochet have to offer, inspiration and advice as well as great quality yarns at incredible prices! Would you like to use our patterns for other than personal use? You can read what you are allowed to do in the Copyright text at the bottom of all our patterns. Happy crafting!
Post a comment to pattern DROPS 158-32
We would love to hear what you have to say about this pattern!
If you want to leave a question, please make sure you select the correct category in the form below, to speed up the answering process. Required fields are marked *.