


Komentáře / Otázky (33)
![]() Colleen napsala:
Colleen napsala:
Hello, I am on the row after the first set of increases. I have 56 stitches in total. I did a garter stitch in the first three band stitches, then I worked the next seven stitches in the stocking stitch. The next instruction is to “insert marker in the next stitch”. Can you please provide instructions on how to insert the marker in the next stitch? If I simply place the marker between the stitches the count is off so I must be doing something wrong. Thank you for your help.
27.11.2024 - 06:10Odpověď DROPS Design :
Hi Colleen, You insert the marker in the stitch itself - in the loop on the needle - then work this stitch in stocking stitch. Continue following the instructions for stocking stitch and inserting the other markers, also in stitches not between stitches, before ending the row with 3 garter stitches. Happy knitting!
27.11.2024 - 06:44
![]() Maj-Britt Björnsson napsala:
Maj-Britt Björnsson napsala:
Hej!\\r\\nNär jag börjar sticka i mönster A1 huvan efter de två varven rätstickning. Måste jag då på de aviga varven räkna om mönstret? Eftersom det är sett från rätsidan. Blir rätsidan på tredje varvet?\r\nMvh Maj-Britt
13.09.2024 - 17:08Odpověď DROPS Design :
Hei Maj-Britt. Når du skal strikk mønstret frem og tilbake blir 1.-3.-5.-7.-9. fra retten og 2.-4.-6.-8.-10. fra vrangen, og fra vrangen leser du diagrammet fra venstre mot høyre og følger diagramforklaringen fra vrangen. mvh DROPS Design
16.09.2024 - 13:44
![]() Karine LIN-SI napsala:
Karine LIN-SI napsala:
Bonjour. La partie concernant les AUG°1 sont obscures : "Tricoter jusqu'à ce qu'il reste 1 m avant la m avec le marqueur, (lequel) 1 jeté, 3 m end et 1 jeté. Répéter aux 3 m restantes avec 1 marqueur sur le même rang/tour. (cette partie n'est pas claire), à quel endroit faut-il placer le marqueur ? Exemple : 3 m. bordure devant - combien de jersey tricoter avant marqueur et avant de faire le jeté. Merci d'avance
11.11.2023 - 23:00Odpověď DROPS Design :
Bonjour Mme Lin-Si, dans les explications, il est indiqué de placer des marqueurs, puis d' augmenter de chaque côté des mailles avec un marqueur – VOIR AUGMENTATIONS 1, vous allez donc suivre cette indication pour augmenter à chacun des marqueurs que vous aurez mis en place. Autrement dit, vous augmentez 1 maille de part et d'autre des 3 mailles (avec un marqueur au milieu de ces 3 mailles) à chaque marqueur, soit 8 mailles à chaque fois: 1 jeté, 3 mailles endroit (la maille avec le marqueur est celle du milieu), 1 jeté. Bon tricot!
13.11.2023 - 07:53
![]() Zuzana napsala:
Zuzana napsala:
Ďakujem za pekný model. Veľmi sa mi páči. Škoda, že tu nie je fotka, ako by mala sedieť kapuca, keď je dolu. Je ťažká a ťahá dozadu. Má to tak byť?
22.10.2022 - 09:07
![]() Raffaella napsala:
Raffaella napsala:
Modello fantastico, ho realizzato la taglia S con i ferri n 7 per la mia nipotina ed è diventato davvero magnifico! Grazie mille, siete fantastici! Se volete vedere le foto, ditemi dove inviarle :-) Cordiali saluti Raffaella
31.01.2021 - 11:06
![]() Elisabeth K napsala:
Elisabeth K napsala:
Bonjour, Je suis arrivée au moment où je passe au tricot en rond : donc je tricote un dernier rang envers (rang retour) et je repars dans le même sens pour fermer le cercle ; c'est là que j'ai un problème, car au bout du 2e tour je m'aperçois que mon ouvrage se présente en jersey envers et non endroit ! Que dois-je faire pour y remédier, svp ? Est-ce que je dois terminer le tricot à plat au bout du rang endroit et là former le rond ? Merci de votre aide.
21.09.2020 - 18:14Odpověď DROPS Design :
Bonjour Elisabeth K, vous pouvez joindre en rond à la fin d'un rang sur l'endroit afin de continuer en rond, toujours sur l'endroit et d'avoir donc le côté jersey endroit face à vous. Bon tricot!
22.09.2020 - 11:16
![]() Elena napsala:
Elena napsala:
Per la tg M "3 m per il bordo davanti a punto legaccio, 6m a maglia rasata, inserire il 1° segno nella m successiva, 6 m a maglia rasata, inserire il 2° segno nella m successiva, 18m a maglia rasata, inserire il 3° segno nella m successiva, 6 m a maglia rasata, inserire il 4° segno nella m successiva, 6 m a maglia rasata, 3 m per il bordo davanti a punto legaccio "=48m totale Ma devono essere 52! dove sta l'errore?
01.12.2019 - 23:06Odpověď DROPS Design :
Buongiorno Elena. Nel conteggio delle maglie, vanno contate anche le quattro maglie con i segni. Queste maglie vengono lavorate anch’esse a maglia rasata. Buon lavoro!
02.12.2019 - 09:45
![]() Rosa Griselda Gutiérrez Villa napsala:
Rosa Griselda Gutiérrez Villa napsala:
Patrón No. ee-51 hola! Estoy tratando de hacer esta capa en talla s pero no entiendo. Tengo 66 pts. Las disminuciones cuando explican que son 22,22,20(2pts menos)20,18,18(4 pts menos )hasta ahí creo entender. Pero después dan cifras de 44,44,46,48,48? De dónde salen estos puntos. Gracias! Saludos desde México
18.09.2018 - 20:02Odpověď DROPS Design :
Hola Rosa, como el patrón es sólo uno para todas las tallas, los números seguidos de guiones son el correspondiente a cada talla: 22 (talla S)- 22 (talla M)- 20 (talla L) - 20 (talla XL) etc. Por lo tanto, a los 66 puntos iniciales se le disminuyen 22 puntos en el caso de la talla S y por lo tanto quedan 66-22 = 44 puntos en la talla S.
29.09.2018 - 20:06
![]() Anna Sofie napsala:
Anna Sofie napsala:
Är det så att utsidorna på huvan ska läggas mot varandra, och sedan sys ihop på insidan så att sömmen hamnar mitt över hjässan och ner i nacken? Verkar vara enda sättet, tycker jag :-)
20.12.2017 - 12:01Odpověď DROPS Design :
Hej Anna Sofie, Ja precis, men sy gärna från rätsidan :)
20.12.2017 - 14:26
![]() Anna Sofie napsala:
Anna Sofie napsala:
Hej, Nu är ponchon nästan färdig, och den blir jättefin :-) Men jag får inte ihop detta med att vika och sy huvan riktigt - vilken del ska vikas mot vilken, och hur ska det sys ihop? Ska "startkanten" vara framkant på huvan, eller ska den vikas in på något sätt? Tack på förhand!
19.12.2017 - 11:08Odpověď DROPS Design :
Hej Anna, de 66 maskor du la upp, lägger du ihop och syr ihop. Det blir en söm från pannan mitt fram och till mitt bak. Lycka till!
20.12.2017 - 11:19
|
|||||||
November#novemberponcho |
|||||||
|
|
|||||||
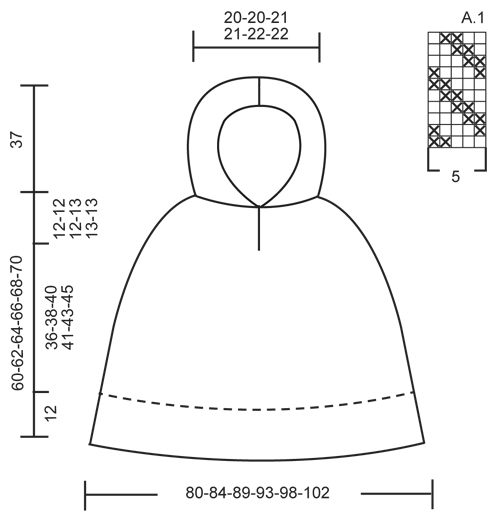
DROPS pončo s kapucí pletené shora dolů z příze "Snow". Velikost: S-XXXL.
DROPS 158-32 |
|||||||
|
VROUBKOVÝ VZOR: V kruhových řadách: pleteme střídavě 1 kruhovou řadu hladce, 1 obrace. 1 vroubek = 2 kruhové řady. V řadách: pleteme stále hladce, lícové i rubové řady. 1 vroubek = 2 řady hladce. VZOR: Viz schéma A.1; zobrazeny jsou všechny řady vzoru nahlížené z lícové strany. TIP - PŘIDÁVÁNÍ 1: Přidáváme vždy v lícových řadách, celkem 8 ok v každé řadě/kruhové řadě s přidáváním. Pleteme po poslední 1 oko před označeným okem, 1x nahodíme, 3 oka upleteme hladce a 1x nahodíme. Tento postup opakujeme i u zbylých 3 označených ok v řadě/kruhové řadě. V následující řadě pleteme nahození hladce/obrace za zadní nit, aby se v pletenině netvořily dírky. TIP - PŘIDÁVÁNÍ 2: PŘED 1. a 3. značkou přidáváme takto: pleteme po poslední 1 oko před značkou, toto oko upleteme hladce, pak 1x nahodíme. ZA 2. a 4. značkou přidáváme takto: pleteme až ke značce, 1 oko za značkou upleteme hladce, pak 1x nahodíme. V následující kruhové řadě pleteme nahození hladce za zadní nit, aby se v pletenině netvořily dírky. ---------------------------------------------------------- PONČO: Pleteme shora dolů. Začínáme kapucou, pak pleteme v řadách horní část ponča, po dokončení výstřihu na předním straně pleteninu spojíme a pončo dokončíme v kruhových řadách. Na kruhovou jehlici č.8 nahodíme přízí Snow 66 ok (platí pro všechny velikosti) a upleteme 1 vroubek vroubkovým vzorem v řadách – viz výše! Následující lícovou řadu pleteme takto: 3 krajní oka vroubkovým vzorem, následujících 60 ok upleteme vzorem A.1 (= 5 ok), 3 krajní oka vroubkovým vzorem. Takto pokračujeme - pleteme v řadách. Ve výši 34 cm upleteme 1 vroubek a SOUČASNĚ ujmeme rovnoměrně 22-22-20-20-18-18 ok = zbývá 44-44-46-46-48-48 ok. Upleteme ještě další 2 vroubky a SOUČASNĚ přidáme v poslední lícové řadě rovnoměrně 8-8-9-10-8-8 ok = 52-52-55-56-56-56 ok. Do pleteniny vložíme značku a NYNÍ MĚŘÍME DÍL OD TOHOTO MÍSTA. Pokračujeme takto: 3 oka légy vroubkovým vzorem, 6-6-7-7-7-7 ok lícovým žerzejem, následující oko si označíme, 6 ok lícovým žerzejem, následující oko si označíme (= 2. značka), 18-18-19-20-20-20 ok lícovým žerzejem, následující oko si označíme (= 3. značka), 6 ok lícovým žerzejem, následující oko si označíme (= 4. značka), 6-6-7-7-7-7 ok lícovým žerzejem, 3 oka légy vroubkovým vzorem. Upleteme 1 řadu obrace. V tomto rozvržení pokračujeme a SOUČASNĚ v následující lícové řadě začneme přidávat na obou stranách každého označeného oka – viz TIP - PŘIDÁVÁNÍ 1! Toto přidávání opakujeme v každé 2. řadě ještě 6-7-8-8-9-9x, pak přidáváme 2-2-2-3-3-4x v každé 4. řadě/kruhové řadě a 6-6-6-6-6-7x v každé 6. kruhové řadě = 172-180-191-200-208-224 ok. SOUČASNĚ ve výši 12-12-12-13-13-13 cm pleteninu spojíme a pokračujeme v kruhových řadách, takto: 3 oka vroubkovým vzorem v kruhových řadách – viz výše, pak pleteme lícovým žerzejem až po poslední 3 oka – tato oka upleteme vroubkovým vzorem. V tomto rozvržení pokračujeme, až máme nad 6 oky u konce výstřihu na přední straně upletené 2 vroubky. Dál pleteme lícovým žerzejem nad všemi oky. Upleteme 6 kruhových řad lícovým žerzejem. Nyní přidáme u každé značky 0-1-1-1-1-0 oko – viz TIP - PŘIDÁVÁNÍ 2 (= 0-4-4-4-4-0 přidaná oka v kruhové řadě) = 172-184-195-204-212-224 ok. Ve výši 45-47-49-51-53-55 cm přidáme v kruhové řadě rovnoměrně 3-1-0-1-3-1 oka = 175-185-195-205-215-225 ok. Pokračujeme vzorem A.1 nad všemi oky v kruhové řadě. Když máme upleteno 10 cm výšky vzorem A.1, upleteme 2 vroubky a poté všechna oka volně uzavřeme. DOKONČENÍ: Kapuci přeložíme a sešijeme. |
|||||||
Vysvětlivky ke schématu |
|||||||
|
|||||||
|
|||||||
Dokončili jste tento model?Pak označte své fotky tagem #dropspattern #novemberponcho nebo je pošlete do galerie #dropsfan. Potřebujete s tímto návodem poradit?Otevřete-li si návod na stránce garnstudio.com, najdete tam 18 výukových video-ukázek, Komentáře/Dotazy a další užitečné informace. © 1982-2025 DROPS Design A/S. Vyhrazujeme si veškerá práva. Tento dokument, včetně všech jeho dílčích částí, podléhá autorským právům. Podrobnější komentář k možnostem užití našich návodů najdete dole pod každým návodem na našich stránkách. |
|||||||


V oblasti pletené a háčkované módy působí DROPS Design více než 40 let. Díky tomu vám můžeme nabídnout jednu z nejrozsáhlejších kolekcí modelů s bezplatnými návody dostupnými na internetu - navíc v 17 jazycích. K dnešnímu dni máme na 314 katalogů a 11822 návodů celkem - z nich je už 7048 dostupných v [češtině].
Přidejte komentář k návodu DROPS 158-32
Rádi bychom věděli, co si o tomto modelu myslíte!
Pokud se chcete na něco zeptat, dbejte prosím na to, abyste ve formuláři níže vybrali správnou kategorii - díky tomu se dříve dozvíte, co potřebujete vědět. Povinná pole jsou označena *.