
Popular categories
Looking for a yarn?


Comments / Questions (112)
![]() Olga wrote:
Olga wrote:
Salve! Ho difficoltà nel cominciare le maniche. All'inizio, quando abbiamo saltato le maglie per le maniche (38 nel mio caso) le abbiamo lasciato con una riga di mb. Perché quando cominciamo a lavorare le maniche ci troviamo di nuovo a lavorare una riga di mb sul rovescio? Da dove bisogna iniziare per fare 3 cat.? Grazie.
10.12.2017 - 00:27DROPS Design answered:
Buongiorno Olga. Il giro in cui vengono saltate le maglie delle maniche è un giro di maglie alte lavorato sul diritto del lavoro. Riprende poi le maniche lavorando a maglie basse sul rovescio del lavoro. Avvia le 3 cat senza attaccarle al lavoro e prosegue lavorando 1 m bassa in ogni maglia. Buon lavoro!
10.12.2017 - 00:48
![]() Linda Weiss wrote:
Linda Weiss wrote:
For clarity, For Body Section: Is the texture rows done before measuring 1 inch with no increases? Can the texture rows be done with NO Increases?
04.12.2017 - 16:25DROPS Design answered:
Dear Mrs Weiss, on body you work textured rows for 1 inch without any increase, then continue textured rows with increasing on the sides to get the A-line. Happy crocheting!
05.12.2017 - 08:16
![]() Linda Weiss wrote:
Linda Weiss wrote:
For the Body section, where it says continue back and forth with Textured Rows. I'm doing the 4th size- the 12-18 month size, so I will increase after 1 inch. I did DC rows before it measured 1 inch. Should it have been alternating DC and SC rows before the increase row? Also, when it says to increase 10 more time, does the textured rows continue after that or just DC rows? Am I continuing to increase the DC rows for another 10 rows? Thank you- Linda
04.12.2017 - 05:11DROPS Design answered:
Dear Linda, you continue working textured pattern while increasing, so that if your last row was a dc-row then increase on next row ie on the sc-row then work ½” and inc on next row (with sc or dc depending on the next row you have to work). Happy crocheting!
04.12.2017 - 10:41
![]() Beth Spotloe wrote:
Beth Spotloe wrote:
I'm confused about the sleeve, do I chain 3 and join with a sc at the 46th stitch or join with a sc at the 46th stitch and then chain 3?
20.11.2017 - 05:12DROPS Design answered:
Dear Mrs Sporloe, sleeve is worked back and forth: chain 3, then crochet 1 sc in each st over sleeve and finish with 5 chains, turn and crochet 1 dc in 4th ch from hook, 1 dc in next chain, 1 dc over each sc from sleeve and finish with 1 dc in each of the last 3 chains. Happy crocheting!
20.11.2017 - 10:01Martina wrote:
Hej! Jag förstår inte riktigt hur ökningen på kragen ska göras. Ska de endast göras vid markörerna (alltså 4 gånger per varv)? Hur många maskor ska det vara per varv efter ökningarna (virkar 12/18månader)? Ska det fortfarande virkas strukturvarv eller ska det virkas två rader med stolpar direkt efter varandra? Tack på förhand!
11.11.2017 - 22:49DROPS Design answered:
Hej, jo du virkar strukturvarv på kragen och ökar enligt A.2 när du kommer dit. Lycka till!
22.11.2017 - 15:11
![]() Linda Weiss wrote:
Linda Weiss wrote:
Does Drops have an toll free number to call. None of their listed numbers are in service. It's also not easy to reach them by e-mail. Any other suggestions?
20.10.2017 - 19:53DROPS Design answered:
Dear Linda, there is no central phoneline you can call, however we work hard to have all the questions posted for a pattern answered- but if you do require an answer you have to categorize your comment as a question. Also you can always get personal help in theg store you bought your DROPS yarn from. Happy Crafting!
21.10.2017 - 23:21
![]() Linda Weiss wrote:
Linda Weiss wrote:
For the 12-18 months size, which section of the pattern do I follow? You have 4 numbers with hyphen in between, then two groups in parenthesis. Would I follow the forth number before the parenthesis? Just want to make sure and not make mistakes. Thank you
20.10.2017 - 18:31DROPS Design answered:
Hi Linda, for the 12-18 months size you have to follow the fourth number (just before the parenthesis). Happy crocheting!
20.10.2017 - 18:37
![]() Linda Weiss wrote:
Linda Weiss wrote:
You suggested that I contact a Drops store about yarn samples or questions. I called the numbers listed, no response, no answering machine. Plus they don't carry the yarn for the Little Lady Rose #1306 and #0100. Can you possibly send me a sample of the yarn since I am making this for a gift. It's difficult to tell the true color since everyone's computer screen shows it differently and it could look totally different on the screen compared to real life in the natural light.
20.10.2017 - 16:12DROPS Design answered:
Dear Mrs Weiss, do not hesitate to write them an email - you can get DROPS yarns only from our DROPS retailers. If you are on Facebook you can also write them on their page if they have one. Happy crocheting!
20.10.2017 - 16:20
![]() Linda Weiss wrote:
Linda Weiss wrote:
Thank you for your advice on how much yarn to purchase. Linda
20.10.2017 - 01:17DROPS Design answered:
Dear Mrs Weiss, you will find amount of yarn required in each size under tab "Materials", ie in size 0/1 months you will need 150 g color no 1306 / 50 g a ball = 3 balls Alpaca Silk 1306 + 1 ball Alpaca Silk 0100. Happy crocheting!
20.10.2017 - 09:31
![]() Linda Weiss wrote:
Linda Weiss wrote:
Do you send samples of yarn? I love this pattern, but I was thinking the yarn color shown the picture on the baby might be too pale. If you could send a sample of 2 yarns that would be very helpful.
20.10.2017 - 01:13DROPS Design answered:
Dear Mrs Weiss, for any assistance choosing a colour, you are welcome to contact your DROPS store, even per mail or telephone. Happy crocheting!
20.10.2017 - 09:15
|
|||||||||||||
Little Lady Rose#littleladyrosecardigan |
|||||||||||||
|
|
|||||||||||||
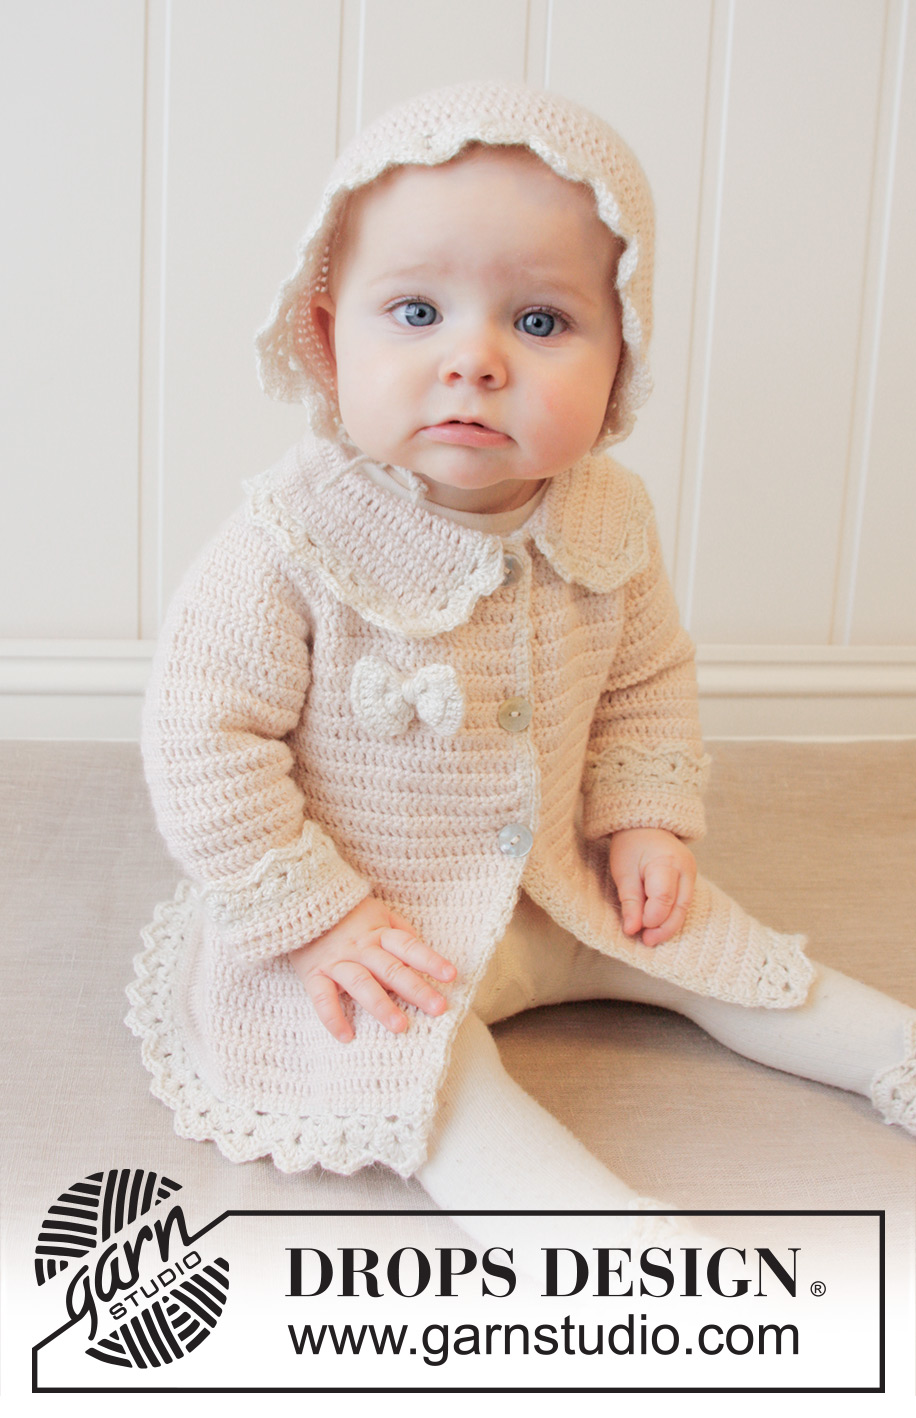
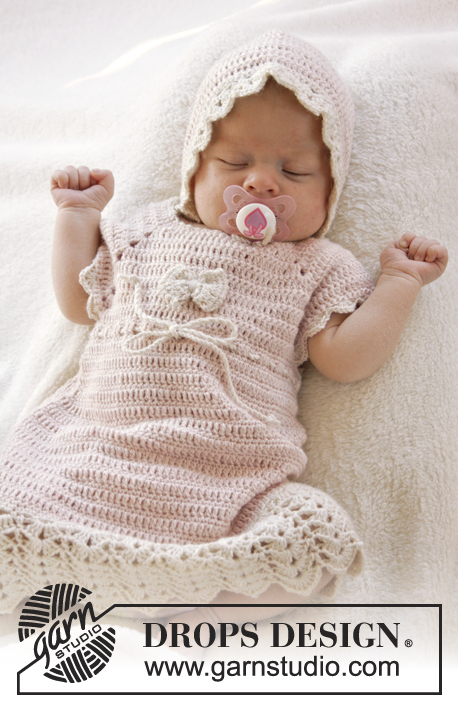
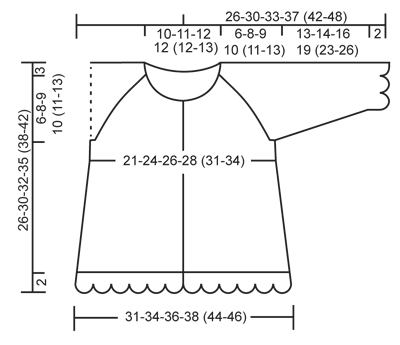
Crochet baby jacket with raglan and fan edges, worked top down in DROPS BabyAlpaca Silk. Size 0-4 years.
DROPS Baby 25-12 |
|||||||||||||
|
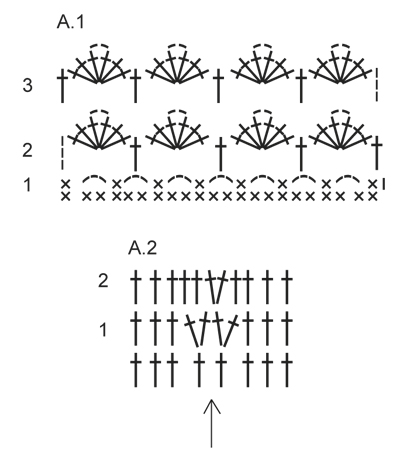
CROCHET INFO: Replace first sc at beg of every sc row with ch 1, finish row with 1 sc in 3rd ch from beg of previous row. Replace first dc at beg of every dc row with ch 3, finish row with 1 dc in ch from beg of previous row. TEXTURE ROWS: * 1 row sc (worked from WS), 1 row dc (worked from RS) *, repeat from *-* (1 row sc + 1 row dc = 1 texture row). INCREASE TIP: Inc 1 sc/dc by working 2 sc/dc in same st. DECREASE TIP: Work 1 sc/dc but wait with last pull through (= 2 sts on hook), then work next sc/dc but on last pull through, pull yarn through all sts on hook = 1 sc/dc dec. PATTERN: See diagram A.1. (A.2 applies to inc on collar). ---------------------------------------------------------- JACKET: The piece is worked top down. Worked back and forth from mid front. YOKE: Ch 83-87-91-91 (91-95) (includes 1 ch to turn with) on hook size 3.5 mm/E/4 with powder. Work 1 sc in 2nd ch from hook, then work 1 sc in every ch the entire row = 82-86-90-90 (90-94) sc on row (includes 5 band sts in each side towards mid front). Now insert 4 markers in piece for raglan as follows (beg mid front – NOTE: Do NOT work while inserting markers): Skip 15-16-17-17 (17-18) sc (= left front piece), insert 1 marker in next sc, skip 14 sc (= sleeve), insert 1 marker in next sc, skip 20-22-24-24 (24-26) sc (= back piece), insert 1 marker in next sc, skip 14 sc (= sleeve) and insert last marker in next sc (there are now 15-16-17-17 (17-18) sc on right front piece after last marker). READ ALL OF THE FOLLOWING SECTION BEFORE CONTINUING: READ CROCHET INFO and work next row as follows from RS: Work 1 dc in every sc but in every sc with marker work 2 dc + 2 ch + 2 dc = 94-98-102-102 (102-106) dc on row. Then work TEXTURE ROWS - see explanation above (work back and forth with 1 sc/dc in every st from previous row – but on every row with sc from WS work 2 ch over the 2 ch from previous row in raglan lines. On row with dc work 2 dc + 2 ch + 2 dc in both ch-spaces). AT THE SAME TIME on first row from RS (i.e. on row with dc) inc for raglan as follows: Work 2 dc + 2 ch + 2 dc in every ch-space in every raglan line (= 16 dc inc on row – note: work around both ch-spaces). Repeat inc on every row from RS 3-4-5-6 (7-8) more times (= 4-5-6-7 (8-9) times in total) = 158-178-198-214 (230-250) sts. REMEMBER THE CROCHET GAUGE! After last inc for raglan work 1 row with sc from WS as before. Work next row as follows from RS: Work 1 dc in each of the first 25-28-31-33 (35-38) sc (= left front piece), skip the next 34-38-42-46 (50-54) sc (= sleeve), work 6-6-6-6 (8-8) ch, work 1 dc in each of the next 40-46-52-56 (60-66) sc (= back piece), skip the next 34-38-42-46 (50-54) sc (= sleeve), work 6-6-6-6 (8-8) ch and work 1 dc in each of the last 25-28-31-33 (35-38) sc (= right front piece). Then finish body and sleeves separately. BODY: NOW MEASURE PIECE FROM HERE! Work 1st row from WS – work 1 sc in every dc from previous row and 1 sc in each of the 6-6-6-6 (8-8) ch under each armhole = 102-114-126-134 (146-158) sc on row. Insert 1 marker 28-31-34-36 (39-42) sts in from each side (= 46-52-58-62 (68-74) sts on back piece). Continue back and forth with TEXTURE ROWS. AT THE SAME TIME when piece measures 2-2-2-3 (2-3) cm / ¾"-¾"-¾"-1" (¾"-1"), inc 1 st on each side of both markers – READ INCREASE TIP (= 4 sts inc). Repeat inc approx. every 1-1½-1½-1½ (1½-1½) cm / ⅜"-½"-½"-½" (½"-½") , 10-10-10-10 (13-13) more times (= 11-11-11-11 (14-14) times in total) = 146-158-170-178 (202-214) sts. When piece measures approx. 15-17-18-20 (22-24) cm / 6"-6¾"-7"-8" (8¾"-9½") from armhole – make sure all that inc are done, work 1 row sc from WS AT THE SAME TIME inc 2-2-2-0 (0-0) sc evenly – READ INCREASE TIP = 148-160-172-178 (202-214) sc. Fasten off. Switch to off white and work 1 row sc from WS with 1 sc in every sc from previous row. Then work Fan pattern according to diagram A.1, i.e. work as follows: ROW 1 (= RS): ch 1, 1 sc in first st, * ch 3, skip 2 sc, 1 sc in next st *, repeat from *-* the entire row = 49-53-57-59 (67-71) ch-spaces, turn. ROW 2 (= WS): ch 3 (= 1 dc), 3 dc + 2 ch + 3 dc in first ch-space, * 1 dc in next ch-space, 3 dc + 2 ch + 3 dc in next ch-space *, repeat from *-* the entire row and finish with 1 dc in first sc from beg of previous row = 25-27-29-30 (34-36) dc-groups with 1 dc between every dc-group, turn piece. ROW 3 (= RS): ch 3 (= 1 dc), 3 dc + 2 ch + 3 dc in ch-space in the mid of first dc-group, * 1 dc in next dc, 3 dc + 2 ch + 3 dc in ch-space in the mid of next dc-group *, repeat from *-* the entire row and finish with 1 dc in 3rd ch from beg of previous row = 25-27-29-30 (34-36) dc-groups with 1 dc between every dc-group. Fasten off. SLEEVE: = 34-38-42-46 (50-54) sts. Insert 1 marker here – NOW MEASURE PIECE FROM HERE. Work 1st row from RS with powder as follows: work 3-3-3-3 (4-4) ch, work 1 dc in each stitch and work 3-3-3-3 (4-4) ch. Turn piece, work 1 sc in 2nd ch from hook, work 1 sc in each of the next 1-1-1-1 (2-2) ch, 1 sc in every dc from previous row and 1 dc in each of the 3-3-3-3 (4-4) ch from beg of previous row = 40-44-48-52 (58-62) sts on row. Then work TEXTURE ROWS back and forth as before with dc from RS and sc from WS. AT THE SAME TIME when sleeve measures 2-2-3-3 (3-3) cm / ¾"-¾"-1"-1" (1"-1") from marker, dec 1 st in each side - SEE DECREASE TIP! Repeat dec every 8-5-3-3 (2½-2½) cm / 3"-2"-1⅛"-1⅛" (⅞"-⅞"), 1-2-4-5 (7-8) more times (= 2-3-5-6 (8-9) times in total in each side) = 36-38-38-40 (42-44) sts. When sleeve measures approx. 13-14-16-19 (23-26) cm / 5"-5½"-6¼"-7½" (9"-10¼") from marker – finish after 1 row with sc from WS, fasten off. Switch to off white. Work 1 row sc from WS AT THE SAME TIME inc 4-2-2-6 (4-2) sc evenly = 40-40-40-46 (46-46) sc. Then work Fan pattern according to diagram A.1, beg from RS, the same way as on bottom of jacket. After 1st row there are 13-13-13-15 (15-15) ch-spaces on row and after 2nd row there are 7-7-7-8 (8-8) dc-groups with 1 dc between every dc-group. ASSEMBLY: Sew underarm seams tog edge to edge in outer loops of edge sts. Sew the openings under the sleeves. Sew the buttons on to left front piece. Upper button should be approx. 1 cm / ½" from neckline and there should be approx. 5 to 7 cm / 2-2¾" between each button. Button through dc in texture pattern. ELEVATION IN BACK OF NECK: For better fit work a small elevation at the back of neck. Insert 1 marker in st in each corner in neck, i.e. at beg of every raglan line. Work on hook size 3.5 mm/E with powder as follows: Begin in 11th st from mid front, work 1 sc in every st until 1 st remains before st with marker, work 1 hdc in next st, 1 dc in st with marker and 1 hdc in next st, then work 1 sc in every st until 1 st remains before next st with marker, 1 hdc in next st, 1 dc in st with marker and 1 hdc in next st. Continue like this until 10 sts remain before mid front in the other side. Turn piece and work 1 sc in every sc but at every marker work 3 sc tog, i.e. work 1 sc in hdc but wait with last YO and pull through, work 1 sc in st with marker but wait with last YO and pull through, work 1 sc in next hdc but now pull last YO through all 4 sts on hook (= 2 sc dec). Fasten off. COLLAR: Work on hook size 3.5 mm/E with powder as follows: Beg in 4th st from mid front and work 1 sc in every sc around the neck until 3 sc remain on row AT THE SAME TIME work 5th and 6th st tog – READ DECREASE TIP = approx. 57-60-64-64 (64-67) sc remain. Make sure that markers at each raglan line moves upwards - remove the markers from the sts they are in and place them between the st they were in and the next st toward the sleeve. Then work texture rows back and forth as on body with 1 st in every st. AT THE SAME TIME after 3-3-3-4 (4-4) cm / 1"-1"-1"-1½" (1½"-1½"), inc on the next 2 rows as shown in A.2. After last inc, collar measures approx. 5-5-5-6 (6-6) cm / 2"-2"-2"-2½" (2½"-2½"). Fasten off. CROCHET EDGE ALONG MID FRONT: Work with off white as follows: Begin from WS at the bottom on left front piece and work 1 row sc up along mid front and then over the 3 sts at the top of neck before collar beg - work approx. 2 sc in every dc-row and 1 sc in every sc-row. Turn piece and work as follows: * ch 3, skip 2 sc, 1 sc in next st *, repeat from *-* the entire row to bottom of band. Fasten off and repeat along right front piece, beg from WS at the top by neck. CROCHET EDGE AROUND COLLAR: Work with off white as follows: Beg from RS where collar beg after the 3 sts at the top of neck and work 1 row sc around the entire collar until where collar ends before the top 3 sts in neck in the other side. Turn piece and work as follows: * ch 3, skip approx. 2 sts, 1 sc in next sc *, repeat from *-*, NOTE: Make sure that no of ch-spaces can be divided by 2 + 1. Turn piece and work a finishing edge with fans as follows from RS: Work sl sts until mid of first ch-space, 3 ch (= 1 dc), * 3 dc + 2 ch + 3 dc in next ch-space, 1 dc in next ch-space *, repeat from *-* the entire row. Fasten off. BOW: Ch 11 on hook size 3.5 mm/E with off white. Work first row as follows: 1 dc in 4th ch from hook, 1 dc in each of the next 7 ch = 9 dc on row. Turn piece and work TEXTURE ROWS back and forth until piece measures approx. 10 cm / 4" – finish after 1 row with sc. Fasten off. Sew short sides tog to form a ring and twine some yarn around the mid of bow to tighten it neatly in the middle. Fasten bow at the top on right front piece. |
|||||||||||||
Diagram explanations |
|||||||||||||
|
|||||||||||||
 |
|||||||||||||
 |
|||||||||||||
Have you finished this pattern?Tag your pictures with #dropspattern #littleladyrosecardigan or submit them to the #dropsfan gallery. Do you need help with this pattern?You'll find 10 tutorial videos, a Comments/Questions area and more by visiting the pattern on garnstudio.com. © 1982-2026 DROPS Design A/S. We reserve all rights. This document, including all its sub-sections, has copyrights. Read more about what you can do with our patterns at the bottom of each pattern on our site. |
|||||||||||||


With over 40 years in knitting and crochet design, DROPS Design offers one of the most extensive collections of free patterns on the internet - translated to 17 languages. As of today we count 325 catalogs and 12298 patterns - 12288 of which are translated into English (US/in).
We work hard to bring you the best knitting and crochet have to offer, inspiration and advice as well as great quality yarns at incredible prices! Would you like to use our patterns for other than personal use? You can read what you are allowed to do in the Copyright text at the bottom of all our patterns. Happy crafting!
Post a comment to pattern DROPS Baby 25-12
We would love to hear what you have to say about this pattern!
If you want to leave a question, please make sure you select the correct category in the form below, to speed up the answering process. Required fields are marked *.