
Popular categories
Looking for a yarn?


Comments / Questions (112)
Tania wrote:
Just typed up my question and it was either too long or had problem with the content???? Made it shorter and still didn't accept it. Having trouble with collar of Little lady Rose pattern and I'd love some help. Thanks.
28.06.2015 - 01:02DROPS Design answered:
Dear Tania, you are welcome to write your question here (make it as short as possible), or to contact your DROPS store for any further assistance. Happy crocheting!
29.06.2015 - 10:50
![]() Tina Besir wrote:
Tina Besir wrote:
Hallo, ich habe eine Frage zu dem Rumpfteil: Nach der letzten Rückreihe in "puder" wird direkt eine Rückreihe in "natur" angeschlossen. Dann folgen die drei Reihen im Fächermuster. Hierdurch würde sich aber ergeben, dass die Reihe 1 und 3, die als "Hinreihe" bezeichnet werden, eigentlich Rückreihen sind, oder? Welche Seite würde dann hinterher außen getragen werden? Vielen Dank für Ihre Hilfe, Tina
21.06.2015 - 23:36DROPS Design answered:
Sie häkeln tatsächlich 2 Rückreihen, das geht ja, da Sie den Faden abschneiden und neu ansetzen. Sie haben also die letzte Rück-R in puder gehäkelt, wenden nicht, sondern setzen den Natur-Faden wieder am Anfang der Rück-R an und häkeln noch mal eine Rück-R. Erst dann wenden Sie und befinden sich wieder auf der Vorderseite, die 1. R des Musters ist eine Hin-R und somit passend auf der Vorderseite der Jacke.
24.06.2015 - 11:01
![]() FROMY wrote:
FROMY wrote:
Je ne comprends pas les explications du n° 12 pour commencer par le haut du manteau
11.04.2015 - 15:09DROPS Design answered:
Bonjour Mme Fromy, après le 1er rang de ms, on place 4 marqueurs (= repères raglan), puis on crochète en brides, et dans chaque m avec 1 marqueur on crochète 2 B, 2 ml, 2 B (= raglan) et on continue en point texturé en augmentant pour le raglan. Bon crochet!
13.04.2015 - 09:04
![]() Irene Hermansson wrote:
Irene Hermansson wrote:
Förstår inte hur jag går vidare efter att oket är färdigt. Ska jag virka dom stolparna på vänster framstycke, och börja med nytt garnnystan efter att jag hoppat över dom maskor som ska bli armen? Och gå vidare så med resten också?? Med vänlig hälsning Irene Hermansson
03.03.2015 - 22:37DROPS Design answered:
Hej Irene, Ja ibland måste du klippa tråden och börja på nytt ställe enligt beskrivningen. Lycka till!
26.05.2015 - 10:18
![]() Anni wrote:
Anni wrote:
Hallo, ich habe folgende Frage zum Häkeln der Ärmel: Wo genau setze ich an um die Ärmel zu häkeln? Man startet mit 3 LM und häkelt dann trotzdem FM in alle Maschen des Ärmelausschnitts? (34 M) Oder werden für die 3 LM auch 3 M übersprungen? Und wozu sind dann die 5 LM am Ende der Runde? Ich nehme an, dass 3 davon das erste Stäbchen der 2. Runde ersetzen?! An dieser Stelle ist die Anleitung für mich sehr unverständlich und ich würde mich sehr über Hilfe freuen. Vielen Dank schon mal im Voraus!
02.03.2015 - 17:01DROPS Design answered:
Genau, Sie beginnen mit 3 Lm, häkeln dann in JEDE M des Armausschnitts 1 fM und am Ende der R 5 Lm. Diese Lm sind also zusätzlich zu den M am Armausschnitt. Sie werden für die Ärmelunterseite benötigt. Von den 5 Lm, die Sie am Ende der R gehäkelt haben, sind 3 zum Wenden bzw. gelten als 1. Stb der nächsten R, denn Sie wenden ja und häkeln in die 4. Lm ab der Nadel 1 Stb. Dann häkeln Sie in die verbleibende Lm 1 Stb, haben also insgesamt 3 Stb, bevor Sie wieder in die fM des Armauschnitts häkeln. Am Ende der R häkeln Sie in die 3 Lm auch je 1 Stb. Sie haben also zu den M des Armausschnitts zusätzlich 6 Stb insgesamt.
10.03.2015 - 13:16
![]() MªJesús wrote:
MªJesús wrote:
Sí pero, cuando se elabora el canesú, la última fila que se hace en la parte de la manga es punto bajo. Si comienzo en punto bajo quedan dos filas juntas
20.11.2014 - 13:47DROPS Design answered:
Hola MªJesús! Efectivamente al aumentar la foto se comprueba que quedan 2 filas de p.b. juntas. El patrón está correcto como lo has realizado. .
30.11.2014 - 20:09
![]() MªJesús wrote:
MªJesús wrote:
Ok. La suma de los puntos ya lo he resuelto. Pero si comienzo en punto bajo me quedaría 2 filas de puntos bajos seguidas. ¿Se pierde la fila relieve?
20.11.2014 - 08:25DROPS Design answered:
Hola Mª Jesús. La primera fila se trabaja por el LR con p.b. La 2ª fila se trabaja con p.a. A partir de la 3ª trabajamos el patrón de relieve (comenzando con una fila de p.b.) - no hay dos filas seguidas de p.b.
20.11.2014 - 10:08
![]() MªJesús wrote:
MªJesús wrote:
Hola: Estoy tejiendo la talla 6/9 pero, estoy atascada en el comienzo de la manga. La manga tiene 42 puntos mas 3 cadenetas mas 5 cadenetas me suman 47 puntos. Por otro lado si la 1ª vuelta es a punto bajo ¿Pierdo el punto relieve? pues la última vuelta se hizo en punto bajo
20.11.2014 - 08:19DROPS Design answered:
Hola Mª Jesús. La primera fila se trabaja por el LR con p.b. La 2ª fila se trabaja con p.a. A partir de la 3ª trabajamos el patrón de relieve (comenzando con una fila de p.b.) - no hay dos filas seguidas de p.b.
20.11.2014 - 10:10
![]() Stefania wrote:
Stefania wrote:
Buongiorno volevo chiedere un chiarimento sto facendo questo lavoro per la mia bambina di due anni e nel testo si legge VEDERE LE INFORMAZIONI PER IL LAVORO e lavorare la riga successiva come segue, sul diritto del lavoro: Lavorare 1 m.a in ogni m.b ma, in ogni m.b con il segno, lavorare 2 m.a + 2 cat + 2 m.a = 94-98-102-102 (102-106) m.a sulla riga. Ma partendo da 90 m.b se si fanno gli aumenti come scritto sopra ho 114 m.a é corretto???
19.11.2014 - 15:43DROPS Design answered:
Buongiorno Stefania. I segni da inserire sono 4 e dopo averli inseriti dovrebbe trovarsi con (per la taglia 2 anni): 17 m, m con il segno, 14 m, m con il segno, 24 m, m con il segno, 14 m, m con il segno, 17 m = 90 m. Con gli aumenti, in ogni m con il segno trova 4 m.a. Quindi: 17+4+14+4+24+4+14+4+17 = 102 m.a (bisogna contare le m.a, ma non le cat). Ci riscriva se non è chiaro. Buon lavoro!
19.11.2014 - 16:20
![]() Ida Costagliola wrote:
Ida Costagliola wrote:
Salve sto facendo il davanti e dietro per eta 2 anni ma non mi trovo con le misure sto facendo un giro d aumenti ogni 1.5 cm ( quindi un giro aumento poi 1 maglia bassa 1 maglia alta 1 maglia bassa e nuovamente aumento) sono al 7° giro di aumenti ( quindi in tot 14) e sono a 16 cm dallo scalfo come faccio a trovarmi 22 cm mancandomi ancora 7 giri di aumenti?
08.11.2014 - 21:57DROPS Design answered:
Buongiorno Ida, i cm vanno calcolati da quando vengono divise le m per il davanti/dietro e maniche, per cui si lavorano 2 cm e poi si iniziano gli aumenti, che sono 13 ogni 1,5 cm (il 14° è fatto a 2 cm) per cui 19,5 cm + 2 cm iniziali = 21,5 cm se il suo campione è corretto ci dovrebbe stare perfettamente nei 22 cm, in ogni caso deve aggiustare il lavoro per arrivare a 22 cm con gli aumenti finiti. Buon lavoro!
13.11.2014 - 11:24
|
|||||||||||||
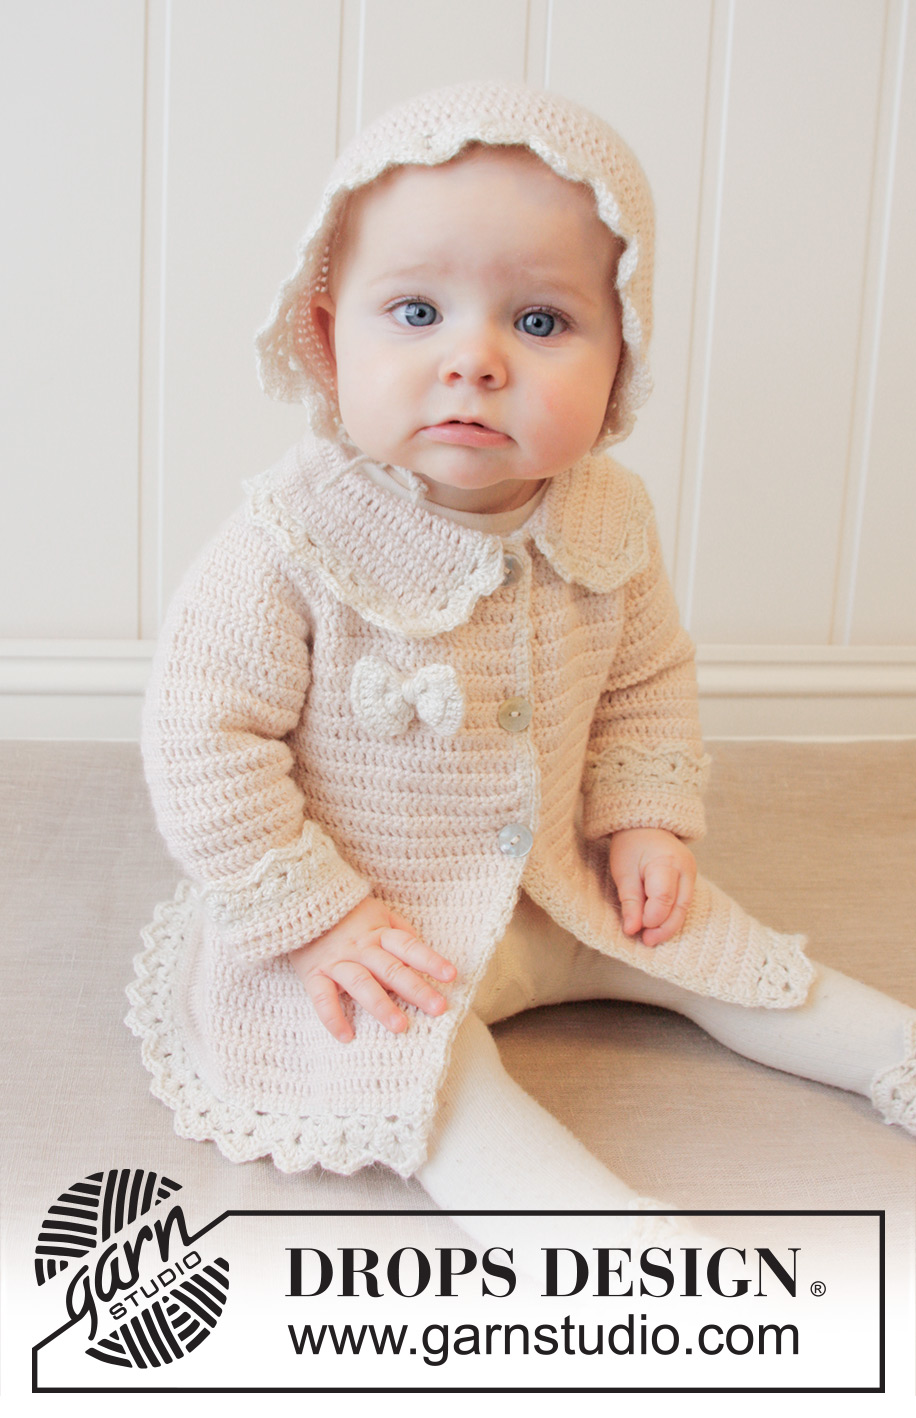
Little Lady Rose#littleladyrosecardigan |
|||||||||||||
|
|
|||||||||||||
Crochet baby jacket with raglan and fan edges, worked top down in DROPS BabyAlpaca Silk. Size 0-4 years.
DROPS Baby 25-12 |
|||||||||||||
|
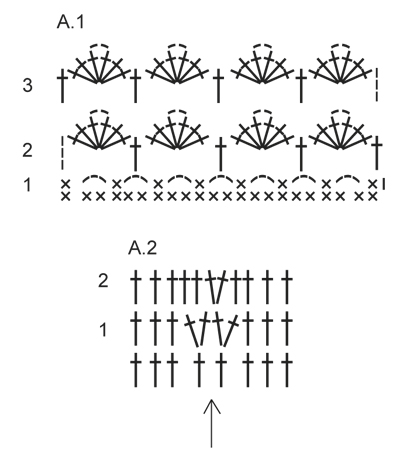
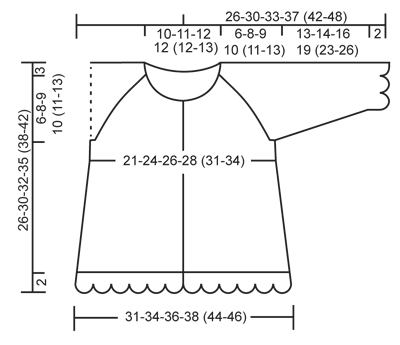
CROCHET INFO: Replace first sc at beg of every sc row with ch 1, finish row with 1 sc in 3rd ch from beg of previous row. Replace first dc at beg of every dc row with ch 3, finish row with 1 dc in ch from beg of previous row. TEXTURE ROWS: * 1 row sc (worked from WS), 1 row dc (worked from RS) *, repeat from *-* (1 row sc + 1 row dc = 1 texture row). INCREASE TIP: Inc 1 sc/dc by working 2 sc/dc in same st. DECREASE TIP: Work 1 sc/dc but wait with last pull through (= 2 sts on hook), then work next sc/dc but on last pull through, pull yarn through all sts on hook = 1 sc/dc dec. PATTERN: See diagram A.1. (A.2 applies to inc on collar). ---------------------------------------------------------- JACKET: The piece is worked top down. Worked back and forth from mid front. YOKE: Ch 83-87-91-91 (91-95) (includes 1 ch to turn with) on hook size 3.5 mm/E/4 with powder. Work 1 sc in 2nd ch from hook, then work 1 sc in every ch the entire row = 82-86-90-90 (90-94) sc on row (includes 5 band sts in each side towards mid front). Now insert 4 markers in piece for raglan as follows (beg mid front – NOTE: Do NOT work while inserting markers): Skip 15-16-17-17 (17-18) sc (= left front piece), insert 1 marker in next sc, skip 14 sc (= sleeve), insert 1 marker in next sc, skip 20-22-24-24 (24-26) sc (= back piece), insert 1 marker in next sc, skip 14 sc (= sleeve) and insert last marker in next sc (there are now 15-16-17-17 (17-18) sc on right front piece after last marker). READ ALL OF THE FOLLOWING SECTION BEFORE CONTINUING: READ CROCHET INFO and work next row as follows from RS: Work 1 dc in every sc but in every sc with marker work 2 dc + 2 ch + 2 dc = 94-98-102-102 (102-106) dc on row. Then work TEXTURE ROWS - see explanation above (work back and forth with 1 sc/dc in every st from previous row – but on every row with sc from WS work 2 ch over the 2 ch from previous row in raglan lines. On row with dc work 2 dc + 2 ch + 2 dc in both ch-spaces). AT THE SAME TIME on first row from RS (i.e. on row with dc) inc for raglan as follows: Work 2 dc + 2 ch + 2 dc in every ch-space in every raglan line (= 16 dc inc on row – note: work around both ch-spaces). Repeat inc on every row from RS 3-4-5-6 (7-8) more times (= 4-5-6-7 (8-9) times in total) = 158-178-198-214 (230-250) sts. REMEMBER THE CROCHET GAUGE! After last inc for raglan work 1 row with sc from WS as before. Work next row as follows from RS: Work 1 dc in each of the first 25-28-31-33 (35-38) sc (= left front piece), skip the next 34-38-42-46 (50-54) sc (= sleeve), work 6-6-6-6 (8-8) ch, work 1 dc in each of the next 40-46-52-56 (60-66) sc (= back piece), skip the next 34-38-42-46 (50-54) sc (= sleeve), work 6-6-6-6 (8-8) ch and work 1 dc in each of the last 25-28-31-33 (35-38) sc (= right front piece). Then finish body and sleeves separately. BODY: NOW MEASURE PIECE FROM HERE! Work 1st row from WS – work 1 sc in every dc from previous row and 1 sc in each of the 6-6-6-6 (8-8) ch under each armhole = 102-114-126-134 (146-158) sc on row. Insert 1 marker 28-31-34-36 (39-42) sts in from each side (= 46-52-58-62 (68-74) sts on back piece). Continue back and forth with TEXTURE ROWS. AT THE SAME TIME when piece measures 2-2-2-3 (2-3) cm / ¾"-¾"-¾"-1" (¾"-1"), inc 1 st on each side of both markers – READ INCREASE TIP (= 4 sts inc). Repeat inc approx. every 1-1½-1½-1½ (1½-1½) cm / ⅜"-½"-½"-½" (½"-½") , 10-10-10-10 (13-13) more times (= 11-11-11-11 (14-14) times in total) = 146-158-170-178 (202-214) sts. When piece measures approx. 15-17-18-20 (22-24) cm / 6"-6¾"-7"-8" (8¾"-9½") from armhole – make sure all that inc are done, work 1 row sc from WS AT THE SAME TIME inc 2-2-2-0 (0-0) sc evenly – READ INCREASE TIP = 148-160-172-178 (202-214) sc. Fasten off. Switch to off white and work 1 row sc from WS with 1 sc in every sc from previous row. Then work Fan pattern according to diagram A.1, i.e. work as follows: ROW 1 (= RS): ch 1, 1 sc in first st, * ch 3, skip 2 sc, 1 sc in next st *, repeat from *-* the entire row = 49-53-57-59 (67-71) ch-spaces, turn. ROW 2 (= WS): ch 3 (= 1 dc), 3 dc + 2 ch + 3 dc in first ch-space, * 1 dc in next ch-space, 3 dc + 2 ch + 3 dc in next ch-space *, repeat from *-* the entire row and finish with 1 dc in first sc from beg of previous row = 25-27-29-30 (34-36) dc-groups with 1 dc between every dc-group, turn piece. ROW 3 (= RS): ch 3 (= 1 dc), 3 dc + 2 ch + 3 dc in ch-space in the mid of first dc-group, * 1 dc in next dc, 3 dc + 2 ch + 3 dc in ch-space in the mid of next dc-group *, repeat from *-* the entire row and finish with 1 dc in 3rd ch from beg of previous row = 25-27-29-30 (34-36) dc-groups with 1 dc between every dc-group. Fasten off. SLEEVE: = 34-38-42-46 (50-54) sts. Insert 1 marker here – NOW MEASURE PIECE FROM HERE. Work 1st row from RS with powder as follows: work 3-3-3-3 (4-4) ch, work 1 dc in each stitch and work 3-3-3-3 (4-4) ch. Turn piece, work 1 sc in 2nd ch from hook, work 1 sc in each of the next 1-1-1-1 (2-2) ch, 1 sc in every dc from previous row and 1 dc in each of the 3-3-3-3 (4-4) ch from beg of previous row = 40-44-48-52 (58-62) sts on row. Then work TEXTURE ROWS back and forth as before with dc from RS and sc from WS. AT THE SAME TIME when sleeve measures 2-2-3-3 (3-3) cm / ¾"-¾"-1"-1" (1"-1") from marker, dec 1 st in each side - SEE DECREASE TIP! Repeat dec every 8-5-3-3 (2½-2½) cm / 3"-2"-1⅛"-1⅛" (⅞"-⅞"), 1-2-4-5 (7-8) more times (= 2-3-5-6 (8-9) times in total in each side) = 36-38-38-40 (42-44) sts. When sleeve measures approx. 13-14-16-19 (23-26) cm / 5"-5½"-6¼"-7½" (9"-10¼") from marker – finish after 1 row with sc from WS, fasten off. Switch to off white. Work 1 row sc from WS AT THE SAME TIME inc 4-2-2-6 (4-2) sc evenly = 40-40-40-46 (46-46) sc. Then work Fan pattern according to diagram A.1, beg from RS, the same way as on bottom of jacket. After 1st row there are 13-13-13-15 (15-15) ch-spaces on row and after 2nd row there are 7-7-7-8 (8-8) dc-groups with 1 dc between every dc-group. ASSEMBLY: Sew underarm seams tog edge to edge in outer loops of edge sts. Sew the openings under the sleeves. Sew the buttons on to left front piece. Upper button should be approx. 1 cm / ½" from neckline and there should be approx. 5 to 7 cm / 2-2¾" between each button. Button through dc in texture pattern. ELEVATION IN BACK OF NECK: For better fit work a small elevation at the back of neck. Insert 1 marker in st in each corner in neck, i.e. at beg of every raglan line. Work on hook size 3.5 mm/E with powder as follows: Begin in 11th st from mid front, work 1 sc in every st until 1 st remains before st with marker, work 1 hdc in next st, 1 dc in st with marker and 1 hdc in next st, then work 1 sc in every st until 1 st remains before next st with marker, 1 hdc in next st, 1 dc in st with marker and 1 hdc in next st. Continue like this until 10 sts remain before mid front in the other side. Turn piece and work 1 sc in every sc but at every marker work 3 sc tog, i.e. work 1 sc in hdc but wait with last YO and pull through, work 1 sc in st with marker but wait with last YO and pull through, work 1 sc in next hdc but now pull last YO through all 4 sts on hook (= 2 sc dec). Fasten off. COLLAR: Work on hook size 3.5 mm/E with powder as follows: Beg in 4th st from mid front and work 1 sc in every sc around the neck until 3 sc remain on row AT THE SAME TIME work 5th and 6th st tog – READ DECREASE TIP = approx. 57-60-64-64 (64-67) sc remain. Make sure that markers at each raglan line moves upwards - remove the markers from the sts they are in and place them between the st they were in and the next st toward the sleeve. Then work texture rows back and forth as on body with 1 st in every st. AT THE SAME TIME after 3-3-3-4 (4-4) cm / 1"-1"-1"-1½" (1½"-1½"), inc on the next 2 rows as shown in A.2. After last inc, collar measures approx. 5-5-5-6 (6-6) cm / 2"-2"-2"-2½" (2½"-2½"). Fasten off. CROCHET EDGE ALONG MID FRONT: Work with off white as follows: Begin from WS at the bottom on left front piece and work 1 row sc up along mid front and then over the 3 sts at the top of neck before collar beg - work approx. 2 sc in every dc-row and 1 sc in every sc-row. Turn piece and work as follows: * ch 3, skip 2 sc, 1 sc in next st *, repeat from *-* the entire row to bottom of band. Fasten off and repeat along right front piece, beg from WS at the top by neck. CROCHET EDGE AROUND COLLAR: Work with off white as follows: Beg from RS where collar beg after the 3 sts at the top of neck and work 1 row sc around the entire collar until where collar ends before the top 3 sts in neck in the other side. Turn piece and work as follows: * ch 3, skip approx. 2 sts, 1 sc in next sc *, repeat from *-*, NOTE: Make sure that no of ch-spaces can be divided by 2 + 1. Turn piece and work a finishing edge with fans as follows from RS: Work sl sts until mid of first ch-space, 3 ch (= 1 dc), * 3 dc + 2 ch + 3 dc in next ch-space, 1 dc in next ch-space *, repeat from *-* the entire row. Fasten off. BOW: Ch 11 on hook size 3.5 mm/E with off white. Work first row as follows: 1 dc in 4th ch from hook, 1 dc in each of the next 7 ch = 9 dc on row. Turn piece and work TEXTURE ROWS back and forth until piece measures approx. 10 cm / 4" – finish after 1 row with sc. Fasten off. Sew short sides tog to form a ring and twine some yarn around the mid of bow to tighten it neatly in the middle. Fasten bow at the top on right front piece. |
|||||||||||||
Diagram explanations |
|||||||||||||
|
|||||||||||||
 |
|||||||||||||
 |
|||||||||||||
Have you finished this pattern?Tag your pictures with #dropspattern #littleladyrosecardigan or submit them to the #dropsfan gallery. Do you need help with this pattern?You'll find 10 tutorial videos, a Comments/Questions area and more by visiting the pattern on garnstudio.com. © 1982-2026 DROPS Design A/S. We reserve all rights. This document, including all its sub-sections, has copyrights. Read more about what you can do with our patterns at the bottom of each pattern on our site. |
|||||||||||||


With over 40 years in knitting and crochet design, DROPS Design offers one of the most extensive collections of free patterns on the internet - translated to 17 languages. As of today we count 325 catalogs and 12298 patterns - 12288 of which are translated into English (US/in).
We work hard to bring you the best knitting and crochet have to offer, inspiration and advice as well as great quality yarns at incredible prices! Would you like to use our patterns for other than personal use? You can read what you are allowed to do in the Copyright text at the bottom of all our patterns. Happy crafting!
Post a comment to pattern DROPS Baby 25-12
We would love to hear what you have to say about this pattern!
If you want to leave a question, please make sure you select the correct category in the form below, to speed up the answering process. Required fields are marked *.