
Popular categories
Looking for a yarn?


Comments / Questions (61)
![]() Lappi wrote:
Lappi wrote:
Miten voin laskea kaula-aukkoa korkeammalle? Tarkoitan ylemmäs, on liian iso.. Miten vähennän kavennuksia. En ole hyvä näissä jutuissa.
27.04.2026 - 09:18DROPS Design answered:
Saat korkeamman kaula-aukon, jos neulot muutaman senttimetrin enemmän ennen kuin päätät pääntien silmukat ohjeen mukaan.
28.04.2026 - 16:37
![]() Claire wrote:
Claire wrote:
Reading the pattern I am confused from BACK PIECE = number of stitches. Are these continued on from the jacket instructions as not clear
03.02.2026 - 19:40DROPS Design answered:
Hi Claire, Yes, you should have this number of stitches left on the back piece after casting off for the armholes on each side. Regards, Drops Team.
06.02.2026 - 07:14
![]() Jenny Carton wrote:
Jenny Carton wrote:
I have just finished this gorgeous jacket. I admit I used double knitting yarn in cotton . So have used size 4mm needles. The effect is wonderful and I have received many compliments. I'm not sure how to add a picture of my finished jacket.
26.09.2024 - 21:51
![]() Anna Watson wrote:
Anna Watson wrote:
Hello I am knitting this lovely cardigan and have reached the point where the jacket measures 42 cm and I have to cast off 6 stitches for the arm holes which is fine. However I do not understand the next bit which starts Back Piece =. Have I to separate out so many stitches for the back piece? I have I'm afraid found this pattern very hard to follow: ( Hope you can help. Many thanks. Anna
25.11.2020 - 17:57DROPS Design answered:
Dear Mrs Watson, when piece measures 42 cm you should now cast off 6 sts for both armholes, ie cast off 3 sts on each side of both markers to divide piece into the both front pieces and the back piece, in 4th size work: 55 sts, cast off 6 sts, work 110 sts, cast off 6 sts, work 55 sts - you keep sts of back piece on the needle and slip the sts of both front pieces on a thread/stitch holder and work now first back piece and when back piece is finished, work left front piece then right front piece. Happy knitting!
26.11.2020 - 09:38
![]() Anne Cole wrote:
Anne Cole wrote:
I’m new to knitting what size needle do I use to get large?
03.10.2020 - 09:43DROPS Design answered:
See answer below :)
05.10.2020 - 09:07
![]() Anne Cole wrote:
Anne Cole wrote:
What size needle do I use to get a large size? I’m new to knitting.
03.10.2020 - 09:41DROPS Design answered:
Dear Mrs Cole, you will find all these informations under header, ie you are working here with needle size 4 mm or the size require to get the correct tension of 21 sts x 40 rows in garter st = 10 x 10 cm. Read more about tension here. Happy knitting!
05.10.2020 - 09:07
![]() Marianne wrote:
Marianne wrote:
Hallo, omdat eerdere patronen die ik heb gebreid wat kort uitvielen, wil ik deze graag een centimeter of 5 langer maken. Moet ik dan op 5cm + 4 beginnen met minderen of kan ik beter meer steken opzetten en vaker minderen (ik brei de L). Alvast bedankt
12.03.2020 - 21:36DROPS Design answered:
Dag Marianne,
Als je het vest alleen langer wilt maken zou ik 5 cm later beginnen met meerderen. Als je hem ook breder wilt maken aan de onderkant zou ik inderdaad meer steken opzetten en eerder beginnen met minderen zodat je daarmee de extra opgezette steken mindert.
22.03.2020 - 11:32
![]() Sheila wrote:
Sheila wrote:
Hi I'm picking up stitches on right band. Do I pick up from bottom or top edge, it says pick up inside 1edge st mid front so I'm a bit confused. Thanks,
20.11.2019 - 18:23DROPS Design answered:
Dear Sheila, you will knit up the stitches from RS, ie from bottom to top on right front piece and from top to bottom on left front piece. The stitches are picked up inside the first stitch on edge - see for example this video showing how to pick stitches inside 1 edge stitch. Happy knitting!
21.11.2019 - 08:48
![]() Wietske Baars wrote:
Wietske Baars wrote:
Hallo, is het ook mogelijk dit vest op gewone pennen te breien ipv op een rondbreipen? Als dat inderdaad ook zou kunnen, kan u mij dan ook uitleggen hoe? Alvast hartelijk dank.
05.10.2019 - 22:20DROPS Design answered:
Dag Wietske,
Ja, dat zou wel kunnen bij dit patroon. We hebben een instructie gemaat waarin staat hoe je een patroon aanpast om met rechte naalden te kunnen breien. Deze vindt je hier.
06.10.2019 - 16:30
![]() Anita Monsieur wrote:
Anita Monsieur wrote:
Ikben bezig met de mouwen bij de minderingen moet ik dan aan de beide kanten minderen? Hoeveel steken blijven er over op het einde? Ik brei maat M Alvast bedankt
11.09.2019 - 10:46DROPS Design answered:
Dag Anita,
Voor maat M minder je 1 keer 4 st + 4 keer 2 st. + 1 keer 1 st aan beide zijden. Dit zijn in totaal 26 steken waardoor je 50 steken over houd. Dan minder je steeds 2 steken aan beide kanten tot het werk 55 cm meet, waarna je nog een keer 3 steken afkant, voordat je de overgebleven steken afkant. Hoeveel steken je over houdt, hangt dus een beetje af van wanneer je op die 55 cm zit (dus je stekenverhouding in de hoogte)
13.09.2019 - 10:16
|
|
Seascapes#seascapescadigan |
|
 |
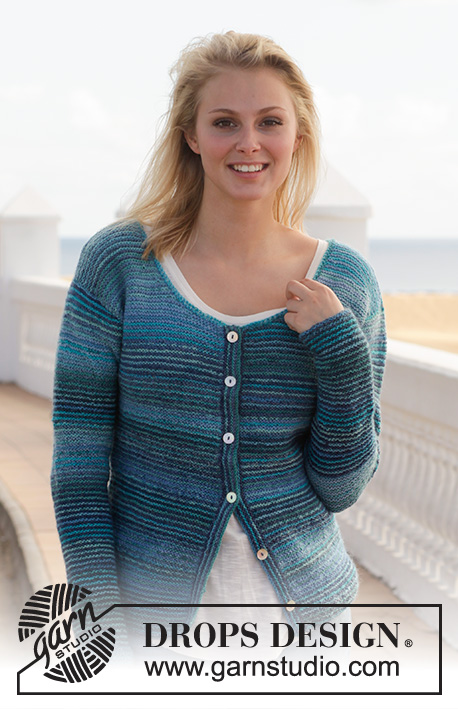 |
Knitted DROPS jacket in garter st in "Fabel" and "Delight". Size: S - XXXL.
DROPS 153-7 |
|
|
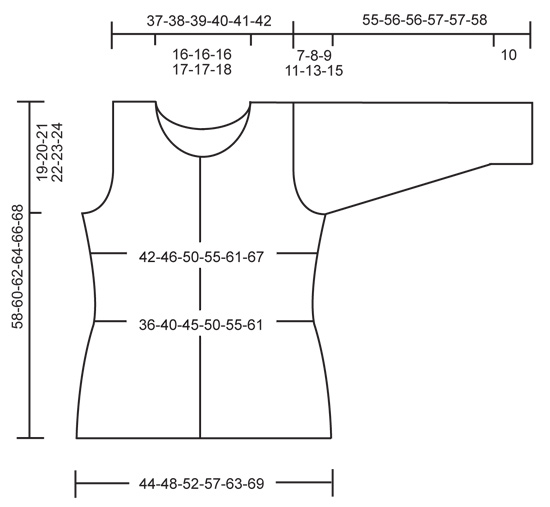
GARTER ST (back and forth on needle): K all rows. 1 ridge = K2 rows. STRIPES: *1 ridge Fabel, 1 ridge Delight *, repeat from *-* the entire piece. DECREASE TIP: Dec 1 st before marker as follows: Work until 2 sts remain before marker, slip 1 st as if to K, K 1, psso. Dec 1 st after marker as follows: K 2 tog. INCREASE TIP: Inc 1 st on each side of every marker as follows: Work until 1 st remains before marker, make 1 YO, K 2 (marker is between these sts), make 1 YO. On next row K YOs twisted (i.e. work in back loop of st instead of front) to avoid holes. -------------------------------------------------------- JACKET: Worked back and forth on circular needle. Cast on 184-200-220-240-264-288 sts on circular needle size 4 mm / US 6 with Delight. Work in GARTER ST and STRIPES - see explanation above. Insert 2 markers in the piece; 46-50-55-60-66-72 sts in from each side (back piece = 92-100-110-120-132-144 sts). REMEMBER THE GAUGE! When piece measures 4 cm / 1½", dec 1 st on each side of each marker - READ DECREASE TIP ABOVE! Repeat every 2 cm / ¾" a total of 8 times = 152-168-188-208-232-256 sts. When piece measures 24 cm / 9½", inc 1 st on each side of marker in each side - READ INCREASE TIP ABOVE. Repeat every 2-2-2½-2½-3-3 cm / ¾"-¾"-⅞"-⅞"-1⅛"-1⅛" 6 times in total = 176-192-212-232-256-280 sts. When piece measures 39-40-41-42-43-44 cm / 15¼"-15¾"-16⅛"-16½"-17"-17¼", bind off 6 sts for armholes in each side (bind off 3 sts on each side of marker), and finish each part separately. BACK PIECE: = 82-90-100-110-122-134 sts. Then bind off for armholes in each side at beg of every row as follows: 2 sts 1-2-4-6-8-10 times and 1 st 0-1-1-1-2-3 times = 78-80-82-84-86-88 sts. When piece measures 54-56-58-59-61-63 cm / 21¼"-22"-22¾"-23¼"-24"-24¾", bind off the middle 30-30-30-32-32-34 sts for neck and finish each side separately. Continue to bind off 2 sts on next row towards the neck = 22-23-24-24-25-25 sts remain on the shoulder. Bind off when piece measures 58-60-62-64-66-68 cm / 22¾"-23⅝"-24⅜"-25¼"-26"-26¾". LEFT FRONT PIECE: = 41-45-50-55-61-67 sts. Bind off for armhole in the side as on back piece = 39-40-41-42-43-44 sts. When piece measures 47-49-50-52-53-55 cm / 18½"-19¼"-19¾"-20½"-21"-22⅝", bind off sts for neck. Bind off 8-8-8-9-9-10 sts, then bind off 3 sts 1 time, 2 sts 2 times and 1 st 2 times = 22-23-24-24-25-25 sts remain on shoulder. Bind off when piece measures 58-60-62-64-66-68 cm / 22¾"-23⅝"-24⅜"-25¼"-26"-26¾" . RIGHT FRONT PIECE: = 41-45-50-55-61-67 sts. Work as left front piece but reversed. SLEEVE: Worked back and forth on circular needle. Cast on 46-48-50-52-54-56 sts on circular needle size 4 mm / US 6 with Delight. Work in garter st and stripes as before. When piece measures 10 cm / 4", inc 1 st inside 1 edge st in each side. Repeat every 3-2½-2½-2-1½-1½ cm / 1⅛"-⅞"-⅞"-¾"-½"-½" 12-14-15-17-19-20 times in total = 70-76-80-86-92-96 sts. When piece measures 48-48-47-46-44-43 cm / 19"-19"-18½"-18"-17¼"-17" (NOTE! Shorter measurements in the larger sizes because of longer sleeve cap and wider shoulders), bind off at the beg of every row for sleeve cap as follows: 4-4-4-3-3-3 sts 1 time, 2 sts 3-4-4-4-4-4 times, 1 st 0-1-1-3-8-11 times, then bind off 2 sts in each side until piece measures 54-55-55-56-56-57 cm / 21¼"-21⅝"-21⅝"-22"-22"-22½". Bind off 3 sts in each side, then bind off the remaining sts. Piece measures approx. 55-56-56-57-57-58 cm / 21⅝"-22"-22"-22½"-22½"-22¾". ASSEMBLY: Sew the shoulder seams. Sew in sleeves and sew sleeve seams. NECK EDGE: Pick up 94-108 sts from RS with Fabel on circular needle size 4 mm / US 6 along neck edge. Work 1 ridge and bind off with K from WS. RIGHT BAND: Work back and forth on needle in garter st and stripes. Pick up 98-102-106-110-112-114 sts inside 1 edge st mid front on right front piece with Delight. K 1 row from WS. On next row from RS, dec for 6-6-6-7-7-7 buttonholes as follows: K 7-6-5-8-4-6, * K 2 tog, make 1 loose YO, K 15-16-17-14-15-15 *, repeat from *-* 4-4-4-5-5-5 more times (= 5-5-5-6-6-6 times in total) and finish with K 2 tog, 1 YO and K 4. On next row K YOs. Continue in garter st and stripes until band measures approx. 2-2-2-3-3-3 cm / ¾"-¾"-¾"-1⅛"-1⅛"-1⅛", loosely bind off all sts. LEFT BAND: Work as right band but without buttonholes. Sew on buttons. |
|
 |
|
Have you finished this pattern?Tag your pictures with #dropspattern #seascapescadigan or submit them to the #dropsfan gallery. Do you need help with this pattern?You'll find 17 tutorial videos, a Comments/Questions area and more by visiting the pattern on garnstudio.com. © 1982-2026 DROPS Design A/S. We reserve all rights. This document, including all its sub-sections, has copyrights. Read more about what you can do with our patterns at the bottom of each pattern on our site. |
|


With over 40 years in knitting and crochet design, DROPS Design offers one of the most extensive collections of free patterns on the internet - translated to 17 languages. As of today we count 324 catalogs and 12290 patterns - 12280 of which are translated into English (US/in).
We work hard to bring you the best knitting and crochet have to offer, inspiration and advice as well as great quality yarns at incredible prices! Would you like to use our patterns for other than personal use? You can read what you are allowed to do in the Copyright text at the bottom of all our patterns. Happy crafting!
Post a comment to pattern DROPS 153-7
We would love to hear what you have to say about this pattern!
If you want to leave a question, please make sure you select the correct category in the form below, to speed up the answering process. Required fields are marked *.