
Popular categories
Looking for a yarn?


Comments / Questions (352)
![]() Rian wrote:
Rian wrote:
Ik herhaal mijn vraag nog een keer omdat ik nog geen antwoord heb gekregen. Het is blijkbaar een lastig punt, gezien de meerdere vragen over dit onderdeel in het patroon. Bedankt alvast! Ik ben met het rechterachterpand bezig na de eerste set van de verkortte toeren. Ik kan nu niet aan de goede kant beginnen met 1 ribbel Delight over alle steken. Hoe los ik dat op?
13.03.2014 - 16:08DROPS Design answered:
Hoi Rian. Wij zijn bezig om het gedeelte voor het rechter achterpand uit te schrijven om verder verwarring te voorkomen. Helaas neemt dat nog even wat tijd in beslag, dus wij vragen nogmaals jij - en andere - om wat geduld ;-). Wij komen zsm terug als meer bekend is.
13.03.2014 - 16:54
![]() Lena wrote:
Lena wrote:
Jag har följt kommentarerna här för att få hjälp med mönster 155-1. Måtten verkar inte stämma. Om jag påbörjar "krysset" redan efter 7-8 com hamnar "midjan" på höften! Är det en felskrivning? Även mönstret är svårtolkat, jag har tittat på instruktionsvideon och har klarat vä framstycke ( men med konstigt mått som sagt) men hö framstycke förstår jag inte. Kommer det att komma en rättelse och ett förtydligande av mönstret?
12.03.2014 - 23:19DROPS Design answered:
Hej Lena. Mønstret er korrekt. Vi har endvidere uddybet beskrivelsen nu. God fvornøjelse.
29.04.2014 - 20:19
![]() Karianne wrote:
Karianne wrote:
Hi again. I still don't know how to make the right side according to the pattern. I have changed the order of the techniques on the right side, so that I use the 2. and 3. technique on the 1. and 4. sections and the 1. and 4. on the 2. and 3. sections. It looks like the picture, but I have to cut the tread and start from the opposite side before the 2. part, and after the 3. I hope you will explain more about the right side.
12.03.2014 - 16:47DROPS Design answered:
Hi Karianne. We are working on an addition to this pattern to make it completely clear how you work the right side. It does take a little time to get ready, but bare with and we will come back asap. Thanks for your patience.
13.03.2014 - 17:09
![]() Karianne wrote:
Karianne wrote:
I have just started on my second jacket. On the first one, the mid-section, the cross, was on my hips because you are suppose to start the asymmetrical part after just 7 or 8 cm. That can't be right? On your picture I can count about 15 stipes of each color before the midsection starts, and the first button is also below this section (If you look at her hips). I will also make the top section shorter. Different shapes :-)
12.03.2014 - 16:46
![]() Solveig wrote:
Solveig wrote:
Hej! På höger bakstycket ska man göra förkortade varv från avigsidan - det förstår jag, men hur fortsätter man? De två varven med Delight efter de förkortade varven kommer väl också att börja från avigsidan och det är ju inte så snyggt när man byter färg på avigan? Det blir väl likadant när man fortsätter med avsnitt två - fult. Från rätan? Har försökt hitta någon rättelse eller förklaring, men inte hittat någon. Videorna visar ju inte "tvärtom"-varven? Tacksam för snabbt svar:)
09.03.2014 - 22:40DROPS Design answered:
Hej Solveig. Vi har uddybet beskrivelsen per dd. Se om det ikke virker nu. God fornøjelse.
29.04.2014 - 20:20
![]() Kathrin wrote:
Kathrin wrote:
Hei! Jeg får det ikke til å strikke høyre bakstykke :-( Kan ikke dere lage en beskrivelse på den???
09.03.2014 - 01:18DROPS Design answered:
Hej Kathrin. Den er uddybet nu. God fornøjelse med den
29.04.2014 - 20:20
![]() Jutta wrote:
Jutta wrote:
Mir ist leider komplett unklar wie ich das rechte Rückenteil gegengleich stricken soll. Vielleicht könntet ihr so nett sein und die Beschreibung vervollständigen. Danke
08.03.2014 - 19:12
![]() Lea wrote:
Lea wrote:
Hej Garnstudio Der er behov for en rettelse i garnmængderne i opskriften til denne model. Jeg har været ved at strikke den i Large. Det kan ikke lade sig gøre at få modellen færdig med kun tre nøgler Delight og Alpaca. En kvart af jakken bruger 38g af begge garner, og lidt let matematik afgør derfor, at der kun er 36g tilbage til sidste kvarte - og det er endda uden garn til at sy den sammen med!
07.03.2014 - 13:48DROPS Design answered:
Hej Lea. Vi skal notere det. Kommer der flere kommentarer paa garnmaengden til denne str, saa skal vi kontrollere garnmaengden igen. God weekend.
07.03.2014 - 16:22
![]() Margit Larsen wrote:
Margit Larsen wrote:
Håber snart der kommer en video med afsnit 3 om tilbagestrikning og udtagning i siden. Det vil være meget nemmere at forstå på video.
06.03.2014 - 21:40DROPS Design answered:
Hej Margit. Videoen er lavet og vi er igang med at redigere. Den kommer meget snart online. God weekend.
07.03.2014 - 10:01
![]() El Síndrome Lanar wrote:
El Síndrome Lanar wrote:
Es precioso. Ya lo tengo empezado porque no me he podido resistir.
06.03.2014 - 09:07
|
||||
Cross My Heart#crossmyheartjacket |
||||
 |
 |
|||
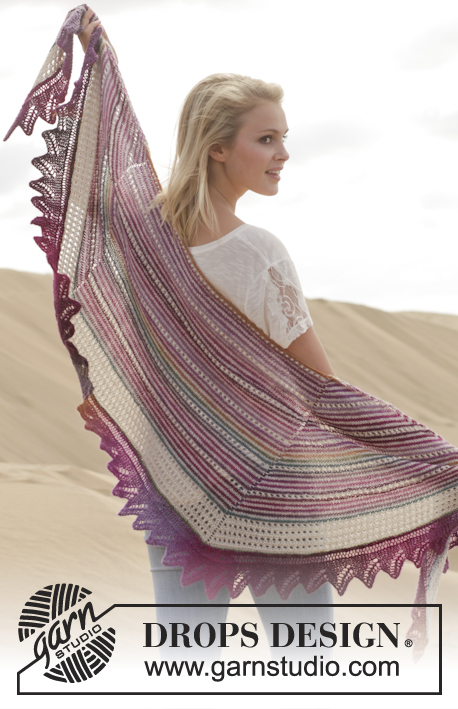
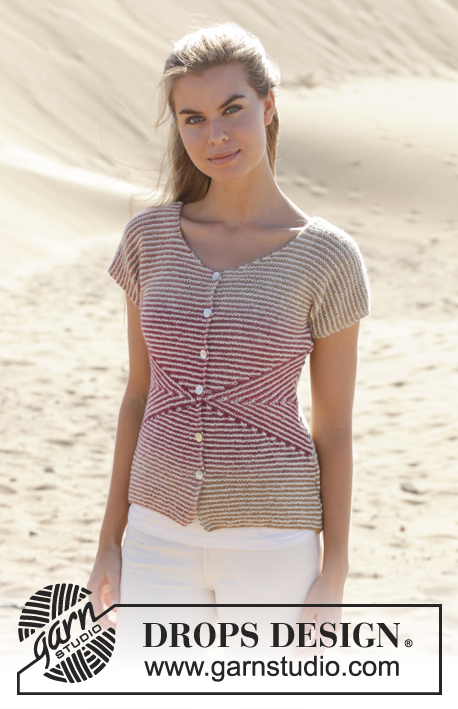
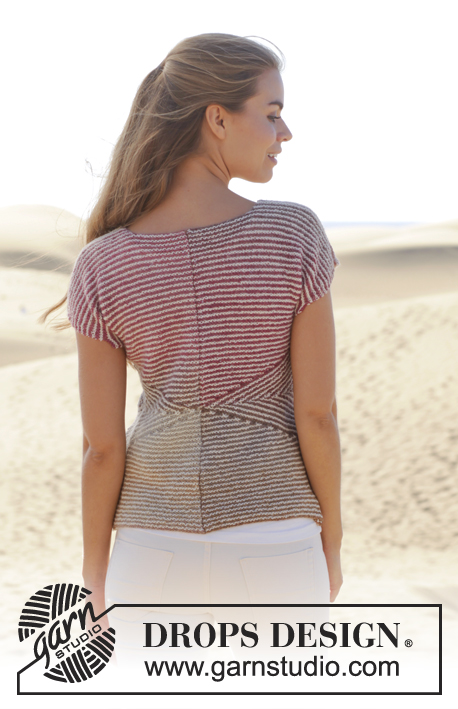
Knitted DROPS jacket in garter st with short sleeves, short rows and stripes in ”Delight” and ”Alpaca”. Size: S - XXXL.
DROPS 155-1 |
||||
|
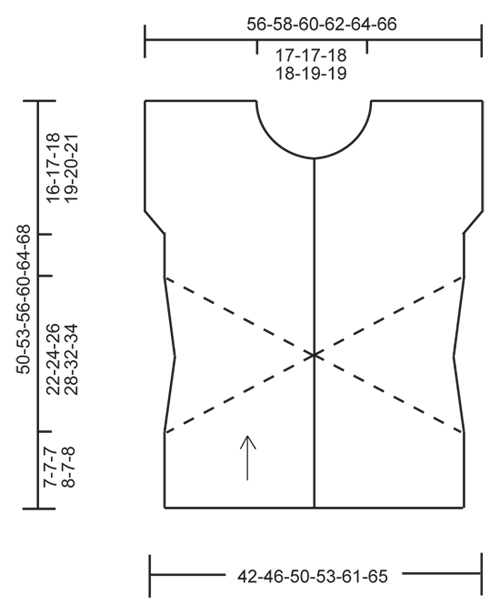
GARTER ST (back and forth on needle): K all rows. 1 ridge = K2 rows. STRIPES: * 1 ridge in GARTER ST - see explanation above - (= 2 rows) Delight, 1 ridge (= 2 rows) Alpaca *, repeat from *-*. NOTE: Make sure that the strands always are on WS of piece. TIP FOR CHANGING YARN: To make the color transitions in Delight pretty when switching ball, it is important to find a ball that starts with the same color last ball ended with. BUTTONHOLES: Dec for buttonholes on right front piece from RS. 1 buttonhole = K tog 3rd and 4th st from mid front, then make 1 YO. Dec for buttonholes when piece measures: SIZE S: 7, 13, 19, 25, 31 and 37 cm / 2¾",5",7½",9¾",12¼" and 14½". SIZE M: 10, 16, 22, 28, 34 and 40 cm / 4",6¼",8¾",11",13½" and 15¾". SIZE L: 7, 14, 21, 28, 35 and 42 cm / 2¾",5½",8¼",11",13¾" and 16½". SIZE XL: 10, 16, 22, 28, 34, 40 and 46 cm / 4",6¼",8¾",11",13½",15¾" ad 18". SIZE XXL: 7, 14, 21, 28, 35, 42 and 49 cm / 2¾",5½",8¼",11",13¾",16½" and 19¼". SIZE XXXL: 11, 18, 25, 32, 39, 46 and 53 cm / 4½",7",9¾",12½",15¼",18" and 21". --------------------------------------------------------- JACKET: Worked in 4 parts, left and right back piece are sewn tog mid back when finished. LEFT BACK PIECE: Worked back and forth on needle. Cast on 44-48-52-56-64-68 sts on circular needle size 4 mm / US 6 with Delight. Work in STRIPES - see explanation above. When piece measures 7-7-7-8-7-8 cm / 2¾"-2¾"-2¾"-3⅛"-2¾"-3⅛", continue with stripes (adjust so that last row is from WS and that next stripe is with Alpaca) AT THE SAME TIME AT THE SAME TIME continue as follows: Section 5 SHORT ROWS: Row 1: Work until 2 st remains, turn piece. Row 2: Work back. Row 3: Work back but do not work the last 4 sts, turn piece. Row 4: Work back. Continue like this by working 2 sts less for every other row until the last 2 sts on row have been worked back and forth. Work one ridge in garter st over all sts. Section 6 READ ALL OF THE FOLLOWING SECTION BEFORE CONTINUING – WORK SHORT ROWS AND DEC AT THE SAME TIME. Row 1: Slip the first 2 sts loosely over on to right needle, pull yarn behind the 2 sts, work the remaining sts on row, turn piece. Row 2: Work back but do not work the last 2 sts, turn piece. Row 3: Slip the first 2 sts loosely over on to right needle, pull yarn behind the 2 sts, work the remaining sts on row, turn piece. Row 4: Work back but do not work the last 4 sts, turn piece. Continue like this with 2 sts less for every other row until 2 sts remain on left needle. DECREASE: Dec at the end of every row from RS with Delight (NOTE: Do not dec on first stripe with Delight in all sizes. In size S and XXL K tog the first 2 sts on last stripe with short rows so that 2 sts remain on row and in size L do not dec on last stripe with Delight) by K tog the last 2 sts until there are 36-40-44-46-52-56 sts on row (= 8-8-8-10-12-12 sts dec). Section 7 READ ALL OF THE FOLLOWING SECTION BEFORE CONTINUING – WORK SHORT ROWS AND INC AT THE SAME TIME. The first 34-38-42-44-50-54 sts are on the right needle. Then work as follows: Row 1: Work 2 sts, turn piece. Row 2: Work back over the 2 sts. Row 3: Slip 2 sts from right needle over on needle, work the 4 sts, turn piece. Row 4: Work back over the 4 sts. Continue like this with 2 sts more for every other row until all sts have been slipped on to same needle and 1 ridge has been worked over all sts. INCREASE: Inc at the end of every row from RS with Delight (NOTE: Inc the same way as dec. Do not inc on first stripe with Delight in all sizes. In size L do not inc on last stripe Delight) by working 2 sts in the last st until there are 44-48-52-56-64-68 sts on needle (= 8-8-8-10-12-12 sts inc). Section 8 Row 1: Work the first 2 sts, turn piece. Row 2: Work back over these 2 sts, turn piece. Row 3: Work the first 4 sts, turn piece. Row 4: Work back over these 4 sts, turn piece. Continue like this with 2 sts more for every other row - repeat until 1 ridge has been worked over all sts. Now work stripes over all sts until finished measurements. Work until piece measures 34-36-38-41-44-47 cm / 13½"-14¼"-15"-16"-17¼"-18½". Then cast on new sts for sleeve at the end of every row from RS in the left side of piece (seen from RS) as follows: Inc 1 st 0-1-2-3-3-1 time, then 2 sts 5-4-3-2-0-0 times. On next row from RS, inc 5-4-3-2-0-0 sts = 59-61-63-65-67-69 sts on needle. NOTE! Shorter measurements in the larger sizes because of wider shoulders. When piece measures 48-51-54-58-62-66 cm / 19"-20"-21¼"-22¾"-24½"-26", bind off for neck at the beg of first row from RS in right side of piece (seen from RS) as follows: bind off 17-17-18-18-19-19 sts = 42-44-45-47-48-50 sts remain on needle, then on next row from RS bind off 1 st = 41-43-44-46-47-49 sts remain on needle. Bind off when piece measures 50-53-56-60-64-68 cm / 19¾"-21"-22"-23½"-25¼"-26¾". RIGHT BACK PIECE: Work as left back piece but reversed. Inc for sleeve in right side of piece (seen from RS). Bind off for neck in left side of piece (seen from RS). Work short rows as follows: Section 1 Row 1: Slip the first 2 sts loosely over on to right needle, pull yarn behind the 2 sts, work the remaining sts on row, turn piece. Row 2: Work back but do not work the last 2 sts, turn piece. Row 3: Slip the first 2 sts loosely over on to right needle, pull yarn behind the 2 sts, work the remaining sts on row, turn piece. Row 4: Work back but do not work the last 4 sts, turn piece. Continue like this by working 2 sts less for every other row until 2 rows have been worked over the last 2 sts. Cut the yarn. Then work 1 ridge over all sts with 1st row = RS. Section 2 READ ALL OF THE FOLLOWING SECTION BEFORE CONTINUING – WORK SHORT ROWS AND DEC AT THE SAME TIME. SHORT ROWS: Row 1: Work until 2 st remains, turn piece. Row 2: Work back. Row 3: Work back but do not work the last 4 sts, turn piece. Row 4: Work back. Continue like this with 2 sts less for every other row until 2 sts remain on right needle. DECREASE: Dec at the beg of every row from RS with Delight (NOTE: Do not dec on first stripe with Delight in all sizes. In size S and XXL K tog the first 2 sts on last stripe with short rows so that 2 sts remain on row and in size L do not dec on last stripe with Delight) by K tog the last 2 sts until there are 36-40-44-46-52-56 sts on row (= 8-8-8-10-12-12 sts dec). Section 3 READ ALL OF THE FOLLOWING SECTION BEFORE CONTINUING – WORK SHORT ROWS AND INC AT THE SAME TIME. SHORT ROWS: Row 1: Work the first 2 sts, turn piece. Row 2: Work back over these 2 sts, turn piece. Row 3: Work the first 4 sts, turn piece. Row 4: Work back over these 4 sts, turn piece. Continue like this with 2 sts more for every other row - repeat until 1 ridge has been worked over all sts. INCREASE: Inc at the beg of every row from RS with Delight (NOTE: Inc the same way as dec. Do not inc on first stripe with Delight in all sizes. In size L do not inc on last stripe Delight) by working 2 sts in the last st until there are 44-48-52-56-64-68 sts on needle (= 8-8-8-10-12-12 sts inc). Cut the yarn. Section 4 The first 34-38-42-44-50-54 sts are on the right needle. Then work as follows: Row 1 (= RS): Work 2 sts, turn piece. Row 2: Work back over the 2 sts. Row 3: Slip 2 sts from right needle over on needle, work the 4 sts, turn piece. Row 4: Work back over the 4 sts. Continue like this with 2 sts more for every other row until all sts have been slipped on to same needle and 1 ridge has been worked over all sts. LEFT FRONT PIECE: Cast on and work as right back piece. When piece measures 38-41-43-47-50-54 cm / 15"-16"-17"-18½"-19¾"-21¼", bind off for neck at beg of every row from WS in left side of piece (seen from RS) as follows: bind off 7 sts 1 time, then 2 sts 3 times, then 1 st 5-5-6-6-7-7 times = 41-43-44-46-47-49 sts remain on needle. AT THE SAME TIME cast on new sts for sleeve as on right back piece. Bind off when piece measures 50-53-56-60-64-68 cm / 19¾"-21"-22"-23½"-25¼"-26¾". RIGHT FRONT PIECE: Cast on and work as left back piece but dec for BUTTONHOLES - see explanation above. When piece measures 38-41-43-47-50-54 cm / 15"-16"-17"-18½"-19¾"-21¼", bind off for neck at beg of every row from RS in right side of piece (seen from RS) as follows: bind off 7 sts 1 time, then 2 sts 3 times, then 1 st 5-5-6-6-7-7 times = 41-43-44-46-47-49 sts remain on needle. AT THE SAME TIME cast on new sts for sleeve as on left back piece. Bind off when piece measures 50-53-56-60-64-68 cm / 19¾"-21"-22"-23½"-25¼"-26¾". ASSEMBLY: Sew right back piece to left back piece. Sew shoulder and side seams. Sew the buttons on to left front piece. |
||||
Diagram explanations |
||||
|
||||
 |
||||
Have you finished this pattern?Tag your pictures with #dropspattern #crossmyheartjacket or submit them to the #dropsfan gallery. Do you need help with this pattern?You'll find 18 tutorial videos, a Comments/Questions area and more by visiting the pattern on garnstudio.com. © 1982-2026 DROPS Design A/S. We reserve all rights. This document, including all its sub-sections, has copyrights. Read more about what you can do with our patterns at the bottom of each pattern on our site. |
||||


With over 40 years in knitting and crochet design, DROPS Design offers one of the most extensive collections of free patterns on the internet - translated to 17 languages. As of today we count 325 catalogs and 12291 patterns - 12281 of which are translated into English (US/in).
We work hard to bring you the best knitting and crochet have to offer, inspiration and advice as well as great quality yarns at incredible prices! Would you like to use our patterns for other than personal use? You can read what you are allowed to do in the Copyright text at the bottom of all our patterns. Happy crafting!
Post a comment to pattern DROPS 155-1
We would love to hear what you have to say about this pattern!
If you want to leave a question, please make sure you select the correct category in the form below, to speed up the answering process. Required fields are marked *.