
Popular categories
Looking for a yarn?


Comments / Questions (352)
![]() Jette Andersen wrote:
Jette Andersen wrote:
Jeg er enig med Susanne Hedegaard 27.03.2014 og jeg mangler også svar på mit spørgsmål ang. en tilføjelse i opskriften til højre side.
28.03.2014 - 10:36
![]() Susanne Hedegaard wrote:
Susanne Hedegaard wrote:
Jeg mangler også nærmere info om højre side. Dejligt med videoer, dog synes jeg der er mange som ikke hører til denne opskrift. Kan det ikke begrænses til kun dem der hører til lige netop denne opskrift.
27.03.2014 - 17:25DROPS Design answered:
Hej Susanne. Vi arbejder paa en lille udvidet beskrivelse paa höjre side, som jeg haaber vi kan faa paa inden laenge. Der er linket til videoer som er relevant til mönstret, saa ikke kun teknik, men ogsaa type masker, udtagning, lukke af osv.
28.03.2014 - 10:44
![]() Rian wrote:
Rian wrote:
Ik denk dat er een fout staat un het patroon in de NL versie linker achterpand deel twee staat: let op: minder in de eerste verkorte toer met Delight. Maar in de UK versie staat: let op: minder NIET in de eerste verkorte toer met Delight. De uk versie klopt aangezien ik voor mt L nog toeren over hield terwijl ik al 8 st geminderd had
27.03.2014 - 17:06DROPS Design answered:
Hoi Rian. Ik heb het originele patroon bekeken en je hebt gelijk. Het patroon is aangepast. Bedankt voor het melden.
28.03.2014 - 10:50
![]() Marinella wrote:
Marinella wrote:
Ho fatto il dietro sinistro. Non riesco a capire come fare il dietro destro mi aiutate per favore a. Grazie Maeinella
25.03.2014 - 23:12DROPS Design answered:
Buongiorno Marinella, per lavorare il dietro destro deve lavorare come per il sinistro, ma al contrario, quindi dovrà lavorare i ferri accorciati sul rovescio del lavoro, dovrà aumentare per la manica sul lato destro e intrecciare per il collo sul lato sinistro, sempre visti dal diritto del lavoro. Ci riscriva se ha altri dubbi. Buon lavoro!!
26.03.2014 - 14:12
![]() Jette Andersen wrote:
Jette Andersen wrote:
Da jeg kan se at jeg ikke er den eneste der har problemer med 155-1 vil jeg foreslå at i skriver udførlig hvordan højrer stykker skal strikkes modsat, ikke kun - SKAL STRIKKES MODSAT.
25.03.2014 - 13:45DROPS Design answered:
Hej Jette. Mønstret er uddybet per dd. Se om det ikke virker nu. God fornøjelse.
29.04.2014 - 20:18
![]() Bep wrote:
Bep wrote:
Ik weet niet of jullie meer reacties krijgen maar ik vind dit patroon er mooi maar ik kom niet uit het patroon zelf hebben jullie daar meer mensen over gehoord
20.03.2014 - 14:18DROPS Design answered:
Hoi Bep. We hebben video's gemaakt van hoe je moet minderen en meerderen voor de zijkanten (kijk onder VIDEOS). Verder werken we met een uitbreiding van het patroon voor het RECHTER ACHTERPAND, dat ik hoop binnenkort toegevoegd kan worden.
02.04.2014 - 11:38
![]() Turid wrote:
Turid wrote:
Er ferdig med venstre bakstykkog det stemmer bra med 7 cm før asymmetrien...
19.03.2014 - 22:08
![]() Primera wrote:
Primera wrote:
Auch mich hat das Modell sofort fasziniert. Das zweite Rückenteil habe ich in Kraus Links gestrickt. Dabei klappt es ganz gut mit dem spiegelgleichen verkürzten Reihen.
19.03.2014 - 15:34
![]() Hanne wrote:
Hanne wrote:
Hej. tænker at strikke denne opskrift, men har ikke lyst til at gå igang før der er svaret på om de 7 cm før asymmetrien starter er korrekt.
18.03.2014 - 15:47DROPS Design answered:
Hej Hanne. Mønstret er korrekt og endvidere uddybet per dd. God fornøjelse.
29.04.2014 - 20:18
![]() Ute K. wrote:
Ute K. wrote:
Habe Probleme bei der spiegelverkehrten Arbeit. Komme nicht weiter beim 2. Satz der verkürzten R.,da ich am Ende der Reihe bin.Krausrippe über alle geht nicht da Rück-R.
16.03.2014 - 18:45DROPS Design answered:
Liebe Uta, wir sind daran, zu dieser Anleitung weitere Video-Tutorials zu erstellen sowie den Anleitungstext ausführlicher zu formuliernen. Vielen Dank für Ihre Geduld!
18.03.2014 - 08:50
|
||||
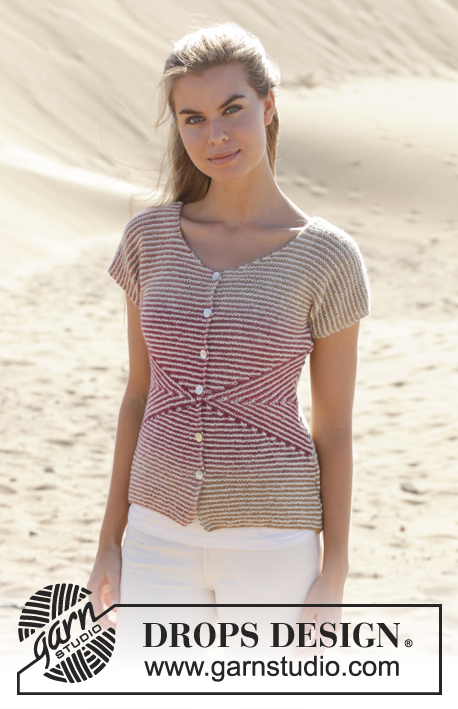
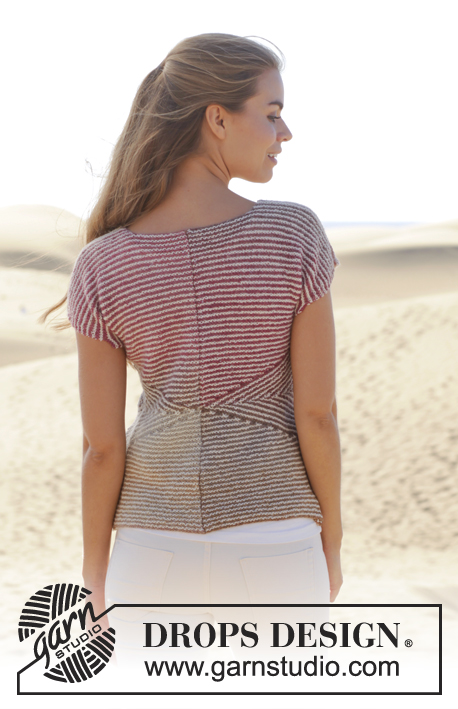
Cross My Heart#crossmyheartjacket |
||||
 |
 |
|||
Knitted DROPS jacket in garter st with short sleeves, short rows and stripes in ”Delight” and ”Alpaca”. Size: S - XXXL.
DROPS 155-1 |
||||
|
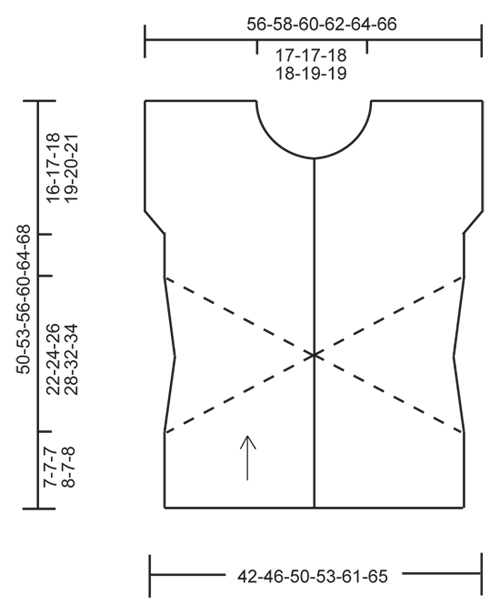
GARTER ST (back and forth on needle): K all rows. 1 ridge = K2 rows. STRIPES: * 1 ridge in GARTER ST - see explanation above - (= 2 rows) Delight, 1 ridge (= 2 rows) Alpaca *, repeat from *-*. NOTE: Make sure that the strands always are on WS of piece. TIP FOR CHANGING YARN: To make the color transitions in Delight pretty when switching ball, it is important to find a ball that starts with the same color last ball ended with. BUTTONHOLES: Dec for buttonholes on right front piece from RS. 1 buttonhole = K tog 3rd and 4th st from mid front, then make 1 YO. Dec for buttonholes when piece measures: SIZE S: 7, 13, 19, 25, 31 and 37 cm / 2¾",5",7½",9¾",12¼" and 14½". SIZE M: 10, 16, 22, 28, 34 and 40 cm / 4",6¼",8¾",11",13½" and 15¾". SIZE L: 7, 14, 21, 28, 35 and 42 cm / 2¾",5½",8¼",11",13¾" and 16½". SIZE XL: 10, 16, 22, 28, 34, 40 and 46 cm / 4",6¼",8¾",11",13½",15¾" ad 18". SIZE XXL: 7, 14, 21, 28, 35, 42 and 49 cm / 2¾",5½",8¼",11",13¾",16½" and 19¼". SIZE XXXL: 11, 18, 25, 32, 39, 46 and 53 cm / 4½",7",9¾",12½",15¼",18" and 21". --------------------------------------------------------- JACKET: Worked in 4 parts, left and right back piece are sewn tog mid back when finished. LEFT BACK PIECE: Worked back and forth on needle. Cast on 44-48-52-56-64-68 sts on circular needle size 4 mm / US 6 with Delight. Work in STRIPES - see explanation above. When piece measures 7-7-7-8-7-8 cm / 2¾"-2¾"-2¾"-3⅛"-2¾"-3⅛", continue with stripes (adjust so that last row is from WS and that next stripe is with Alpaca) AT THE SAME TIME AT THE SAME TIME continue as follows: Section 5 SHORT ROWS: Row 1: Work until 2 st remains, turn piece. Row 2: Work back. Row 3: Work back but do not work the last 4 sts, turn piece. Row 4: Work back. Continue like this by working 2 sts less for every other row until the last 2 sts on row have been worked back and forth. Work one ridge in garter st over all sts. Section 6 READ ALL OF THE FOLLOWING SECTION BEFORE CONTINUING – WORK SHORT ROWS AND DEC AT THE SAME TIME. Row 1: Slip the first 2 sts loosely over on to right needle, pull yarn behind the 2 sts, work the remaining sts on row, turn piece. Row 2: Work back but do not work the last 2 sts, turn piece. Row 3: Slip the first 2 sts loosely over on to right needle, pull yarn behind the 2 sts, work the remaining sts on row, turn piece. Row 4: Work back but do not work the last 4 sts, turn piece. Continue like this with 2 sts less for every other row until 2 sts remain on left needle. DECREASE: Dec at the end of every row from RS with Delight (NOTE: Do not dec on first stripe with Delight in all sizes. In size S and XXL K tog the first 2 sts on last stripe with short rows so that 2 sts remain on row and in size L do not dec on last stripe with Delight) by K tog the last 2 sts until there are 36-40-44-46-52-56 sts on row (= 8-8-8-10-12-12 sts dec). Section 7 READ ALL OF THE FOLLOWING SECTION BEFORE CONTINUING – WORK SHORT ROWS AND INC AT THE SAME TIME. The first 34-38-42-44-50-54 sts are on the right needle. Then work as follows: Row 1: Work 2 sts, turn piece. Row 2: Work back over the 2 sts. Row 3: Slip 2 sts from right needle over on needle, work the 4 sts, turn piece. Row 4: Work back over the 4 sts. Continue like this with 2 sts more for every other row until all sts have been slipped on to same needle and 1 ridge has been worked over all sts. INCREASE: Inc at the end of every row from RS with Delight (NOTE: Inc the same way as dec. Do not inc on first stripe with Delight in all sizes. In size L do not inc on last stripe Delight) by working 2 sts in the last st until there are 44-48-52-56-64-68 sts on needle (= 8-8-8-10-12-12 sts inc). Section 8 Row 1: Work the first 2 sts, turn piece. Row 2: Work back over these 2 sts, turn piece. Row 3: Work the first 4 sts, turn piece. Row 4: Work back over these 4 sts, turn piece. Continue like this with 2 sts more for every other row - repeat until 1 ridge has been worked over all sts. Now work stripes over all sts until finished measurements. Work until piece measures 34-36-38-41-44-47 cm / 13½"-14¼"-15"-16"-17¼"-18½". Then cast on new sts for sleeve at the end of every row from RS in the left side of piece (seen from RS) as follows: Inc 1 st 0-1-2-3-3-1 time, then 2 sts 5-4-3-2-0-0 times. On next row from RS, inc 5-4-3-2-0-0 sts = 59-61-63-65-67-69 sts on needle. NOTE! Shorter measurements in the larger sizes because of wider shoulders. When piece measures 48-51-54-58-62-66 cm / 19"-20"-21¼"-22¾"-24½"-26", bind off for neck at the beg of first row from RS in right side of piece (seen from RS) as follows: bind off 17-17-18-18-19-19 sts = 42-44-45-47-48-50 sts remain on needle, then on next row from RS bind off 1 st = 41-43-44-46-47-49 sts remain on needle. Bind off when piece measures 50-53-56-60-64-68 cm / 19¾"-21"-22"-23½"-25¼"-26¾". RIGHT BACK PIECE: Work as left back piece but reversed. Inc for sleeve in right side of piece (seen from RS). Bind off for neck in left side of piece (seen from RS). Work short rows as follows: Section 1 Row 1: Slip the first 2 sts loosely over on to right needle, pull yarn behind the 2 sts, work the remaining sts on row, turn piece. Row 2: Work back but do not work the last 2 sts, turn piece. Row 3: Slip the first 2 sts loosely over on to right needle, pull yarn behind the 2 sts, work the remaining sts on row, turn piece. Row 4: Work back but do not work the last 4 sts, turn piece. Continue like this by working 2 sts less for every other row until 2 rows have been worked over the last 2 sts. Cut the yarn. Then work 1 ridge over all sts with 1st row = RS. Section 2 READ ALL OF THE FOLLOWING SECTION BEFORE CONTINUING – WORK SHORT ROWS AND DEC AT THE SAME TIME. SHORT ROWS: Row 1: Work until 2 st remains, turn piece. Row 2: Work back. Row 3: Work back but do not work the last 4 sts, turn piece. Row 4: Work back. Continue like this with 2 sts less for every other row until 2 sts remain on right needle. DECREASE: Dec at the beg of every row from RS with Delight (NOTE: Do not dec on first stripe with Delight in all sizes. In size S and XXL K tog the first 2 sts on last stripe with short rows so that 2 sts remain on row and in size L do not dec on last stripe with Delight) by K tog the last 2 sts until there are 36-40-44-46-52-56 sts on row (= 8-8-8-10-12-12 sts dec). Section 3 READ ALL OF THE FOLLOWING SECTION BEFORE CONTINUING – WORK SHORT ROWS AND INC AT THE SAME TIME. SHORT ROWS: Row 1: Work the first 2 sts, turn piece. Row 2: Work back over these 2 sts, turn piece. Row 3: Work the first 4 sts, turn piece. Row 4: Work back over these 4 sts, turn piece. Continue like this with 2 sts more for every other row - repeat until 1 ridge has been worked over all sts. INCREASE: Inc at the beg of every row from RS with Delight (NOTE: Inc the same way as dec. Do not inc on first stripe with Delight in all sizes. In size L do not inc on last stripe Delight) by working 2 sts in the last st until there are 44-48-52-56-64-68 sts on needle (= 8-8-8-10-12-12 sts inc). Cut the yarn. Section 4 The first 34-38-42-44-50-54 sts are on the right needle. Then work as follows: Row 1 (= RS): Work 2 sts, turn piece. Row 2: Work back over the 2 sts. Row 3: Slip 2 sts from right needle over on needle, work the 4 sts, turn piece. Row 4: Work back over the 4 sts. Continue like this with 2 sts more for every other row until all sts have been slipped on to same needle and 1 ridge has been worked over all sts. LEFT FRONT PIECE: Cast on and work as right back piece. When piece measures 38-41-43-47-50-54 cm / 15"-16"-17"-18½"-19¾"-21¼", bind off for neck at beg of every row from WS in left side of piece (seen from RS) as follows: bind off 7 sts 1 time, then 2 sts 3 times, then 1 st 5-5-6-6-7-7 times = 41-43-44-46-47-49 sts remain on needle. AT THE SAME TIME cast on new sts for sleeve as on right back piece. Bind off when piece measures 50-53-56-60-64-68 cm / 19¾"-21"-22"-23½"-25¼"-26¾". RIGHT FRONT PIECE: Cast on and work as left back piece but dec for BUTTONHOLES - see explanation above. When piece measures 38-41-43-47-50-54 cm / 15"-16"-17"-18½"-19¾"-21¼", bind off for neck at beg of every row from RS in right side of piece (seen from RS) as follows: bind off 7 sts 1 time, then 2 sts 3 times, then 1 st 5-5-6-6-7-7 times = 41-43-44-46-47-49 sts remain on needle. AT THE SAME TIME cast on new sts for sleeve as on left back piece. Bind off when piece measures 50-53-56-60-64-68 cm / 19¾"-21"-22"-23½"-25¼"-26¾". ASSEMBLY: Sew right back piece to left back piece. Sew shoulder and side seams. Sew the buttons on to left front piece. |
||||
Diagram explanations |
||||
|
||||
 |
||||
Have you finished this pattern?Tag your pictures with #dropspattern #crossmyheartjacket or submit them to the #dropsfan gallery. Do you need help with this pattern?You'll find 18 tutorial videos, a Comments/Questions area and more by visiting the pattern on garnstudio.com. © 1982-2026 DROPS Design A/S. We reserve all rights. This document, including all its sub-sections, has copyrights. Read more about what you can do with our patterns at the bottom of each pattern on our site. |
||||


With over 40 years in knitting and crochet design, DROPS Design offers one of the most extensive collections of free patterns on the internet - translated to 17 languages. As of today we count 325 catalogs and 12291 patterns - 12281 of which are translated into English (US/in).
We work hard to bring you the best knitting and crochet have to offer, inspiration and advice as well as great quality yarns at incredible prices! Would you like to use our patterns for other than personal use? You can read what you are allowed to do in the Copyright text at the bottom of all our patterns. Happy crafting!
Post a comment to pattern DROPS 155-1
We would love to hear what you have to say about this pattern!
If you want to leave a question, please make sure you select the correct category in the form below, to speed up the answering process. Required fields are marked *.