
Popular categories
Looking for a yarn?


Comments / Questions (352)
![]() Dagmar Eidemüller wrote:
Dagmar Eidemüller wrote:
Auch die Angleichung der Farbverläufe bereitet Probleme, denn trotz Beginn mit einem neuen Knäuel, stimmt der Farbverläufe nicht überein.Insgesamt ist in dieser Anleitung wohl der Wurm drin , schade , das Modell ist so hübsch !
14.04.2014 - 02:00
![]() Dagmar Eidemüller wrote:
Dagmar Eidemüller wrote:
Auch ich habe so einige Probleme mit diesem Modell. Neben den bereits von anderen gestellten Fragen, wüßte ich auch noch gern, wie man saubere und vor allem auf beiden Seiten gleiche Ränder hinbekommt, Zumal die ja dann die endgültigen Kanten an Ärmel und Vorderreil bilden. Außerdem scheint mir der Garnbedarf in Gr. L zu knapp bemessen zu sein.Nach Stricken eines halben Rückenteils ist das erste Knäuel jeweils fast aufgebraucht.
14.04.2014 - 01:53DROPS Design answered:
Liebe Dagmar, wir werden weitere Hilfsvideos erstellen und die Anleitung wird gerade von unserer Designabteilung mit weiteren Tipps und Erklärungen ergänzt. Danke für Ihre Geduld!
14.04.2014 - 08:42
![]() Knut wrote:
Knut wrote:
Det står som vanligt vid diagrammet längst ner.
10.04.2014 - 18:27
![]() Lone Nielsen wrote:
Lone Nielsen wrote:
Jeg har et spørgsmål om størrelse, hvordan er brystvidden på de forskellige størrelser??
10.04.2014 - 17:49DROPS Design answered:
Hej Lone. Nederst paa mönstret er der et maaleskema med alle maal i cm per str.
11.04.2014 - 09:48
![]() Tilly wrote:
Tilly wrote:
Is de vraag van Rian van 13-3 over het rechterachterpand betreffende het tweede gedeelte na de verkorte toeren al beantwoord?? Ik kom er niet uit. Ik zit na de ribbel met delight aan de verkeerde kant?
07.04.2014 - 17:06DROPS Design answered:
Hoi Tilly. Dat klopt. Je moet de draad afknippen om weer aan het begin van de nld te kunnen beginnen
25.04.2014 - 16:08FANI DEKOULI wrote:
I'm from Greece and i love your yarn & patterns.But is so difficult to understand the instructions especially in some unusual designs,like this one.why you don't translate them in my language too!!! THANK YOU
01.04.2014 - 18:04
![]() Susanne Hedegaard wrote:
Susanne Hedegaard wrote:
Til jeres svar den 28.3: Var det muligt at lave henvisninger i selve opskriften at her er en video. Der er for mig stadig flere videoer som jeg ikke har fundet ud af hvor skal bruges i denne opskrift. Mht. Højre side har jeg nu løst udfordringen ved at bryde begge garner, jåber andre kan bruge dette.
31.03.2014 - 23:00
![]() Marinella wrote:
Marinella wrote:
Sto provando a fare il dietro desto. S no partita dal rovescio con i ferri accorciati. Adesso mi trovo sul rovescio del lavoro coi i due capi della lana tutte e due a destra. Come faccio a lavorare 1 costa? E poi come procedo? Proprio non riesco a capire. Grazie tante e complimenti per il vostro lavoro
31.03.2014 - 18:43
![]() Marinella wrote:
Marinella wrote:
Sto provando a fare il dietro desto. S no partita dal rovescio con i ferri accorciati. Adesso mi trovo sul rovescio del lavoro coi i due capi della lana tutte e due a destra. Come faccio a lavorare 1 costa? E poi come procedo? Proprio non riesco a capire. Grazie tante e complimenti per il vostro lavoro
31.03.2014 - 18:26DROPS Design answered:
Il destro deve essere lavorato al contrario, quindi dovrebbe iniziare i ferri accorciati sul rovescio del lavoro, ma per il resto non cambia niente. Le coste si lavorano sempre con 2 ferri diritti. Se inizia i ferri accorciati sul rov, tutto si sposta solo di 1 ferro. Ha provato a vedere i video anche?
07.04.2014 - 11:55
![]() Fien Van Duin wrote:
Fien Van Duin wrote:
Er wordt gemeld in ribbel dus alles pennen recht breien maar op het patroon is het toch duidelijk tricotsteek 1 pen recht en 1 pen averecht?
29.03.2014 - 16:10DROPS Design answered:
Hoi Fien. Het zijn ribbelsteken - ook op de foto.
31.03.2014 - 17:10
|
||||
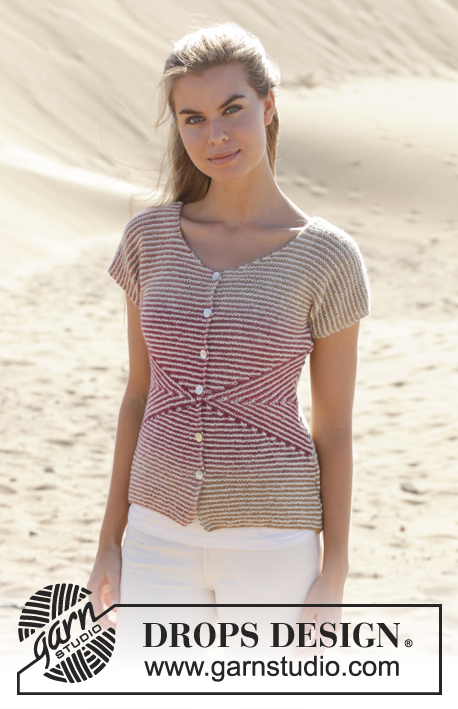
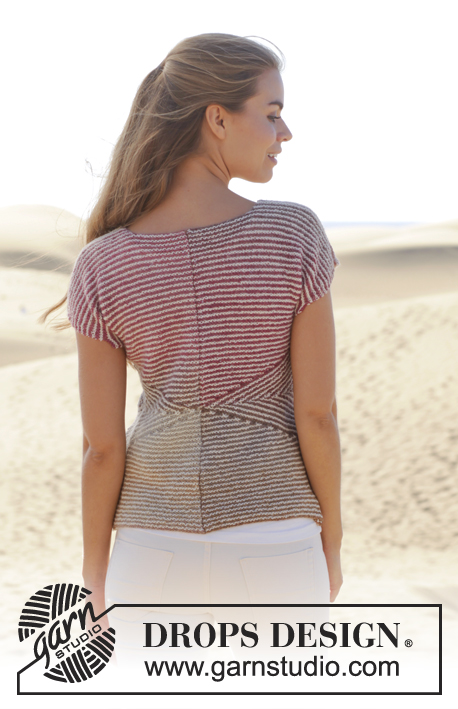
Cross My Heart#crossmyheartjacket |
||||
 |
 |
|||
Knitted DROPS jacket in garter st with short sleeves, short rows and stripes in ”Delight” and ”Alpaca”. Size: S - XXXL.
DROPS 155-1 |
||||
|
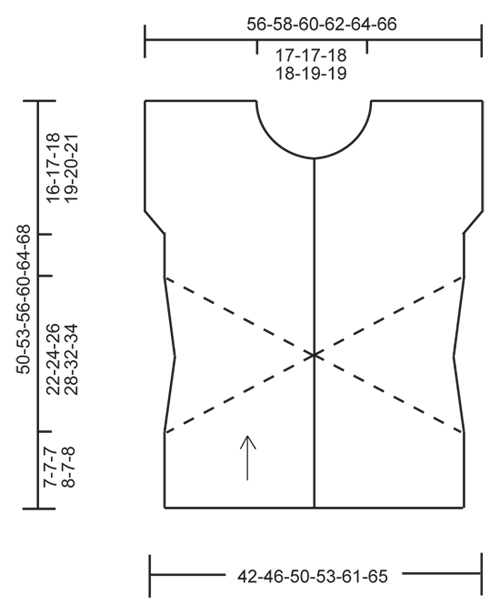
GARTER ST (back and forth on needle): K all rows. 1 ridge = K2 rows. STRIPES: * 1 ridge in GARTER ST - see explanation above - (= 2 rows) Delight, 1 ridge (= 2 rows) Alpaca *, repeat from *-*. NOTE: Make sure that the strands always are on WS of piece. TIP FOR CHANGING YARN: To make the color transitions in Delight pretty when switching ball, it is important to find a ball that starts with the same color last ball ended with. BUTTONHOLES: Dec for buttonholes on right front piece from RS. 1 buttonhole = K tog 3rd and 4th st from mid front, then make 1 YO. Dec for buttonholes when piece measures: SIZE S: 7, 13, 19, 25, 31 and 37 cm / 2¾",5",7½",9¾",12¼" and 14½". SIZE M: 10, 16, 22, 28, 34 and 40 cm / 4",6¼",8¾",11",13½" and 15¾". SIZE L: 7, 14, 21, 28, 35 and 42 cm / 2¾",5½",8¼",11",13¾" and 16½". SIZE XL: 10, 16, 22, 28, 34, 40 and 46 cm / 4",6¼",8¾",11",13½",15¾" ad 18". SIZE XXL: 7, 14, 21, 28, 35, 42 and 49 cm / 2¾",5½",8¼",11",13¾",16½" and 19¼". SIZE XXXL: 11, 18, 25, 32, 39, 46 and 53 cm / 4½",7",9¾",12½",15¼",18" and 21". --------------------------------------------------------- JACKET: Worked in 4 parts, left and right back piece are sewn tog mid back when finished. LEFT BACK PIECE: Worked back and forth on needle. Cast on 44-48-52-56-64-68 sts on circular needle size 4 mm / US 6 with Delight. Work in STRIPES - see explanation above. When piece measures 7-7-7-8-7-8 cm / 2¾"-2¾"-2¾"-3⅛"-2¾"-3⅛", continue with stripes (adjust so that last row is from WS and that next stripe is with Alpaca) AT THE SAME TIME AT THE SAME TIME continue as follows: Section 5 SHORT ROWS: Row 1: Work until 2 st remains, turn piece. Row 2: Work back. Row 3: Work back but do not work the last 4 sts, turn piece. Row 4: Work back. Continue like this by working 2 sts less for every other row until the last 2 sts on row have been worked back and forth. Work one ridge in garter st over all sts. Section 6 READ ALL OF THE FOLLOWING SECTION BEFORE CONTINUING – WORK SHORT ROWS AND DEC AT THE SAME TIME. Row 1: Slip the first 2 sts loosely over on to right needle, pull yarn behind the 2 sts, work the remaining sts on row, turn piece. Row 2: Work back but do not work the last 2 sts, turn piece. Row 3: Slip the first 2 sts loosely over on to right needle, pull yarn behind the 2 sts, work the remaining sts on row, turn piece. Row 4: Work back but do not work the last 4 sts, turn piece. Continue like this with 2 sts less for every other row until 2 sts remain on left needle. DECREASE: Dec at the end of every row from RS with Delight (NOTE: Do not dec on first stripe with Delight in all sizes. In size S and XXL K tog the first 2 sts on last stripe with short rows so that 2 sts remain on row and in size L do not dec on last stripe with Delight) by K tog the last 2 sts until there are 36-40-44-46-52-56 sts on row (= 8-8-8-10-12-12 sts dec). Section 7 READ ALL OF THE FOLLOWING SECTION BEFORE CONTINUING – WORK SHORT ROWS AND INC AT THE SAME TIME. The first 34-38-42-44-50-54 sts are on the right needle. Then work as follows: Row 1: Work 2 sts, turn piece. Row 2: Work back over the 2 sts. Row 3: Slip 2 sts from right needle over on needle, work the 4 sts, turn piece. Row 4: Work back over the 4 sts. Continue like this with 2 sts more for every other row until all sts have been slipped on to same needle and 1 ridge has been worked over all sts. INCREASE: Inc at the end of every row from RS with Delight (NOTE: Inc the same way as dec. Do not inc on first stripe with Delight in all sizes. In size L do not inc on last stripe Delight) by working 2 sts in the last st until there are 44-48-52-56-64-68 sts on needle (= 8-8-8-10-12-12 sts inc). Section 8 Row 1: Work the first 2 sts, turn piece. Row 2: Work back over these 2 sts, turn piece. Row 3: Work the first 4 sts, turn piece. Row 4: Work back over these 4 sts, turn piece. Continue like this with 2 sts more for every other row - repeat until 1 ridge has been worked over all sts. Now work stripes over all sts until finished measurements. Work until piece measures 34-36-38-41-44-47 cm / 13½"-14¼"-15"-16"-17¼"-18½". Then cast on new sts for sleeve at the end of every row from RS in the left side of piece (seen from RS) as follows: Inc 1 st 0-1-2-3-3-1 time, then 2 sts 5-4-3-2-0-0 times. On next row from RS, inc 5-4-3-2-0-0 sts = 59-61-63-65-67-69 sts on needle. NOTE! Shorter measurements in the larger sizes because of wider shoulders. When piece measures 48-51-54-58-62-66 cm / 19"-20"-21¼"-22¾"-24½"-26", bind off for neck at the beg of first row from RS in right side of piece (seen from RS) as follows: bind off 17-17-18-18-19-19 sts = 42-44-45-47-48-50 sts remain on needle, then on next row from RS bind off 1 st = 41-43-44-46-47-49 sts remain on needle. Bind off when piece measures 50-53-56-60-64-68 cm / 19¾"-21"-22"-23½"-25¼"-26¾". RIGHT BACK PIECE: Work as left back piece but reversed. Inc for sleeve in right side of piece (seen from RS). Bind off for neck in left side of piece (seen from RS). Work short rows as follows: Section 1 Row 1: Slip the first 2 sts loosely over on to right needle, pull yarn behind the 2 sts, work the remaining sts on row, turn piece. Row 2: Work back but do not work the last 2 sts, turn piece. Row 3: Slip the first 2 sts loosely over on to right needle, pull yarn behind the 2 sts, work the remaining sts on row, turn piece. Row 4: Work back but do not work the last 4 sts, turn piece. Continue like this by working 2 sts less for every other row until 2 rows have been worked over the last 2 sts. Cut the yarn. Then work 1 ridge over all sts with 1st row = RS. Section 2 READ ALL OF THE FOLLOWING SECTION BEFORE CONTINUING – WORK SHORT ROWS AND DEC AT THE SAME TIME. SHORT ROWS: Row 1: Work until 2 st remains, turn piece. Row 2: Work back. Row 3: Work back but do not work the last 4 sts, turn piece. Row 4: Work back. Continue like this with 2 sts less for every other row until 2 sts remain on right needle. DECREASE: Dec at the beg of every row from RS with Delight (NOTE: Do not dec on first stripe with Delight in all sizes. In size S and XXL K tog the first 2 sts on last stripe with short rows so that 2 sts remain on row and in size L do not dec on last stripe with Delight) by K tog the last 2 sts until there are 36-40-44-46-52-56 sts on row (= 8-8-8-10-12-12 sts dec). Section 3 READ ALL OF THE FOLLOWING SECTION BEFORE CONTINUING – WORK SHORT ROWS AND INC AT THE SAME TIME. SHORT ROWS: Row 1: Work the first 2 sts, turn piece. Row 2: Work back over these 2 sts, turn piece. Row 3: Work the first 4 sts, turn piece. Row 4: Work back over these 4 sts, turn piece. Continue like this with 2 sts more for every other row - repeat until 1 ridge has been worked over all sts. INCREASE: Inc at the beg of every row from RS with Delight (NOTE: Inc the same way as dec. Do not inc on first stripe with Delight in all sizes. In size L do not inc on last stripe Delight) by working 2 sts in the last st until there are 44-48-52-56-64-68 sts on needle (= 8-8-8-10-12-12 sts inc). Cut the yarn. Section 4 The first 34-38-42-44-50-54 sts are on the right needle. Then work as follows: Row 1 (= RS): Work 2 sts, turn piece. Row 2: Work back over the 2 sts. Row 3: Slip 2 sts from right needle over on needle, work the 4 sts, turn piece. Row 4: Work back over the 4 sts. Continue like this with 2 sts more for every other row until all sts have been slipped on to same needle and 1 ridge has been worked over all sts. LEFT FRONT PIECE: Cast on and work as right back piece. When piece measures 38-41-43-47-50-54 cm / 15"-16"-17"-18½"-19¾"-21¼", bind off for neck at beg of every row from WS in left side of piece (seen from RS) as follows: bind off 7 sts 1 time, then 2 sts 3 times, then 1 st 5-5-6-6-7-7 times = 41-43-44-46-47-49 sts remain on needle. AT THE SAME TIME cast on new sts for sleeve as on right back piece. Bind off when piece measures 50-53-56-60-64-68 cm / 19¾"-21"-22"-23½"-25¼"-26¾". RIGHT FRONT PIECE: Cast on and work as left back piece but dec for BUTTONHOLES - see explanation above. When piece measures 38-41-43-47-50-54 cm / 15"-16"-17"-18½"-19¾"-21¼", bind off for neck at beg of every row from RS in right side of piece (seen from RS) as follows: bind off 7 sts 1 time, then 2 sts 3 times, then 1 st 5-5-6-6-7-7 times = 41-43-44-46-47-49 sts remain on needle. AT THE SAME TIME cast on new sts for sleeve as on left back piece. Bind off when piece measures 50-53-56-60-64-68 cm / 19¾"-21"-22"-23½"-25¼"-26¾". ASSEMBLY: Sew right back piece to left back piece. Sew shoulder and side seams. Sew the buttons on to left front piece. |
||||
Diagram explanations |
||||
|
||||
 |
||||
Have you finished this pattern?Tag your pictures with #dropspattern #crossmyheartjacket or submit them to the #dropsfan gallery. Do you need help with this pattern?You'll find 18 tutorial videos, a Comments/Questions area and more by visiting the pattern on garnstudio.com. © 1982-2026 DROPS Design A/S. We reserve all rights. This document, including all its sub-sections, has copyrights. Read more about what you can do with our patterns at the bottom of each pattern on our site. |
||||


With over 40 years in knitting and crochet design, DROPS Design offers one of the most extensive collections of free patterns on the internet - translated to 17 languages. As of today we count 325 catalogs and 12291 patterns - 12281 of which are translated into English (US/in).
We work hard to bring you the best knitting and crochet have to offer, inspiration and advice as well as great quality yarns at incredible prices! Would you like to use our patterns for other than personal use? You can read what you are allowed to do in the Copyright text at the bottom of all our patterns. Happy crafting!
Post a comment to pattern DROPS 155-1
We would love to hear what you have to say about this pattern!
If you want to leave a question, please make sure you select the correct category in the form below, to speed up the answering process. Required fields are marked *.