
Popular categories
Looking for a yarn?


Comments / Questions (352)
Magda wrote:
Hello, Regarding second section of left back piece, size S. I think there are not enough rows from RS in Delight to decrease 9 sts so that 35 sts are left on needle. Am I right or just mistaken in understanding the pattern?
19.01.2014 - 14:02DROPS Design answered:
Dear Magda, dec/inc have been edited - do not hesitate to print the pattern one more time if necessary. Happy knitting!
23.01.2014 - 16:36Ivana wrote:
For M size, how to start 2nd paragraph (after left back piece)? With Alpaca or Delight? And If I have to dec 1 on every Delight row but not 1st and last with Delight and in the same time slip 2 sts more on every row I have situation: 38 slipped sts and 2 remained but only 8 dec so far! What am I missing?
19.01.2014 - 13:51DROPS Design answered:
Dear Ivana, 2nd and 3rd paragraph has been edited, in size M, you have indeed 8 dec/inc. Happy knitting!
23.01.2014 - 16:35
![]() Sandy wrote:
Sandy wrote:
Are both Delight and Alpaca stripes garter stitch? In the colour samples it appears as if Delight are garter ridges and Alpaca is stocking stitch. Thanks!
18.01.2014 - 19:31DROPS Design answered:
Dear Sandy, stripes are worked in garter st as explained in pattern. Happy knitting!
22.01.2014 - 09:33
![]() Johanna wrote:
Johanna wrote:
Gibt es zu diesem Modell auch eine 10x10cm Angabe einer Strickprobe der verwendeten Wolle, damit auch andere Wolle/Farben ihrer Firma verwendet werden können?
17.01.2014 - 13:57DROPS Design answered:
Liebe Johanna, Sie finden diese Angabe oben unter "Material": 21 M x 40 R kraus rechts = 10 x 10 cm.
17.01.2014 - 15:27
![]() Lia wrote:
Lia wrote:
Waarom moet ik een rondbreinaald gebruiken, de panden worden toch apart gebreid
16.01.2014 - 16:22DROPS Design answered:
Hoi Lia. Je kan veel meer steken kwijt op een rondbreinaald en in Scandinavië (dit zijn van oorsprong Noorse patronen) wordt eigenlijk altijd op rondbreinld gebreid. Maar je kan hier ook gewoon rechte naalden gebruiken.
17.01.2014 - 17:10
![]() Alicja wrote:
Alicja wrote:
Wydaje mi się, że bluzeczka nie jest robiona ściegiem francuskim (wszystkie rzędy na prawo) a prawe oczka na prawej stronie i lewe oczka na lewej stronie.
16.01.2014 - 11:48DROPS Design answered:
Witam, na sweterku widzę ścieg francuki, w opisie do wzoru również. Tylko ta próbka kolorystyczna jest dżersejem, co może być faktycznie mylące. Pozdrawiam
16.01.2014 - 12:13
![]() Helle wrote:
Helle wrote:
Når jeg ser på billedet af farveforslagene, ser det ud som om alpacastriberne er strikket glat, men i opskriften står retstrikning?
16.01.2014 - 07:47DROPS Design answered:
Hej Helle. Du skal strikke striberne (ogsaa Alpaca) i ret.
16.01.2014 - 10:49
![]() Ina wrote:
Ina wrote:
Mir kommt Nagelstärke 4 etwas dick vor. Und das wird nicht zu "lappig" ?
15.01.2014 - 20:43DROPS Design answered:
Liebe Ina, die Nadelstärke müssen Sie so anpassen, dass Sie die Maschenprobe von 21 M x 40 R in kraus rechts erhalten, Wenn Sie locker stricken, kann es gut sein, dass Sie eine kleinere Nadel benötigen.
16.01.2014 - 08:47
![]() Truus wrote:
Truus wrote:
Erg mooi, is het een moeilijkpatroon om te breien?
15.01.2014 - 18:43
![]() Karin wrote:
Karin wrote:
Delight & Alpaca på stickor 4 mm? Det måste blir väldigt löst och sladdrigt. Vad synd på en så fin modell...
15.01.2014 - 13:09DROPS Design answered:
Hej Karin. Det er skam korrekt. Du skal bruge pind nummer 4 eller den pind du har brug for at faa den rette stickfasthet til dette mönster. Det bliver rigtig fint saadan :-)
15.01.2014 - 14:37
|
||||
Cross My Heart#crossmyheartjacket |
||||
 |
 |
|||
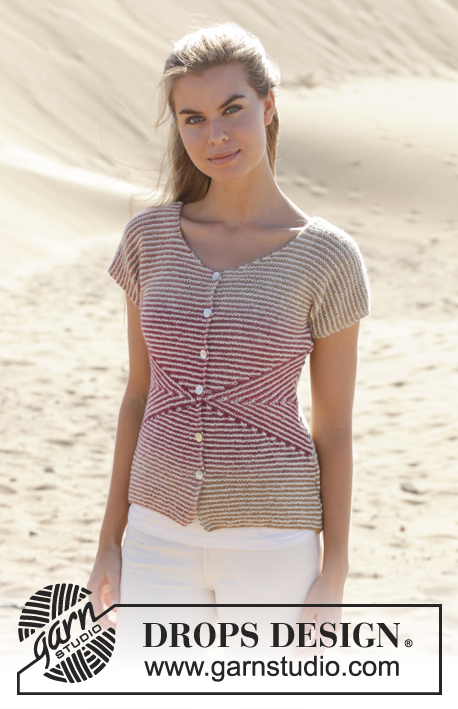
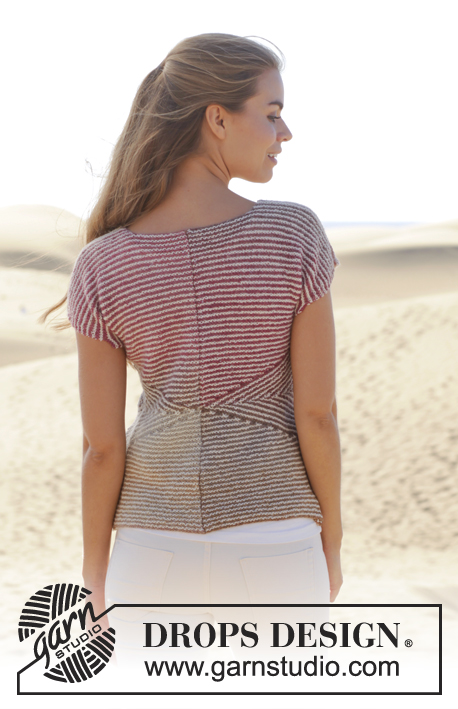
Knitted DROPS jacket in garter st with short sleeves, short rows and stripes in ”Delight” and ”Alpaca”. Size: S - XXXL.
DROPS 155-1 |
||||
|
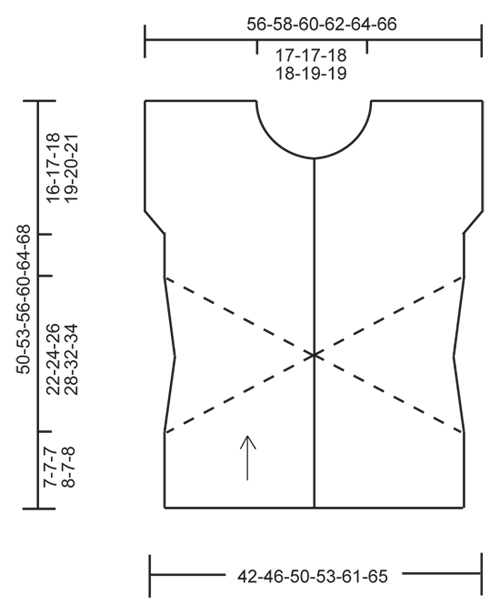
GARTER ST (back and forth on needle): K all rows. 1 ridge = K2 rows. STRIPES: * 1 ridge in GARTER ST - see explanation above - (= 2 rows) Delight, 1 ridge (= 2 rows) Alpaca *, repeat from *-*. NOTE: Make sure that the strands always are on WS of piece. TIP FOR CHANGING YARN: To make the color transitions in Delight pretty when switching ball, it is important to find a ball that starts with the same color last ball ended with. BUTTONHOLES: Dec for buttonholes on right front piece from RS. 1 buttonhole = K tog 3rd and 4th st from mid front, then make 1 YO. Dec for buttonholes when piece measures: SIZE S: 7, 13, 19, 25, 31 and 37 cm / 2¾",5",7½",9¾",12¼" and 14½". SIZE M: 10, 16, 22, 28, 34 and 40 cm / 4",6¼",8¾",11",13½" and 15¾". SIZE L: 7, 14, 21, 28, 35 and 42 cm / 2¾",5½",8¼",11",13¾" and 16½". SIZE XL: 10, 16, 22, 28, 34, 40 and 46 cm / 4",6¼",8¾",11",13½",15¾" ad 18". SIZE XXL: 7, 14, 21, 28, 35, 42 and 49 cm / 2¾",5½",8¼",11",13¾",16½" and 19¼". SIZE XXXL: 11, 18, 25, 32, 39, 46 and 53 cm / 4½",7",9¾",12½",15¼",18" and 21". --------------------------------------------------------- JACKET: Worked in 4 parts, left and right back piece are sewn tog mid back when finished. LEFT BACK PIECE: Worked back and forth on needle. Cast on 44-48-52-56-64-68 sts on circular needle size 4 mm / US 6 with Delight. Work in STRIPES - see explanation above. When piece measures 7-7-7-8-7-8 cm / 2¾"-2¾"-2¾"-3⅛"-2¾"-3⅛", continue with stripes (adjust so that last row is from WS and that next stripe is with Alpaca) AT THE SAME TIME AT THE SAME TIME continue as follows: Section 5 SHORT ROWS: Row 1: Work until 2 st remains, turn piece. Row 2: Work back. Row 3: Work back but do not work the last 4 sts, turn piece. Row 4: Work back. Continue like this by working 2 sts less for every other row until the last 2 sts on row have been worked back and forth. Work one ridge in garter st over all sts. Section 6 READ ALL OF THE FOLLOWING SECTION BEFORE CONTINUING – WORK SHORT ROWS AND DEC AT THE SAME TIME. Row 1: Slip the first 2 sts loosely over on to right needle, pull yarn behind the 2 sts, work the remaining sts on row, turn piece. Row 2: Work back but do not work the last 2 sts, turn piece. Row 3: Slip the first 2 sts loosely over on to right needle, pull yarn behind the 2 sts, work the remaining sts on row, turn piece. Row 4: Work back but do not work the last 4 sts, turn piece. Continue like this with 2 sts less for every other row until 2 sts remain on left needle. DECREASE: Dec at the end of every row from RS with Delight (NOTE: Do not dec on first stripe with Delight in all sizes. In size S and XXL K tog the first 2 sts on last stripe with short rows so that 2 sts remain on row and in size L do not dec on last stripe with Delight) by K tog the last 2 sts until there are 36-40-44-46-52-56 sts on row (= 8-8-8-10-12-12 sts dec). Section 7 READ ALL OF THE FOLLOWING SECTION BEFORE CONTINUING – WORK SHORT ROWS AND INC AT THE SAME TIME. The first 34-38-42-44-50-54 sts are on the right needle. Then work as follows: Row 1: Work 2 sts, turn piece. Row 2: Work back over the 2 sts. Row 3: Slip 2 sts from right needle over on needle, work the 4 sts, turn piece. Row 4: Work back over the 4 sts. Continue like this with 2 sts more for every other row until all sts have been slipped on to same needle and 1 ridge has been worked over all sts. INCREASE: Inc at the end of every row from RS with Delight (NOTE: Inc the same way as dec. Do not inc on first stripe with Delight in all sizes. In size L do not inc on last stripe Delight) by working 2 sts in the last st until there are 44-48-52-56-64-68 sts on needle (= 8-8-8-10-12-12 sts inc). Section 8 Row 1: Work the first 2 sts, turn piece. Row 2: Work back over these 2 sts, turn piece. Row 3: Work the first 4 sts, turn piece. Row 4: Work back over these 4 sts, turn piece. Continue like this with 2 sts more for every other row - repeat until 1 ridge has been worked over all sts. Now work stripes over all sts until finished measurements. Work until piece measures 34-36-38-41-44-47 cm / 13½"-14¼"-15"-16"-17¼"-18½". Then cast on new sts for sleeve at the end of every row from RS in the left side of piece (seen from RS) as follows: Inc 1 st 0-1-2-3-3-1 time, then 2 sts 5-4-3-2-0-0 times. On next row from RS, inc 5-4-3-2-0-0 sts = 59-61-63-65-67-69 sts on needle. NOTE! Shorter measurements in the larger sizes because of wider shoulders. When piece measures 48-51-54-58-62-66 cm / 19"-20"-21¼"-22¾"-24½"-26", bind off for neck at the beg of first row from RS in right side of piece (seen from RS) as follows: bind off 17-17-18-18-19-19 sts = 42-44-45-47-48-50 sts remain on needle, then on next row from RS bind off 1 st = 41-43-44-46-47-49 sts remain on needle. Bind off when piece measures 50-53-56-60-64-68 cm / 19¾"-21"-22"-23½"-25¼"-26¾". RIGHT BACK PIECE: Work as left back piece but reversed. Inc for sleeve in right side of piece (seen from RS). Bind off for neck in left side of piece (seen from RS). Work short rows as follows: Section 1 Row 1: Slip the first 2 sts loosely over on to right needle, pull yarn behind the 2 sts, work the remaining sts on row, turn piece. Row 2: Work back but do not work the last 2 sts, turn piece. Row 3: Slip the first 2 sts loosely over on to right needle, pull yarn behind the 2 sts, work the remaining sts on row, turn piece. Row 4: Work back but do not work the last 4 sts, turn piece. Continue like this by working 2 sts less for every other row until 2 rows have been worked over the last 2 sts. Cut the yarn. Then work 1 ridge over all sts with 1st row = RS. Section 2 READ ALL OF THE FOLLOWING SECTION BEFORE CONTINUING – WORK SHORT ROWS AND DEC AT THE SAME TIME. SHORT ROWS: Row 1: Work until 2 st remains, turn piece. Row 2: Work back. Row 3: Work back but do not work the last 4 sts, turn piece. Row 4: Work back. Continue like this with 2 sts less for every other row until 2 sts remain on right needle. DECREASE: Dec at the beg of every row from RS with Delight (NOTE: Do not dec on first stripe with Delight in all sizes. In size S and XXL K tog the first 2 sts on last stripe with short rows so that 2 sts remain on row and in size L do not dec on last stripe with Delight) by K tog the last 2 sts until there are 36-40-44-46-52-56 sts on row (= 8-8-8-10-12-12 sts dec). Section 3 READ ALL OF THE FOLLOWING SECTION BEFORE CONTINUING – WORK SHORT ROWS AND INC AT THE SAME TIME. SHORT ROWS: Row 1: Work the first 2 sts, turn piece. Row 2: Work back over these 2 sts, turn piece. Row 3: Work the first 4 sts, turn piece. Row 4: Work back over these 4 sts, turn piece. Continue like this with 2 sts more for every other row - repeat until 1 ridge has been worked over all sts. INCREASE: Inc at the beg of every row from RS with Delight (NOTE: Inc the same way as dec. Do not inc on first stripe with Delight in all sizes. In size L do not inc on last stripe Delight) by working 2 sts in the last st until there are 44-48-52-56-64-68 sts on needle (= 8-8-8-10-12-12 sts inc). Cut the yarn. Section 4 The first 34-38-42-44-50-54 sts are on the right needle. Then work as follows: Row 1 (= RS): Work 2 sts, turn piece. Row 2: Work back over the 2 sts. Row 3: Slip 2 sts from right needle over on needle, work the 4 sts, turn piece. Row 4: Work back over the 4 sts. Continue like this with 2 sts more for every other row until all sts have been slipped on to same needle and 1 ridge has been worked over all sts. LEFT FRONT PIECE: Cast on and work as right back piece. When piece measures 38-41-43-47-50-54 cm / 15"-16"-17"-18½"-19¾"-21¼", bind off for neck at beg of every row from WS in left side of piece (seen from RS) as follows: bind off 7 sts 1 time, then 2 sts 3 times, then 1 st 5-5-6-6-7-7 times = 41-43-44-46-47-49 sts remain on needle. AT THE SAME TIME cast on new sts for sleeve as on right back piece. Bind off when piece measures 50-53-56-60-64-68 cm / 19¾"-21"-22"-23½"-25¼"-26¾". RIGHT FRONT PIECE: Cast on and work as left back piece but dec for BUTTONHOLES - see explanation above. When piece measures 38-41-43-47-50-54 cm / 15"-16"-17"-18½"-19¾"-21¼", bind off for neck at beg of every row from RS in right side of piece (seen from RS) as follows: bind off 7 sts 1 time, then 2 sts 3 times, then 1 st 5-5-6-6-7-7 times = 41-43-44-46-47-49 sts remain on needle. AT THE SAME TIME cast on new sts for sleeve as on left back piece. Bind off when piece measures 50-53-56-60-64-68 cm / 19¾"-21"-22"-23½"-25¼"-26¾". ASSEMBLY: Sew right back piece to left back piece. Sew shoulder and side seams. Sew the buttons on to left front piece. |
||||
Diagram explanations |
||||
|
||||
 |
||||
Have you finished this pattern?Tag your pictures with #dropspattern #crossmyheartjacket or submit them to the #dropsfan gallery. Do you need help with this pattern?You'll find 18 tutorial videos, a Comments/Questions area and more by visiting the pattern on garnstudio.com. © 1982-2026 DROPS Design A/S. We reserve all rights. This document, including all its sub-sections, has copyrights. Read more about what you can do with our patterns at the bottom of each pattern on our site. |
||||


With over 40 years in knitting and crochet design, DROPS Design offers one of the most extensive collections of free patterns on the internet - translated to 17 languages. As of today we count 325 catalogs and 12291 patterns - 12281 of which are translated into English (US/in).
We work hard to bring you the best knitting and crochet have to offer, inspiration and advice as well as great quality yarns at incredible prices! Would you like to use our patterns for other than personal use? You can read what you are allowed to do in the Copyright text at the bottom of all our patterns. Happy crafting!
Post a comment to pattern DROPS 155-1
We would love to hear what you have to say about this pattern!
If you want to leave a question, please make sure you select the correct category in the form below, to speed up the answering process. Required fields are marked *.