
Popular categories
Looking for a yarn?


Comments / Questions (352)
![]() Anne Hansen wrote:
Anne Hansen wrote:
Skuffende at I ikke svarer på spørgsmål! Øv, altså.
05.03.2014 - 11:56DROPS Design answered:
Hej Annie. Jeg svarer skam (se övrige spörgsmaal). Men den her tager lige lidt tid, da vi lige skal have undersögt et par ting her, men jeg skal reagere naar det er ordnet. Tak for din taalmodighed ;-)
05.03.2014 - 12:14
![]() Esther Illek wrote:
Esther Illek wrote:
Mir ist nicht ganz klar, auf was sich in der Skizze mit den Abmessungen die untere Breitenangabe bezieht, da die "Striche" weder zur Hüfte noch zur Taille passen.
02.03.2014 - 15:19
![]() Anne Hansen wrote:
Anne Hansen wrote:
Jeg har kigget beskeder for at se om jeg kunne finde en forklaring på, hvordan jeg kommer videre på højre rygstykke. 1. afsnit er klaret. Men for at lave en delight rille, skal tråden over i højre side. Hvordan kommer den det? Eller er der noget, jeg har misforstået?
28.02.2014 - 19:05DROPS Design answered:
Hej Anne. Du skal klippe trådene. Vi har uddybet beskrivelsen per dd. God fornøjelse
29.04.2014 - 20:21
![]() Jude wrote:
Jude wrote:
Sorry maybe i wasnt clear. I have slipped from left to right and have my 40 sts (2nd size). Now how do i work the sts from right to left please?
28.02.2014 - 17:02DROPS Design answered:
Dear Jude, sorry for misunderstanding, could you please give us more details. Do not forget to check our videos to this pattern. Happy knitting!
04.03.2014 - 10:21
![]() Jude wrote:
Jude wrote:
I am really struggling to understand how to work over the stitches from slipping from right hand needle to left. Am i alternating the colours or knitting them in the same colour? Please could you explain this more fully? I maybe slightly dylexic! Thanks.
28.02.2014 - 14:01DROPS Design answered:
Dear Jude, on 3rd paragraph for left back piece, from RS, slip the first 2 sts from left needle to right needle, and work all sts in garter st as before, with stripes (so change colour every other row = every row from RS), ie you will knit 2 sts less every row from RS. Happy knitting!
28.02.2014 - 14:54
![]() Ingrid wrote:
Ingrid wrote:
Nydelig modell. Vil det bli pent om jeg striker denne i cotton viscose og safran, eller er garnene for glatte i dette tilfellet?
27.02.2014 - 13:25DROPS Design answered:
Hej Ingrid. Jeg tror sagtens du kan lave en kombination af Cotton Viscose og Safran, men den bliver noget tungere end "uld-versionen". Men tag en snak i din DROPS butik og vaelg dine farver. God fornöjelse med den!
27.02.2014 - 16:09
![]() Kerstin wrote:
Kerstin wrote:
Hallo Drops, bitte schickt mir eine Anleitung für Drops 155-1, Modell Nr. de-117. Ich weiß nicht, wie ich das rechte Rückenteil spiegelverkehrt stricken soll. Wo sind da die verkürzten Reihen bei der Rückreihe? Ich habe schon im Lanade-Geschäft in Stralsund angerufen, leider konnte die Frau mir nicht helfen und hat mir geraten, bei Ihnen anzufragen.
27.02.2014 - 09:30DROPS Design answered:
Liebe Kerstin, unser Video-Team erstellt gerade mehrere Tutorialvideos zu diesem Modell.
28.02.2014 - 09:23
![]() Rian wrote:
Rian wrote:
Ik ben met het rechterachterpand bezig na de eerste set van de verkortte toeren. Ik kan nu niet aan de goede kant beginnen met 1 ribbel Delight over alle steken. Hoe los ik dat op?
25.02.2014 - 23:35DROPS Design answered:
Hoi Rian. Je moet de draad afknippen en weer beginnen aan het begin van de nld met de ribbel.
17.03.2014 - 16:58
![]() Karianne wrote:
Karianne wrote:
Hvordan strikker man høyre bakstykke? (Og etterhvert venstre forstykke) Klipper man tråden etter den første delen slik Birgitte spør om, så vil jo det bli 2 rette pinner, og dermed ikke riller. Foreløpig har jeg prøvd meg med å flytte 2 og 2 masker over slik som på andre del av venstre forstykke, jeg klippet tråden etter avsnittet, og fortsetter med forkortede pinner. Vet ikke om resultatet blir helt likt, men håper at det vil fungere. Kan dere utdype den "speilvendte" delen av oppskriften?
23.02.2014 - 18:47DROPS Design answered:
Hei Karianne + övrige her paa bloggen. Vi forstaar jeres problem og vi vender tilbage med svar saa hurtigt vi kan. Tak for jeres taalmodighed ;-)
05.03.2014 - 16:19Juana Canales Chavez wrote:
Una obra de arte preciosa blusa. Muchas gracias por esto
23.02.2014 - 00:56
|
||||
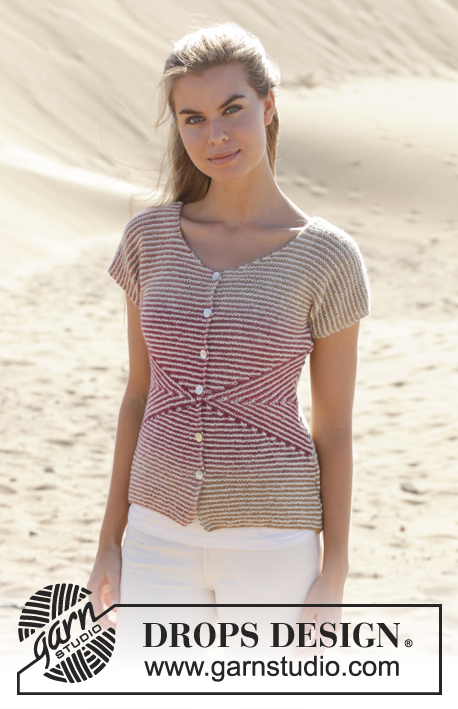
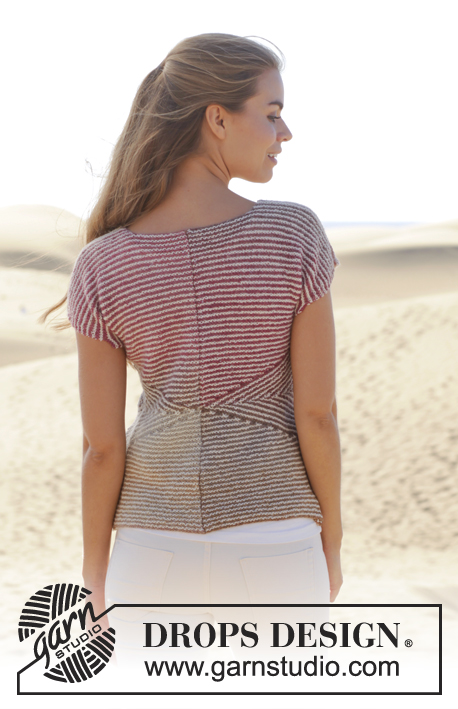
Cross My Heart#crossmyheartjacket |
||||
 |
 |
|||
Knitted DROPS jacket in garter st with short sleeves, short rows and stripes in ”Delight” and ”Alpaca”. Size: S - XXXL.
DROPS 155-1 |
||||
|
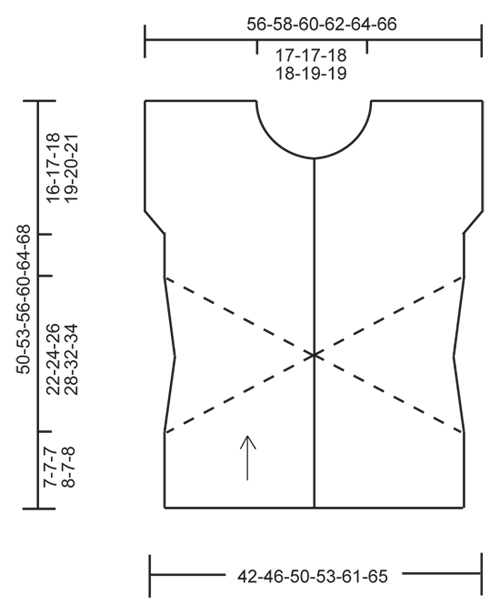
GARTER ST (back and forth on needle): K all rows. 1 ridge = K2 rows. STRIPES: * 1 ridge in GARTER ST - see explanation above - (= 2 rows) Delight, 1 ridge (= 2 rows) Alpaca *, repeat from *-*. NOTE: Make sure that the strands always are on WS of piece. TIP FOR CHANGING YARN: To make the color transitions in Delight pretty when switching ball, it is important to find a ball that starts with the same color last ball ended with. BUTTONHOLES: Dec for buttonholes on right front piece from RS. 1 buttonhole = K tog 3rd and 4th st from mid front, then make 1 YO. Dec for buttonholes when piece measures: SIZE S: 7, 13, 19, 25, 31 and 37 cm / 2¾",5",7½",9¾",12¼" and 14½". SIZE M: 10, 16, 22, 28, 34 and 40 cm / 4",6¼",8¾",11",13½" and 15¾". SIZE L: 7, 14, 21, 28, 35 and 42 cm / 2¾",5½",8¼",11",13¾" and 16½". SIZE XL: 10, 16, 22, 28, 34, 40 and 46 cm / 4",6¼",8¾",11",13½",15¾" ad 18". SIZE XXL: 7, 14, 21, 28, 35, 42 and 49 cm / 2¾",5½",8¼",11",13¾",16½" and 19¼". SIZE XXXL: 11, 18, 25, 32, 39, 46 and 53 cm / 4½",7",9¾",12½",15¼",18" and 21". --------------------------------------------------------- JACKET: Worked in 4 parts, left and right back piece are sewn tog mid back when finished. LEFT BACK PIECE: Worked back and forth on needle. Cast on 44-48-52-56-64-68 sts on circular needle size 4 mm / US 6 with Delight. Work in STRIPES - see explanation above. When piece measures 7-7-7-8-7-8 cm / 2¾"-2¾"-2¾"-3⅛"-2¾"-3⅛", continue with stripes (adjust so that last row is from WS and that next stripe is with Alpaca) AT THE SAME TIME AT THE SAME TIME continue as follows: Section 5 SHORT ROWS: Row 1: Work until 2 st remains, turn piece. Row 2: Work back. Row 3: Work back but do not work the last 4 sts, turn piece. Row 4: Work back. Continue like this by working 2 sts less for every other row until the last 2 sts on row have been worked back and forth. Work one ridge in garter st over all sts. Section 6 READ ALL OF THE FOLLOWING SECTION BEFORE CONTINUING – WORK SHORT ROWS AND DEC AT THE SAME TIME. Row 1: Slip the first 2 sts loosely over on to right needle, pull yarn behind the 2 sts, work the remaining sts on row, turn piece. Row 2: Work back but do not work the last 2 sts, turn piece. Row 3: Slip the first 2 sts loosely over on to right needle, pull yarn behind the 2 sts, work the remaining sts on row, turn piece. Row 4: Work back but do not work the last 4 sts, turn piece. Continue like this with 2 sts less for every other row until 2 sts remain on left needle. DECREASE: Dec at the end of every row from RS with Delight (NOTE: Do not dec on first stripe with Delight in all sizes. In size S and XXL K tog the first 2 sts on last stripe with short rows so that 2 sts remain on row and in size L do not dec on last stripe with Delight) by K tog the last 2 sts until there are 36-40-44-46-52-56 sts on row (= 8-8-8-10-12-12 sts dec). Section 7 READ ALL OF THE FOLLOWING SECTION BEFORE CONTINUING – WORK SHORT ROWS AND INC AT THE SAME TIME. The first 34-38-42-44-50-54 sts are on the right needle. Then work as follows: Row 1: Work 2 sts, turn piece. Row 2: Work back over the 2 sts. Row 3: Slip 2 sts from right needle over on needle, work the 4 sts, turn piece. Row 4: Work back over the 4 sts. Continue like this with 2 sts more for every other row until all sts have been slipped on to same needle and 1 ridge has been worked over all sts. INCREASE: Inc at the end of every row from RS with Delight (NOTE: Inc the same way as dec. Do not inc on first stripe with Delight in all sizes. In size L do not inc on last stripe Delight) by working 2 sts in the last st until there are 44-48-52-56-64-68 sts on needle (= 8-8-8-10-12-12 sts inc). Section 8 Row 1: Work the first 2 sts, turn piece. Row 2: Work back over these 2 sts, turn piece. Row 3: Work the first 4 sts, turn piece. Row 4: Work back over these 4 sts, turn piece. Continue like this with 2 sts more for every other row - repeat until 1 ridge has been worked over all sts. Now work stripes over all sts until finished measurements. Work until piece measures 34-36-38-41-44-47 cm / 13½"-14¼"-15"-16"-17¼"-18½". Then cast on new sts for sleeve at the end of every row from RS in the left side of piece (seen from RS) as follows: Inc 1 st 0-1-2-3-3-1 time, then 2 sts 5-4-3-2-0-0 times. On next row from RS, inc 5-4-3-2-0-0 sts = 59-61-63-65-67-69 sts on needle. NOTE! Shorter measurements in the larger sizes because of wider shoulders. When piece measures 48-51-54-58-62-66 cm / 19"-20"-21¼"-22¾"-24½"-26", bind off for neck at the beg of first row from RS in right side of piece (seen from RS) as follows: bind off 17-17-18-18-19-19 sts = 42-44-45-47-48-50 sts remain on needle, then on next row from RS bind off 1 st = 41-43-44-46-47-49 sts remain on needle. Bind off when piece measures 50-53-56-60-64-68 cm / 19¾"-21"-22"-23½"-25¼"-26¾". RIGHT BACK PIECE: Work as left back piece but reversed. Inc for sleeve in right side of piece (seen from RS). Bind off for neck in left side of piece (seen from RS). Work short rows as follows: Section 1 Row 1: Slip the first 2 sts loosely over on to right needle, pull yarn behind the 2 sts, work the remaining sts on row, turn piece. Row 2: Work back but do not work the last 2 sts, turn piece. Row 3: Slip the first 2 sts loosely over on to right needle, pull yarn behind the 2 sts, work the remaining sts on row, turn piece. Row 4: Work back but do not work the last 4 sts, turn piece. Continue like this by working 2 sts less for every other row until 2 rows have been worked over the last 2 sts. Cut the yarn. Then work 1 ridge over all sts with 1st row = RS. Section 2 READ ALL OF THE FOLLOWING SECTION BEFORE CONTINUING – WORK SHORT ROWS AND DEC AT THE SAME TIME. SHORT ROWS: Row 1: Work until 2 st remains, turn piece. Row 2: Work back. Row 3: Work back but do not work the last 4 sts, turn piece. Row 4: Work back. Continue like this with 2 sts less for every other row until 2 sts remain on right needle. DECREASE: Dec at the beg of every row from RS with Delight (NOTE: Do not dec on first stripe with Delight in all sizes. In size S and XXL K tog the first 2 sts on last stripe with short rows so that 2 sts remain on row and in size L do not dec on last stripe with Delight) by K tog the last 2 sts until there are 36-40-44-46-52-56 sts on row (= 8-8-8-10-12-12 sts dec). Section 3 READ ALL OF THE FOLLOWING SECTION BEFORE CONTINUING – WORK SHORT ROWS AND INC AT THE SAME TIME. SHORT ROWS: Row 1: Work the first 2 sts, turn piece. Row 2: Work back over these 2 sts, turn piece. Row 3: Work the first 4 sts, turn piece. Row 4: Work back over these 4 sts, turn piece. Continue like this with 2 sts more for every other row - repeat until 1 ridge has been worked over all sts. INCREASE: Inc at the beg of every row from RS with Delight (NOTE: Inc the same way as dec. Do not inc on first stripe with Delight in all sizes. In size L do not inc on last stripe Delight) by working 2 sts in the last st until there are 44-48-52-56-64-68 sts on needle (= 8-8-8-10-12-12 sts inc). Cut the yarn. Section 4 The first 34-38-42-44-50-54 sts are on the right needle. Then work as follows: Row 1 (= RS): Work 2 sts, turn piece. Row 2: Work back over the 2 sts. Row 3: Slip 2 sts from right needle over on needle, work the 4 sts, turn piece. Row 4: Work back over the 4 sts. Continue like this with 2 sts more for every other row until all sts have been slipped on to same needle and 1 ridge has been worked over all sts. LEFT FRONT PIECE: Cast on and work as right back piece. When piece measures 38-41-43-47-50-54 cm / 15"-16"-17"-18½"-19¾"-21¼", bind off for neck at beg of every row from WS in left side of piece (seen from RS) as follows: bind off 7 sts 1 time, then 2 sts 3 times, then 1 st 5-5-6-6-7-7 times = 41-43-44-46-47-49 sts remain on needle. AT THE SAME TIME cast on new sts for sleeve as on right back piece. Bind off when piece measures 50-53-56-60-64-68 cm / 19¾"-21"-22"-23½"-25¼"-26¾". RIGHT FRONT PIECE: Cast on and work as left back piece but dec for BUTTONHOLES - see explanation above. When piece measures 38-41-43-47-50-54 cm / 15"-16"-17"-18½"-19¾"-21¼", bind off for neck at beg of every row from RS in right side of piece (seen from RS) as follows: bind off 7 sts 1 time, then 2 sts 3 times, then 1 st 5-5-6-6-7-7 times = 41-43-44-46-47-49 sts remain on needle. AT THE SAME TIME cast on new sts for sleeve as on left back piece. Bind off when piece measures 50-53-56-60-64-68 cm / 19¾"-21"-22"-23½"-25¼"-26¾". ASSEMBLY: Sew right back piece to left back piece. Sew shoulder and side seams. Sew the buttons on to left front piece. |
||||
Diagram explanations |
||||
|
||||
 |
||||
Have you finished this pattern?Tag your pictures with #dropspattern #crossmyheartjacket or submit them to the #dropsfan gallery. Do you need help with this pattern?You'll find 18 tutorial videos, a Comments/Questions area and more by visiting the pattern on garnstudio.com. © 1982-2026 DROPS Design A/S. We reserve all rights. This document, including all its sub-sections, has copyrights. Read more about what you can do with our patterns at the bottom of each pattern on our site. |
||||


With over 40 years in knitting and crochet design, DROPS Design offers one of the most extensive collections of free patterns on the internet - translated to 17 languages. As of today we count 325 catalogs and 12291 patterns - 12281 of which are translated into English (US/in).
We work hard to bring you the best knitting and crochet have to offer, inspiration and advice as well as great quality yarns at incredible prices! Would you like to use our patterns for other than personal use? You can read what you are allowed to do in the Copyright text at the bottom of all our patterns. Happy crafting!
Post a comment to pattern DROPS 155-1
We would love to hear what you have to say about this pattern!
If you want to leave a question, please make sure you select the correct category in the form below, to speed up the answering process. Required fields are marked *.