
Popular categories
Looking for a yarn?


Comments / Questions (62)
![]() EVA wrote:
EVA wrote:
Var finns diagrammet A1? Förklaring till diagrammet finns men inte själva diagrammet.
13.09.2024 - 18:28DROPS Design answered:
Hei Eva. Diagrammet ligger under ermet på målskissen. Består av 2 masker i bredden og 4 masker i høyden. mvh DROPS Design
16.09.2024 - 13:46
![]() Monica Dulfer wrote:
Monica Dulfer wrote:
Waar vind ik het telpatroon A1?
28.01.2024 - 02:35DROPS Design answered:
Dag Monica,
Deze vindt je rechts onder de maattekening, onderaan het patroon. (Zit inderdaad een beetje verstopt :)
28.01.2024 - 18:32
![]() Sandra Damnotti wrote:
Sandra Damnotti wrote:
Ho difficoltà a leggere il diagramma che descrive il punto
30.03.2023 - 22:44DROPS Design answered:
Buonasera Sandra, in quale punto riscontra difficoltà? Buon lavoro!
03.04.2023 - 22:33
![]() Lucia wrote:
Lucia wrote:
Buongiorno , alternando la lavorazione a legaccio con il punto traforato non bisognerebbe variare il numero delle maglie (come indicato ad esempio nel vostro modello Sunny Stride)? La parte lavorata a punto traforato rimane più larga a parità di numero di maglie. Grazie.
16.11.2022 - 15:35DROPS Design answered:
Buonasera Lucia, durante la lavorazione del motivo il numero di maglie rimane costante. Buon lavoro!
24.11.2022 - 22:36
![]() Dirk Spiegelhoff wrote:
Dirk Spiegelhoff wrote:
Wie wird denn die Schulter gestrickt? Kraus rechts oder im Muster? Danke vorweg für die Antwort
19.08.2022 - 20:50
![]() Karin wrote:
Karin wrote:
I do no understand the A1 pattern. I see the drawing but still dont understand . Is the front row knit 2 tigether pass stitch over and the back row garte could you please explain the two pattern rows . Thank you so much
17.11.2021 - 15:52DROPS Design answered:
Dear Karin, this video shows from time code 06:30 (diagram A.4 in the video) how to work this lace pattern. It should help you to understand how to knit. Let us know if you still have questions. Happy knitting!
17.11.2021 - 16:51
![]() Conny Holm wrote:
Conny Holm wrote:
Diagram: I teksten til diagrammet angives en symbolforklaring: "= slå om mellem 2 m", men jeg kan ikke se symbolet i det lille diagram under ærmet?
22.12.2020 - 13:20DROPS Design answered:
Hej Conny, jo omslaget laver du før de 2 masker som strikkes sammen på første pind og efter de 2 masker som strikkes sammen på 3.pind. God fornøjelse!
22.12.2020 - 14:28
![]() Ing-Marie wrote:
Ing-Marie wrote:
Hej Måste man använda rundsticka och varför ska man göra det när bakstycke och framstycke ska sys ihop
09.10.2018 - 16:21DROPS Design answered:
Hej, denna modell kan du självklart även sticka på parstickor. Observera att halskanten ska stickas runt.
09.10.2018 - 18:09
![]() Fran Hoffman wrote:
Fran Hoffman wrote:
Where are the diagrams for the pattern?
03.07.2018 - 19:58DROPS Design answered:
Dear Fran, this pattern is not very difficult, so the diagram is just small - see it on right side of schematic drawing of pulover below the written pattern. Happy knitting!
03.07.2018 - 21:20
![]() Marie-Lise wrote:
Marie-Lise wrote:
Bonjour, j'ai rabattu mes mailles dans le dos pour les manches et j'ai 70 mailles donc quand je recommence le point fantaisie a-1 avec mes 2 mailles lisières j'ai donc 68 mailles et cela n'arrive pas à la fin du rang comment je fais pour que mon motif arrive Merci
24.10.2017 - 04:26DROPS Design answered:
Bonjour Marie-Lise, A.1 se tricote sur 2 mailles, tricotez ainsi vos 70 m: 1 m lisière au point mousse, répétez A.1 jusqu'à ce qu'il reste 1 m et terminez par 1 m lisière au point mousse. Bon tricot!
24.10.2017 - 08:52
|
|||||||||||||
Everyday#everydaysweater |
|||||||||||||
 |
 |
||||||||||||
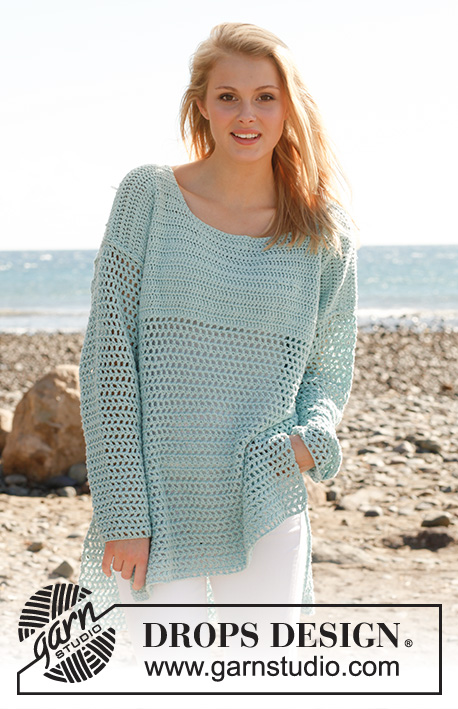
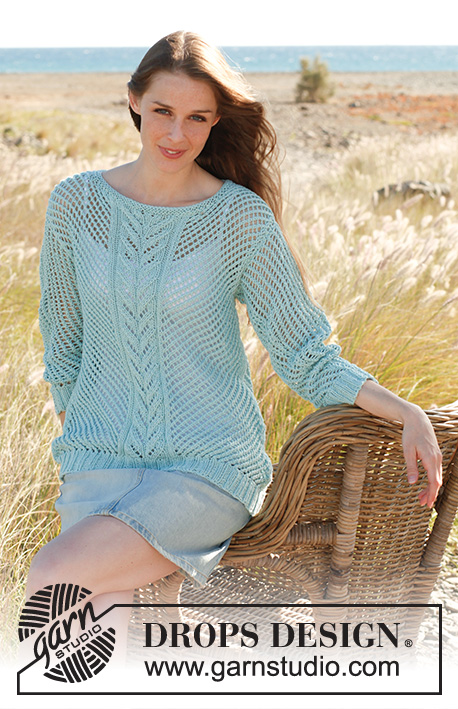
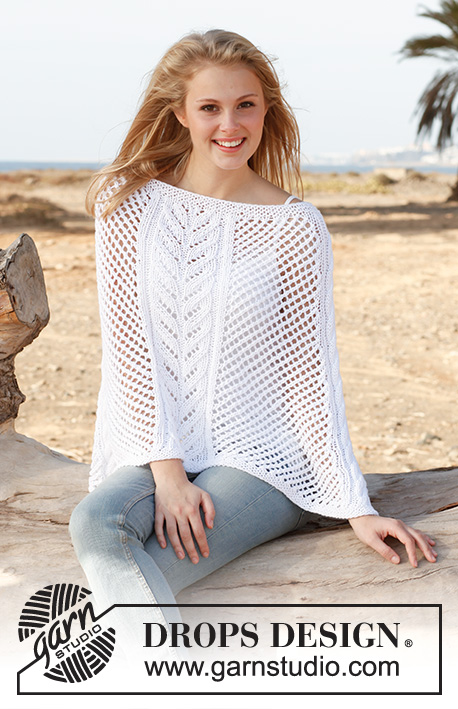
Knitted DROPS jumper with lace pattern in "Bomull Lin" or "Paris". Size: S - XXXL.
DROPS 145-12 |
|||||||||||||
|
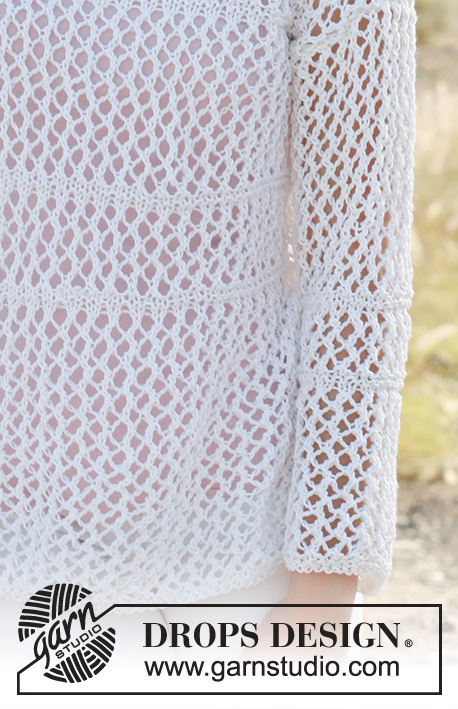
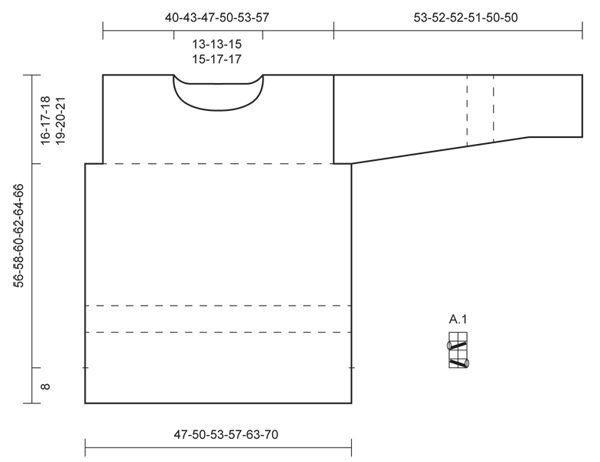
GARTER ST (back and forth on needle): K all rows. 1 ridge = 2 rows K. NOTE: All edge sts in the sides are worked in garter st. PATTERN: See diagram A.1, diagram shows all rows in 1 pattern repetition seen from RS. INCREASE TIP: Inc 1 st by making 1 YO inside 1 edge st in each side. Work the new sts gradually in pattern A.1. -------------------------------------------------------- BACK PIECE: Worked back and forth on needle. Cast on 58-62-66-70-78-86 sts on circular needle size 5.5 mm / US 9 with Bomull-Lin. Work 4 rows in GARTER ST - see explanation above (1st row = RS). Then work A.1 with 1 edge st in garter st in each side. REMEMBER THE GAUGE! When piece measures 20-21-22-23-24-25 cm / 8"-8¼"-8¾"-9"-9½"-9¾", work 4 rows in garter st over all sts. Then work A.1 until piece measures 28-29-30-31-32-33 cm / 11"-11⅜"-11¾"-12¼"-12½"-13", then work 2 ridges over all sts (= 2 stripes with ridges between pattern A.1). Then work A.1 until piece measures 40-41-42-43-44-45 cm / 15¾"-16⅛"-16½"-17"-17¼"-17¾", then K 2 rows (= 1 ridge) over all sts - AT THE SAME TIME bind off for armholes at the beg of these 2 rows as follows: bind off 4-4-4-4-6-8 sts = 50-54-58-62-66-70 sts. K 2 rows over all sts (= 2 ridges in total), then work A.1 with 1 st in garter st in each side until finished measurements. When piece measures 54-56-58-60-62-64 cm / 21¼"-22"-22¾"-23⅝"-24⅜"-25¼", bind off the middle 12-12-14-14-16-16 sts for neck and finish each shoulder separately. Then bind off 2 sts on next row from neck = 17-19-20-22-23-25 sts remain on the shoulder. Loosely bind off all sts when piece measures 56-58-60-62-64-66 cm / 22"-22¾"-23⅝"-24⅜"-25¼"-26". FRONT PIECE: Cast on and work as on back piece until piece measures 46-48-49-51-52-54 cm / 18"-19"-19¼"-20"-20½"-21¼" = 50-54-58-62-66-70 sts on row. On next row from RS, bind off the middle 6-6-8-8-10-10 sts for neck and finish each shoulder separately. Then bind off on every row from neck as follows: bind off 2 sts 2 times, 1 st 1 time = 17-19-20-22-23-25 sts remain on shoulder. Loosely bind off all sts when piece measures 56-58-60-62-64-66 cm / 22"-22¾"-23⅝"-24⅜"-25¼"-26". SLEEVE: Worked back and forth on needle. Cast on 28-30-30-32-34-36 sts on circular needle size 5.5 mm / US 9. Work 4 rows in GARTER ST (1st row = RS). Then work A.1 with 1 edge st in garter st in each side. When piece measures 8-8-8-7-7-7 cm / 3"-3"-3"-2¾"-2¾"-2¾", inc 1 st in each side - READ INCREASE TIP, work the new sts gradually in pattern. Repeat inc every 10-8-6½-6½-6-6 cm / 4"-3"-2½"-2½"-2⅜"-2⅜" 4-5-6-6-6-6 more times (5-6-7-7-7-7 times in total) = 38-42-44-46-48-50 sts - AT THE SAME TIME when piece measures approx. 14 cm / 5½", work 2 ridges over all sts, continue with A.1 until piece measures 22 cm / 8¾", then work 2 ridges (= 2 stripes with ridges between pattern A.1). Continue with A.1 with 1 edge st in garter st until piece measures 50-49-49-48-45-43 cm / 19¾"-19¼"-19¼"-19"-17¾"-17", now insert 1 marker in each side of sleeve (for assembly). Continue until piece measures 53-52-52-51-50-50 cm / 21"-20½"-20½"-20"-19¾"-19¾" (shorter measurements in the larger sizes because of wider shoulders). Loosely bind off all sts. ASSEMBLY: Sew shoulder seams in outermost sts. Sew in sleeves, sew sleeve seams inside 1 edge st - NOTE: The section worked after the marker at the top of sleeve, should fit the bind off for armhole. Sew side seams from armholes and down, but leave approx 8 cm/3" open at the bottom for vents. NECK EDGE: Worked in the round. Pick up from RS approx. 70 to 80 sts around the neck on circular needle size 5.5 mm / US 9 (40 cm / 16"). P next round - while AT THE SAME TIME adjusting no of sts to 62-62-68-68-74-74. K 1 round and P 1 round (= 2 ridges in total), loosely bind off all sts on next round. |
|||||||||||||
Diagram explanations |
|||||||||||||
|
|||||||||||||
 |
|||||||||||||
Have you finished this pattern?Tag your pictures with #dropspattern #everydaysweater or submit them to the #dropsfan gallery. Do you need help with this pattern?You'll find 15 tutorial videos, a Comments/Questions area and more by visiting the pattern on garnstudio.com. © 1982-2026 DROPS Design A/S. We reserve all rights. This document, including all its sub-sections, has copyrights. Read more about what you can do with our patterns at the bottom of each pattern on our site. |
|||||||||||||


With over 40 years in knitting and crochet design, DROPS Design offers one of the most extensive collections of free patterns on the internet - translated to 17 languages. As of today we count 324 catalogs and 12290 patterns - 12280 of which are translated into English (US/in).
We work hard to bring you the best knitting and crochet have to offer, inspiration and advice as well as great quality yarns at incredible prices! Would you like to use our patterns for other than personal use? You can read what you are allowed to do in the Copyright text at the bottom of all our patterns. Happy crafting!
Post a comment to pattern DROPS 145-12
We would love to hear what you have to say about this pattern!
If you want to leave a question, please make sure you select the correct category in the form below, to speed up the answering process. Required fields are marked *.