
Popular categories
Looking for a yarn?


Comments / Questions (290)
![]() Nahed Nashed wrote:
Nahed Nashed wrote:
In the oval section: keep sts bet 2nd & 4th marker on needle = 125-137-149 sts on needle. However, the number of sts between 2nd & 4th will be 199 sts . Any help?
13.08.2022 - 11:01DROPS Design answered:
Dear Mrs Nashed, after you have increased 10-12-14 times on each side of each marker there are 62-68-74 sts between each stitch with a marker, you will then get between 2nd and 4th marker: 62-68-74 sts + 3rd marker + 62-68-74 sts = 125-137-149 sts. Happy knitting!
15.08.2022 - 08:18
![]() Nikoline Pahl wrote:
Nikoline Pahl wrote:
Hej Drops Hvordan skal jeg forstå diagrammet A2? Skal jeg strikke A2 diagrammet først og derefter tage A2A, bagefter A2B og A2 C Eller skal de strikkes samtidig..? Vil i give en tilbagemelding? På forhånd tak
11.08.2022 - 14:05
![]() Nikoline Pahl wrote:
Nikoline Pahl wrote:
"Behold m mellem 2. og 4 mærketråd på p, de resterende m sættes på en tråd = 125-137-149 m på p. Fortsæt med glatstrik frem og tilbage over m på p," I skriver behold m mellem 2. og 4 mærketråde, betyder det at m mellem 2. og 4. mærketråd = 125 m? Eller hvor fra og til tæller i 125 m , mellem hvilke mærketråde? og hvor mange m skal der strikkes over mellem 2. og 4 mærketråd?
30.05.2022 - 17:35DROPS Design answered:
Hej Nikoline, Maskerne mellem mærketråd 1 og 2 er bag i nakken. De midterste masker mellem mærketråd 2 og 3 er til ærmet. Det er 125 masker mellem mærke 2 og 4 (= den ene side), som nu strikkes frem og tilbage
02.06.2022 - 10:33
![]() Monique Petrucciani wrote:
Monique Petrucciani wrote:
Je vous remercie infiniment de votre réponse toutefois, cette partie je l'avais comprise, mais c'est la suite que je ne comprends pas. Merci beaucoup
18.03.2022 - 20:27DROPS Design answered:
Bonjour Mme Petrucciani, une fois que les mailles des emmanchures sont montées à nouveau, vous continuez le cercle, en rond. Vous tricotez d'abord 1 côte mousse puis continuez en jersey en continuant à augmenter 12 mailles tous les 2 tours (10 à 14 fois selon la taille); puis vous allez tricoter les devants séparément en allers et retours en laissant des mailles en attente de chaque côté pour créer l'arrondi col et bas; quand les 2 devants sont faits, on relève les mailles tout autour de l'ovale obtenu et on tricote la bordure A.2. Est-ce que ceci peut vous aider?
21.03.2022 - 07:43
![]() Monique Petrucciani wrote:
Monique Petrucciani wrote:
Bonjour, j'ai commencé ce modèle, mais je bloque à partir d moment oû on remonte les mailles, j'imagine pour faire les manches par la suite. Peut-on m'expliquer clairement comment faire. Merci
17.03.2022 - 20:21DROPS Design answered:
Bonjour Mme Petrucciani, au tour après avoir rabattu les mailles des emmanchures, vous allez tricoter toutes les mailles à l'envers, et, en même temps, monter de nouvelles mailles (cf cette vidéo ou bien cette leçon) au-dessus des mailles rabattues pour les emmanchures, et tricoter toutes les autres mailles à l'envers. Bon tricot!
18.03.2022 - 09:29
![]() Danielle wrote:
Danielle wrote:
Hej! Jag förstår inte hur man får det att se snyggt ut i övergångarna när man ska lägga till 4 maskor efter varje varv. Jag får det väldigt bubbligt och fult hur jag är försöker. Kan ni snälla förklara hur man gör? Jag försökte se en video från er, men förstod fortfarande inte. Med bästa hälsningar, Danielle
16.12.2021 - 12:38DROPS Design answered:
Hej Daniella. Menar du när du sätter 4 maskor i varje sida på tråd? Då stickar du bara fram till de sista 4 maskorna, sätter de sista 4 på tråd (utan att de stickas) och vänder arbetet och stickar tillbaka. Senare stickas dessa maskor tillbaka in på tråden under ett varv där du i alla övergångar plockar upp tråden mellan maskorna vridet för att undvika hål och ökar samtidigt enligt beskrivningen. Mvh DROPS Design
20.12.2021 - 09:45
![]() Inge wrote:
Inge wrote:
Da ich nicht so gerne verkürze reihe stricke kann man den Stern auch gerade hochstricken ? und wie ist da die anleitunge ?
10.08.2021 - 11:29DROPS Design answered:
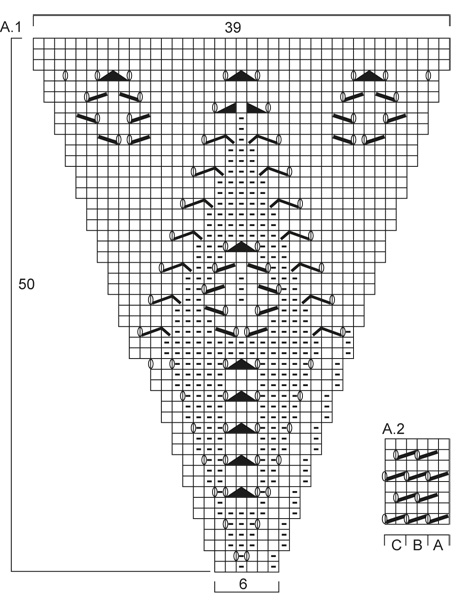
Liebe Inge, mit dem Stern, meinen Sie Diagram A.1? Es wird nur beim Rückenteil gestrickt, die verkürzten Reihen werden später bei jedem Vorderteil gestrickt, um das Oval-Form (siehe Maßskizze) zu bilden. Viel Spaß beim stricken!
10.08.2021 - 14:15
![]() Annbjørg Vegmo wrote:
Annbjørg Vegmo wrote:
I oppskriften står det at man skal felle av alle m. mellom 1. og 2.. merketråd. På neste omg. skal man strikke opp 1 m. I hver felte m. mellom 1. og 2. merketråd. Betyr det at man skal ta opp m. fra de felte m. , og ikke legge opp nye m. slik at det blir «hull» mellom de to omg.?
25.07.2021 - 13:22DROPS Design answered:
Hei Annbjørg. Maskene som er felt mellom 2. og 3. merketråd og mellom 6. og 1. merketråd = ermhull. Over disse maskene legges det opp nye masker på neste omgang. Maskene mellom 1. og 2. merketråd tilsvarer skuldervidden øverst. For at skuldervidden ikke skal bli for vid felles disse maskene av og strikkes deretter opp igjen på neste pinne. Dette vil hindre at arbeidet siger utover skuldrene. mvh DROPS design
09.08.2021 - 13:53
![]() Renáta Pěkná wrote:
Renáta Pěkná wrote:
Děkuji za odpověď. Já už nakoupila a mám trochu víc, to nevadí. Lepší když zbyde, než aby chybělo. Renáta
25.04.2021 - 08:36
![]() Renáta Pěkná wrote:
Renáta Pěkná wrote:
Dobrý den, ráda bych si upletla kardigan, ale nemohu najít , kolik si mám koupit příze na velikost 44-46. Děkuji Pěkná
11.04.2021 - 20:49DROPS Design answered:
Dobrý den, Renáto! Požadovaná velikost odpovídá cca vel. L. Vzhledem k volnému střihu tohoto kabátku mají jednotlivé veikostní verze určitou "vůli" - pro vás by tedy připadala v úvahu střední verze, L/XL. Zvolenou velikost si ještě můžete zkontrolovat podle uvedených rozměrů u nákresu pod návodem. Tento střih se také velmi dobře upravuje během pletení - po dokončení základního kola si jej můžete před uzavřením průramků přeměřit, zda odpovídá šířce vašich zad a případně upavit. Spotřeba příze pro velikost L/XL je DROPS ALPACA 350 g, DROPS KID-SILK 150 g. Hodně zdaru! Hana
25.04.2021 - 08:05
|
|||||||||||||||||||||||||||||||
Daybreak#daybreakjacket |
|||||||||||||||||||||||||||||||
 |
 |
||||||||||||||||||||||||||||||
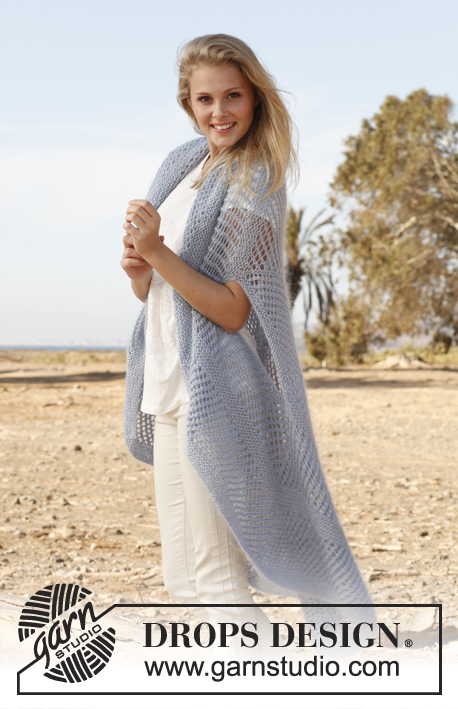
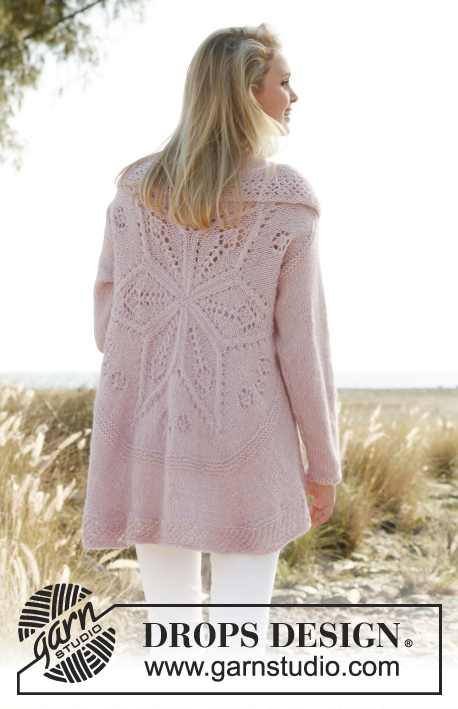
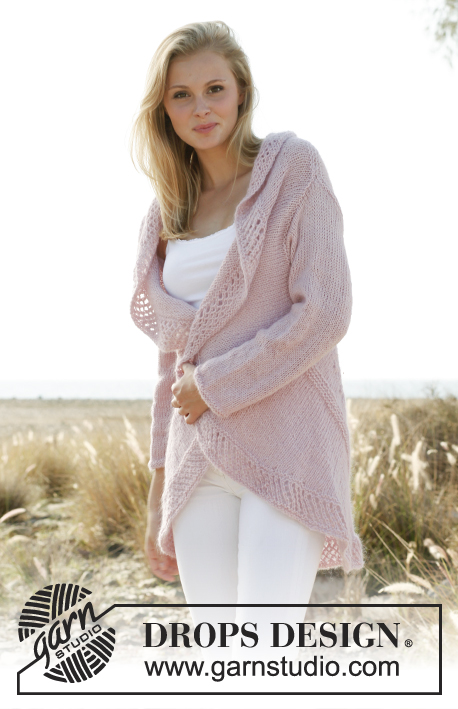
Knitted DROPS jacket worked in a circle with lace pattern in "Alpaca" and "Kid-Silk". Size: S - XXXL.
DROPS 148-1 |
|||||||||||||||||||||||||||||||
|
GARTER ST (in the round on circular needle): * K 1 round and P 1 round *, repeat from *-*. 1 ridge = 2 rounds. PATTERN: See diagram A.1. Diagram shows all rows in pattern seen from RS. ---------------------------------------------------------- JACKET WORKED IN A CIRCLE: Worked in the round in a circle from mid back. First work on double pointed needles, then switch to circular needle when needed. Cast on 12 sts with 1 strand of each yarn and distribute them on 4 double pointed needles size 6 mm / US 10. K 1 round while AT THE SAME TIME working 2 sts in all sts = 24 sts. K 1 round without inc. On next round, work as follows: * K 1, K 2 in next st *, repeat from *-* = 36 sts. Then work according to diagram A.1 (= 6 repetitions in the round). REMEMBER THE GAUGE! Switch to circular needle when needed. When A.1 has been worked, there are 234 sts on needle. Insert 1 marker in each of the tips on the star (in the middle st in every repetition) = 6 markers in total. Work in stockinette st AT THE SAME TIME inc 1 st on each side of markers. Inc with 1 YO on each side of sts with marker – on next round K yo twisted to avoid holes = 12 inc sts per round. Repeat inc every other round 1-2-3 more times (24-36-48 inc sts in total) = 258-270-282 sts (42-44-46 sts between every st with marker). Then work 2 ridges in GARTER ST – see explanation above - over all sts, without inc. On next round K while AT THE SAME TIME bind off all sts between 1st and 2nd marker, bind off the middle 32-34-36 sts between 2nd and 3rd marker and the middle 32-34-36 sts between 6th and 1st marker for armhole. P next round, AT THE SAME TIME pick up 1 new st in every bound off st between 1st and 2nd marker, and cast on 32-34-36 new sts over the bind off sts between 2nd and 3rd marker and 6th and 1st marker. (Sts between 1st and 2nd marker is equivalent to the shoulder width at the top. To avoid the shoulder width being to wide, bind off these sts and pick them up again on next row. This will stop the piece from being to long over the shoulder.) When all sts have been cast on/knitted up, there are 258-270-282 sts on needle. Work 1 ridge. Piece measures approx. 31-32-33 cm / 12¼"-12½"-13" from the middle. Then work in stockinette st, AT THE SAME TIME inc 1 st each side of sts with markers (= 12 inc). Inc with YO (work twisted on next round to avoid holes). Repeat inc every other round 9-11-13 more times (10-12-14 inc in total) = 378-414-450 sts. Keep sts between 2nd and 4th marker on needle, slip the other sts on a stitch holder = 125-137-149 sts on needle. Then work in stockinette st back and forth over sts on needle, AT THE SAME TIME at the end of every row slip the last 4 sts on stitch holder (do not work them, turn), continue until 37-49-61 sts remain on row. Slip the last 37-49-61 sts on stitch holder. Slip sts between 5th and 1st marker on circular needle size 6 mm / US 10, work the same way as in the other side. Then K all sts from RS back on to circular needle size 6 mm / US 10 - between every time sts where slipped on stitch holders in each side, get the yarn and twist it before slipping it on needle (i.e. between every 4th st, to avoid holes in the transitions), in addition inc evenly so that there are 452-496-540 sts in total on needle. Work 2 ridges. Then work according to A.2. Work A.2 A, repeat A.2 B until 2 sts remain and end with A.2 C. Work A.2 for 6 cm / 2⅜", work 1 ridge and bind off. SLEEVE: Worked in the round on double pointed needles. Cast on 36-38-40 sts on double pointed needles size 6 mm / US 10 with 1 strand of each yarn. Insert 1 marker at beg of round = mid under sleeve. Work 2 ridges. Continue in stockinette st. When piece measures 8 cm / 3⅛", inc 1 st on each side of marker mid under. Repeat inc every 4-3½-3 cm / 1½"-1¼"-1⅛" 10-11-13 more times (11-12-14 inc in total) = 58-62-68 sts. When piece measures 53-54-56 cm / 21"-21¼"-22", bind off 6 sts mid under sleeve and work back and forth until finished measurements. Then bind off for sleeve cap at beg of every row in each side: 3 sts 3 times = 34-38-44 sts. Bind off the remaining sts, sleeve measures approx. 56-57-59 cm / 22"-22½"-23¼". Sew in sleeves. |
|||||||||||||||||||||||||||||||
Diagram explanations |
|||||||||||||||||||||||||||||||
|
|||||||||||||||||||||||||||||||
 |
|||||||||||||||||||||||||||||||
 |
|||||||||||||||||||||||||||||||
Have you finished this pattern?Tag your pictures with #dropspattern #daybreakjacket or submit them to the #dropsfan gallery. Do you need help with this pattern?You'll find 23 tutorial videos, a Comments/Questions area and more by visiting the pattern on garnstudio.com. © 1982-2026 DROPS Design A/S. We reserve all rights. This document, including all its sub-sections, has copyrights. Read more about what you can do with our patterns at the bottom of each pattern on our site. |
|||||||||||||||||||||||||||||||


With over 40 years in knitting and crochet design, DROPS Design offers one of the most extensive collections of free patterns on the internet - translated to 17 languages. As of today we count 325 catalogs and 12298 patterns - 12288 of which are translated into English (US/in).
We work hard to bring you the best knitting and crochet have to offer, inspiration and advice as well as great quality yarns at incredible prices! Would you like to use our patterns for other than personal use? You can read what you are allowed to do in the Copyright text at the bottom of all our patterns. Happy crafting!
Post a comment to pattern DROPS 148-1
We would love to hear what you have to say about this pattern!
If you want to leave a question, please make sure you select the correct category in the form below, to speed up the answering process. Required fields are marked *.