
Popular categories
Looking for a yarn?


Comments / Questions (28)
![]() Claudia wrote:
Claudia wrote:
Hallo, nach wieviel Maschen fange ich mit dem Lochmuster an und wieviel Maschen sind dazwischen? Danke
11.02.2026 - 16:52DROPS Design answered:
Liebe Claudia, Sie stricken nach dem Anschlagen der Maschen 1 Rück-R rechts, dann die nächste Hin-R wie folgt: 4 M kraus re (= Blende), A.1 bis noch 4 M übrig sind, 4 M kraus re (= Blende). Die ersten 4 R von A.1 werden glatt re gestrickt, in der 5. R beginnen Sie nach den 4 kraus rechten M direkt damit, 2 M zusammenzustricken und 1 Umschlag zu arbeiten (= Loch). Dann kommen 5 M glatt re, dann wieder ein Loch. Wenn Sie die R zu Ende gestrickt haben, stricken Sie 5 R glatt re (mit den Blenden wie vorher), dann das Lochmuster versetzt, beginnen also mit 3 M glatt re, dann erst ein Loch, dann wieder 5 M glatt re zwischen den Löchern. Viel Spaß beim Weiterstricken!
18.02.2026 - 20:29
![]() Helle wrote:
Helle wrote:
Findes denne flotte trøje i en voksen udgave?
14.07.2025 - 12:07DROPS Design answered:
Hei Helle. Har dessverre ikke helt lik jakke i en voksen versjon. mvh DROPS Design
01.08.2025 - 10:49
![]() Annette wrote:
Annette wrote:
I have now complete the parts to this cardigan and am about to assembly it together. For the Neck band it states "NECK EDGE: Knit up 80 to 100 sts (incl sts on stitch holders in each side) around the neck on circular needle", How do I know I have the right amount? the difference between 80 and 100 stitches is a lot? I am knitting the second size. Help on how many stitches to pick up for this size would be very helpful??
03.07.2025 - 23:50DROPS Design answered:
Hi Annette, The number of stitches is flexible, but as a rule the smaller sizes will have fewer stitches (closer to 80 ) and the larger sizes will have more. For your size you could knit up 85 stitches. Have a good Summer. Regards, Drops Team.
04.07.2025 - 06:26
![]() Annette wrote:
Annette wrote:
I have now completed the parts to this cardigan but the pattern doesn't say how to attach the granny squares to the body of the garment. Do I sew them together or do I crochet them together. Any help and tutorials/Videos would be helpful.
03.07.2025 - 23:40DROPS Design answered:
Dear Annette, the instructions for attaching the granny squares are indicated at the end of the "WORK THE SQUARES AS FOLLOWS" section: "Work 5-5-6-6 squares of B and 4-5-5-6 squares of A = 9-10-11-12 squares in total. Sew squares to into a long strip, place the colours alternately – sew edge to edge with lime to avoid a chunky seam. Sew the square strip to bottom of jacket, edge to edge with neat little stitches – the squares should go all the way out to each side, to and with the bands. " So you sew the squares edge to edge, alternating between an A square and a B square and then sew edge to edge the square strip to the bottom of the jacket. Happy knitting!
06.07.2025 - 20:04
![]() Ulla Granlund wrote:
Ulla Granlund wrote:
Hej. Har en fråga om mönster 23-50 ang armen. Ni har gjort en rättelse om armlängds total. Undrar nu vilka mått som gäller när man ska maska av för ärmkullen. Tacksam för snabbt svar. Hälsningar Ulla Granlund Tel 0708-707721
30.05.2025 - 09:25DROPS Design answered:
Hei Ulla. Når arb måler 29-33-38-44 cm, felles det til ermtopp. Om du ser på målskissen strikkes det først 5 cm, deretter 24-28-33-39 cm (disse tallene er rettet, fra 20/4/2021) + 5 = 29-33-38-44. Den totale lengden er ca 35-40-45-52 cm. mvh DROPS Design
02.06.2025 - 10:57
![]() Carina Höglund wrote:
Carina Höglund wrote:
Om den totala längden på ärmen ska vara 28 cm. När ska jag börja maska av för ärmkullen. Eller ska det totala måttet på armen vara 40 cm ? Och var snäll och svara
10.05.2025 - 15:36
![]() Carina Höglund wrote:
Carina Höglund wrote:
Jag stickar 5-7 år och har frågor ang ärmen. Får inte detta att stämma trots att jag följer ändringarna. Stämmer det att mudden är 5 cm, och ärmkullen 6-7 cm och mittepartiet 28 cm ???? Det innebär att den totala längden på ärmen blir 39-40 cm. Är det rimligt med en sådan lång ärm. Ser inte proportionellt ut mot fram och bakstycke.
05.05.2025 - 21:31DROPS Design answered:
Hei Carina. Hele lengden på ermen i str. 5/7 år er 40 cm (vrangbord 5 cm - midtpartiet 28 cm + 7 ärmkullen = 40 cm). mvh DROPS Design
12.05.2025 - 08:26
![]() Monika wrote:
Monika wrote:
Sorry, die Fragen haben sich erledigt. Danke trotzdem!
27.03.2025 - 11:48
![]() Monika wrote:
Monika wrote:
Hallo, bitte können Sie mir zu den Granny Square antworten: 1) Muss es in der 2. Linie nicht heißen "IN den Ring" ? 2) Was heißt in der 6. Linie "[-]" ? Vielen Dank! Es ist super, dass man hier Fragen stellen kann! Alles Gute dem Team!
27.03.2025 - 11:29DROPS Design answered:
Liebe Monika, bei der 1. Runde werden die Maschen in die Luftmaschenring gehäkelt, dh um die Luftmaschen; bei der 4. Runde häkeln Sie die Maschen wie zwischen den beiden Symbole [ und ] erklärt. Viel Spaß beim Häkeln!
28.03.2025 - 08:45
![]() Kristena wrote:
Kristena wrote:
Please ignore my last comment. By looking at an enlarged photo of the photo of the granny square for Sweet Berry Cardigan, we realized what we were doing wrong.
17.03.2025 - 11:41
|
||||||||||
Sweet berry cardigan#sweetberrycardigan |
||||||||||
 |
 |
|||||||||
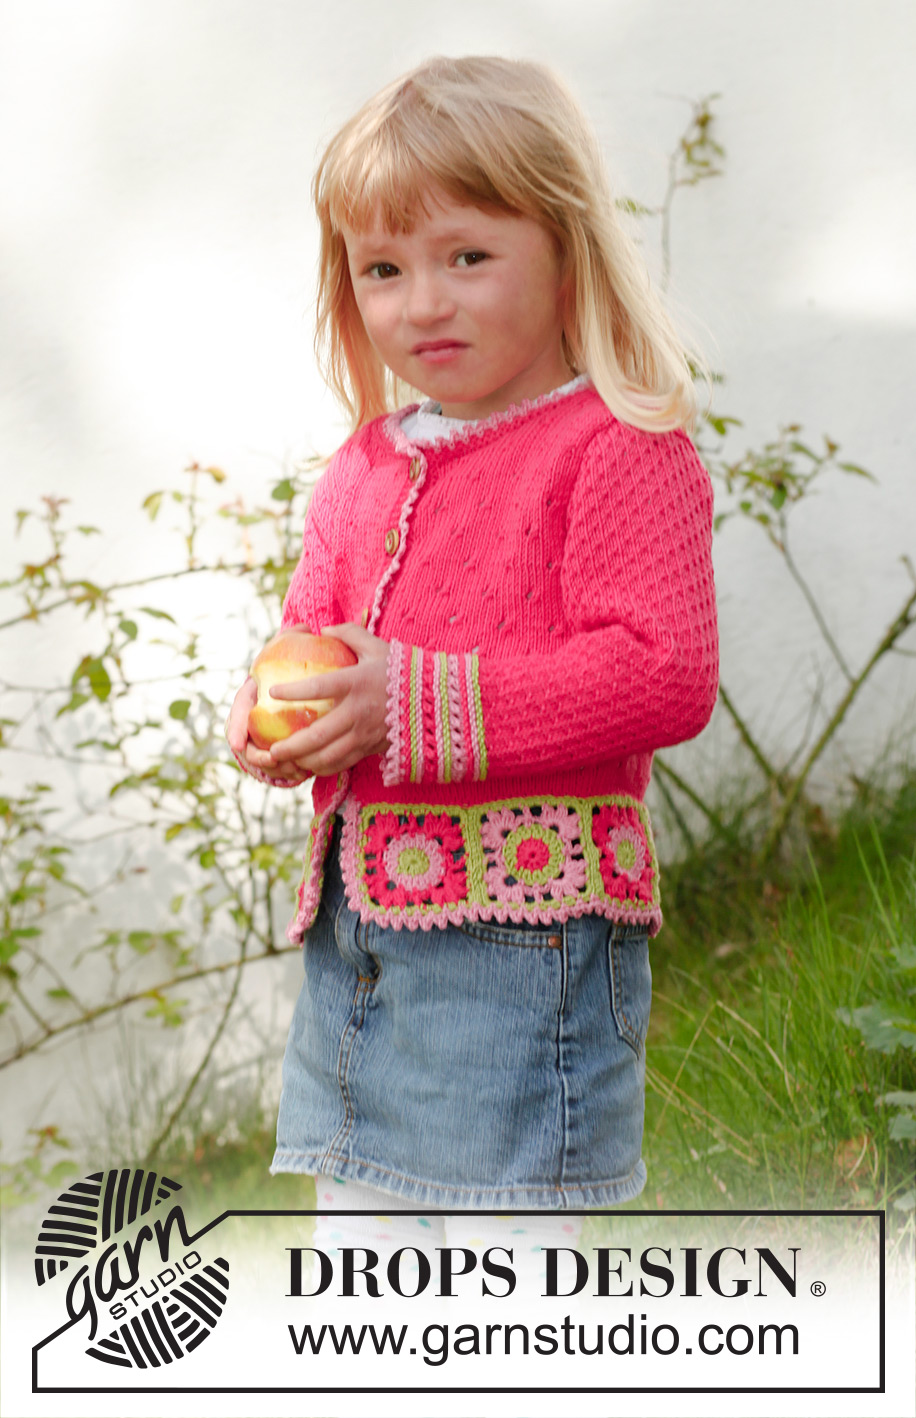
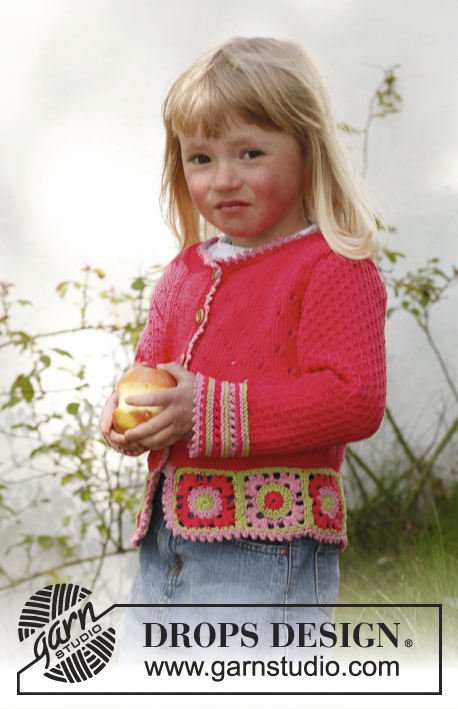
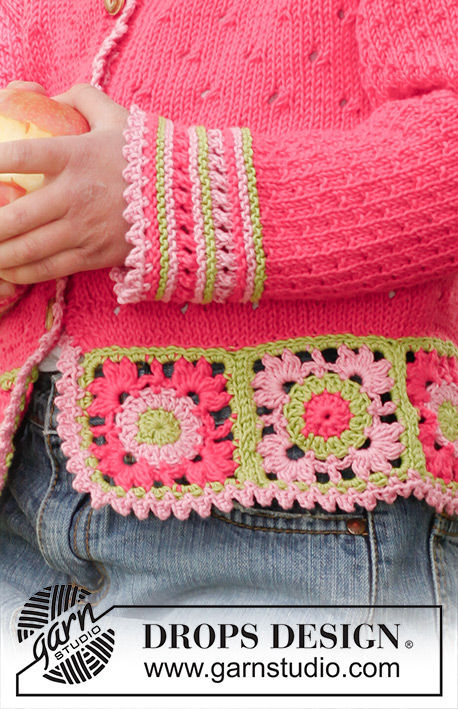
Knitted jacket with granny squares in DROPS Safran. Size children 3 to 12 years.
DROPS Children 23-50 |
||||||||||
|
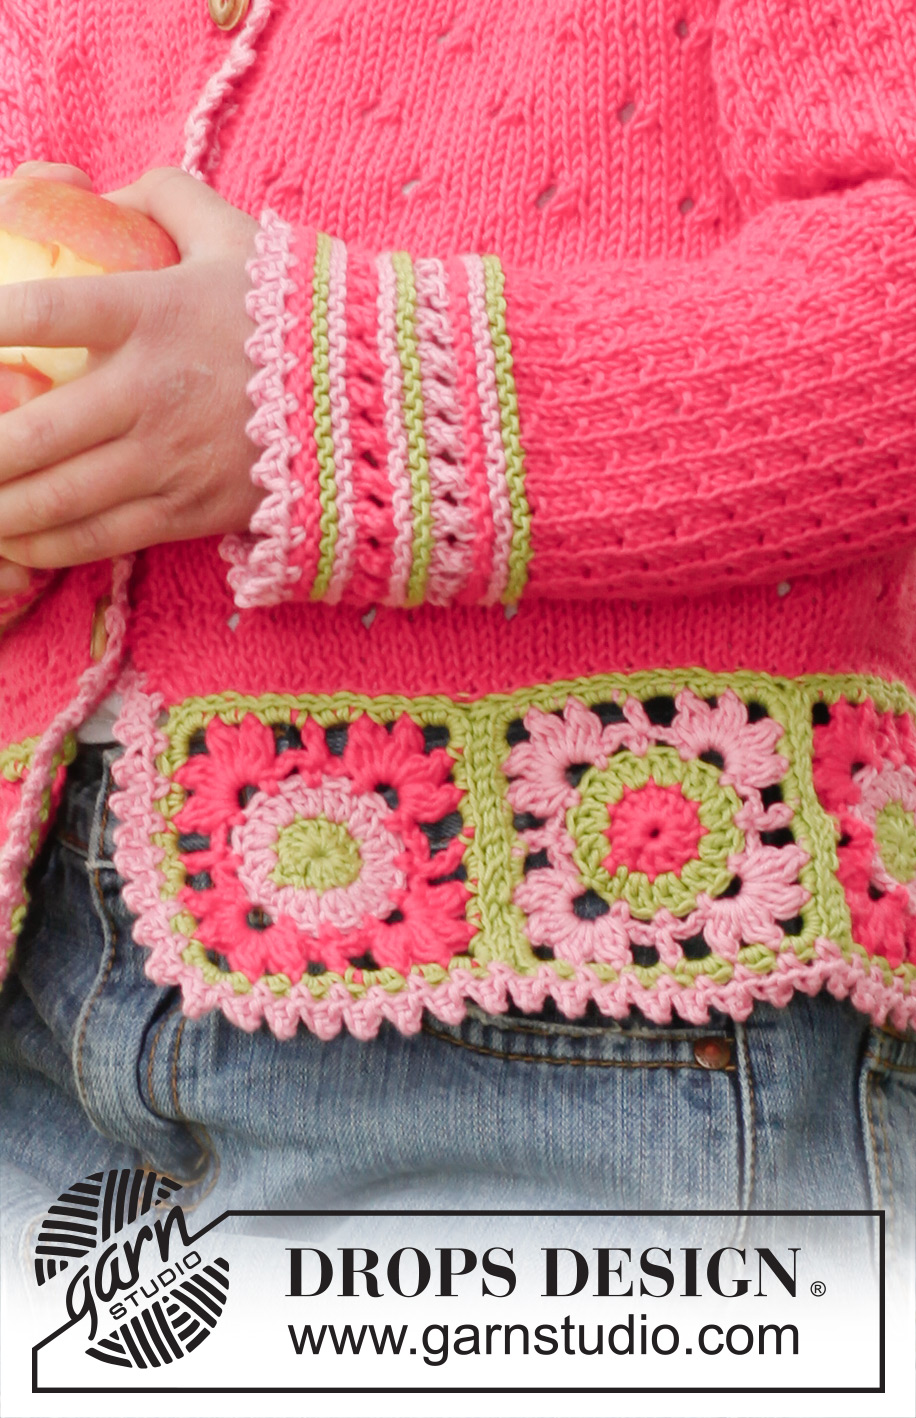
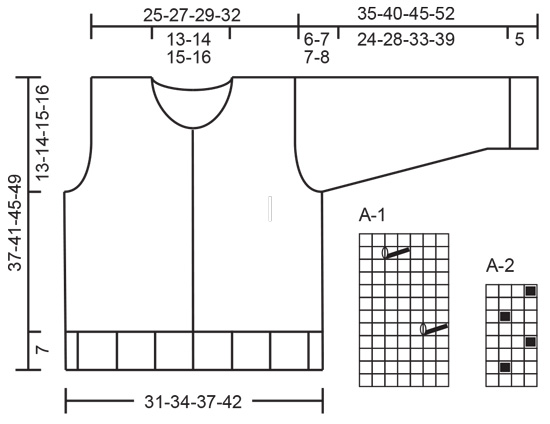
PATTERN: See diagrams A-1 and A-2, diagrams show all rows in pattern seen from RS. GARTER ST (back and forth on needle): K all rows. 1 ridge = 2 rows K. BUTTON HOLES: Bind off for button holes on right band. 1 button hole = K tog 2nd and 3rd st from mid front and make 1 YO. Bind off for button holes when piece measures: SIZE 3/4 years: 2, 7, 12, 17 and 22 cm / ¾",2¾",4¾",6¾" and 8¾" SIZE 5/7 years: 2, 8, 14, 20 and 26 cm / ¾",3⅛",5½",8" and 10¼" SIZE 8/10 years: 2, 9, 16, 23 and 29 cm / ¾",3½",6¼",9" and 11⅜" SIZE 11/12 years: 2, 10, 18, 26 and 33 cm / ¾",4",7",10¼" and 13" --------------------------------------------------------- BODY: Worked back and forth on circular needle from mid front. Cast on 155-169-183-204 sts (includes 4 band sts in each side towards mid front) on circular needle size 3 mm / US 2.5 with raspberry. K 1 row from WS, continue with diagram A-1 but work 4 band sts in each side in GARTER ST – see explanation above. When piece measures 2 cm / ¾", beg to bind off for BUTTON HOLES – see explanation above. REMEMBER THE GAUGE! When piece measures 17-20-23-26 cm / 6¾"-8"-9"-10¼", work next row from RS as follows: 37-41-44-49 sts as before (= right front piece), bind off 6 sts for armhole, work 69-75-83-94 sts as before (= back piece), bind off 6 sts for armhole and work as before over the remaining 37-41-44-49 sts (= left front piece). Finish each part separately. LEFT FRONT PIECE: = 37-41-44-49 sts. Continue A-1 - AT THE SAME TIME bind off for armhole at beg of every row from the side: 2 sts 1-1-2-3 times and 1 st 2-3-3-3 times = 33-36-37-40 sts. Continue to work until piece measures 23-27-30-34 cm / 9"-10½"-11¾"-13½", slip the outermost 12-14-14-15 sts towards mid front on a stitch holder for neck. Then bind off on every row from neck: 2 sts 2 times and 1 st 2 times = 15-16-17-19 sts remain on shoulder. Bind off when piece measures 30-34-38-42 cm / 11¾"-13½"-15"-16½". RIGHT FRONT PIECE: Work as left front piece but reversed – remember button holes. BACK PIECE: = 69-75-83-94 sts. Continue A-1 - AT THE SAME TIME bind off for armholes in each side as on front piece = 61-65-69-76 sts. Continue to work until piece measures 28-32-36-40 cm / 11"-12½"-14¼"-15¾". On next row, bind off the middle 27-29-31-34 sts for neck and finish each shoulder separately. Then bind off on every row from neck: 1 st 2 times = 15-16-17-19 sts remain on shoulder. Bind off when piece measures 30-34-38-42 cm / 11¾"-13½"-15"-16½". SLEEVE: Worked back and forth on circular needle. Cast on 46-48-50-52 sts (includes 1 edge st in each side) on circular needle size 2.5 mm / US 1.5 with raspberry. K 1 row from WS. Continue with 2 rows in garter st in lime and 2 rows in garter st in medium pink, switch to raspberry, ** work 2 rows in stockinette st, work next row as follows: K 1 edge st, * K 2 tog, 1 YO *, repeat from *-*, finish with K 1 edge st, P 1 row **. Then K 2 rows in garter st in medium pink and K2 rows in garter st in lime, switch to medium pink and work from **-** (i.e. as the 4 rows in raspberry). Continue with 2 rows in garter st in raspberry, 2 rows in garter st in medium pink and 2 rows in garter st in lime. Switch to raspberry and circular needle size 3 mm / US 2.5. Continue with A-2 (1st row = RS) and 1 edge st in garter st in each side. When piece measures 9-9-10-10 cm / 3½"-3½"-4"-4", inc 1 st in each side. Repeat inc every 3-3-3-3½ cm / 1⅛"-1⅛"-1⅛"-1¼", 6-7-8-9 more times - work the inc sts in A-2 = 60-64-68-72 sts. When piece measures 29-33-38-44 cm / 11½"-13"-15"-17¼", bind off for sleeve cap at the beg of every row, in each side: 4 sts 1 time, 2 sts 3 times and 1 st 2-3-3-5 times, then bind off 2 sts in each side until piece measures 34-39-44-51 cm / 13½"-15¼"-17¼"-20", now bind off 3 sts 1 time in each side. Bind off the remaining sts, piece measures approx. 35-40-45-52 cm / 13¾"-15¾"-17¾"-20½". ASSEMBLY: Sew the shoulder seams. NECK EDGE: Pick up 80 to 100 sts (includes sts on stitch holders in each side) around the neck on circular needle size 2.5 mm / US 1.5 with raspberry. K 3 rows, then bind off. Sew sleeve seams inside 1 edge st and sew in the sleeves. COLORS ON CROCHET SQUARES: Squares are worked in 2 different color combinations: SQUARE A: Cast on + 1st round = raspberry, 2nd round = lime, 3rd and 4th round = medium pink, 5th round = lime. SQUARE B: Cast on + 1st round = lime, 2nd round = medium pink, 3rd and 4th round = raspberry, 5th round = lime. CROCHET TIP: Replace first dc at beg of every round with 3 ch and finish every round with 1 sl st in third ch from beg of round. BOBBLE: 3 dc that are worked tog, i.e. wait with last pull through on every dc until all 3 dc have been worked, make a YO on hook and pull through all 4 loops. WORK THE SQUARES AS FOLLOWS: Ch 4 on hook size 3 mm / C and form a ring with 1 sl st in first ch. ROUND 1: Work 12 dc in ch-ring – read CROCHET TIP. ROUND 2: 2 dc in every dc = 24 dc. ROUND 3: * 1 sc in dc, ch 3, skip 1 dc *, repeat from *-*, finish with 1 sl st in first sc from beg of round (= 12 sc with ch spaces in between). ROUND 4: In first ch space work [-]: * [ 1 BOBBLE – see explanation above, ch 2, 1 bobble, 4 ch (= corner), 1 bobble, ch 2, 1 bobble], ch 3, 1 hdc in sc between the next 2 ch spaces, ch 3, skip 1 ch space *, repeat from *-* a total of 4 times but the last time finish after 3 ch with 1 sl st at the top of first bobble. ROUND 5: * 2 sc in first 2-ch space, 6 sc in next 4-ch space (= corner), 2 sc in next 2-ch space, 3 sc in next 3-ch space, 3 sc in next 3-ch space *, repeat from *-* the entire round. Square measures approx. 7 x 7 cm / 2¾" x 2¾". Work 5-5-6-6 squares of B and 4-5-5-6 squares of A = 9-10-11-12 squares in total. Sew squares to into a long strip, place the colors alternately – sew edge to edge with lime to avoid a chunky seam. Sew the square strip to bottom of jacket, edge to edge with neat little stitches – the squares should go all the way out to each side, to and with the bands. PICOT BORDER: Work a picot border with medium pink on hook size 3 mm / C around the entire jacket, i.e. at the bottom, along the bands and around the neck: * 1 sc, ch 3, 1 sc in first ch (= 1 picot), skip 1 sc *, repeat from *-*. Work the same way around the bottom of sleeves, finish round with 1 sl st in first sc. |
||||||||||
Diagram explanations |
||||||||||
|
||||||||||
 |
||||||||||
Have you finished this pattern?Tag your pictures with #dropspattern #sweetberrycardigan or submit them to the #dropsfan gallery. Do you need help with this pattern?You'll find 10 tutorial videos, a Comments/Questions area and more by visiting the pattern on garnstudio.com. © 1982-2026 DROPS Design A/S. We reserve all rights. This document, including all its sub-sections, has copyrights. Read more about what you can do with our patterns at the bottom of each pattern on our site. |
||||||||||


With over 40 years in knitting and crochet design, DROPS Design offers one of the most extensive collections of free patterns on the internet - translated to 17 languages. As of today we count 324 catalogs and 12252 patterns - 12242 of which are translated into English (US/in).
We work hard to bring you the best knitting and crochet have to offer, inspiration and advice as well as great quality yarns at incredible prices! Would you like to use our patterns for other than personal use? You can read what you are allowed to do in the Copyright text at the bottom of all our patterns. Happy crafting!
Post a comment to pattern DROPS Children 23-50
We would love to hear what you have to say about this pattern!
If you want to leave a question, please make sure you select the correct category in the form below, to speed up the answering process. Required fields are marked *.