DROPS Safran
DROPS Safran
100% Cotton
from 8.00 RON /50g
Get the yarn to make this pattern from 40.00RON.

The yarn cost is calculated from the pattern’s smallest size and the yarn’s cheapest product type. Looking for an even better price? You might find it on the DROPS Deals!

DROPS SS24

Sweet berry cardigan

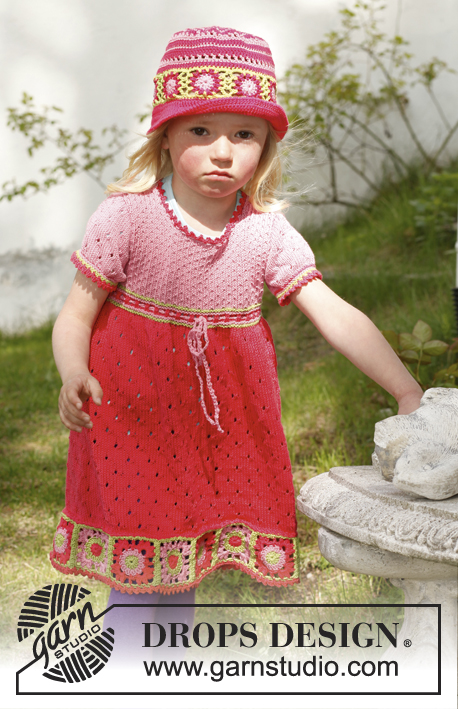
Knitted jacket with granny squares in DROPS Safran. Size children 3 to 12 years.

DROPS Children 23-50
DROPS design: Pattern no E-009-bn
Yarn group A
---------------------------------------------------------
Size: 3/4 - 5/7 - 8/10 - 11/12 years
Size in cm: 98/104 - 110/122 - 128/140 - 146/152
Materials:
DROPS SAFRAN from Garnstudio
150-200-250-300 g colour no 13, raspberry
50-50-50-100 colour no 02, medium pink
50 g for all sizes in colour no 31, lime

DROPS CIRCULAR NEEDLE (60 cm) SIZE 3 mm - or size needed to get 24 sts x 32 rows in stocking st = 10 x 10 cm.
DROPS CIRCULAR NEEDLE (60 cm) SIZE 2.5 mm – for garter st.
DROPS CROCHET HOOK SIZE 3 mm
DROPS WOODEN BUTTONS NO 513: 5 pieces

-------------------------------------------------------

Alternative Yarn – See how to change yarns here
Yarn Groups A to F – Use the same pattern and change the yarn here
Yarn usage using an alternative yarn – Use our yarn converter here

-------------------------------------------------------

DROPS Safran
DROPS Safran
100% Cotton
from 8.00 RON /50g
Get the yarn to make this pattern from 40.00RON.

The yarn cost is calculated from the pattern’s smallest size and the yarn’s cheapest product type. Looking for an even better price? You might find it on the DROPS Deals!

Pattern instructions

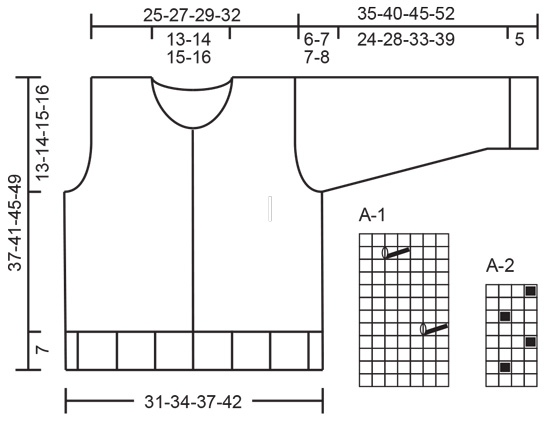
PATTERN:
See diagrams A-1 and A-2, diagrams show all rows in pattern from RS.

GARTER ST (back and forth on needle):
K all rows. 1 ridge = 2 rows K.

BUTTON HOLES:
Cast off for button holes on right band.
1 button hole = K tog 2nd and 3rd st from mid front and make 1 YO. Cast off for button holes when piece measures:
SIZE 3/4 years: 2, 7, 12, 17 and 22 cm
SIZE 5/7 years: 2, 8, 14, 20 and 26 cm
SIZE 8/10 years: 2, 9, 16, 23 and 29 cm
SIZE 11/12 years: 2, 10, 18, 26 and 33 cm
---------------------------------------------------------

BODY:
Worked back and forth on circular needle from mid front.
Cast on 155-169-183-204 sts (incl 4 band sts in each side towards mid front) on circular needle size 3 mm with raspberry. K 1 row from WS, continue with diagram A-1 but work 4 band sts in each side in GARTER ST – see explanation above. When piece measures 2 cm, beg to cast off for BUTTON HOLES – see explanation above. REMEMBER THE KNITTING TENSION!
When piece measures 17-20-23-26 cm, work next row from RS as follows: 37-41-44-49 sts as before (= right front piece), cast off 6 sts for armhole, work 69-75-83-94 sts as before (= back piece), cast off 6 sts for armhole and work as before over the remaining 37-41-44-49 sts (= left front piece). Finish each part separately.

LEFT FRONT PIECE:
= 37-41-44-49 sts. Continue A-1 - AT THE SAME TIME cast off for armhole at beg of every row from the side: 2 sts 1-1-2-3 times and 1 st 2-3-3-3 times = 33-36-37-40 sts. Continue to work until piece measures 23-27-30-34 cm, slip the outermost 12-14-14-15 sts towards mid front on a stitch holder for neck. Then cast off on every row from neck: 2 sts 2 times and 1 st 2 times = 15-16-17-19 sts remain on shoulder. Cast off when piece measures 30-34-38-42 cm.

RIGHT FRONT PIECE:
Work as left front piece but reversed – remember button holes.

BACK PIECE:
= 69-75-83-94 sts. Continue A-1 - AT THE SAME TIME cast off for armholes in each side as on front piece = 61-65-69-76 sts. Continue to work until piece measures 28-32-36-40 cm. On next row, cast off the middle 27-29-31-34 sts for neck and finish each shoulder separately. Then cast off on every row from neck: 1 st 2 times = 15-16-17-19 sts remain on shoulder. Cast off when piece measures 30-34-38-42 cm.

SLEEVE:
Worked back and forth on circular needle.
Cast on 46-48-50-52 sts (incl 1 edge st in each side) on circular needle size 2.5 mm with raspberry. K 1 row from WS. Continue with 2 rows in garter st in lime and 2 rows in garter st in medium pink, switch to raspberry, ** work 2 rows in stocking st, work next row as follows: K 1 edge st, * K 2 tog, 1 YO *, repeat from *-*, finish with K 1 edge st, P 1 row **. Then work 2 rows in garter st in medium pink and 2 rows in garter st in lime, switch to medium pink and work from **-** (i.e. as the 4 rows in raspberry). Continue with 2 rows in garter st in raspberry, 2 rows in garter st in medium pink and 2 rows in garter st in lime. Switch to raspberry and circular needle size 3 mm. Continue with A-2 (1st row = RS) and 1 edge st in garter st in each side. When piece measures 9-9-10-10 cm, inc 1 st in each side. Repeat inc every 3-3-3-3½ cm a total of 7-8-9-10 times - work the inc sts in A-2 = 60-64-68-72 sts. When piece measures 29-33-38-44 cm, cast off for sleeve cap at the beg of every row in each side: 4 sts 1 time, 2 sts 3 times and 1 st 2-3-3-5 times, then cast off 2 sts in each side until piece measures 34-39-44-51 cm, now cast off 3 sts 1 time in each side. Cast off the remaining sts, piece measures approx. 35-40-45-52 cm.

ASSEMBLY:
Sew the shoulder seams.

NECK EDGE: Knit up 80 to 100 sts (incl sts on stitch holders in each side) around the neck on circular needle size 2.5 mm with raspberry. K 3 rows, then cast off.
Sew sleeve seams inside 1 edge st and sew in the sleeves.

COLOURS ON CROCHET SQUARES:
Squares are worked in 2 different colour combinations:
SQUARE A: Cast on + 1st round = raspberry, 2nd round = lime, 3rd and 4th round = medium pink, 5th round = lime.
SQUARE B: Cast on + 1st round = lime, 2nd round = medium pink, 3rd and 4th round = raspberry, 5th round = lime.

CROCHET TIP: Replace first tr at beg of every round with 3 ch and finish every round with 1 sl st in third ch from beg of round.

BOBBLE: 3 tr that are worked tog, i.e. wait with last pull through on every tr until all 3 tr have been worked, make a YO on hook and pull through all 4 loops.

WORK THE SQUARES AS FOLLOWS:
Work 4 ch on hook size 3 mm and form a ring with 1 sl st in first ch.
ROUND 1: Work 12 tr in ch-ring – read CROCHET TIP.
ROUND 2: 2 tr in every tr = 24 tr.
ROUND 3: * 1 dc in tr, 3 ch, skip 1 tr *, repeat from *-*, finish with 1 sl st in first dc from beg of round (= 12 dc with ch-loops in between).
ROUND 4: In first ch-loop work [-]: * [1 BOBBLE – see explanation above, 2 ch, 1 bobble, 4 ch (= corner), 1 bobble, 2 ch, 1 bobble], 3 ch, 1 htr in dc between the next 2 ch-loops, 3 ch, skip 1 ch-loop *, repeat from *-* a total of 4 times but the last time finish after 3 ch with 1 sl st at the top of first bobble.
ROUND 5: * 2 dc in first 2-ch-loop, 6 dc in next 4-ch-loop (= corner), 2 dc in next 2-ch-loop, 3 dc in next 3-ch-loop, 3 dc in next 3-ch-loop *, repeat from *-* the entire round. Square measures approx. 7 x 7 cm.

Work 5-5-6-6 squares of B and 4-5-5-6 squares of A = 9-10-11-12 squares in total. Sew squares to into a long strip, place the colours alternately – sew edge to edge with lime to avoid a chunky seam. Sew the square strip to bottom of jacket, edge to edge with neat little stitches – the squares should go all the way out to each side, to and with the bands.

PICOT BORDER:
Work a picot border with medium pink on hook size 3 mm around the entire jacket, i.e. at the bottom, along the bands and around the neck: * 1 dc, 3 ch, 1 dc in first ch (= 1 picot), skip 1 dc *, repeat from *-*. Work the same way around the bottom of sleeves, finish round with 1 sl st in first dc.

----------------------------------------------------------
Hat - see pattern SmåDrops 23-48
---------------------------------------------------------
Dress - see pattern SmåDrops 23-49
---------------------------------------------------------

This pattern has been corrected.

Updated online: 20.04.2021
Sketch: Length of sleeve corrected to 24-28-33-39.

Diagram

symbols = K from RS, P from WS
symbols = K from WS
symbols = K 2 tog, 1 YO
diagram
Do you have a question? See a list of frequently asked questions (FAQ)

Knitting tension is what determines the final measurements of your work, and is usually measured per 10 x 10 cm. It is provided like so: number of stitches in width x number of rows in height - eg: 19 stitches x 26 rows = 10 x 10 cm.

The knitting tension is very individual; some people knit/crochet loosely while others work tightly. You adjust the knitting tension with the needle size, which is why the suggested needle size is only meant as a guide! You need to adjust this (up or down) to ensure that YOUR knitting tension matches the knitting tension provided in the pattern. If you work with a different knitting tension than provided you will have a different yarn consumption, and your work will have different measurements than what the pattern suggests.

The knitting tension also determines which yarns can replace each other. As long as you achieve the same knitting tension you can replace one yarn with another.

See DROPS lesson: How to measure your tension/gauge

See DROPS video: How to make a gauge tension swatch

The required amount of yarn is provided in grams, eg: 450 g. To calculate how many balls you’ll need you first need to know how many grams are in 1 ball (25g, 50g or 100g). This information is available if you click on the individual yarn quality on our pages. Divide the amount required with the amount of each ball. For example, if each ball is 50g (the most common amount), the calculation will be as follows: 450 / 50 = 9 balls.

The important thing when changing from one yarn to another is that the knitting/crochet tension remains the same. This is so that the measurements of the finished piece will be the same as on the sketch provided. It is easier to achieve the same knitting tension using yarns from the same yarn group. It is also possible to work with multiple strands of a thinner yarn to achieve the knitting tension of a thicker one. Please try our yarn converter. We recommend you to always work a test swatch.

Please NOTE: when changing yarn the garment might have a different look and feel to the garment in the photo, due to individual properties and qualities of each yarn.

See DROPS lesson: Can I use a different yarn than the one mentioned in the pattern?

All our yarns are categorised into yarn groups (from A to F) according to thickness and knitting tension – group A contains the thinnest yarns and group F the thickest. This makes it easier for you to find alternative yarns to our patterns, should you wish to switch yarn. All yarns within the same group have a similar knitting tension and can easily replace each other. However, different yarn qualities have different structures and properties which will give the finished work a unique look and feel.

Click here for an overview of the yarns in each yarn group

At the top of all our patterns you’ll find a link to our yarn calculator, which is a helpful tool should you wish to use a different yarn than suggested. By filling in the yarn quality you wish to replace, the amount (in your size) and number of strands, the calculator will present good alternative yarns with the same knitting tension. Additionally it will tell you how much you’ll require in the new qualities and whether you’ll need to work with multiple strands. Most skeins are 50g (some are 25g or 100g).

If the pattern is worked with multiple colours, every colour will have to be calculated separately. Similarly, if the pattern is worked with several strands of different yarns (for example 1 strand Alpaca and 1 strand Kid-Silk) you will have to find alternatives for each, individually.

Click here to see our yarn calculator

Since different yarns have different qualities and textures we have chosen to keep the original yarn in our patterns. However, you can easily find options among our available qualities by using our yarn calculator, or simply pick a yarn from the same yarn group.

It is possible that some retailers still have discontinued yarns in stock, or that someone has a few skeins at home that they would like to find patterns for.

The yarn calculator will provide both alternative yarn as well as required amount in the new quality.

If you think it's hard to decide what size to make, it can be a good idea to measure a garment you own already and like the size of. Then you can pick the size by comparing those measures with the ones available in the pattern's size chart.

You'll find the size chart at the bottom of the pattern.

See DROPS lesson: How to read size chart

The needle size provided in the pattern serves only as a guide, the important thing is to follow the knitting tension. And since knitting tension is very individual, you will have to adjust the needle size to ensure that YOUR tension is the same as in the pattern – maybe you’ll have to adjust 1, or even 2 needle sizes, up or down to achieve the correct tension. For this, we recommend that you work test swatches.

Should you work with a different knitting tension than the one provided, the measurements of the finished garment might deviate from the measurement sketch.

See DROPS lesson: How to measure your tension/gauge

See DROPS video: How to make a tension/gauge swatch

Working a garment top-down provides more flexibility and room for personal adjustment. For example it is easier to try the garment on while working, as well as making adjustments to length of yoke and shoulder caps.

The instructions are carefully explaining every step, in the correct order. Diagrams are adjusted to the knitting direction and are worked as usual.

The diagram depicts all rows/rounds, and every stitch seen from the right side. It is read from bottom to top, from right to left. 1 square = 1 stitch.

When working back and forth, every other row is worked from the right side and every other row is worked from the wrong side. When working from the wrong side, the diagram will have to be worked reversed: from left to right, knit stitches are purled, purl stitches are knit etc.

When working in the round every round is worked from the right side and the diagram are worked from right to left on all rounds.

See DROPS lesson: How to read knitting diagrams

The diagram depicts all rows/rounds, and every stitch seen from the right side. It is worked from bottom to top, from right to left.

When working back and forth every other row is worked from the right side: from right to left and every other row is worked from the wrong side: from left to right.

When working in the round, every row in the diagram are worked from the right side, from right to left.

When working a circular diagram you start in the middle and work your way outwards, counter clockwise, row by row.

The rows usually start with a given number of chain stitches (equivalent to the height of the following stitch), this will either be depicted in the diagram or explained in the pattern.

See DROPS lesson: How to read crochet diagrams

Instructions for working several diagrams after each other on the same row/round, will often be written like so: “work A.1, A.2, A.3 a total of 0-0-2-3-4 times". This means you work A.1 once, then A.2 is worked once, and A.3 is repeated (in width) the number of times provided for your size – in this case like so: S = 0 times, M = 0 times, L=2 times, XL= 3 times and XXL = 4 times.

The diagrams are worked as usual: begin with the first row in A.1, then work the first row in A.2 etc.

See DROPS lesson: How to read knitting diagrams

See DROPS lesson: How to read crochet diagrams

The total width of the garment (from wrist-to-wrist) will be larger in the larger sizes, despite the actual sleeves being shorter. The larger sizes have longer sleeve caps and wider shoulders, so there will be a good fit in all sizes.

The measurement sketch/schematic drawing provides information regarding the full length of the garment. If it’s a jumper or a jacket the length is measured from the highest point on the shoulder closest to the neckline, and straight down to the bottom of the garment. It is NOT measured from the tip of shoulder. Similarly, the length of yoke is measured from the highest point on the shoulder and down to where yoke is split into body and sleeves.

On a jacket measures are never taken along bands, unless specifically stated. Always measure inside band stitches when measuring the length.

See DROPS lesson: How to read a schematic drawing

Diagrams are often repeated on the round or in height. 1 repeat is the diagram the way it appears in the pattern. If it says to work 5 repeats of A.1 in the round, then you work A.1 a total of 5 times after/next to each other in the round. If it says to work 2 repeats of A.1 vertically/in height you work the entire diagram once, then begin again at the start and work the entire diagram one more time.

Chain stitches are slightly narrower than other stitches and to avoid working the cast-on edge too tight, we simply chain more stitches to begin with. The stitch count will be adjusted on the following row to fit the pattern and measurement sketch.

The rib edge is more elastic and will contract slightly compared to, for example, stocking stitch. By increasing before the rib edge, you avoid a visible difference in width between the rib edge and the rest of the body.

It’s very easy to cast off too tightly, and by making yarn overs while casting off (and simultaneously casting these off) you avoid a too tight cast off edge.

See DROPS video: How to bind off with yarn overs (yo)

To achieve an even increase (or decrease) you can increase on, for example: every 3rd and 4th row alternately, like so: work 2 rows and increase on the 3rd row, work 3 rows and increase on the 4th. Repeat this until the increase is complete.

See DROPS lesson: Increase or decrease 1 st on every 3rd and 4th row alternately

Should you prefer to work in the round instead of back and forth, you may of course adjust the pattern. You’ll need to add steeks mid-front (usually 5 stitches), and follow the instructions. When you would normally turn and work from the wrong side, simply work across the steek and continue in the round. At the end you’ll cut the piece open, pick up stitches to work bands, and cover the cut edges.

See DROPS video: How to knit steeks and cut open

Should you prefer to work back and forth instead of in the round, you may of course adjust the pattern so you work the pieces separately and then assemble them at the end. Divide the stitches for the body in 2, add 1 edge stitch in each side (for sewing) and work the front and back pieces separately.

See DROPS lesson: Can I adapt a pattern for circular needles into straight needles?

Pattern repeats can vary slightly in the different sizes, in order to get the correct proportions. If you’re not working the exact same size as the garment in the photo, yours might deviate slightly. This has been carefully developed and adjusted so that the complete impression of the garment is the same in all sizes.

Make sure to follow instructions and diagrams for your size!

If you have found a pattern you like which is available in women’s size it’s not very difficult to convert it to men’s size. The biggest difference will be the length of sleeves and body. Start working on the women size that you think would fit across the chest. The additional length will be worked right before you cast off for the armhole/sleeve cap. If the pattern is worked top-down you can add the length right after the armhole or before the first decrease on sleeve.

Regarding additional yarn amount, this will depend on how much length you add, but it is better with a skein too many than too few.

All yarns will have excess fibres (from production) that might come off as lint or shedding. Brushed yarns (ie hairier yarns) have more of these loose, excess fibres, causing more shedding.

Shedding also depends on what is worn under or over the garment, and whether this pulls at the yarn fibres. It’s therefore not possible to guarantee that there will be no shedding

Below are some tips on how to get the best result when working with hairier yarns:

1. When the garment is finished (before you wash it) shake it vigorously so the looser hairs come off. NOTE: do NOT use a lint roller, brush or any method that pulls at the yarn.

2. Place the garment in a plastic bag and put it in your freezer - the temperature will cause the fibres to become less attached to each other, and excess fibres will come off easier.

3. Leave in the freezer for a few hours before taking it out and shaking it again.

4. Wash the garment according to the instructions on the yarn label.

Pilling is a natural process that happens to even the most exclusive of fibers. It's a natural sign of wear and tear that is hard to avoid, and that is most visible in high friction areas of your garment like a sweater's arms and cuffs.

You can make your garment look as new by removing the pilling, using a fabric comb or a pill/lint remover.

Still can't find the answer you need? Then scroll down and leave your question so one of our experts can try to help you. This will be done normally within 5 to 10 working days.
In the meantime, you can read the questions and answers that others have left to this pattern or join the DROPS Workshop on Facebook to get help from fellow knitters/crocheters!

You might also like...

Post a comment to pattern DROPS Children 23-50

We would love to hear what you have to say about this pattern!

If you want to leave a question, please make sure you select the correct category in the form below, to speed up the answering process. Required fields are marked *.

Comments / Questions (15)

country flag Laima wrote:

När ska jag minska av för ärmkulle nu när ni justerat ärmen längd till betydligt kortare? På strl 5-7 år ska den totala ärmländen nu vara 28 cm, vid vilken längd ska jag då börja avmaskning till ärmkullen ( tidigare mått 33cm)

22.02.2024 - 11:48

DROPS Design answered:

Hej Laima, det er rettet i selve opskriften, du kan også se målene på måleskitsen nederst i opskriften :)

23.02.2024 - 13:25

country flag Masson Nicole wrote:

Faut-il faire un rang de picot tout autour du tricot y compris les devants ?

01.05.2023 - 12:08

DROPS Design answered:

Bonjour Mme Masson, tout à fait, cette info a été ajoutée/complétée, merci pour votre retour. Bonne continuation!

02.05.2023 - 09:30

country flag Micocoule wrote:

Bonjour je recopie le schéma et en même temps je ne trouve pas la longueur de la manche en additionnant les segments 6 + 22 +5 = 33 et non 35. Quelle est la bonne mesure pour la plus petite taille ? merci de votre réponse.

14.04.2021 - 14:51

DROPS Design answered:

Bonjour Micocoule et merci pour l'info, le schéma a été corrigé, la longueur de la manche doit être de 24-28-33-39 cm. Bon tricot!

20.04.2021 - 12:59

country flag Elena wrote:

Salve, volevo un chiarimento sulla manica. Sto facendo la taglia 3/4 anni, quando si iniziano gli aumenti, dopo 9 cm., il diagramma A2 si deve modificare? Grazie

21.03.2021 - 15:54

DROPS Design answered:

Buonasera Elena, durante gli aumenti sulla manica deve incorporare gli aumenti nella lavorazione di A.2. Buon lavoro!

21.03.2021 - 23:12

country flag Elena wrote:

Buongiorno, volevo fare questo modello ma di lana. quale filato devo prendere? grazie

23.10.2020 - 11:46

DROPS Design answered:

Buongiorno Elena. Può scegliere un filato del gruppo filati A. come p.es Alpaca, Baby alpaca silk, Nord, Flora. Dipende dalla composizione che preferisce e dalla cartella dei colori. Il suo rivenditore Drops di fiducia è a sua disposizione per aiutarla nella scelta. Verifichi inoltre di ottenere il campione indicato nelle spiegazioni. Buon lavoro!

23.10.2020 - 12:16

country flag Elena wrote:

Poiché ho difficoltà a lavorare con i ferri circolari, volevo sapere se questo modello si può eseguire con i ferri diritti ed eventualmente cosa dovrei cambiare. Grazie

22.10.2020 - 17:46

DROPS Design answered:

Buongiorno Elena. Il cardigan è lavorato in ferri di andata e ritorno. Può usare i ferri normali senza modificare le spiegazioni. Buon lavoro!

23.10.2020 - 08:56

country flag Tina Aston wrote:

Mycket sockersött

30.04.2020 - 10:29

country flag Tonnie wrote:

Het vestje gebreid met Drops for you 9, het is mooi geworden. Alleen bij de vierkantjes wat gesmokkeld, extra randje vasten gehaakt langs de zijkanten van middelste achter . Bedankt voor het leuke patroon.

04.07.2018 - 18:19

country flag Maria wrote:

Bei den Ärmeln wird es nach Anleitung oben rund - in der Zeichnung sieht es gerade aus? Ist der Ärmel nicht zu lang? Ich habe die Jacke soweit fertig und den Arm provisorisch geheftet, da war die Länge viel zu lang. (Habe die erste Größe gestrickt.

17.08.2016 - 15:58

DROPS Design answered:

Liebe Maria, auf der Schnittzeichnung kann man auch die Armkugel erkennen. Die Ärmel haben die Masse wie im Schnitt dargestellt. Stimmt Ihre Maschenprobe auch in der Höhe? Dann erhalten Sie nach Anleitung die beschriebenen Masse, Sie können jedoch den Ärmel durchaus kürzer stricken, wenn es Ihnen besser gefällt.

18.08.2016 - 08:42

Thouvenot wrote:

Bonjour, je ne trouve plus l'adresse de votre magasin dans le 13è arrondissement de paris. Pouvez- vous me l'indiquer ? j' habite à mantes la ville 78711, y a t il un magasin près de chez moi ? Merci.

15.10.2015 - 15:15

DROPS Design answered:

Bonjour Mme Thouvenot, cliquez ici pour accéder à la liste des détaillants en France, trouver toutes les coordonnées d'un magasin, et trouver le magasin le plus proche de chez vous. Bon tricot!

15.10.2015 - 16:52