
Popular categories
Looking for a yarn?


Comments / Questions (24)
![]() Carpentier Fanny wrote:
Carpentier Fanny wrote:
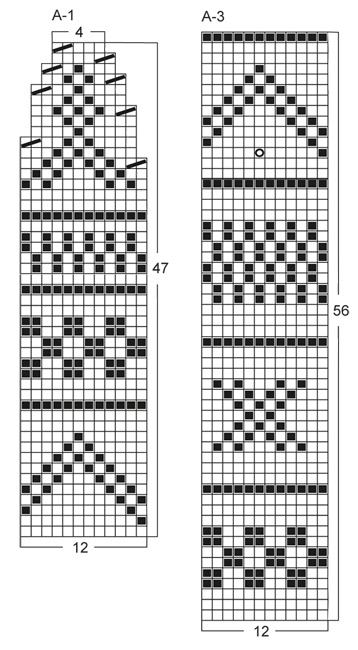
Bonjour, pouvez vous m'aider svp. Le 1er dessin du diagramme A3 ne fonctionne pas , j'ai des lignes diagonale à la place des carrés étant donné qu'il faut tricoter la 1 ère m de A3 encore une fois. Donc à chaque rang ça décale le dessin vu que l'on tricote une maille en plus.
08.12.2016 - 12:03DROPS Design answered:
Bonjour Mme Carpentier, vous répétez 3 fois en largeur les 12 m de A.3 puis vous tricotez la 1ère m de A.3 (= 1 m jersey end aux rangs 1-3, puis 1 m end aux rangs 4-5, 1 m env aux rangs 5-6 etc). Sur l'envers, tricotez d'abord la 1ère m de A.3 puis lisez le diagramme A.3 de gauche à droite. Bon tricot!
08.12.2016 - 13:21
![]() Birgitte Heen wrote:
Birgitte Heen wrote:
Hej. Jeg kan desværre ikke printe selve mønstret korrekt ud. Side 4 og 5 volder mig problemer. Har prøvet flere gange. Det bliver kun lidt af topppen og lidt nederst på A-2 og kun 13 rækker af mønster A-1 og A-3. Hvad gør jeg? Kan I hjælpe mig? Mønstret er jo så sødt og jeg vil gerne strikke sættet. Mvh Birgitte
04.11.2016 - 10:34DROPS Design answered:
Hej Birgitte. Jeg kan printe uden problemer, saa jeg tror det kan vaere din printindstillinger der gör det. Pröv evt fra en anden browser eller pc.
04.11.2016 - 14:54
![]() Margaret wrote:
Margaret wrote:
Please help me with A3. I have watched the video several times and correlated the stitches writing them on my printed pattern, but I can't seem to get past Row 4. Your video indicates ending row 4 with P2, K2. However, row 4 on my piece ends with P2 and 3 remaining stitches. I have looked at the previous comments regarding the 43 stitches, but it doesn't make sense.
02.11.2016 - 14:12DROPS Design answered:
Dear Margaret, when working A.3 you will work the white squares in stocking st = K from RS and P from WS and the black dot in reverse stocking st = P from RS and K from WS. 1st row in A.3 is worked from WS = P from Ws, then row 2 = K from RS, row 3 P from WS, row4: K2,P2,K2,P2 ..., row5: K over K and P over P, row 6: P2,K2... Row 7: K over K and P over P etc... Happy knitting!
02.11.2016 - 15:49
![]() Margaret wrote:
Margaret wrote:
Thank you so much, I can stop practising now. It makes perfect sense. I'm learning all the time.
01.11.2016 - 10:05
![]() Maj-britt wrote:
Maj-britt wrote:
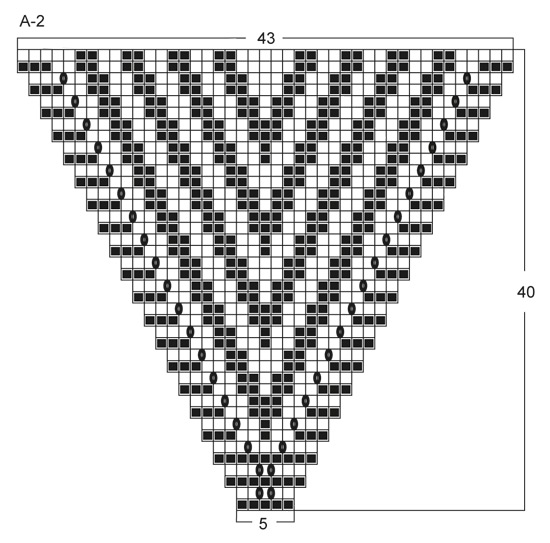
Jeg har problemer med diagram A2, man skal starte med 5 masker, men hvordan får jeg det til at gå op med de to slå om huller der skal være, det ender med jeg har et ulige antal på hver side af hullerne ?
06.01.2016 - 20:34DROPS Design answered:
Hej. På rad två stickar du: rm, rm, slå om, rm, slå om, rm, rm. Lycka till!
13.01.2016 - 08:27
![]() Louise wrote:
Louise wrote:
Voor de muts en het patroon (A1). Leest men voor de eerste ronde vanonder rechts naar links. De tweede ronde, leest men dan van links naar rechts, of van rechts naar links?
30.11.2014 - 20:20DROPS Design answered:
Hoi Louise. Je breit in de rondte, dus elke rij lees je van rechts naar links. Je begint rechtsonder. Je kan hier ook lezen hoe je onze telpatronen moet lezen.
01.12.2014 - 14:48
![]() Gracia wrote:
Gracia wrote:
El diagrama muestra las vueltas impares,el lado derecho las pares o sea el reves se hacen segun se presentan los puntos
12.12.2013 - 17:15DROPS Design answered:
Hola Gracia! El diagrama muestra todas las filas/vueltas. Se lee de diferente manera si se trata de la bufanda o del gorro, el gorro se trabaja en redondo y solo se trabaja por el lado derecho. La bufanda (de ida y vuelta) se trabaja una fila por el lado derecho y una fila por el lado revés. Cómo trabajar cada punto (cuadrado en el diagrama) se explica antes del diagrama.
17.12.2013 - 11:10
![]() S G wrote:
S G wrote:
Det kan virke som om det er noe galt med oppskriften. Både lue, skjerf og votter passer bedre til barn enn voksne fordi det blir så smått.
02.11.2013 - 17:55DROPS Design answered:
Sørg for at du har 18 m på 10 cm til lue og votter. Til skjerfet må du ha 16 m på 10 cm. Hvis strikkefastheden overholdes får du samme mål som i oppskriften.
04.11.2013 - 11:34
![]() Ashley wrote:
Ashley wrote:
Can you please clarify A3? I don't understand how repeating the first stitch solves the additional stitch issue. When I repeat the first stitch, my "blocks" (first pattern of A3) do not line up because you repeat the first stich at the end on every row which means the following row moves by one stich. Thank you.
29.10.2013 - 04:30DROPS Design answered:
Dear Ashley, seen from RS, you will finish row with 1st st in A.3 (1st "line" at the right of the diag), from WS, start with that line before reading next repeat starting from the left towards the right. Happy knitting!
29.10.2013 - 09:30Angela wrote:
I don t understand how to continue when i have finished A2 and i have to make A 3 because 12+12+12 is 36 and i have 43 sts to work.thank you
03.01.2013 - 09:43DROPS Design answered:
Dear Angela, after A2, you work A3 as follows : 3 garter st, diagram A3 a total of 3 times, then work the 1st st only in A3 and finish with 3 garter sts = 3+ (12x3) + 1 + 3 = 43 sts. Happy knitting !
03.01.2013 - 13:07
|
||||||||||||||||
Veronica#veronicaset |
||||||||||||||||
 |
 |
|||||||||||||||
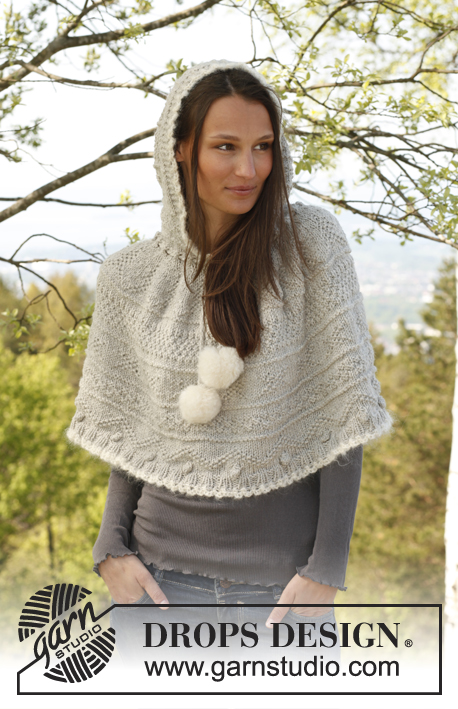
Knitted DROPS mittens, hat and scarf with textured pattern in "Nepal", pompoms in "Vienna".
DROPS 141-23 |
||||||||||||||||
|
PATTERN: See diagram A-1 for hat and mittens, and A-2 and A-3 for scarf. Diagrams show 1 repetition of pattern. ---------------------------------------------------------- HAT: Worked in the round. Cast on 84 sts on circular needle size 3.5 mm / US 4 with Nepal. K 1 round, then work 6 rounds rib = K 2/P 2. Switch to circular needle size 4.5 mm / US 7, then work diagram A-1 (= 7 repetitions on the round). REMEMBER THE GAUGE! When A-1 has been worked, 28 sts remain on needle, on next round K2 tog around = 14 sts. Cut the thread and pull it through the remaining sts and tighten tog. POMPOM: Make 1 large, dense pompom with Vienna with an approx. diameter of 10 cm / 4". Sew the pompom at the top of the hat. ---------------------------------------------------------- SCARF: Worked in 2 parts back and forth on needle and sewn tog in the middle when finished. Cast on 5 sts on needle size 5.5 mm / US 9 with Nepal. Work and inc according to diagram A-2 (1st row = WS). When A-2 has been worked, there are 43 sts on needle and piece measures approx. 20 cm / 8". Continue as follows (1st row = WS): 3 sts in garter st, A-3 three times in breadth, then work first st in A-3 one more time and work the last 3 sts in garter st. REMEMBER THE GAUGE! Repeat A-3 until piece measures approx. 75 cm / 29½" – finish after one whole border in pattern, then K 2 rows over all sts. Put piece aside and knit another part. ASSEMBLY: Sew the 2 parts tog with grafting/kitchener sts. POMPOMS: Make 2 large, dense pompoms with Vienna with an approx. diameter of 8 cm / 3". Fasten 1 pompom in each end of scarf. ---------------------------------------------------------- MITTEN: Worked in the round on double pointed needles. Cast on 36 sts on double pointed needles size 3.5 mm / US 4 with Nepal, K 1 round then work rib = K 2/P 2 for 10 cm / 4". Work next round as follows: * K 2 tog, 1 YO *, repeat from *-* the rest of round. Switch to double pointed needles size 4.5 mm / US 7, then work diagram A-1 (= 3 repetitions on the round). REMEMBER THE GAUGE! Insert a marker in first st on round (= thumb st). When A-1 has been worked for 2 cm / ¾", beg inc for thumb gusset. Inc on each side of thumb st by making 1 YO, on next round K YOs twisted. Repeat inc every other round 3 more times - inc on each side of all thumb sts every time, i.e. next time inc on each side of 3 sts, then 5 sts etc. – work the inc sts in stockinette st. After all inc, there are 9 thumb sts and 44 sts in total. When A-1 has been worked for 6 cm / 2½", slip the 9 thumb sts on a stitch holder and cast on 1 new st over stitch holder = 36 sts. Work until A-1 is finished, 12 sts now remain on needle. On next round K2 tog around = 6 sts. Cut the thread and pull it through the remaining sts and tighten tog. THUMB: Slip sts from stitch holder over thumb gusset on double pointed needles size 4.5 mm / US 7 and in addition pick up 3 sts along the edge behind the thumb = 12 sts. Work in stockinette st for 5 cm / 2", then K2 tog around = 6 sts. Cut the thread and pull it through the remaining sts and tighten tog. Knit another mitten. |
||||||||||||||||
Diagram explanations |
||||||||||||||||
|
||||||||||||||||
 |
||||||||||||||||
 |
||||||||||||||||
Have you finished this pattern?Tag your pictures with #dropspattern #veronicaset or submit them to the #dropsfan gallery. Do you need help with this pattern?You'll find 9 tutorial videos, a Comments/Questions area and more by visiting the pattern on garnstudio.com. © 1982-2026 DROPS Design A/S. We reserve all rights. This document, including all its sub-sections, has copyrights. Read more about what you can do with our patterns at the bottom of each pattern on our site. |
||||||||||||||||


With over 40 years in knitting and crochet design, DROPS Design offers one of the most extensive collections of free patterns on the internet - translated to 17 languages. As of today we count 325 catalogs and 12298 patterns - 12288 of which are translated into English (US/in).
We work hard to bring you the best knitting and crochet have to offer, inspiration and advice as well as great quality yarns at incredible prices! Would you like to use our patterns for other than personal use? You can read what you are allowed to do in the Copyright text at the bottom of all our patterns. Happy crafting!
Post a comment to pattern DROPS 141-23
We would love to hear what you have to say about this pattern!
If you want to leave a question, please make sure you select the correct category in the form below, to speed up the answering process. Required fields are marked *.