
Popular categories
Looking for a yarn?


Comments / Questions (47)
![]() Margi wrote:
Margi wrote:
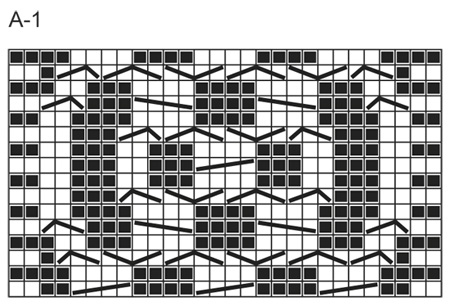
Hallo Leute, das Diagramm ist keineswegs falsch. Es ist so abgebildet, das alle Maschen von vorne gesehen werden. Also klar, Hinreihe rechts, Rückreihe links. Von vorne ist beides rechts im Diagramm. Viel Spaß noch ihr Lieben!
22.11.2021 - 21:06
![]() Angela wrote:
Angela wrote:
Der Hut ist wunderschön.An alle die Probleme mit der Anleitung haben,habe ich die Lösung herausgefunden.(was in der Anleitung falsch ist)Die Hinreihen sind alle richtig ,ihr müßt die Rückreihen entgegengesetzt arbeiten.Das heißt wenn dort zwei links steht,müßt ihr zwei rechts stricken.Dann habt ihr nachher auch das schöne Muster.Ich hoffe ich konnte Euch helfen.Viel Spaß beim stricken wünscht Euch Angela 🧶🧶🧶
07.08.2021 - 16:16
![]() Eva Hederström wrote:
Eva Hederström wrote:
Hej I mönstret står att det ska stickas 8 rapporter av flätkanten för huvudmått 55 cm. Jag har nu stickat 4 rapporter och arb mäter redan 55 cm! Var ligger felet? Tack och bästa hälsningar Eva
08.10.2019 - 13:35DROPS Design answered:
Hej Eva, Det lyder til at du strikker lidt løsere end hvad vi gør i opskriften. Din strikkeprøve skal måle 10 cm efter 23 pinde glatstrik. Strikker du i DROPS Nepal? Skal du evt bruge et nummer mindre? Læs gerne mere om strikkefasthed under FAQ.
09.10.2019 - 14:09
![]() Antonina Meloni wrote:
Antonina Meloni wrote:
Non capisco quando dite: primo ferro a dritto sul rovescio del lavoro, grazie. Antonina Meloni
31.01.2019 - 22:27DROPS Design answered:
Buonasera Antonina. Per rovescio del lavoro si intenda la parte interna del lavoro, quella che non risulta visibile quando il capo viene indossato. Lavorare a diritto sul rovescio del lavoro, vuol dire che, con il rovescio del lavoro rivolto verso di lei, lavora tutte le maglie a diritto. Buon lavoro!
31.01.2019 - 23:04
![]() Teresa wrote:
Teresa wrote:
Buongiorno. Siccome vorrei iniziare la treccia centrale con un avvio provvisorio, penso che quandro andrò a fare l'unione le trecce non combaciano ma ci sono dei ferri in più. poi il kfb lascia una m come se fosse a R. Potrei avviare con il filo di scarto direttamente 28 m, ma poi non capisco quale è il D e il R del lavoro. Il primo ferro dopo l'avvio provvisorio sarebbe D o R ? Se inizio subito con la chart dopo l'avvio provvisorio poi mi trovo con la chiusura ad ago? Grazie
17.07.2017 - 01:40DROPS Design answered:
Buongiorno Teresa. Dopo l’avvio provvisorio con un filo di scarto può seguire le indicazioni riportate nel testo senza modifiche. Generalmente l’avvio provvisorio comporta avere delle maglie vive che vengono chiuse a punto maglia. Buon lavoro!
17.07.2017 - 12:37
![]() Susan Berlin wrote:
Susan Berlin wrote:
I'm just knitting this pattern, which is lovely -- but I'm wondering what would happen if the cable section were knit with a provisional cast-on, then the ends grafter together, and then the cap and brim knitted in the round? Is there a reason to knit it flat?
19.08.2016 - 18:26DROPS Design answered:
Dear Mrs Berlin, this is the designer's choice, some knitters have also choose to work cable section with a provisional cast-on, grafted tog and then cap and brim in the round. Happy knitting!
22.08.2016 - 08:35
![]() Anke wrote:
Anke wrote:
Danke für die Antwort. Und ist das alles richtig in dem Diagramm? Es gab ja hier schon einen Kommentar, nachdem die Angaben rechts/links falsch seien. So wie ich gestrickt habe, kommt kein schöner Zopf raus... Danke Anke
07.04.2016 - 20:55DROPS Design answered:
Liebe Anke, wenn Sie die Legende zum Diagramm genau beachten (wann die Maschen vor bzw. hinter die Arbeit gelegt werden) entsteht genau dieses Zopfmuster. Dieser Hut wurde schon sehr oft nachgearbeitet.
08.04.2016 - 08:31
![]() Anke wrote:
Anke wrote:
Hallo, zeigt das Diagramm A1 Hin- und Rückreihen oder nur die Hinreihen? Ich habe Hin- und Rückreihen gestrickt, aber es sieht falsch aus. Normalerweise werden bei Zopfmustern doch bei der Rückreihe die Maschen so gestrickt, wie sie erscheinen, das wäre dann hier anders, wenn die Rückreihen gezeigt werden. Vielen Dank
06.04.2016 - 21:55DROPS Design answered:
Liebe Anke, im Diagramm sind Hin-und Rückreihen gezeigt.
07.04.2016 - 07:16
![]() Kathy DeWitt wrote:
Kathy DeWitt wrote:
If you knit this hat plain without the cable will it come out alright please? Kathy
27.01.2016 - 14:34DROPS Design answered:
Dear Mrs DeWitt, you should then have to edit the pattern (cables require more sts in width than stocking st for same width in cm) - for any personnal assistance remember you can contact your DROPS store even per telephone or per mail. Happy knitting!
28.01.2016 - 13:00
![]() Rita wrote:
Rita wrote:
Hallo liebes Garnstudio-Team! Ich möchte auf einen Fehler aufmerksam machen: Bei der Anleitung für das Zopfband müssen alle Maschen genau andersherum lauten, statt rechts muss es links heißen. Sonst wird es nichts mit dem Muster. Ansonsten ist es eine tolle Anleitung und der Hut ist super gelungen! Überhaupt habt ihr geniale Anleitungen, die man sogar als Anfänger leicht nachstricken oder -häkeln kann! Vielen Dank!
15.01.2016 - 10:01
|
|||||||||||||||||||||||||
Runa#runahat |
|||||||||||||||||||||||||
 |
 |
||||||||||||||||||||||||
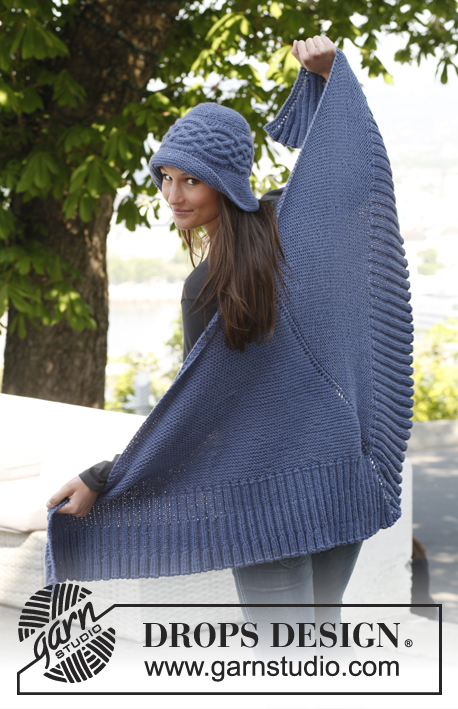
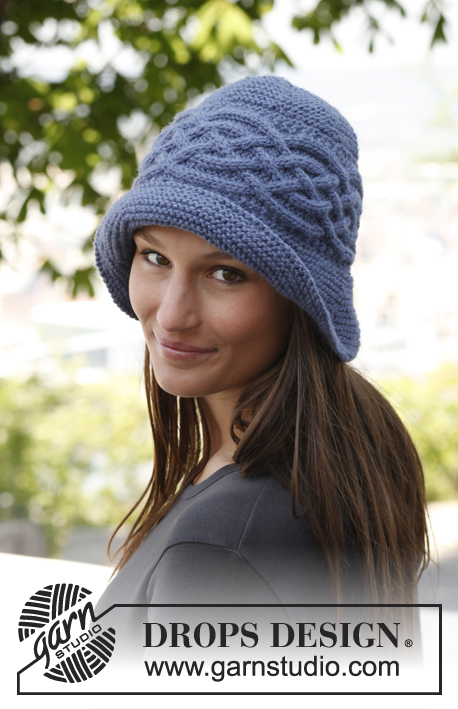
Knitted DROPS hat with sideways cable in ”Nepal”.
DROPS 141-42 |
|||||||||||||||||||||||||
|
GARTER ST (back and forth on needle): K sts on all rows. 2 K rows = 1 ridge PATTERN: See diagram A-1. Diagram shows 1 repetition of pattern in width and vertically, the diagram shows all rows in pattern seen from RS. ---------------------------------------------------------- HAT: First work the cable back and forth sideways. Then pick up sts along one side of cable and work crown of hat. Then pick up sts along the other side of cable and work brim of hat. Finally sew the hat tog mid back. CABLE EDGE: Worked back and forth on needle size 4.5 mm / US 7. Cast on 22 sts with Nepal. K 1 row from WS. Work next row as follows: 2 sts in GARTER ST – see explanation above, * P 2, K 2 in each of the next 2 sts (= K 4), P 2 *, repeat from *-* 2 more times, finish with 2 sts in garter st = 28 sts. Work 1 row from WS with K over K and P over P with 2 sts in garter st in each side. Continue with A-1 until 7-8 repetitions have been worked (piece measures approx. 49-55 cm / 19¼"-21½""). Work next row as follows: 2 sts in garter st, * P 2, K 2 tog, K 2 tog, P 2 *, repeat from *-* 2 more times, finish with 2 sts in garter st = 22 sts. K 1 row from WS over all sts, then bind off. Edge is approx. 12 cm / 4¾" wide. CROWN OF HAT: Worked back and forth on circular needle size 4 mm / US 6. Pick up 1 st in every ridge in front loop of outermost st along one side of cable edge. K 1 row from WS while at the same time inc evenly to 90-100 sts (inc by working 2 sts in 1 st). Insert 1 marker at beg of row (from RS) and then 1 marker for every 10th st (= 9-10 markers in total). Work in GARTER ST back and forth - see explanation above. AT THE SAME TIME on 4th row from when sts where picked up (= row from RS), dec 1 st after every marker by K 2 tog. Repeat dec every 4 rows 3 more times and then every other row 5 times = 9-10 sts remain on needle. Cut the thread and pull it through the remaining sts and tighten tog. BRIM OF HAT: Worked back and forth on circular needle size 4 mm / US 6. Pick up 1 st in every ridge along the other side of cable edge. K 1 row from WS while at the same time inc evenly to 90-100 sts. Insert 1 marker at beg of row (from RS) and then 1 marker for every 10th st (= 9-10 markers in total). Work in GARTER ST back and forth - see explanation above. AT THE SAME TIME on 2nd row from when sts where knit up (= row from RS), inc 1 st after every marker by making 1 YO. On next row K YOs twisted to avoid holes. Repeat inc every other row 2 more times and then every 4 rows 2 times = 135-150 sts. Work in garter st without inc until brim measures 7½-8 cm / 2¾"-3", bind off from RS (NOTE: Do not bind off too loosely). ASSEMBLY: Sew hat tog mid back outermost sts to avoid a chunky seam. |
|||||||||||||||||||||||||
Diagram explanations |
|||||||||||||||||||||||||
|
|||||||||||||||||||||||||
 |
|||||||||||||||||||||||||
Have you finished this pattern?Tag your pictures with #dropspattern #runahat or submit them to the #dropsfan gallery. Do you need help with this pattern?You'll find 9 tutorial videos, a Comments/Questions area and more by visiting the pattern on garnstudio.com. © 1982-2026 DROPS Design A/S. We reserve all rights. This document, including all its sub-sections, has copyrights. Read more about what you can do with our patterns at the bottom of each pattern on our site. |
|||||||||||||||||||||||||


With over 40 years in knitting and crochet design, DROPS Design offers one of the most extensive collections of free patterns on the internet - translated to 17 languages. As of today we count 324 catalogs and 12290 patterns - 12280 of which are translated into English (US/in).
We work hard to bring you the best knitting and crochet have to offer, inspiration and advice as well as great quality yarns at incredible prices! Would you like to use our patterns for other than personal use? You can read what you are allowed to do in the Copyright text at the bottom of all our patterns. Happy crafting!
Post a comment to pattern DROPS 141-42
We would love to hear what you have to say about this pattern!
If you want to leave a question, please make sure you select the correct category in the form below, to speed up the answering process. Required fields are marked *.