
Popular categories
Looking for a yarn?


Comments / Questions (113)
![]() Vanessa wrote:
Vanessa wrote:
Hallo Zusammen! Wenn ich den bunten Teil der Tasche lieber einfarbig stricken möchte,wie viel Wolle brauche ich denn da ungefähr? Liebe Grüße!
27.02.2013 - 13:37DROPS Design answered:
Liebe Vanessa, wir haben diese Anleitung leider nur für die bunte Tasche. da die Tasche nicht mehr hier ist, kann ich sie auch nicht wiegen. Evtl. brauchen Sie weniger als bei der bunten Tasche, aber ich kann Ihnen die Menge leider nicht sagen. Sie können sich an einfarbigen Taschenmodellen orientieren.
28.02.2013 - 09:26
![]() Bine wrote:
Bine wrote:
Habe die Tasche genau nach Anleitung gestrickt.Leider reicht die dunkelbraune Wolle nicht.Also lieber ein Knäuel mehr kaufen.
24.02.2013 - 16:16
![]() Maria wrote:
Maria wrote:
Habe die Streifen mit dem Rückstich (und einem Wollgarn)zusammengenäht. Wird die Tasche beim Filzen trotzdem gleichmäßig einlaufen können, oder ist diese Naht zu fest?
19.02.2013 - 17:51DROPS Design answered:
Liebe Maria, mit Alaska kann man gut nähen (es ist kein Dochtgarn), daher empfehlen wir, die Tasche mit dem Originalgarn zusammenzunähen. Da ich das von Ihnen benutzte Garn nicht kenne, kann ich nicht beurteilen wie es sich beim Filzen verhält. Eine Naht mit Rückstichen ist in Ordnung.
20.02.2013 - 07:51
![]() Maria wrote:
Maria wrote:
Habe die Runde mit Umschlägen in Farbe 23 gestrickt, sind aber 216 maschen geworden. müssen aber, wenn ich richtig verstehe, 200 sein? was mache ich falsch?
17.02.2013 - 19:50DROPS Design answered:
Liebe Maria, dann haben Sie zu viele Maschen aufgefasst: Sie haben ja insgesamt über 10 Quadraten Maschen aufzufassen (je 4 vorne und hinten und je 1 auf der Seite) – nun müssen Sie einfach darauf achten, pro Quadrat etwa 20 M aufzufassen.
18.02.2013 - 10:03
![]() Heide wrote:
Heide wrote:
Muss man die für die Träger die 2 m lange Schnur zweimal stricken? Und wie wird sie dann eingefädelt?
16.01.2013 - 09:50DROPS Design answered:
Liebe Heide, die Schnur wird nur 1 x gestrickt und nach dem Filzen wie auf dem Foto sichtbar durch die Löcher gefädelt (die beiden Enden mit Knoten innen in der Tasche fixieren).
17.01.2013 - 13:45Christina wrote:
Hej! Är mycket intresserad av stickning o virkning. Har betat av en hel del mönster från er hemsida. Tänker göra väskan Anatolia i garnet Alaska, har kommit en bit på vägen och ska nu sätta ihop de olika “remsorna” enligt ert diagram.Men när jag lägger ut dem så stämmer inte längderna och “gavelbiten”. Det verkar som om jag måste hålla igen en del för att få det att stämma. Ska det vara så? Har stickat och tovat en hel del och inte råkat ut för detta tidigare.
22.11.2012 - 11:06DROPS Design answered:
Det er mange som har laget denne vesken og det skal ikke være noe feil med denne modellen. Om lappene dine har riktig mål skal de passe sammen som beskrevet. Om det er litt forskjell hadde jeg prøvd å tilpasse med sømmen så godt det går. Det viktigste er iallefall at kanten oppe blir jevn og fin.
22.11.2012 - 11:08
![]() DROPS Design NL wrote:
DROPS Design NL wrote:
Hoi Mita. Je kan ze tegelijkertijd vilten. Dat lijkt me geen probleem. Leg eventueel wat oud kleding en tennisballen samen met de tassen in de machine. Dan vilten ze niet samen. Maar maak eerst een test en zie hoe het werkt (met twee proeflapje s).
05.11.2012 - 13:12
![]() Mita wrote:
Mita wrote:
Kan ik twee handtassen gelijkertijd vilten in de wasmachine,of moet het stuk per stuk gedaan worden.Ik maak nml.voor elk van mijn dochters 1 als geschenk voor de feestdagen.Dank voor reacties.
04.11.2012 - 16:42
![]() Margreet wrote:
Margreet wrote:
Jullie hebben gelijk. Het hengsel is bij nader inzien wél lang genoeg. De tas op de foto lijkt wel een langer hengsel te hebben, sowieso lijkt de tas veel groter dan de mijne. Misschien dat het fotomodel erg klein van stuk is? In ieder geval ben ik erg blij met mijn resultaat.
07.10.2012 - 11:09
![]() Margreet wrote:
Margreet wrote:
Ik heb de tas en het hengsel gebreid en gevilt. Het resultaat is verbluffend. Echt heel mooi. Maar..... is 1 hengsel, zoals het patroon vermeld wel de bedoeling? Ik meen er twee nodig te hebben, die ene die vóór het vilten ruim 200 cm was, is echt niet genoeg.
01.10.2012 - 22:47DROPS Design answered:
Het patroon zou moeten kloppen met de juiste stekenverhouding. Na het vilten zou een hengsel van 200 cm ongeveer 130 cm lang zijn en lang genoeg voor deze tas.
02.10.2012 - 16:09
|
|||||||
Anatolia#anatoliabag |
|||||||
|
|
|||||||
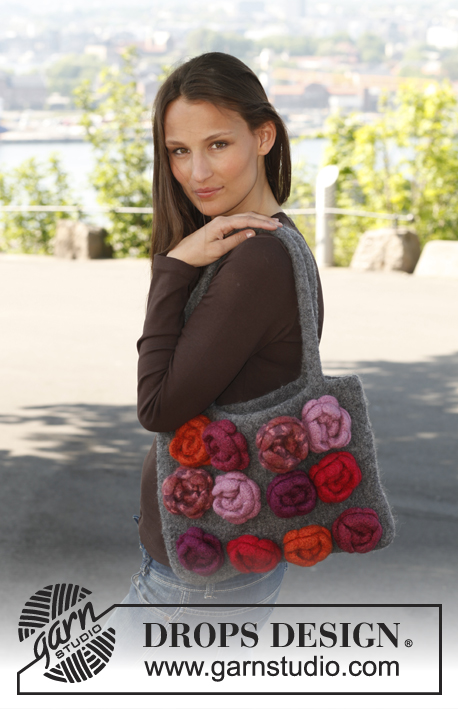
Felted DROPS bag in ”Alaska”.
DROPS 140-33 |
|||||||
|
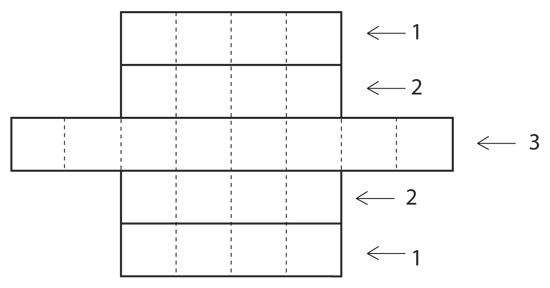
BAG: The entire bag is worked in stockinette st, work 5 strips that are sewn tog when finished. STRIP 1 (make 2): Worked back and forth on circular needle. Cast on 20 sts on circular needle size 5 mm / US 8 with color no 54 and work 34 rows in each color in the following order: Color no 54, 53, 58, 37, bind off. STRIP 2 (make 2): Worked back and forth on circular needle. Cast on 20 sts on circular needle size 5 mm / US 8 with color no 56 and work 34 rows in each color in the following order: Color no 56, 11, 57, 45, bind off. STRIP 3 (make 1): Worked back and forth on circular needle. Cast on 20 sts on circular needle size 5 mm / US 8 with color no 45 and work 34 rows in each color in the following order: Color no 45, 57, 37, 58, 53, 54, 11, 56, bind off. Sew strips tog sideways – see figure for placement. Sew the rest of strip 3 to short side on strip 1 and 2 in each side. Pick up 200 sts around the upper edge of bag with color no 23 on circular needle size 5 mm / US 8. Insert 1 marker in the middle st from one short side = beg of round. Work in stockinette st in the round. When 3 cm / 1" have been worked, work as follows: K 8, 2 YO, K 2 tog, K 18, 2 YO, K 2 tog, K 38, 2 YO, K 2 tog, * K 18, 2 YO, K 2 tog *, repeat from *-* 3 times, K 38, 2 YO, K 2 tog, K 18, 2 YO, K 2 tog, K 10. On next row slip one YO off the needle and K the other YO – make sure that holes are made. Continue in stockinette st. When piece measures 7 cm / 2¾", work as follows: bind off the first 40 sts on round, work 20 sts, bind off the remaining sts. Cut the thread. Work 28 rows in stockinette st over the 20 sts, work next row as follows: Work 9 sts, 2 YO, K 2 tog, work the rest of row. On next row slip one YO off the needle and K the other YO – make sure that a hole is made. Work 5 rows in stockinette st over all sts, bind off. TIE: Work a tube with 4 sts back and forth on circular needle size 5 mm / US 8 as follows: Cast on 4 sts with color no 23 and K 1 row. Then work as follows: * Slide all sts to the right side of needle without turning the piece, tighten thread and K over all sts *, repeat from *-* until tie measures 200 cm / 80". Cut and fasten the thread. FELTING: The piece can be felted either in the washing machine or the tumble dryer – read description below. Remember: Subsequent washes are as for a normal wool garment. IN WASHING MACHINE: Washing machines will vary when felting. If the piece is not felted enough, it can be felted again. If it is felted too much, it can be stretched to the correct size while still wet. DO THE FOLLOWING: Lay the piece in the washing machine, using a programme of approx. 40 minutes (not a wool programme). Wash at 40 degrees C = 104 degrees F without pre-wash, detergent is optional. After washing, shape the piece while it is still wet. IN TUMBLE DRYER: Felting in a tumble dryer gives good control over the degree of felting. The tumble dryer can be opened during drying to check the size of the piece. If it is not felted enough it can be thoroughly wetted and felted again. If it is felted too much it can be stretched to the correct size while still wet. DO THE FOLLOWING: Lay the piece in water so it becomes completely wet, then place it in the tumble dryer and begin the drying process. Dry to the desired size, checking regularly. Thread tie up and down the holes and tie ends tog inside the bag. Sew button on top of bag. |
|||||||
Diagram explanations |
|||||||
|
|||||||
 |
|||||||
Have you finished this pattern?Tag your pictures with #dropspattern #anatoliabag or submit them to the #dropsfan gallery. Do you need help with this pattern?You'll find 6 tutorial videos, a Comments/Questions area and more by visiting the pattern on garnstudio.com. © 1982-2026 DROPS Design A/S. We reserve all rights. This document, including all its sub-sections, has copyrights. Read more about what you can do with our patterns at the bottom of each pattern on our site. |
|||||||


With over 40 years in knitting and crochet design, DROPS Design offers one of the most extensive collections of free patterns on the internet - translated to 17 languages. As of today we count 324 catalogs and 12290 patterns - 12280 of which are translated into English (US/in).
We work hard to bring you the best knitting and crochet have to offer, inspiration and advice as well as great quality yarns at incredible prices! Would you like to use our patterns for other than personal use? You can read what you are allowed to do in the Copyright text at the bottom of all our patterns. Happy crafting!
Post a comment to pattern DROPS 140-33
We would love to hear what you have to say about this pattern!
If you want to leave a question, please make sure you select the correct category in the form below, to speed up the answering process. Required fields are marked *.