
Popular categories
Looking for a yarn?


Comments / Questions (113)
![]() Paula wrote:
Paula wrote:
Hallo! Gibt es die Farbe Nr. 56 von Alaska nicht mehr? Und was währe die Alternative dazu?
27.09.2015 - 14:35DROPS Design answered:
Nr. 56 gibt es nicht mehr, das ist richtig. Einen genauen farblichen Ersatz gibt es nicht, aber die Tasche ist ja insgesamt sehr bunt, Sie können also einfach schauen, welche andere Farbe Ihnen gefallen würde. Auf dem Foto ist Nr. 56 das Quadrat oben links und unten rechts. Ich fände als Ersatz Nr. 40 altrosa oder Nr. 03 hellgrau geeignet, aber auch Nr. 52 petrol für einen etwas knalligeren Kontrast und andersfarbigen Akzent, das bleibt letztendlich Ihrem Geschmack überlassen.
27.09.2015 - 20:23
![]() Paula wrote:
Paula wrote:
Hallo!Mir fehlt bei dieser Anleitung die Farbe Nr. 56 von Alaska .Gibt es die nicht mehr? Und was wäre die Alternative dazu? Liebe Grüße!
27.09.2015 - 14:25DROPS Design answered:
Antwort siehe oben! :-)
27.09.2015 - 20:23
![]() Rike Litz wrote:
Rike Litz wrote:
Warum soll ich Streifen stricken und sie zusammennähen. Man könnte doch die Streifen direkt aneinanderstricken. Dann gibt es zwar Farbwechsel beim Stricken der Reihen, aber ist ja bei hin und her kein Problem. Oder sind die Nähte für eine bessere Stabilität der Tasche notwendig? Ich hasse es, Teile zusammenzunähen und würde lieber alles in einem stricken, so dass am Ende nur die Seitennähte zu schließen wären.
02.03.2015 - 11:10DROPS Design answered:
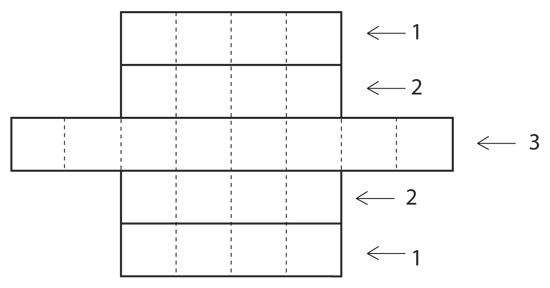
Sie haben dann immer 5 Knäuel am Gestrick hängen. Wenn Ihnen das nichts ausmacht, können Sie die ganze Tasche am Stück stricken. Die Strickrichtung sehen Sie in der Skizze. Sie müssten also mit dem 3. Streifen beginnen und nach 2 Farbquadraten rechts und links neue M anschlagen (für die Streifen 1 u. 2) oder die zusätzlichen Quadrate von Streifen 3 später anstricken. Die Knäuel müssen Sie vorher aufteilen, denn Sie brauchen in einem Streifen 2 Farben ja 2x, am besten notieren Sie sich das vorher, um nicht durcheinander zu kommen.
03.03.2015 - 16:28
![]() Rike Litz wrote:
Rike Litz wrote:
Warum soll ich Streifen stricken und sie zusammennähen. Man könnte doch die Streifen direkt aneinanderstricken. Dann gibt es zwar Farbwechsel beim Stricken der Reihen, aber ist ja bei hin und her kein Problem. Oder sind die Nähte für eine bessere Stabilität der Tasche notwendig? Ich hasse es, Teile zusammenzunähen und würde lieber alles in einem stricken, so dass am Ende nur die Seitennähte zu schließen wären.
26.02.2015 - 19:13DROPS Design answered:
Antwort siehe oben! :-)
06.03.2015 - 20:30
![]() Hanna wrote:
Hanna wrote:
Hallo, Ich stricke derzeit an dieser tollen Tasche, verwende aber nur zwei Farben. Nun hab ich mich gefragt, ob ich zu der senffarbenen alaskawolle eine beliebige andere Wolle kombinieren kann? Da ich öfters gelesen habe dass oben die 100g wolle nicht reichen möchte ich auf nummer sicher gehen, aber 5 Euro Versand für eine wolle ist mir zuviel... Wäre super, wenn Sie mir weiterhelfen können! Viele Grüße Hanna
20.01.2015 - 14:24DROPS Design answered:
Da die Tasche ja gefilzt wird, sollten Sie nur eine Garnqualität verwenden und nicht mischen, da sich die verschiedenen Garne beim Filzen unterschiedlich verhalten können. Das könnte dann zu unschönen "Verzerrungen" führen. Sie sollten also bei Alaska bleiben. Höchstens die Träger könnten Sie aus einer anderen Wolle stricken, da die Trägerschnur separat gefilzt wird, aber das sieht dann wohl etwas unpassend aus.
21.01.2015 - 22:05
![]() Manuela wrote:
Manuela wrote:
Beim waschen hat es mir die Löcher für die Träger mit zugefilzt. Was kann ich machen? Einfach reinschneiden? Bin etwas ratlos...
21.10.2014 - 21:13DROPS Design answered:
Je nachdem, wie stark die Löcher zugefilzt sind, würde ich versuchen, sie mit einer Nadel/Stricknadel wieder aufzudrücken/aufzubohren. Bei starker Verfilzung und wenn die Tasche insgesamt gut und fest gefilzt ist, können Sie tatsächlich zur Schere greifen, vorsichtig mit einer spitzen Schere und kleinen Schnitten.
22.10.2014 - 12:31
![]() Inger wrote:
Inger wrote:
Skal snoren til tasken være strikket og fastgjort inden tasken fiiltes?
01.10.2014 - 21:17DROPS Design answered:
Hej Inger. Ja, det skal den.
02.10.2014 - 10:20
![]() Annie wrote:
Annie wrote:
Je viens de terminer ce sac. Il est magnifique!!! c'était mon 1er essai feutrage...parfaitement réussi;o) Merci et bravo pour votre site et les superbes laines et modèles proposés.
28.07.2014 - 10:18
![]() Antonella wrote:
Antonella wrote:
Buongiorno, ho terminato la lavorazione della borsa ma con la chiusura delle maglie vedo che si il bordo della borsa si arrotola un po' verso l'esterno. Ho paura che poi con l'infeltrimento la situazione peggiori... cosa posso fare per risolvere il problema?
20.06.2014 - 13:14DROPS Design answered:
Buonasera Antonella. Con l’infeltrimento il problema del bordo si dovrebbe risolvere. Si assicuri di mettere bene in forma la borsa appena lavata. Buon lavoro!
21.06.2014 - 22:24
![]() Ryanne Smit wrote:
Ryanne Smit wrote:
Hoi! Superleuke patroon! Ik heb 'm nu bijna af en zal 'm dan gaan vilten. Ik lees op sommige fora dat vilten in de droger beter is omdat je dan af en toe kan kijken hoe het gaat. Kan dat met deze tas ook? En heeft u daar nog tips voor?
01.05.2014 - 01:08DROPS Design answered:
Ik heb persoonlijk goede ervaringen met de droger. Ik maak het werk dan goed nat (2 minuten heen en weer bewegen in lauw water met een beetje wasmiddel) en knijp het dan uit zodat het niet kletsnat is. Dan in de droger en vaak kijken. Zo lopen kleuren ook minder makkelijk door. Maar... elke droger is anders en het kan wat langer duren. Als het werk bijna droog is, maar niet genoeg gevilt, dan opnieuw vers water, beetje zeep, etc.
01.05.2014 - 09:09
|
|||||||
Anatolia#anatoliabag |
|||||||
|
|
|||||||
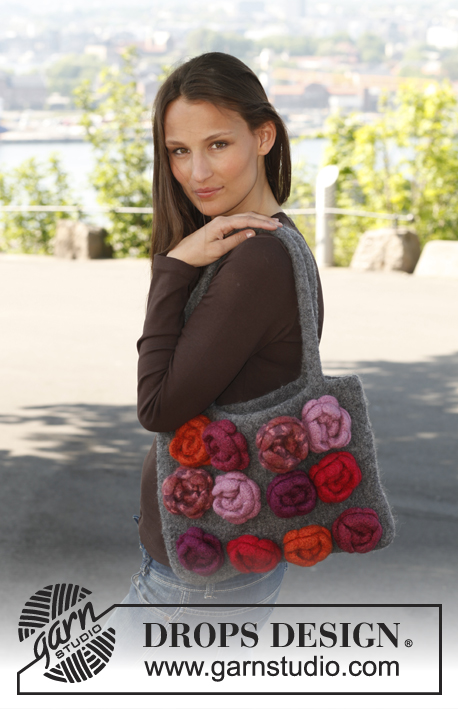
Felted DROPS bag in ”Alaska”.
DROPS 140-33 |
|||||||
|
BAG: The entire bag is worked in stockinette st, work 5 strips that are sewn tog when finished. STRIP 1 (make 2): Worked back and forth on circular needle. Cast on 20 sts on circular needle size 5 mm / US 8 with color no 54 and work 34 rows in each color in the following order: Color no 54, 53, 58, 37, bind off. STRIP 2 (make 2): Worked back and forth on circular needle. Cast on 20 sts on circular needle size 5 mm / US 8 with color no 56 and work 34 rows in each color in the following order: Color no 56, 11, 57, 45, bind off. STRIP 3 (make 1): Worked back and forth on circular needle. Cast on 20 sts on circular needle size 5 mm / US 8 with color no 45 and work 34 rows in each color in the following order: Color no 45, 57, 37, 58, 53, 54, 11, 56, bind off. Sew strips tog sideways – see figure for placement. Sew the rest of strip 3 to short side on strip 1 and 2 in each side. Pick up 200 sts around the upper edge of bag with color no 23 on circular needle size 5 mm / US 8. Insert 1 marker in the middle st from one short side = beg of round. Work in stockinette st in the round. When 3 cm / 1" have been worked, work as follows: K 8, 2 YO, K 2 tog, K 18, 2 YO, K 2 tog, K 38, 2 YO, K 2 tog, * K 18, 2 YO, K 2 tog *, repeat from *-* 3 times, K 38, 2 YO, K 2 tog, K 18, 2 YO, K 2 tog, K 10. On next row slip one YO off the needle and K the other YO – make sure that holes are made. Continue in stockinette st. When piece measures 7 cm / 2¾", work as follows: bind off the first 40 sts on round, work 20 sts, bind off the remaining sts. Cut the thread. Work 28 rows in stockinette st over the 20 sts, work next row as follows: Work 9 sts, 2 YO, K 2 tog, work the rest of row. On next row slip one YO off the needle and K the other YO – make sure that a hole is made. Work 5 rows in stockinette st over all sts, bind off. TIE: Work a tube with 4 sts back and forth on circular needle size 5 mm / US 8 as follows: Cast on 4 sts with color no 23 and K 1 row. Then work as follows: * Slide all sts to the right side of needle without turning the piece, tighten thread and K over all sts *, repeat from *-* until tie measures 200 cm / 80". Cut and fasten the thread. FELTING: The piece can be felted either in the washing machine or the tumble dryer – read description below. Remember: Subsequent washes are as for a normal wool garment. IN WASHING MACHINE: Washing machines will vary when felting. If the piece is not felted enough, it can be felted again. If it is felted too much, it can be stretched to the correct size while still wet. DO THE FOLLOWING: Lay the piece in the washing machine, using a programme of approx. 40 minutes (not a wool programme). Wash at 40 degrees C = 104 degrees F without pre-wash, detergent is optional. After washing, shape the piece while it is still wet. IN TUMBLE DRYER: Felting in a tumble dryer gives good control over the degree of felting. The tumble dryer can be opened during drying to check the size of the piece. If it is not felted enough it can be thoroughly wetted and felted again. If it is felted too much it can be stretched to the correct size while still wet. DO THE FOLLOWING: Lay the piece in water so it becomes completely wet, then place it in the tumble dryer and begin the drying process. Dry to the desired size, checking regularly. Thread tie up and down the holes and tie ends tog inside the bag. Sew button on top of bag. |
|||||||
Diagram explanations |
|||||||
|
|||||||
 |
|||||||
Have you finished this pattern?Tag your pictures with #dropspattern #anatoliabag or submit them to the #dropsfan gallery. Do you need help with this pattern?You'll find 6 tutorial videos, a Comments/Questions area and more by visiting the pattern on garnstudio.com. © 1982-2026 DROPS Design A/S. We reserve all rights. This document, including all its sub-sections, has copyrights. Read more about what you can do with our patterns at the bottom of each pattern on our site. |
|||||||


With over 40 years in knitting and crochet design, DROPS Design offers one of the most extensive collections of free patterns on the internet - translated to 17 languages. As of today we count 324 catalogs and 12290 patterns - 12280 of which are translated into English (US/in).
We work hard to bring you the best knitting and crochet have to offer, inspiration and advice as well as great quality yarns at incredible prices! Would you like to use our patterns for other than personal use? You can read what you are allowed to do in the Copyright text at the bottom of all our patterns. Happy crafting!
Post a comment to pattern DROPS 140-33
We would love to hear what you have to say about this pattern!
If you want to leave a question, please make sure you select the correct category in the form below, to speed up the answering process. Required fields are marked *.