
Popular categories
Looking for a yarn?


Comments / Questions (95)
![]() Benedetta wrote:
Benedetta wrote:
Scusate,ho dimenticato di dirvi che ho eseguito 2 ripetizioni di f.accorciati e cioè 8 ferri in alto e 16 ferri in basso.grazie
22.03.2014 - 23:14DROPS Design answered:
Buongiorno Benedetta, dopo aver inserito i segnapunti, deve iniziare a lavorare a ferri accorciati e contemporaneamente iniziare le diminuzioni per gli scalfi. Dopo l'ultimo intreccio per lo scalfo deve lavorare a ferri accorciati fino a quando sono stati lavorati 6 f in alto vicino allo scalfo. Ci riscriva se non è chiaro. Buon lavoro!!
23.03.2014 - 13:07
![]() Benedetta wrote:
Benedetta wrote:
Buonasera,scusate ma non capisco iun passaggio:ho lavorato i ferri accorciati ed ho eseguito le diminuzioni x gli scalfi,;poi dite di continuare con i ferri accorciati fino a quando sono stati lavorati 6 f. In alto presso lo scalfo dopo l'ultimo intreccio.ma in totale x per quante volte devo procedere con i f.accorciati.???grazie
22.03.2014 - 22:56DROPS Design answered:
Buongiorno Benedetta, dopo aver inserito i segnapunti, deve iniziare a lavorare a ferri accorciati e contemporaneamente iniziare le diminuzioni per gli scalfi. Dopo l'ultimo intreccio per lo scalfo deve lavorare a ferri accorciati fino a quando sono stati lavorati 6 f in alto vicino allo scalfo. Ci riscriva se non è chiaro. Buon lavoro!!
23.03.2014 - 13:07
![]() Ernoult wrote:
Ernoult wrote:
Bonjour, mon échantillon en 3, 5 n'est pas spécialement serré. L'échantillon en 4 de 20m x28 rangs est bien = à 10 x10 cm. Si je tricote 20m x42 rangs j'aurai dc un échantillon bcp trop haut. Êtes vous sûr du nombre de rangs à tricoter pour cet échantillon (42) ? Merci
14.09.2013 - 14:21DROPS Design answered:
Bonjour Mme Ernoult, on a pour 10 cm de hauteur: 28 rangs point fantaisie (aiguilles 4) et 42 rangs point mousse (=21 côtes mousse) en aiguilles 3,5 (ou la taille nécessaire, par ex en 4 si en 3,5 vous n'avez pas le bon nombre de m/rangs. Bon tricot!
16.09.2013 - 09:04
![]() Ernoult wrote:
Ernoult wrote:
Bonjour, j'ai un pb avec les échantillons, celui tricoté en 3, 5, 20m x 42 rangs ne mesure pas 10 x 10 cm mais 7, 5 x 12cm alors que celui tricoté en 4 tombe bien. Une solution à me proposer ? Merci
13.09.2013 - 11:52DROPS Design answered:
Bonjour Mme Ernoult, si votre échantillon est trop serré en 3,5 essayez en 4, si vous avez bien les 10 x 10 cm avec 20 m x 42 rangs point mousse avec les aiguilles 4, tricotez tout avec cette taille d'aiguille. Bon tricot!
13.09.2013 - 14:56
![]() Maria Benini wrote:
Maria Benini wrote:
Helt underbar.Jag fick hjälp i garnaffären med att börja, nu har jag snart stickat klart baktstycket:)Den är sååå fin och kvinnlig, ska ha den i sommar.Jag stickar den dock i färg nr 60,isblå:)
16.02.2013 - 20:57
![]() La Zette wrote:
La Zette wrote:
Après Secret Garden, je vais faire ce modèle, et m'en réjouis déjà à l'avance...
19.07.2012 - 13:12
![]() Inga Gunnarsson wrote:
Inga Gunnarsson wrote:
Vad menas med rapport - M.1= 4 rapporter runt????
21.05.2012 - 20:39
![]() Anna Karlsen wrote:
Anna Karlsen wrote:
Takk for svar vedr. rillestrikk, men stemmer det at pinnenr. er 3,5? resten av jakken strikkes med pinne 4. Jeg ville kanskje ventet at maskene plukkes opp langs bakstykket med pinne 3,5 og at man deretter bytter til 4? Ellers er det slik at sidestykkene bør være litt fastere strikket enn resten av jakken for å gi litt stabilitet og ekstra elastisitet?
19.04.2012 - 09:38DROPS Design answered:
Rillene strikkes på p 3,5 eftersom det annars skulle blitt lösere en resten som er i glattstrikk.
19.04.2012 - 18:39
![]() Anna Karlsen wrote:
Anna Karlsen wrote:
Hei, Stemmer det at sidestykkene strikkes i rillestrikk i sin helhet på pinne 3,5? Mvh, Anna Karlsen
18.04.2012 - 09:46DROPS Design answered:
Ja, i rillestrikk med forkortete pinner.
18.04.2012 - 09:57
![]() Gull-Britt wrote:
Gull-Britt wrote:
Måste åka i morgon lördag och se om jag kan få tag på garnet och börja sticka pronto
24.02.2012 - 19:45
|
|||||||||||||||||||
Miss Sophie#misssophiecardigan |
|||||||||||||||||||
 |
 |
||||||||||||||||||
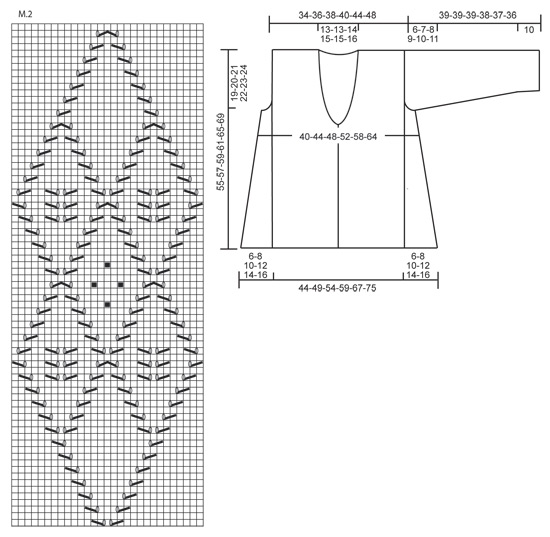
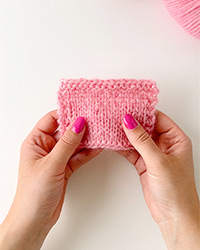
Knitted DROPS jacket in ”Muskat” with square on the back, lace pattern and ¾ sleeves. Size: S - XXXL
DROPS 137-6 |
|||||||||||||||||||
|
PATTERN: See diagrams M.1 and M.2. Diagrams show pattern from RS. GARTER ST (back and forth on needle): K all rows. SHORT ROWS (applies to side piece): Beg from bottom edge and work as follows: * Work until 1st marker, turn and work back, work 2 rows over all sts, work until 2nd marker, turn and work back, work 2 rows over all sts *, repeat from *-*. I.e. 1 repetition = 4 rows at the top and 8 rows at the bottom. BUTTON HOLES: Bind off for 3 button holes from RS on right band. 1 button hole = bind off fourth st from mid front and cast on 1 new st on next row over this st. Bind off for button holes when piece measures: SIZE S: 15, 22 and 29 cm / 6", 8¾" and 11⅜" SIZE M: 16, 23 and 30 cm / 6¼", 9" and 11¾" SIZE L: 17, 24 and 31 cm / 6¾", 9½" and 12¼" SIZE XL: 18, 25 and 32 cm / 7", 9¾" and 12½" SIZE XXL: 18, 26 and 34 cm / 7", 10¼" and 13⅜". SIZE XXXL: 20, 28 and 36 cm / 8", 11" and 14¼" DECREASE TIP (applies to neck dec at the front): All dec are done from RS inside all sts in garter st (= band + the inc sts for collar). RIGHT FRONT PIECE: Dec as follows after all sts in garter st: Slip 1 st as if to K, K 1, psso. LEFT FRONT PIECE: Dec as follows when 2 sts in stockinette st remain before all sts in garter st: K 2 tog. -------------------------------------------------------- JACKET: First worked in a square in the round, then worked down the back piece and outwards in the sides. Then work front piece and the sleeves. BACK PIECE: Cast on 8 sts with Muskat and divide them on 4 double pointed needles size 4 mm / US 6 (= 2 sts on every needle). Insert a marker at the beg of the round. Then work diagram M.1 = 4 repetitions in the round. Switch to circular needle when needed. REMEMBER THE GAUGE! When diagram M.1 has been worked, there are 264 sts on needle. Continue in the round in stockinette st and with inc in every corner as before until there are 272-288-304-320-352-384 sts on needle, work 1 round after last inc. Work next round as follows (all sizes): K 41-45-49-53-61-69 and then slip them on stitch holder 1 (= towards right side), bind off the next 28 sts (= armhole), K 67-71-75-79-87-95 and then slip them on stitch holder 2 (= up towards neck), bind off the next 28 sts (= armhole), K 41-45-49-53-61-69 and slip them on stitch holder 3 (= towards left side). 67-71-75-79-87-95 sts remain on needle, cast on 1 new st in each side (= edge st). NOW MEASURE PIECE FROM HERE! Work in stockinette st back and forth with 1 edge st in each side in GARTER ST – see explanation above – for 18 cm / 7" (= down the back piece). Switch to circular needle size 3.5 mm / US 4 and work 6 rows in garter st. Then LOOSELY bind off. Piece measures approx. 53-55-57-59-63-67 cm / 21"-21⅝"-22½"-23¼"-24¾"-26⅜". BACK PIECE – upwards: Slip the 67-71-75-79-87-95 sts from stitch holder 2 (= up towards neck) on circular needle size 4 mm / US 6 and work as follows (1st row = RS): 22-24-25-27-30-34 sts in stockinette st, bind off the next 23-23-25-25-27-27 sts for neck and work in stockinette st the rest of row (= 22-24-25-27-30-34 sts). Finish each shoulder separately in stockinette st. Continue to bind off 1 st on next row towards the neck = 21-23-24-26-29-33 sts remain on the shoulder. When a total of 5 rows have been worked after sts were slipped back on needle, bind off with P from WS. The entire back piece measures approx. 55-57-59-61-65-69 cm / 21⅝"-22½"-23¼"-24"-25½"-27⅛". RIGHT SIDE PIECE: Pick up 40 sts on circular needle size 3.5 mm / US 4 inside edge st along the right side of the section in stockinette st at the bottom of back piece, then work the 41-45-49-53-61-69 sts from stitch holder 1 back on needle = 81-85-89-93-101-109 sts. Turn and K 1 row from WS – AT THE SAME TIME bind off the first 2 sts (= towards armhole). Insert 2 markers in the piece as follows from RS: 1st marker after 25-25-26-27-27-28 sts and 2nd marker after a total of 50-50-52-54-54-56 sts (insert markers without working the row). READ ALL OF THE FOLLOWING SECTION BEFORE CONTINUING! Continue in garter st back and forth – while AT THE SAME TIME working SHORT ROWS – see explanation above! ARMHOLES: At the same time bind off at beg of all rows beg from armhole: 2 sts 2-2-2-2-3-3 more times and then 1 st 2-4-6-8-8-10 times. 73-75-77-79-85-91 sts remain on needle. Continue with short rows until 6-6-6-8-8-10 rows have been worked at the top by armhole after last bind off. On next row worked from bottom edge, cast on 1 new st at the end of row towards armhole, repeat inc at the end of every row towards armhole 1-3-5-7-7-9 more times, then cast on 2 sts 3-3-3-3-4-4 times. 81-85-89-93-101-109 sts now remain on needle and side piece measures approx. 6-8-10-12-14-16 cm / 2⅜"-3⅛"-4"-4¾"-5½"-6¼" at the top (and approx. 12-16-20-24-28-32 cm / 4¾"-6¼"-8"-9½"-11"-12½" at the bottom). LOOSELY bind off all sts. LEFT SIDE PIECE: Work the 41-45-49-53-61-69 sts from stitch holder 3 on to circular needle size 3.5 mm / US 4, then pick up 40 sts down along left side of back piece inside 1 edge st = 81-85-89-93-101-109 sts. K 2 rows over all sts - at the same time on 2nd row beg bind off for armhole as on right side piece. On next row (i.e. from bottom edge) beg short rows (first insert markers as on right side). Continue as on right side piece. RIGHT FRONT PIECE: Cast on 41-43-45-47-51-55 sts (includes 6 band sts towards mid front and 1 edge st in the side) on needle size 3.5 mm / US 4 with Muskat. Work 6 rows in garter st. Switch to needle size 4 mm / US 6 and continue in stockinette st but with 6 band sts and 1 edge st in the side worked in garter st until finished measurements. When piece measures 11-12-12-13-13-14 cm / 4⅜"-4¾"-4¾"-5⅛"-5⅛"-5½", work as follows (beg from RS): 6 band sts in garter st, 2-3-4-5-7-9 sts in stockinette st, diagram M.2 (= 29 sts), 3-4-5-6-8-10 sts in stockinette st and 1 edge st in garter st. READ ALL OF THE FOLLOWING SECTION BEFORE CONTINUING! BUTTON HOLES: When piece measures 15-16-17-18-18-20 cm / 6"-6¼"-6¾"-7"-7"-8", bind off for BUTTON HOLES - see explanation above. COLLAR: At the same time when piece measures 28-29-30-31-33-35 cm / 11"-11⅜"-11¾"-12¼"-13"-13¾", beg to inc for collar. Inc inside outermost band st by making 1 YO. On next row K YO twisted to avoid holes. Repeat inc on every other row a total of 14 times and then on every 4th row 5 times (inc 19 sts in total, i.e. 25 sts in garter st incl 6 band sts after last inc). NECK DEC: At the same time when piece measures 31-32-33-34-36-38 cm / 12¼"-12½"-13"-13⅜"-14¼"-15", dec 1 st for neckline - SEE DECREASE TIP! Repeat dec every row from RS a total of 13-13-14-14-15-15 times. ARMHOLES: When piece measures 41-43-45-47-51-55 cm / 16⅛"-17"-17¾"-18½"-20"-21⅝", bind off 1 st in the side for armhole. After all inc and dec there are 46-48-49-51-54-58 sts on needle. When diagram M.2 has been worked, continue in stockinette st over these sts. Work until piece measures 55-57-59-61-65-69 cm / 21⅝"-22½"-23¼"-24"-25½"-27⅛" in total (adjust according to back piece). Now bind off the outermost 21-23-24-26-29-33 sts on the shoulder (bind off from WS to avoid cutting the yarn when continuing with collar), work the rest of row (= 25 sts remain). Continue in garter st over these sts as follows: * 2 rows in garter st over all sts, 2 rows in garter st over only the outermost 18 sts (i.e. towards mid front) *, repeat from *-* until collar measures approx. 7-7-7½-7½-8-8 cm / 2¾"-2¾"-2⅞"-2⅞"-3⅛"-3⅛" at the inside on the most narrow part (it will then measure the double at the edge). Putting the sts on a stitch holder now and sewing collar tog mid back with kitchener sts will look nicer, but you can also bind off and sew the collar tog with neat stitches. LEFT FRONT PIECE: Work as right front piece but reversed and without button holes. Bind off shoulder sts from RS. SLEEVE: Worked back and forth on circular needle. Cast on 52-54-56-60-62-66 sts (includes 1 edge st each side) on needle size 3.5 mm / US 4. Work 4 cm / 1½" in garter st. Switch to circular needle size 4 mm / US 6 and continue in stockinette st with 1 edge st in garter st in each side. When piece measures 10 cm / 4", inc 1 st in each side. Repeat inc every 2-2-1½-1½-1-1 cm / ¾"-¾"-½"-½"-⅜"-⅜" a total of 10-11-12-12-14-14 times = 72-76-80-84-90-94 sts. When piece measures 33-32-31-29-27-25 cm / 13"-12½"-12¼"-11⅜"-10⅝"-9¾" (shorter measurements in the larger sizes because of longer sleeve cap and broader shoulder width), bind off for sleeve cap at beg of every row in each side: 3 sts 1 time, then bind off 2 sts in each side until piece measures 38-38-38-37-36-35 cm / 15"-15"-15"-14½"-14¼"-13¾", finally bind off 3 sts 1 time in each side, then bind off the remaining sts. Sleeve measures approx. 39-39-39-38-37-36 cm / 15¼"-15¼"-15¼"-14½"-14¼". ASSEMBLY: Sew the shoulder seams. Sew the 2 collar parts tog mid back by using either kitchener sts or neat stitches and sew on to back piece. Sew front piece to the edge pieces in garter st - sew inside 1 edge st on front piece and inside bind off edge on edge piece. Sew sleeve seams inside 1 edge st and sew in the sleeves. Sew on buttons. |
|||||||||||||||||||
Diagram explanations |
|||||||||||||||||||
|
|||||||||||||||||||
 |
|||||||||||||||||||
 |
|||||||||||||||||||
Have you finished this pattern?Tag your pictures with #dropspattern #misssophiecardigan or submit them to the #dropsfan gallery. Do you need help with this pattern?You'll find 25 tutorial videos, a Comments/Questions area and more by visiting the pattern on garnstudio.com. © 1982-2026 DROPS Design A/S. We reserve all rights. This document, including all its sub-sections, has copyrights. Read more about what you can do with our patterns at the bottom of each pattern on our site. |
|||||||||||||||||||
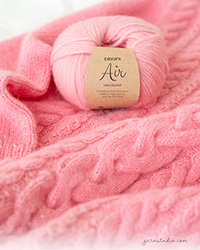

With over 40 years in knitting and crochet design, DROPS Design offers one of the most extensive collections of free patterns on the internet - translated to 17 languages. As of today we count 324 catalogs and 12199 patterns - 12189 of which are translated into English (US/in).
We work hard to bring you the best knitting and crochet have to offer, inspiration and advice as well as great quality yarns at incredible prices! Would you like to use our patterns for other than personal use? You can read what you are allowed to do in the Copyright text at the bottom of all our patterns. Happy crafting!
Post a comment to pattern DROPS 137-6
We would love to hear what you have to say about this pattern!
If you want to leave a question, please make sure you select the correct category in the form below, to speed up the answering process. Required fields are marked *.