
Popular categories
Looking for a yarn?


Comments / Questions (30)
![]() Álfheiður wrote:
Álfheiður wrote:
I love this one.
11.01.2012 - 13:53
![]() Ásta Guðrún wrote:
Ásta Guðrún wrote:
Love it - can't wait for it to be available on your website
11.01.2012 - 13:03
![]() Jenas wrote:
Jenas wrote:
It was just what i'm looking for. That's what I call Posh!
10.01.2012 - 18:55
![]() Carmen wrote:
Carmen wrote:
Elegant und super kombinierbar. Tolle Farbkombi, dieses Muster würde ich soooo gerne nachhäkeln! :-)
09.01.2012 - 22:06MaFrancoise wrote:
Ce point de tricot léger/aéré est tout indiqué pour le coton Paris
02.01.2012 - 18:29
![]() Rita wrote:
Rita wrote:
Mooi vestje,frisse uivoering,staat op mijn verlanglijstje
29.12.2011 - 17:09
![]() Roselaine wrote:
Roselaine wrote:
Un modèle simple mais très sympa à porter au printemps!
26.12.2011 - 11:28
![]() Silje wrote:
Silje wrote:
Simple and pretty!
09.12.2011 - 20:56Janet Milne wrote:
A long-sleeved version too please.
09.12.2011 - 00:31
![]() Tineke wrote:
Tineke wrote:
Leuk vestje voor in de lente/vroege zomer
08.12.2011 - 15:59
|
|||||||
Holly#hollycardigan |
|||||||
 |
 |
||||||
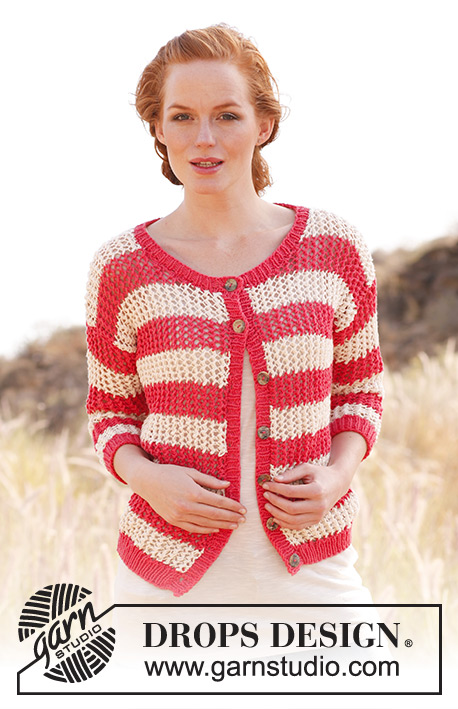
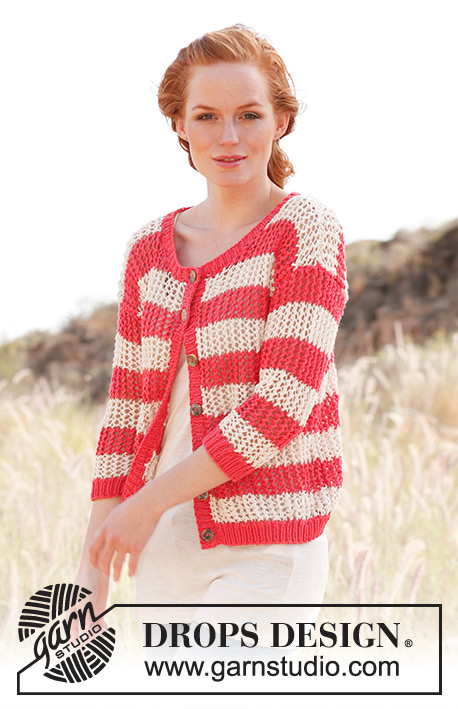
Knitted DROPS jacket with lace pattern in ”Paris”. Size S-XXXL.
DROPS 139-34 |
|||||||
|
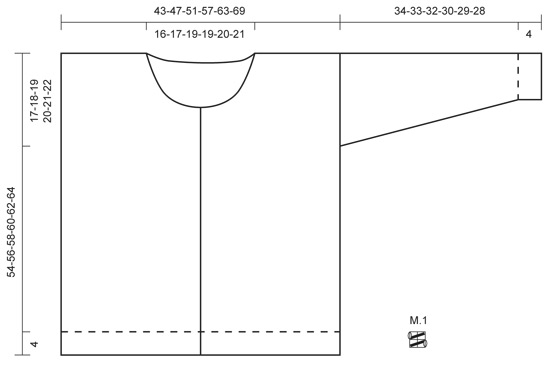
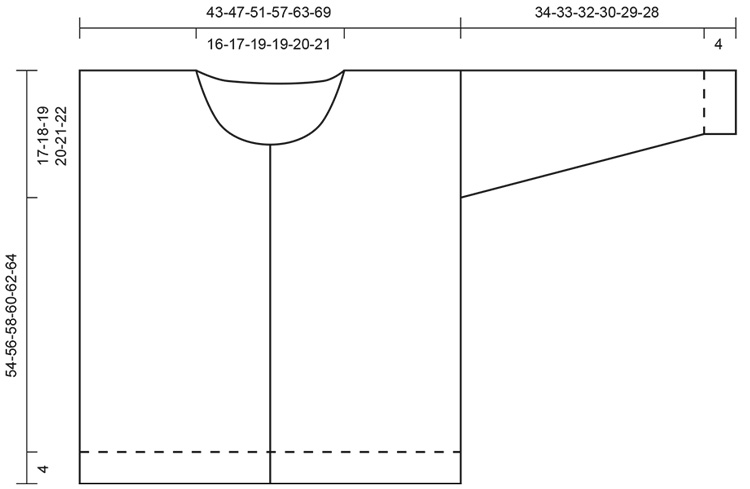
GARTER ST (back and forth on needle): K all rows. NOTE: All edge sts are worked in garter st. PATTERN: See diagram M.1. The diagram shows both rows in the pattern seen from RS. STRIPES: Work * 10 rows off white, 10 rows raspberry *. Repeat from *-*. INCREASE TIP: Inc 1 st by picking up the strand between 2 sts from previous row - K this st twisted, i.e. work in back loop of st instead of front to avoid holes. NOTE: Work inc sts in stockinette st until they can be worked in pattern in each side. ---------------------------------------------------------- BACK PIECE: Worked back and forth on needle. Cast on 70-76-82-94-102-110 sts with raspberry on circular needle size 4.5 mm / US 7. Work rib (K 1/P 1) with 1 edge st in garter st - Read explanation above - in each side for 4 cm / 1½". NOTE: On last row from WS, dec 8-8-8-12-12-12 sts evenly = 62-68-74-82-90-98 sts. Then switch to needle size 5 mm / US 8 and off white - At the same time work diagram M.1 and STRIPES - Read explanation above - with 1 edge st in each side. REMEMBER THE GAUGE! When piece measures 37-38-39-40-41-42 cm / 14½"-15"-15¼"-15¾"-16⅛"-16½", insert a marker in each side of piece (armholes beg here). Continue to work until piece measures 52-54-56-58-60-62 cm / 20½"-21¼"-22"-22¾"-23⅝"-24⅜". Now bind off the middle 18-20-22-22-24-26 sts for neck and finish each shoulder separately. Bind off 2 sts at beg of next row from neck = 20-22-24-28-31-34 sts remain on the shoulder. Loosely bind off all sts when piece measures 54-56-58-60-62-64 cm / 21¼"-22"-22¾"-23⅝"-24⅜"-25¼". RIGHT FRONT PIECE: Worked back and forth on needle. Cast on 36-40-42-48-52-56 sts with raspberry on circular needle size 4.5 mm / US 7. Work rib K 1/P 1 with 1 edge st in each side for 4 cm / 1½". NOTE: On last row from WS, dec 4-4-4-6-6-6 sts evenly = 32-36-38-42-46-50 sts. Then switch to needle size 5 mm / US 8 and off white - At the same time work diagram M.1 and STRIPES with 1 edge st in each side. Then work as on back piece until piece measures 43-45-46-48-49-51 cm / 17"-17¾"-18"-19"-19¼"-20". Bind off at the beg of every row from neck (= every other row) as follows: bind off 6-7-7-8-7-8 sts 1 time, 2 sts 1 time, and 1 st 1-1-1-1-2-2 times. Then bind off 1 st at beg of every other row from neck a total of 3-4-4-3-4-4 times = 20-22-24-28-31-34 sts remain on shoulder. Loosely bind off all sts when piece measures 54-56-58-60-62-64 cm / 21¼"-22"-22¾"-23⅝"-24⅜"-25¼". LEFT FRONT PIECE: Work as right front piece but reversed. SLEEVE: Worked back and forth on needle. Cast on 38-40-42-46-48-50 sts with raspberry on circular needle size 4.5 mm / US 7. Work rib K 1/P 1 with 1 edge st in each side for 4 cm / 1½". NOTE: On last row from WS, dec 8-8-8-10-10-10 sts evenly = 30-32-34-36-38-40 sts. Then switch to needle size 5 mm / US 8 and off white - AT THE SAME TIME work diagram M.1 and STRIPES. When piece measures 5 cm / 2", inc 1 st - Read INCEREASE TIP above - inside 1 edge st in each side. Repeat inc every 2½- 2½-2½-2-2-1½ cm / ⅞"-⅞"-⅞"-¾"-¾"-½" a total of 10-10-10-12-12-12 times = 50-52-54-58-60-64 sts. Continue until piece measures 34-33-32-30-29-28 cm / 13½"-13"-12½"-11¾"-11⅜"-11" (shorter measurements in the larger sizes because of wider shoulders). Loosely bind off all sts. Knit another sleeve the same way. ASSEMBLY: Sew shoulder seams from RS with stitches. Sew in sleeves between markers in each side inside 1 edge st. Sew sleeve and side seams in one. RIGHT BAND: Worked in rib back and forth on circular needle size 4.5 mm / US 7 with raspberry. Pick up from RS approx. 70 to 90 sts inside 1 edge st along the edge mid front on right front piece. P next row from WS while at the same time adjusting no of sts to 70-70-70-81-88-88. On next row (= RS) work rib (K 1/P 1) - AT THE SAME TIME bind off for button holes as follows: Work 4 sts, * bind off the next 2 sts, work 9-9-9-9-10-10 sts *, repeat from *-* a total of 6-6-6-7-7-7 times. On next row cast on 2 new sts over the bind off sts. Continue until band measures approx. 2 cm / ¾", loosely bind off with K over K and P and P. LEFT BAND: Work as right band but without button holes. NECK EDGE: Work around the neck with raspberry on circular needle size 4.5 mm / US 7 as follows: Pick up from RS approx. 90 to 120 sts inside 1 edge st around the neck (also over bands in each side). P next row from WS while AT THE SAME TIME adjusting no of sts to 91-95-101-107-111-115. On next row work rib (K 1/P 1) from RS, AT THE SAME TIME bind off for last button hole as follows: Work 4 sts, bind off the next 2 sts, work rib the rest of row, finish with K 1. On next row cast on 2 new sts over the bound off sts. Continue until neck edge measures approx. 2 cm / ¾", loosely bind off with K over K and P and P. Sew the buttons on to the left band. |
|||||||
Diagram explanations |
|||||||
|
|||||||
 |
|||||||
 |
|||||||
Have you finished this pattern?Tag your pictures with #dropspattern #hollycardigan or submit them to the #dropsfan gallery. Do you need help with this pattern?You'll find 16 tutorial videos, a Comments/Questions area and more by visiting the pattern on garnstudio.com. © 1982-2026 DROPS Design A/S. We reserve all rights. This document, including all its sub-sections, has copyrights. Read more about what you can do with our patterns at the bottom of each pattern on our site. |
|||||||


With over 40 years in knitting and crochet design, DROPS Design offers one of the most extensive collections of free patterns on the internet - translated to 17 languages. As of today we count 324 catalogs and 12290 patterns - 12280 of which are translated into English (US/in).
We work hard to bring you the best knitting and crochet have to offer, inspiration and advice as well as great quality yarns at incredible prices! Would you like to use our patterns for other than personal use? You can read what you are allowed to do in the Copyright text at the bottom of all our patterns. Happy crafting!
Post a comment to pattern DROPS 139-34
We would love to hear what you have to say about this pattern!
If you want to leave a question, please make sure you select the correct category in the form below, to speed up the answering process. Required fields are marked *.