
Popular categories
Looking for a yarn?


Comments / Questions (88)
![]() Maggie wrote:
Maggie wrote:
Som jeg læser opskriften, er det kun 4 pinde, der ikke strikkes helt ud til forkanten. På billedet er trøjen noget længere bagpå end ved forkanten. Er det knapkanten, der skal trække trøjen sammen foran, så den bliver længere bagpå? Mvh Maggie
07.01.2014 - 09:51DROPS Design answered:
Hej Maggie. Ja, det er korrekt. Du strikker kun de forkortede pinde 1 gang og knapkanten i kombination med mönstret paa jakken selv sörger for at bagstykket traekker laengere ned.
09.01.2014 - 16:40
![]() Wally wrote:
Wally wrote:
Kann man das Model in Baby Alpaka Silk stricken? Und falls ja, könnt ihr mir sagen wieviel ich dann ungefähr bräuchte. Danke dafür, Wally
10.05.2013 - 15:49DROPS Design answered:
Liebe Wally, das Modell ist mit einem Garn der Garngruppe B gestrickt. Das lässt sich leider nicht durch ein Garn der Gruppe A ersetzen ohne die ganze Anleitung umzurechnen. Unter *Garnalternativen“ sehen Sie alle Möglichkeiten, durch welche anderen Qualitäten das Garn ersetzt werden kann.
13.05.2013 - 06:53
![]() Devlaeminck wrote:
Devlaeminck wrote:
J'aimerai avoir plus de précisions pour réaliser le devant droit. Je ne parviens pas à concrétiser l'inverse du devant gauche. Quelqu'un peut-il m'indiquer en détail le 1er rang raccourci du devant droit
12.02.2013 - 16:59DROPS Design answered:
Bonjour Madame Devlaeminck, pour tricoter en sens inverse du devant gauche, tout ce qui a été fait à gauche doit être maintenant fait à droite et vice versa. N'hésitez pas à demander de l'aide à votre magasin DROPS ou sur le forum DROPS si nécessaire. Bon tricot !
13.02.2013 - 11:16
![]() Angoradronning wrote:
Angoradronning wrote:
Skal lages innen en uke i ren angora. Gleder meg til det. Vil antagelig poste bilde..
07.04.2012 - 00:12
![]() Mieke wrote:
Mieke wrote:
Ik vroeg me af hoe ik het beste het rechter voorpand in spiegelbeeld kan breien? Het gaat met name om het schuine gedeelte direkt na de boordsteek. Alvast bedankt!
11.03.2012 - 10:32DROPS Design answered:
U breit op dezelfde manier, maar goede kant wordt verkeerde kant. Belangrijk is dat u ook hier de verkorte toeren aan de zijkant begint, dus niet middenvoor.
12.03.2012 - 11:56
![]() Montse wrote:
Montse wrote:
Muy femenina
18.02.2012 - 14:50
![]() Ellinor Busse wrote:
Ellinor Busse wrote:
Blir et flott strikkeplagg, gleder meg til jeg blir ferdig
07.02.2012 - 23:03
![]() Bonnie Kaake wrote:
Bonnie Kaake wrote:
WOW!!! How stylish and feminine. I would make this immediately. I love it!
02.02.2012 - 01:50
![]() Leen wrote:
Leen wrote:
Mooi, sportief en toch klasse
16.01.2012 - 13:32
![]() Henny Kipp wrote:
Henny Kipp wrote:
Wat een mooie! lijkt me leuk in een glittergaren voor de kerst.
15.01.2012 - 19:00
|
||||||||||||||||
Melanie#melaniejacket |
||||||||||||||||
 |
 |
|||||||||||||||
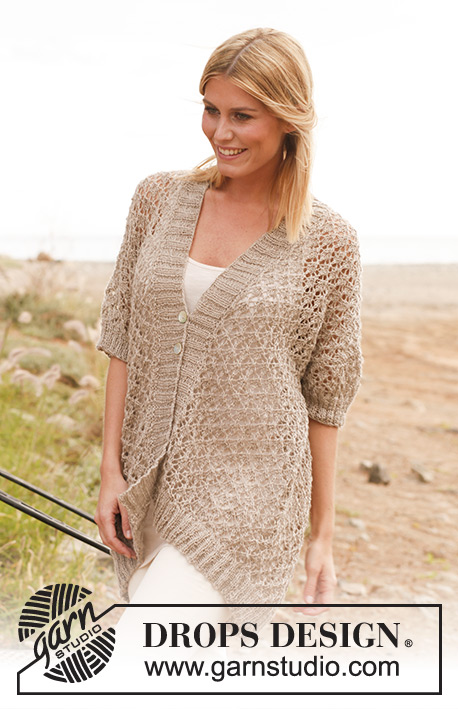
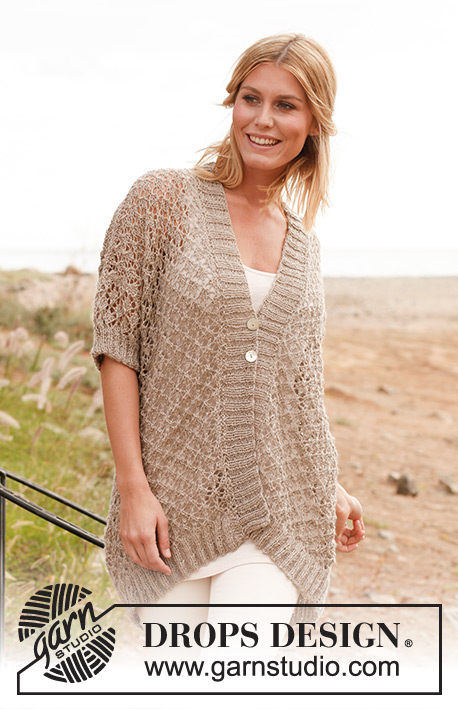
Knitted DROPS jacket with lace pattern in “Lin” or "Belle". Size: S - XXXL.
DROPS 139-7 |
||||||||||||||||
|
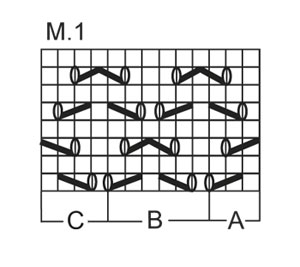
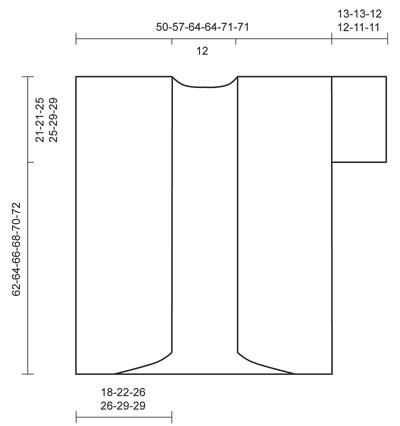
GARTER ST (back and forth on needle): K all rows. NOTE: All edge sts are worked in garter st. PATTERN: See diagrams M.1, M.1A = 3 sts, M.1B = 6 sts and M.1C = 4 sts. Diagrams show the pattern from RS. DECREASE TIP: Dec 1 st by working 2 sts tog. BUTTON HOLES: Bind off for 2 button holes on right band, approx. 33-34-35-36-37-38 cm / 13"-13⅜"-13¾"-14¼"-14½"-15" and approx. 38-39-40-41-42-43 cm / 15-15¼"-15¾"-16⅛"-16½"-17" from the top of shoulder. 1 BUTTON HOLE = bind off 2 sts and cast on 2 new sts on next row over these sts. -------------------------------------------------------- BACK PIECE: Worked back and forth on needle. Cast on 172-196-220-220-244-244 sts (incl 1 edge st in each side) on circular needle size 4 mm / US 6 with Lin or Belle. Then work rib as follows (1st row = RS): 1 edge sts in garter st - See explanation above, * K 2, P 4 *, repeat from *-*, finish with K 2 and 1 edge st in garter st = 28-32-36-36-40-40 P-sections (seen from RS). When piece measures 3-3-3-4-4-4 cm / 1⅛"-1⅛"-1⅛"-1½"-1½"-1½", dec 1 st in every P-section (seen from RS) - Read DECREASE TIP = 144-164-184-184-204-204 sts. Continue in rib with K 2/P 3 with 1 edge st in each side. When piece measures 5-5-5-6-6-6 cm / 2"-2"-2"-2⅜"-2⅜"-2⅜", dec 1 more st in every P-section (seen from RS) = 116-132-148-148-164-164 sts. Continue in rib with K 2/P 2 with 1 edge st in each side. When piece measures 6-6-6-7-7-7 cm / 2⅜"-2⅜"-2⅜"-2¾"-2¾"-2¾", dec 29-33-37-37-41-41 sts evenly on last row from WS = 87-99-111-111-123-123 sts. On next row from RS switch to circular needle size 5 mm / US 8 and work as follows: 1 edge st, work diagram M.1A 1 time (= 3 sts), then diagram M.1B a total of 13-15-17-17-19-19 times and finally diagram M.1C 1 time (= 4 sts), finish with 1 edge st. Continue diagram M.1 with 1 edge st in each side until piece measures 41-43-41-43-41-43 cm / 16⅛"-17"-16⅛"-17"-16⅛"-17". REMEMBER THE GAUGE! Now insert a marker in each side of piece (= armhole starts here). Continue to work until piece measures 60-62-64-66-68-70 cm / 23⅝"-24⅜"-25¼"-26"-26¾"-27½". Then work in garter st over all sts until finished measurements - AT THE SAME TIME on 1st row from RS bind off the middle 17 sts for neck and finish each shoulder separately. Bind off 2 sts on next row from neck = 33-39-45-45-51-51 sts remain on shoulder. Loosely bind off all sts when piece measures 62-64-66-68-70-72 cm / 24⅜"-25¼"-26"-26¾"-27½"-28⅜". LEFT FRONT PIECE: Worked back and forth on needle. Cast on 62-74-86-86-98-98 sts (incl 1 edge st in each side) on circular needle size 4 mm / US 6. Then work rib as follows (1st row = RS): 1 edge st, * P 4, K 2 *, repeat from *-*, finish with 1 edge st towards mid front = 10-12-14-14-16-16 P-sections (seen from RS). When piece measures 3-3-3-4-4-4 cm / 1⅛"-1⅛"-1⅛"-1½"-1½"-1½", dec 1 st in every P-section (seen from RS) = 52-62-72-72-82-82 sts. Continue in rib with K 2/P 3 with 1 edge st in each side. When piece measures 5-5-5-6-6-6 cm / 2"-2"-2"-2⅜"-2⅜"-2⅜", dec 1 more st in every P-section (seen from RS) = 42-50-58-58-66-66 sts. Continue in rib with K 2/P 2 with 1 edge st in each side. When piece measures 6-6-6-7-7-7 cm / 2⅜"-2⅜"-2⅜"-2¾"-2¾"-2¾" dec 9-11-13-13-15-15 sts evenly on last row from WS = 33-39-45-45-51-51 sts. On next row from RS switch to circular needle size 5 mm / US 8 and work short rows for diagonal front edge as follows: 1 edge st, work diagram M.1A 1 time (= 3 sts), diagram M.1B a total of 1-2-3-3-4-4 times (= 6-12-18-18-24-24 sts) = 10-16-22-22-28-28 sts on needle, turn piece, tighten yarn and work back. Work next row from RS as follows: 1 edge st, work diagram M.1A 1 time, diagram M.1B a total of 2-3-4-4-5-5 times = 16-22-28-28-34-34 sts on needle, turn piece, tighten yarn and work back. Work next row from RS as follows: 1 edge st, work diagram M.1A 1 time, diagram M.1B a total of 3-4-5-5-6-6 times = 22-28-34-34-40-40 sts on needle, turn piece, tighten yarn and work back. On next row from RS work all sts as follows: 1 edge st, work diagram M.1A 1 time, diagram M.1B a total of 4-5-6-6-7-7 times, then work diagram M.1C 1 time, finish with 1 edge st = 33-39-45-45-51-51 sts. Continue diagram M.1 with 1 edge st in each side until piece measures 41-43-41-43-41-43 cm / 16⅛"-17"-16⅛"-17"-16⅛"-17". Now insert a marker in the right side of piece seen from RS (armhole starts here). Continue to work until piece measures 60-62-64-66-68-70 cm / 23⅝"-24⅜"-25¼"-26"-26¾"-27½". Now work in garter st over all sts until finished measurements. Loosely bind off all sts when piece measures 62-64-66-68-70-72 cm / 24⅜"-25¼"-26"-26¾"-27½"-28⅜". RIGHT FRONT PIECE: Work as left front piece but reversed. ASSEMBLY: Sew the shoulder seams. SLEEVE: Worked back and forth on needle. Pick up from RS on circular needle size 5 mm / US 8 approx. 80 to 100 sts between markers along one armhole. K next row from WS - AT THE SAME TIME adjust no of sts to 75-75-87-87-99-99 (incl 1 edge st in each side). On next row from RS work as follows: 1 edge st, work diagram M.1A 1 time (= 3 sts), then diagram M.1B a total of 11-11-13-13-15-15 times, work diagram M.1C 1 time (= 4 sts), finish with 1 edge st. Continue to work diagram M.1 with 1 edge st in each side until piece measures approx. 9-9-8-8-7-7 cm / 3½"-3½"-3⅛"-3⅛"-2¾"-2¾" (shorter measurements in the larger sizes because of wider shoulders). On next row from RS switch to circular needle size 4 mm / US 6 and dec 1 st on row - while AT THE SAME TIME working rib (K 2, P 2) with 1 edge st in each side = 74-74-86-86-98-98 sts. When sleeve measures 13-13-12-12-11-11 cm / 5⅛"-5⅛"-4¾"-4¾"-4⅜"-4⅜", loosely bind off sts with K over K and P over P. Knit another sleeve the same way. ASSEMBLY: Sew sleeve and side seams in one inside 1 edge st. RIGHT BAND: Worked back and forth on needle. Pick up from RS on circular needle size 4 mm / US 6 approx. 110 to 130 sts along the entire right front piece, at the end of row cast on 15 new sts for collar at the back. K next row from WS - AT THE SAME TIME adjust no of sts along right front piece to 112-116-120-124-128-132 (do not inc/dec over the collar sts at the back) = 127-131-135-139-143-147 sts in total. Then work rib from RS as follows: * K 2, P 2 *, repeat from *-*, finish with K 2 and 1 edge st in garter st (= 31-32-33-34-35-36 P-sections). Continue in rib until band measures 3 cm / 1⅛", then inc from RS 1 P st in the last 12-12-14-14-16-16 P-sections (= inc around the neck) = 139-143-149-153-159-163 sts. When band measures 5-5-5-6-6-6 cm / 2"-2"-2"-2⅜"-2⅜"-2⅜", bind off for button holes - see explanation above. Continue with K over K and P over P until band measures 6-6-6-7-7-7 cm / 2⅜"-2⅜"-2⅜"-2¾"-2¾"-2¾", loosely bind off all sts with K over K and P over P. LEFT FRONT BAND: Cast on 15 sts on circular needle size 4 mm / US 6 for collar at the back, then pick up sts along left front band as on right front band. Work as right band but reversed and without button holes. ASSEMBLY: Sew collar tog mid back inside 1 edge st (with WS against WS), and sew collar to neck line at the back of neck. Sew the buttons on to the left band. |
||||||||||||||||
Diagram explanations |
||||||||||||||||
|
||||||||||||||||
 |
||||||||||||||||
 |
||||||||||||||||
Have you finished this pattern?Tag your pictures with #dropspattern #melaniejacket or submit them to the #dropsfan gallery. Do you need help with this pattern?You'll find 9 tutorial videos, a Comments/Questions area and more by visiting the pattern on garnstudio.com. © 1982-2026 DROPS Design A/S. We reserve all rights. This document, including all its sub-sections, has copyrights. Read more about what you can do with our patterns at the bottom of each pattern on our site. |
||||||||||||||||


With over 40 years in knitting and crochet design, DROPS Design offers one of the most extensive collections of free patterns on the internet - translated to 17 languages. As of today we count 324 catalogs and 12267 patterns - 12257 of which are translated into English (US/in).
We work hard to bring you the best knitting and crochet have to offer, inspiration and advice as well as great quality yarns at incredible prices! Would you like to use our patterns for other than personal use? You can read what you are allowed to do in the Copyright text at the bottom of all our patterns. Happy crafting!
Post a comment to pattern DROPS 139-7
We would love to hear what you have to say about this pattern!
If you want to leave a question, please make sure you select the correct category in the form below, to speed up the answering process. Required fields are marked *.