
Popular categories
Looking for a yarn?


|
||||||||||||||||
Melanie |
||||||||||||||||
 |
 |
|||||||||||||||
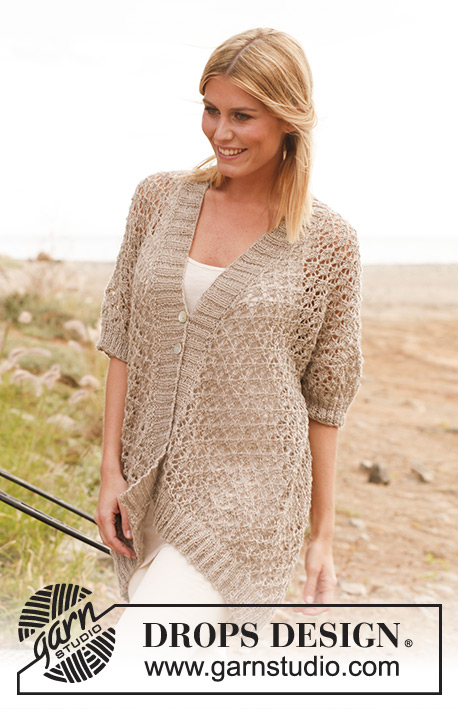
Knitted DROPS jacket with lace pattern in “Lin” or "Belle". Size: S - XXXL.
DROPS 139-7 |
||||||||||||||||
|
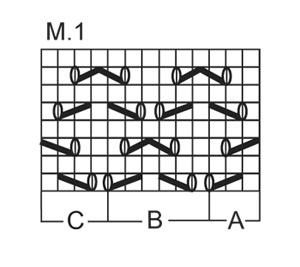
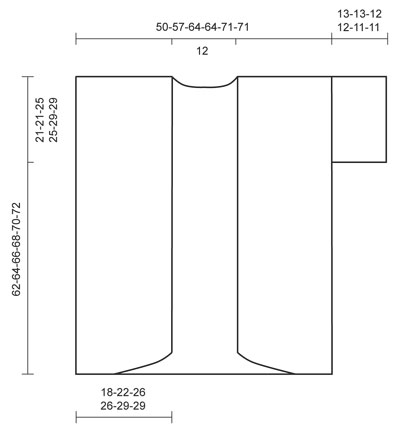
GARTER ST (back and forth on needle): K all rows. NOTE: All edge sts are worked in garter st. PATTERN: See diagrams M.1, M.1A = 3 sts, M.1B = 6 sts and M.1C = 4 sts. Diagrams show the pattern from RS. DECREASE TIP: Dec 1 st by working 2 sts tog. BUTTON HOLES: Bind off for 2 button holes on right band, approx. 33-34-35-36-37-38 cm / 13''-13 3/8''-13¾''-14¼''-14½''-15'' and approx. 38-39-40-41-42-43 cm / 15-15¼''-15¾''-16 1/8''-16½''-17'' from the top of shoulder. 1 BUTTON HOLE = bind off 2 sts and cast on 2 new sts on next row over these sts. -------------------------------------------------------- BACK PIECE: Worked back and forth on needle. Cast on 172-196-220-220-244-244 sts (incl 1 edge st in each side) on circular needle size 4 mm / US 6 with Lin or Belle. Then work rib as follows (1st row = RS): 1 edge sts in garter st - See explanation above, * K 2, P 4 *, repeat from *-*, finish with K 2 and 1 edge st in garter st = 28-32-36-36-40-40 P-sections (seen from RS). When piece measures 3-3-3-4-4-4 cm / 1 1/8''-1 1/8''-1 1/8''-1½''-1½''-1½'', dec 1 st in every P-section (seen from RS) - Read DECREASE TIP = 144-164-184-184-204-204 sts. Continue in rib with K 2/P 3 with 1 edge st in each side. When piece measures 5-5-5-6-6-6 cm / 2''-2''-2''-2 3/8''-2 3/8''-2 3/8'', dec 1 more st in every P-section (seen from RS) = 116-132-148-148-164-164 sts. Continue in rib with K 2/P 2 with 1 edge st in each side. When piece measures 6-6-6-7-7-7 cm / 2 3/8''-2 3/8''-2 3/8''-2¾''-2¾''-2¾'', dec 29-33-37-37-41-41 sts evenly on last row from WS = 87-99-111-111-123-123 sts. On next row from RS switch to circular needle size 5 mm / US 8 and work as follows: 1 edge st, work diagram M.1A 1 time (= 3 sts), then diagram M.1B a total of 13-15-17-17-19-19 times and finally diagram M.1C 1 time (= 4 sts), finish with 1 edge st. Continue diagram M.1 with 1 edge st in each side until piece measures 41-43-41-43-41-43 cm / 16 1/8"-17"-16 1/8"-17"-16 1/8"-17". REMEMBER THE GAUGE! Now insert a marker in each side of piece (= armhole starts here). Continue to work until piece measures 60-62-64-66-68-70 cm / 23 5/8''-24 3/8''-25¼''-26''-26¾''-27½''. Then work in garter st over all sts until finished measurements - AT THE SAME TIME on 1st row from RS bind off the middle 17 sts for neck and finish each shoulder separately. Bind off 2 sts on next row from neck = 33-39-45-45-51-51 sts remain on shoulder. Loosely bind off all sts when piece measures 62-64-66-68-70-72 cm / 24 3/8''-25¼''-26''-26¾''-27½''-28 3/8''. LEFT FRONT PIECE: Worked back and forth on needle. Cast on 62-74-86-86-98-98 sts (incl 1 edge st in each side) on circular needle size 4 mm / US 6. Then work rib as follows (1st row = RS): 1 edge st, * P 4, K 2 *, repeat from *-*, finish with 1 edge st towards mid front = 10-12-14-14-16-16 P-sections (seen from RS). When piece measures 3-3-3-4-4-4 cm / 1 1/8''-1 1/8''-1 1/8''-1½''-1½''-1½'', dec 1 st in every P-section (seen from RS) = 52-62-72-72-82-82 sts. Continue in rib with K 2/P 3 with 1 edge st in each side. When piece measures 5-5-5-6-6-6 cm / 2''-2''-2''-2 3/8''-2 3/8''-2 3/8'', dec 1 more st in every P-section (seen from RS) = 42-50-58-58-66-66 sts. Continue in rib with K 2/P 2 with 1 edge st in each side. When piece measures 6-6-6-7-7-7 cm / 2 3/8''-2 3/8''-2 3/8''-2¾''-2¾''-2¾'' dec 9-11-13-13-15-15 sts evenly on last row from WS = 33-39-45-45-51-51 sts. On next row from RS switch to circular needle size 5 mm / US 8 and work short rows for diagonal front edge as follows: 1 edge st, work diagram M.1A 1 time (= 3 sts), diagram M.1B a total of 1-2-3-3-4-4 times (= 6-12-18-18-24-24 sts) = 10-16-22-22-28-28 sts on needle, turn piece, tighten yarn and work back. Work next row from RS as follows: 1 edge st, work diagram M.1A 1 time, diagram M.1B a total of 2-3-4-4-5-5 times = 16-22-28-28-34-34 sts on needle, turn piece, tighten yarn and work back. Work next row from RS as follows: 1 edge st, work diagram M.1A 1 time, diagram M.1B a total of 3-4-5-5-6-6 times = 22-28-34-34-40-40 sts on needle, turn piece, tighten yarn and work back. On next row from RS work all sts as follows: 1 edge st, work diagram M.1A 1 time, diagram M.1B a total of 4-5-6-6-7-7 times, then work diagram M.1C 1 time, finish with 1 edge st = 33-39-45-45-51-51 sts. Continue diagram M.1 with 1 edge st in each side until piece measures 41-43-41-43-41-43 cm / 16 1/8"-17"-16 1/8"-17"-16 1/8"-17". Now insert a marker in the right side of piece seen from RS (armhole starts here). Continue to work until piece measures 60-62-64-66-68-70 cm / 23 5/8''-24 3/8''-25¼''-26''-26¾''-27½''. Now work in garter st over all sts until finished measurements. Loosely bind off all sts when piece measures 62-64-66-68-70-72 cm / 24 3/8''-25¼''-26''-26¾''-27½''-28 3/8''. RIGHT FRONT PIECE: Work as left front piece but reversed. ASSEMBLY: Sew the shoulder seams. SLEEVE: Worked back and forth on needle. Pick up from RS on circular needle size 5 mm / US 8 approx. 80 to 100 sts between markers along one armhole. K next row from WS - AT THE SAME TIME adjust no of sts to 75-75-87-87-99-99 (incl 1 edge st in each side). On next row from RS work as follows: 1 edge st, work diagram M.1A 1 time (= 3 sts), then diagram M.1B a total of 11-11-13-13-15-15 times, work diagram M.1C 1 time (= 4 sts), finish with 1 edge st. Continue to work diagram M.1 with 1 edge st in each side until piece measures approx. 9-9-8-8-7-7 cm / 3½"-3½"-3 1/8"-3 1/8"-2 3/4"-2 3/4" (shorter measurements in the larger sizes because of wider shoulders). On next row from RS switch to circular needle size 4 mm / US 6 and dec 1 st on row - while AT THE SAME TIME working rib (K 2, P 2) with 1 edge st in each side = 74-74-86-86-98-98 sts. When sleeve measures 13-13-12-12-11-11 cm / 5 1/8"-5 1/8"-4 3/4"-4 3/4"-4 3/8"-4 3/8", loosely bind off sts with K over K and P over P. Knit another sleeve the same way. ASSEMBLY: Sew sleeve and side seams in one inside 1 edge st. RIGHT BAND: Worked back and forth on needle. Pick up from RS on circular needle size 4 mm / US 6 approx. 110 to 130 sts along the entire right front piece, at the end of row cast on 15 new sts for collar at the back. K next row from WS - AT THE SAME TIME adjust no of sts along right front piece to 112-116-120-124-128-132 (do not inc/dec over the collar sts at the back) = 127-131-135-139-143-147 sts in total. Then work rib from RS as follows: * K 2, P 2 *, repeat from *-*, finish with K 2 and 1 edge st in garter st (= 31-32-33-34-35-36 P-sections). Continue in rib until band measures 3 cm / 1 1/8'', then inc from RS 1 P st in the last 12-12-14-14-16-16 P-sections (= inc around the neck) = 139-143-149-153-159-163 sts. When band measures 5-5-5-6-6-6 cm / 2''-2''-2''-2 3/8''-2 3/8''-2 3/8'', bind off for button holes - see explanation above. Continue with K over K and P over P until band measures 6-6-6-7-7-7 cm / 2 3/8''-2 3/8''-2 3/8''-2¾''-2¾''-2¾'', loosely bind off all sts with K over K and P over P. LEFT FRONT BAND: Cast on 15 sts on circular needle size 4 mm / US 6 for collar at the back, then pick up sts along left front band as on right front band. Work as right band but reversed and without button holes. ASSEMBLY: Sew collar tog mid back inside 1 edge st (with WS against WS), and sew collar to neck line at the back of neck. Sew the buttons on to the left band. |
||||||||||||||||
Diagram explanations |
||||||||||||||||
|
||||||||||||||||
|
||||||||||||||||
|
||||||||||||||||
|
Have you made this or any other of our designs? Tag your pictures in social media with #dropsdesign so we can see them! Do you need help with this pattern?You'll find tutorial videos, a Comments/Questions area and more by visiting the pattern on garnstudio.com. © 1982-2024 DROPS Design A/S. We reserve all rights. This document, including all its sub-sections, has copyrights. Read more about what you can do with our patterns at the bottom of each pattern on our site. |
||||||||||||||||


With over 40 years in knitting and crochet design, DROPS Design offers one of the most extensive collections of free patterns on the internet - translated to 17 languages. As of today we count 304 catalogs and 11422 patterns - 11417 of which are translated into English (US/in).
We work hard to bring you the best knitting and crochet have to offer, inspiration and advice as well as great quality yarns at incredible prices! Would you like to use our patterns for other than personal use? You can read what you are allowed to do in the Copyright text at the bottom of all our patterns. Happy crafting!
Comments / Questions (82)
Buongiorno. Il diagramma M.1 deve essere eseguito come descritto nella spiegazione: M.1A 1 volta, M.1B 13 volte, M.1C 1 volta? Ma M.1 A e M.1C nell'ultima riga non si possono eseguire da soli. Come faccio?
27.05.2016 - 08:26DROPS Design answered:
Buongiorno Donatella. Nell'ultima riga dei diagrammi, inizia con il diag. M1.A e prosegue subito con M.1B: di fatto è un diagramma unico. Quindi lavora 2 m dir, 1 gettato, passa 1 m dir, 2 m insieme a dir, accavalla, 1 gettato, 3 m dir e poi nuovamente 1 gettato e così via. Analogamente alla fine della riga. Buon lavoro!
27.05.2016 - 08:38Bonjour, Je ne comprends pas comment décomposer' le rang 7. J'ai vu que la question avait été posée mais je ne comprends pas la langue de la réponse..... Je n'arrive pas à comprendre la logique du 7 ième rang fantaisie. Merci ce votre aide.
25.04.2016 - 18:59DROPS Design answered:
Bonjour Mme Coelho, la vidéo ci-dessous montre (pour un autre modèle) comment réaliser ce motif et notamment le rang 7. Bon tricot!
26.04.2016 - 08:20Prachtige vest. Mooi gelukt. Cotton Viscose geeft een heel mooi resultaat.
15.08.2015 - 12:46Alice MUSY wrote:
Very interesting pattern! My question concerns the lack of armholes. Why are the sleeves sewn onto the straight sides rather than, for example, casting off some stitches on the sides to make a more set-in armscye? I'm afraid that the pattern, as it stands, creates too much bulk under the arms. Thank you for your reply.
18.07.2015 - 19:03DROPS Design answered:
Dear Mrs Musy, picking up the sts between markers for armhole will avoid any bulky seam. Happy knitting!
27.07.2015 - 15:11Hallo, wie stricke ich das rechte Vorderteil spiegelverkehrt??? Steh da irgendwie auf dem Schlauch. Bündchen hab ich zwar hinbekommen aber mit dem Muster der verkürzten Reihen komm ich nicht mit klar. Könnt ihr mir bitte helfen???
16.03.2015 - 18:47Jeg er ikke sikker på hvordan jeg strikker højre forstykke som det venstre men modsat?
21.07.2014 - 18:27DROPS Design answered:
Hej Michella. Du spejlvender mønstret og maskerne. De venstre forstykke strikker du fra siden ud til midten og de højre strikkes fra midten ud mod siden.
22.07.2014 - 20:19Hej har en fråga angående hö framst.När jag gör korta rader och vad jag förstår så ska man börja på avisidan ska man då sticka hålmöstret avigt? Det går ju inte...förstår inte hur jag ska göra för att få hö framst spegelvänd mot vä framstycke
03.05.2014 - 16:39DROPS Design answered:
Nej hålmönstret måste du sticka från rätsidan. Men du stickar de förkortade varven i den andra sidan, så det blir mot kanten mitt fram. Lycka till!
07.05.2014 - 10:39Nashwaahmed wrote:
Excuse me but i have one more question how to reverse the short rows for the right front?? i can't get it right.
09.04.2014 - 21:48DROPS Design answered:
Dear Nashwaahmed, for right front piece, you will work short rows on the other side, starting from WS to get them reversed. Happy knitting!
10.04.2014 - 09:06Nashwaahmed wrote:
2- after finishing the left front it should be equal in length like the back keeping in mind that there are short rows done then where should i measure the left front? from the neutral part where there weren't short rows done or from the point where short rows where done ?
09.04.2014 - 13:57DROPS Design answered:
Dear Mrs Nashwaahmed, measure left front piece on the side (where it will be sewn to back piece + armhole side) to get same measurements as for back piece. Happy knitting!
09.04.2014 - 15:41Nashwaahmed wrote:
I have a questions: 1- when working short rows of the left front when i tighten the thread and turn back purling all the sts through then i will start working M.1A again in this point should i repeat the same row of M1A again and again until i finish all the short rows or should i work M.1A as a whole pattern until the short rows are finished and if so then this means that every certain number of stitches i will work the diagram differently ?
09.04.2014 - 13:57DROPS Design answered:
Dear Mrs Nashwaahmed, follow pattern as it should be, ie, work M.1 + M.1B on the first sts for all short rows, then when you will work the next row on all sts follow the same row for the last sts (ie 4th row in M.1A, M.1B and M.C) to get the pattern match. Happy knitting!
09.04.2014 - 15:40