
Popular categories
Looking for a yarn?


Comments / Questions (88)
![]() Mona Svenningsen wrote:
Mona Svenningsen wrote:
Det er stadig de forkortede pinde på højre forstykke ( tænker mønstret gir sig selv når de forkortede pinde er strikket) Det skal lige siges at jeg har strikket rib stykket som på venstre, det ved jeg ikke om er korrekt.
12.01.2017 - 15:22DROPS Design answered:
Hej Mona. Du strikker höjre forstk fra retten, saa begynder du midt foran. Dvs, mönstret strikkes i spejlbillede i forhold til det venstre. Strik fra retten: M.1B, M.1A og 1 kantmaske i siden. Saa strikker du f.eks. den mindste, saa skal du vende fra vrangen: 1 kantm, M.1A 1 gang og M.1B 2 gange, vend og strik tilbage (retten). Osv.
08.03.2017 - 14:00
![]() Mona Svenningsen wrote:
Mona Svenningsen wrote:
Hej igen Kan i uddybe svaret lidt nærmere, da jeg syntes jeg har prøvet den måde og stadig ikke kan få det til at passe. sådan som jeg læser svaret vil højre forstykke strikkes fra c til a i diagrammet. eller har jeg misforstået det.
12.01.2017 - 06:24DROPS Design answered:
Hej Mona. Er det stadig de forkortede pinde eller er det nu hvordan du strikker diagrammerne paa höjre forst?
12.01.2017 - 14:44
![]() Mona Svenningsen wrote:
Mona Svenningsen wrote:
Hvordan strikker jeg de forkortede pinde på højre forstykke? Fra ret eller vrang siden? Syntes ikke jeg kan få det til at passe på nogen måde
26.12.2016 - 14:19DROPS Design answered:
Hej Mona. Du strikker de forkortede p fra siden (= retten paa venstre forstk), saa det vil blive fra vrangen paa de höjre forstk
30.12.2016 - 12:48
![]() Mona Svenningsen wrote:
Mona Svenningsen wrote:
Kan ikke diagrammet til at passe med 109 masker + 2 kantmasker efter jeg har skiftet fra ribstykket. Og hvordan strikkes pind 7 i diagrammet? kan i hjælpe, da jeg ikke helt forstår det som det er beskrevet i opskriften
20.08.2016 - 11:36DROPS Design answered:
Hej Mona. Jo, du strikker som fölger: 1 kantm, A.1 (= 3 m), A.1B 17 ganger (17 x 6 m = 102) og afslut med M.1C (= 4 m) og 1 kantmaske: 1+3+102+4+1 = 111 m. Du strikker p som fölger: 1 kantmaske, Saa A.1: 2 r, 1 kast (og nu gaar du automatisk over i M.1B) og strikker: ta 1 m løst av p som om den strikkes r, 2 r sammen, løft den løse m over, 1 kast, 3 r, 1 kast, ta 1 m løst av p som om den strikkes r, 2 r sammen, løft den løse m over, 1 kast osv. Dette gentages til du kommer til sidste gentagelse hvor du automatisk vil gaa over i M.1C, afslut med ta 1 m løst av p som om den strikkes r, 2 r sammen, løft den løse m over, 1 kast, 2 r og 1 kantmaske.
25.08.2016 - 15:58
![]() Mona Svenningsen wrote:
Mona Svenningsen wrote:
Hej Kan denne ikke strikkes i garn af garngruppe A på mindre pinde? Garnet jeg har er cotton viscose som jeg gerne vil strikke denne model i.
10.08.2016 - 06:46TINA wrote:
Hi, I don't really get it how do you knit back which is 99 sts if M1 has 13 sts + 2 edge sts. Thank you for your answer.
07.07.2016 - 08:52DROPS Design answered:
Dear Tina, over the 99 sts on back piece, work as follows: 1 edge st, M.1 A (= 3 sts), repeat M.1B (= 6 sts) a total of 15 times (= over 90 sts), work then M.1 C (= 4 sts) and finish with 1 edge st. Happy knitting!
07.07.2016 - 12:32
![]() Donatella wrote:
Donatella wrote:
Buongiorno, mi scusi per le frequenti domande ma sono alle prime armi. Ho eseguito il davanti sinistro e iniziando il destro sto ragionando che per simmetria dovrei eseguire il diagramma M1 al contrario. In parole povere io fino ad ora l'ho eseguito da destra a sinistra e adesso dovrei farlo da sinistra a destra? E' giusto? Grazie per la disponibilità buona giornata.
03.06.2016 - 11:48DROPS Design answered:
Buongiorno Donatella. Sul davanti destro lavora il diagramma leggendolo sempre da destra verso sinistra. Ci riscriva se è ancora in difficoltà. Buon lavoro!
03.06.2016 - 12:02
![]() Donatella wrote:
Donatella wrote:
Buongiorno, avrei una domanda. Come può bastare 400 gr. di cotone per questo modello se io ho appena finito il dietro e ne già ho usato quasi 300 gr.? Faccio sempre i vostri modelli ed è la prima volta che mi capita, è sempre tutto perfetto!. Mi viene il dubbio di aver sbagliato qualcosa ma ho controllato ed è tutto come da indicazioni.
31.05.2016 - 16:44DROPS Design answered:
Buongiorno Donatella. L’indicazione dei 400 g è riferita al filato Lin (fuori produzione) o a Belle. Entrambi prevedono 120 m in 50 g. Se ha sostituito con un cotone con un metraggio diverso, deve calcolare la quantità necessaria: p.es se sta usando Muskat, sono 100 m in 50 g. Avrà bisogno di 120 m x8 (gomitoli) = 960 m / 100 (metri in un gomitolo di Safran) = 9,6 gomitoli, quindi ca. 500g. Verifichi anche la correttezza del campione. Buon lavoro!
31.05.2016 - 17:13
![]() Donatella wrote:
Donatella wrote:
Buongiorno. Il diagramma M.1 deve essere eseguito come descritto nella spiegazione: M.1A 1 volta, M.1B 13 volte, M.1C 1 volta? Ma M.1 A e M.1C nell'ultima riga non si possono eseguire da soli. Come faccio?
27.05.2016 - 08:26DROPS Design answered:
Buongiorno Donatella. Nell'ultima riga dei diagrammi, inizia con il diag. M1.A e prosegue subito con M.1B: di fatto è un diagramma unico. Quindi lavora 2 m dir, 1 gettato, passa 1 m dir, 2 m insieme a dir, accavalla, 1 gettato, 3 m dir e poi nuovamente 1 gettato e così via. Analogamente alla fine della riga. Buon lavoro!
27.05.2016 - 08:38
![]() Martine Vandewalle wrote:
Martine Vandewalle wrote:
Prachtige vest. Mooi gelukt. Cotton Viscose geeft een heel mooi resultaat.
15.08.2015 - 12:46
|
||||||||||||||||
Melanie#melaniejacket |
||||||||||||||||
 |
 |
|||||||||||||||
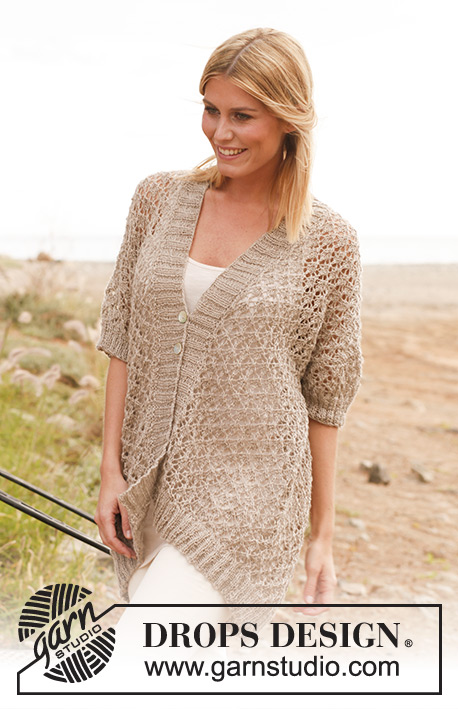
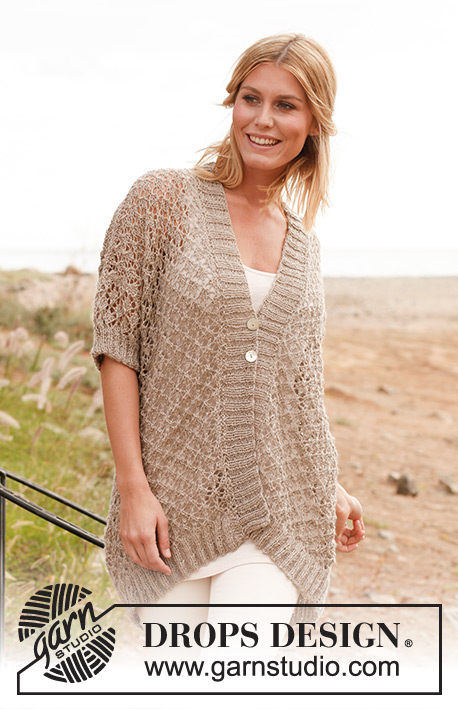
Knitted DROPS jacket with lace pattern in “Lin” or "Belle". Size: S - XXXL.
DROPS 139-7 |
||||||||||||||||
|
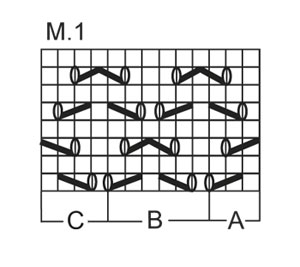
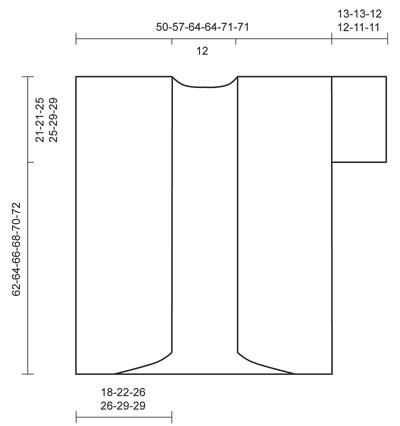
GARTER ST (back and forth on needle): K all rows. NOTE: All edge sts are worked in garter st. PATTERN: See diagrams M.1, M.1A = 3 sts, M.1B = 6 sts and M.1C = 4 sts. Diagrams show the pattern from RS. DECREASE TIP: Dec 1 st by working 2 sts tog. BUTTON HOLES: Bind off for 2 button holes on right band, approx. 33-34-35-36-37-38 cm / 13"-13⅜"-13¾"-14¼"-14½"-15" and approx. 38-39-40-41-42-43 cm / 15-15¼"-15¾"-16⅛"-16½"-17" from the top of shoulder. 1 BUTTON HOLE = bind off 2 sts and cast on 2 new sts on next row over these sts. -------------------------------------------------------- BACK PIECE: Worked back and forth on needle. Cast on 172-196-220-220-244-244 sts (incl 1 edge st in each side) on circular needle size 4 mm / US 6 with Lin or Belle. Then work rib as follows (1st row = RS): 1 edge sts in garter st - See explanation above, * K 2, P 4 *, repeat from *-*, finish with K 2 and 1 edge st in garter st = 28-32-36-36-40-40 P-sections (seen from RS). When piece measures 3-3-3-4-4-4 cm / 1⅛"-1⅛"-1⅛"-1½"-1½"-1½", dec 1 st in every P-section (seen from RS) - Read DECREASE TIP = 144-164-184-184-204-204 sts. Continue in rib with K 2/P 3 with 1 edge st in each side. When piece measures 5-5-5-6-6-6 cm / 2"-2"-2"-2⅜"-2⅜"-2⅜", dec 1 more st in every P-section (seen from RS) = 116-132-148-148-164-164 sts. Continue in rib with K 2/P 2 with 1 edge st in each side. When piece measures 6-6-6-7-7-7 cm / 2⅜"-2⅜"-2⅜"-2¾"-2¾"-2¾", dec 29-33-37-37-41-41 sts evenly on last row from WS = 87-99-111-111-123-123 sts. On next row from RS switch to circular needle size 5 mm / US 8 and work as follows: 1 edge st, work diagram M.1A 1 time (= 3 sts), then diagram M.1B a total of 13-15-17-17-19-19 times and finally diagram M.1C 1 time (= 4 sts), finish with 1 edge st. Continue diagram M.1 with 1 edge st in each side until piece measures 41-43-41-43-41-43 cm / 16⅛"-17"-16⅛"-17"-16⅛"-17". REMEMBER THE GAUGE! Now insert a marker in each side of piece (= armhole starts here). Continue to work until piece measures 60-62-64-66-68-70 cm / 23⅝"-24⅜"-25¼"-26"-26¾"-27½". Then work in garter st over all sts until finished measurements - AT THE SAME TIME on 1st row from RS bind off the middle 17 sts for neck and finish each shoulder separately. Bind off 2 sts on next row from neck = 33-39-45-45-51-51 sts remain on shoulder. Loosely bind off all sts when piece measures 62-64-66-68-70-72 cm / 24⅜"-25¼"-26"-26¾"-27½"-28⅜". LEFT FRONT PIECE: Worked back and forth on needle. Cast on 62-74-86-86-98-98 sts (incl 1 edge st in each side) on circular needle size 4 mm / US 6. Then work rib as follows (1st row = RS): 1 edge st, * P 4, K 2 *, repeat from *-*, finish with 1 edge st towards mid front = 10-12-14-14-16-16 P-sections (seen from RS). When piece measures 3-3-3-4-4-4 cm / 1⅛"-1⅛"-1⅛"-1½"-1½"-1½", dec 1 st in every P-section (seen from RS) = 52-62-72-72-82-82 sts. Continue in rib with K 2/P 3 with 1 edge st in each side. When piece measures 5-5-5-6-6-6 cm / 2"-2"-2"-2⅜"-2⅜"-2⅜", dec 1 more st in every P-section (seen from RS) = 42-50-58-58-66-66 sts. Continue in rib with K 2/P 2 with 1 edge st in each side. When piece measures 6-6-6-7-7-7 cm / 2⅜"-2⅜"-2⅜"-2¾"-2¾"-2¾" dec 9-11-13-13-15-15 sts evenly on last row from WS = 33-39-45-45-51-51 sts. On next row from RS switch to circular needle size 5 mm / US 8 and work short rows for diagonal front edge as follows: 1 edge st, work diagram M.1A 1 time (= 3 sts), diagram M.1B a total of 1-2-3-3-4-4 times (= 6-12-18-18-24-24 sts) = 10-16-22-22-28-28 sts on needle, turn piece, tighten yarn and work back. Work next row from RS as follows: 1 edge st, work diagram M.1A 1 time, diagram M.1B a total of 2-3-4-4-5-5 times = 16-22-28-28-34-34 sts on needle, turn piece, tighten yarn and work back. Work next row from RS as follows: 1 edge st, work diagram M.1A 1 time, diagram M.1B a total of 3-4-5-5-6-6 times = 22-28-34-34-40-40 sts on needle, turn piece, tighten yarn and work back. On next row from RS work all sts as follows: 1 edge st, work diagram M.1A 1 time, diagram M.1B a total of 4-5-6-6-7-7 times, then work diagram M.1C 1 time, finish with 1 edge st = 33-39-45-45-51-51 sts. Continue diagram M.1 with 1 edge st in each side until piece measures 41-43-41-43-41-43 cm / 16⅛"-17"-16⅛"-17"-16⅛"-17". Now insert a marker in the right side of piece seen from RS (armhole starts here). Continue to work until piece measures 60-62-64-66-68-70 cm / 23⅝"-24⅜"-25¼"-26"-26¾"-27½". Now work in garter st over all sts until finished measurements. Loosely bind off all sts when piece measures 62-64-66-68-70-72 cm / 24⅜"-25¼"-26"-26¾"-27½"-28⅜". RIGHT FRONT PIECE: Work as left front piece but reversed. ASSEMBLY: Sew the shoulder seams. SLEEVE: Worked back and forth on needle. Pick up from RS on circular needle size 5 mm / US 8 approx. 80 to 100 sts between markers along one armhole. K next row from WS - AT THE SAME TIME adjust no of sts to 75-75-87-87-99-99 (incl 1 edge st in each side). On next row from RS work as follows: 1 edge st, work diagram M.1A 1 time (= 3 sts), then diagram M.1B a total of 11-11-13-13-15-15 times, work diagram M.1C 1 time (= 4 sts), finish with 1 edge st. Continue to work diagram M.1 with 1 edge st in each side until piece measures approx. 9-9-8-8-7-7 cm / 3½"-3½"-3⅛"-3⅛"-2¾"-2¾" (shorter measurements in the larger sizes because of wider shoulders). On next row from RS switch to circular needle size 4 mm / US 6 and dec 1 st on row - while AT THE SAME TIME working rib (K 2, P 2) with 1 edge st in each side = 74-74-86-86-98-98 sts. When sleeve measures 13-13-12-12-11-11 cm / 5⅛"-5⅛"-4¾"-4¾"-4⅜"-4⅜", loosely bind off sts with K over K and P over P. Knit another sleeve the same way. ASSEMBLY: Sew sleeve and side seams in one inside 1 edge st. RIGHT BAND: Worked back and forth on needle. Pick up from RS on circular needle size 4 mm / US 6 approx. 110 to 130 sts along the entire right front piece, at the end of row cast on 15 new sts for collar at the back. K next row from WS - AT THE SAME TIME adjust no of sts along right front piece to 112-116-120-124-128-132 (do not inc/dec over the collar sts at the back) = 127-131-135-139-143-147 sts in total. Then work rib from RS as follows: * K 2, P 2 *, repeat from *-*, finish with K 2 and 1 edge st in garter st (= 31-32-33-34-35-36 P-sections). Continue in rib until band measures 3 cm / 1⅛", then inc from RS 1 P st in the last 12-12-14-14-16-16 P-sections (= inc around the neck) = 139-143-149-153-159-163 sts. When band measures 5-5-5-6-6-6 cm / 2"-2"-2"-2⅜"-2⅜"-2⅜", bind off for button holes - see explanation above. Continue with K over K and P over P until band measures 6-6-6-7-7-7 cm / 2⅜"-2⅜"-2⅜"-2¾"-2¾"-2¾", loosely bind off all sts with K over K and P over P. LEFT FRONT BAND: Cast on 15 sts on circular needle size 4 mm / US 6 for collar at the back, then pick up sts along left front band as on right front band. Work as right band but reversed and without button holes. ASSEMBLY: Sew collar tog mid back inside 1 edge st (with WS against WS), and sew collar to neck line at the back of neck. Sew the buttons on to the left band. |
||||||||||||||||
Diagram explanations |
||||||||||||||||
|
||||||||||||||||
 |
||||||||||||||||
 |
||||||||||||||||
Have you finished this pattern?Tag your pictures with #dropspattern #melaniejacket or submit them to the #dropsfan gallery. Do you need help with this pattern?You'll find 9 tutorial videos, a Comments/Questions area and more by visiting the pattern on garnstudio.com. © 1982-2026 DROPS Design A/S. We reserve all rights. This document, including all its sub-sections, has copyrights. Read more about what you can do with our patterns at the bottom of each pattern on our site. |
||||||||||||||||


With over 40 years in knitting and crochet design, DROPS Design offers one of the most extensive collections of free patterns on the internet - translated to 17 languages. As of today we count 324 catalogs and 12290 patterns - 12280 of which are translated into English (US/in).
We work hard to bring you the best knitting and crochet have to offer, inspiration and advice as well as great quality yarns at incredible prices! Would you like to use our patterns for other than personal use? You can read what you are allowed to do in the Copyright text at the bottom of all our patterns. Happy crafting!
Post a comment to pattern DROPS 139-7
We would love to hear what you have to say about this pattern!
If you want to leave a question, please make sure you select the correct category in the form below, to speed up the answering process. Required fields are marked *.