
Popular categories
Looking for a yarn?


Comments / Questions (74)
![]() Cornen wrote:
Cornen wrote:
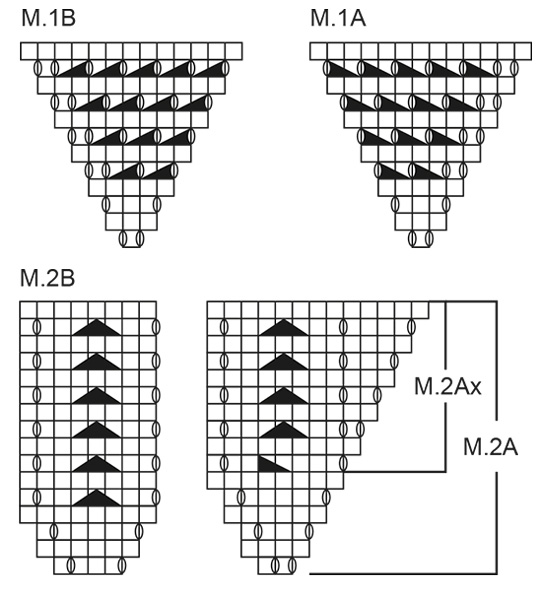
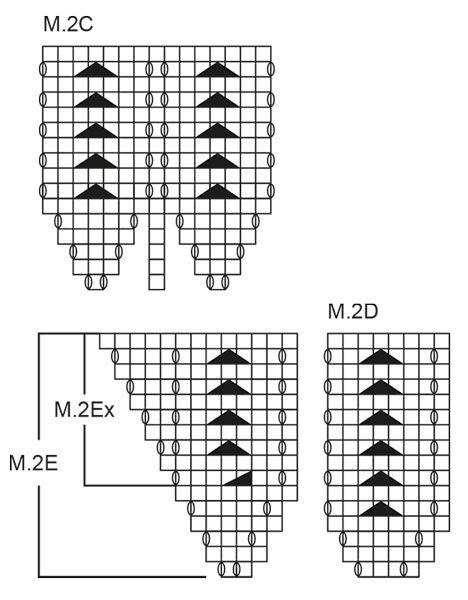
Bonjour, quand on est dans la partieM2, doit on reconstituer le point fantaisie au fur et à mesure des augmentations en M2 A et M2 E ou laisser en jersey ?
17.09.2012 - 10:10DROPS Design answered:
Bonjour Cornen, les diagrammes M.2 montrent comment tricoter les augmentations : M2.A en début de rang (sur l'endroit), M2.C au milieu et M.2 E à la fin du rang (sur l'endroit). Il faut simplement suivre et répéter ces diagrammes à chaque fois. Le nombre de mailles tricotées en M2 B et D augmentera ainsi à chaque rapport tricoté en hauteur. Bon tricot !
17.09.2012 - 10:28
![]() Joanna wrote:
Joanna wrote:
Het patroon is niet juist. In de laatste toer voor de start van M2 moet je niet tot 5 maar tot 3 steken meerderen. Ik vind dat dit gecorrigeerd moet worden. Je hebt namelijk heel veel steken op je naald en je moet terugsteken als je het verkeerd hebt gedaan. Ook een duitse breister heeft de fout in dit patroon al opgemerkt.
15.09.2012 - 20:28DROPS Design answered:
Zoals ook eerder geschreven dan is het patroon juist. Wij werken wel met de mogelijkheid om een aantal dingen wat duidelijker uit te leggen. Zodra wij een aanpassing klaar hebben, dan zal ik het hier ook laten weten!
02.10.2012 - 16:27
![]() Joanna wrote:
Joanna wrote:
Wordt het patroon gecorigeerd als het niet klopt? Duitse opmerking: je moet na 42 cm M1 tot 3 of tot 5 steken meerderen?
09.09.2012 - 21:00DROPS Design answered:
Het patroon wordt gecorrigeerd als er een fout is in de tekst. Dat er een fout in de Duitse tekst betekent niet dat er een fout in de Nederlandse tekst is. Ik heb verder de Duits/Nederlandse tekst vergeleken en ze zijn gelijk. Bij ongeveer 42 cm in de middelste st tot 5 st meerderen.
10.09.2012 - 10:26
![]() Joanna wrote:
Joanna wrote:
Ik begrijp het nog steeds niet. Ik heb 42 cm nu gebreid in M1. Dan moet ik aan de goede kant de middelste steek vermeerderen tot 5 steken. Moet ik daarna aan de verkeerde kant beginnen met patroon M2?
22.08.2012 - 20:26DROPS Design answered:
Nee, je breit de verkeerde nld en begint dan in de volgende nld op de goede kant met het patroon M.2
31.08.2012 - 16:31
![]() Joanna wrote:
Joanna wrote:
Klopt het dat je patroon M2 begint aan de verkeerde kant? Of moet je na het meerderen tot 5 steken in de middelste steek de volgende naald aan de verkeerde kant averechts breien?
20.08.2012 - 19:41DROPS Design answered:
Nee, klopt niet. In nld 5 staat er: Nld 5 (verkeerde kant). Dus nld 6 moet u rekenen als goede kant en het telpatroon komt dan ook goed.
22.08.2012 - 10:14
![]() MonicaWesterlund wrote:
MonicaWesterlund wrote:
Förstår inte beskrivningen på M2.
30.06.2012 - 19:39
![]() Barbara wrote:
Barbara wrote:
Ich habe eine weitere Unstimmigkeit in der Anleitung entdeckt! In der letzten Reihe vor M2 werden nicht 5 sondern 3 Maschen zugenommen, so wie in der Strickschrift dargestellt. Der Text ist fehlerhaft! Ich habe es gerade gestrickt ;-)
14.02.2012 - 23:05DROPS Design answered:
Angepasst. Danke für den Tipp.
15.02.2012 - 10:58
![]() DROPS Deutsch wrote:
DROPS Deutsch wrote:
Damit die Arbeit die richtige Form erhält strickt man die Aufnahmen am Anfang der Reihe und nicht in der Mitte. Dadurch kommen die ”dicken” Linien senkrecht und nicht waagrecht wie auf dem Bild gezeigt.
13.02.2012 - 12:53
![]() Maxi wrote:
Maxi wrote:
Irgendwie stimmt das Bild, welches sich bei mir ergibt nicht mit eurem Bild überein....bei mir laufen die "dicken" Linien parallel zur Mittelmasche, bei euch sieht das aus, als laufen die dickeren Linien von der Mittelmasche weg... irgendwie verstehe ich das nicht
06.02.2012 - 17:13
![]() DROPS Deutsch wrote:
DROPS Deutsch wrote:
Das stimmt. Ich werde die Grafikger bitten das anzupassen.
06.02.2012 - 12:44
|
||||||||||||||||
Rosita#rositashawl |
||||||||||||||||
 |
 |
|||||||||||||||
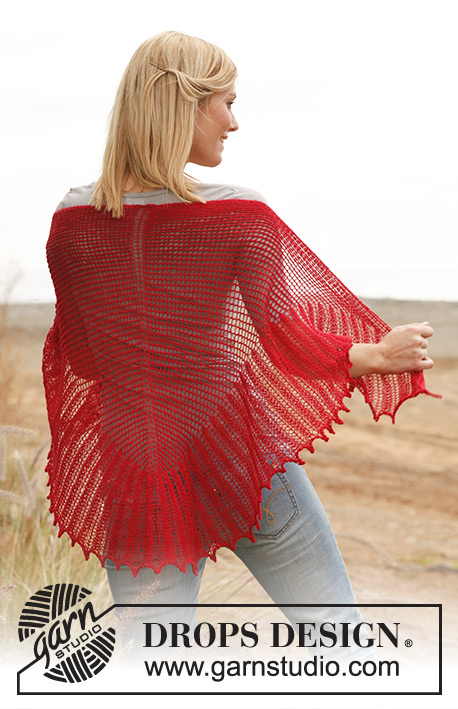
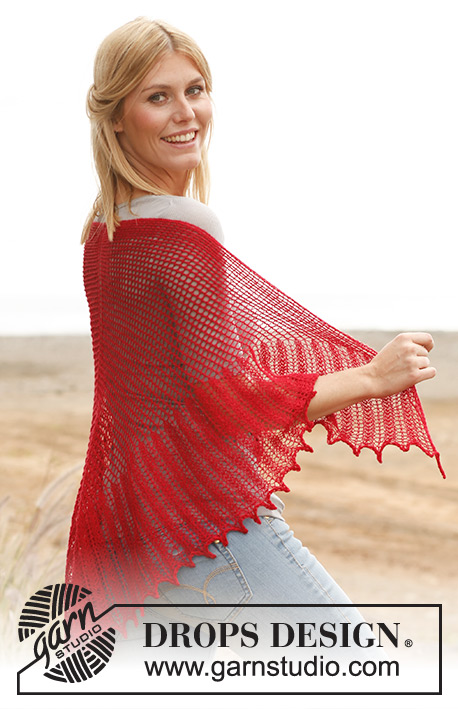
Knitted DROPS shawl with lace pattern in "Lace".
DROPS 139-2 |
||||||||||||||||
|
KNITTING GAUGE: This garment is to be soaked and blocked/stretched to size afterwards so the knitting gauge is not that important but to get a sense of whether you are working too loose/tight, work a test on needle size 3.5 mm / US 4 in stockinette st and get approx. 23 sts x 30 rows = 10 x 10 cm / 4" x 4". GARTER ST (back and forth on needle): K all rows. PATTERN: See diagrams M.1 and M.2. Diagrams show pattern from RS. Pattern in diagram M.1A is reversed from pattern in diagram M.1B. INCREASE TIP: Work 5 sts in 1 st as follows: K 1, 1 YO, K 1, 1 YO, K 1. NOTE: To avoid a "fragile" middle st when inc 5 sts in this st, knit up sts both through middle st on needle and middle st from previous row at the same time. --------------------------------------------------------- SHAWL: Worked back and forth on circular needle, work from mid back of neck and down. Cast on 3 sts on circular needle size 3.5 mm / US 4 with Lace. Work as follows: Row 1: K 2 sts in 1st and 2nd st, and K 1 st in 3rd st = 5 sts. Row 2: K all sts. Row 3: K 1, K 2 sts in next st, insert a marker in next st (mid st), K 2 sts in next st, K 1 = 7 sts. Row 4: K all sts. Row 5 (WS): K 2 (= edge sts), P 3 and K 2 (= edge sts). Continue as follows: 2 edge sts in GARTER ST - see explanation above, diagram M.1A, 1 mid st in stockinette st, diagram M.1B and 2 edge sts in garter st. When diagram M.1 has been worked, continue inc and pattern the same way, i.e. inc 4 sts on every row from RS. Work until the shawl measures approx. 42 cm/ 16½" – measure mid back and lightly pull when measuring (finish after 1 row from WS). Continue in pattern and on next row (= from RS) inc mid st to 5 sts (4 sts inc) – SEE INCREASE TIP. Work one more row from the WS – purl the inc sts. Continue with diagram M.2 as follows: 2 sts in garter st, diagram M.2A over the first 2 sts, insert a marker, then diagram M.2B until the 3 sts in the middle (the middle st and 1 st on each side of this st), insert a marker, work the 3 middle sts in diagram M.2C, insert a marker, continue with diagram M.2D until 4 sts remain, insert a marker, work diagram M.2E over 2 sts and the last 2 sts in garter st. Continue pattern like this until a total of 20 rows of M.2 have been worked. Continue as follows: 2 sts in garter st, diagram M.2Ax over the next 8 sts, continue the rest of the pattern as before until 10 sts remain, work M.2Ex over the next 8 sts, 2 sts in garter st. Continue like this, incorporating new sts each side in pattern until piece measures approx. 60 cm / 23½" mid back (with a light pull). Bind off with 2 strands as follows: K 2 sts, slip them back on left needle and K them twisted tog (i.e. work in back loop of st instead of front). * Work 1 more st (= 2 sts on right needle), slip them back on the left needle, K them twisted tog *, repeat from *-* until all sts have been bind off. This is done to make the edge elastic for blocking. BLOCKING: Place the shawl in lukewarm water until it is soaking wet. Carefully squeeze the water out of the shawl - do not twist the shawl - then roll the shawl in a towel and squeeze to remove more water - the shawl will now only be moist. Place the shawl on a carpet or mattress - carefully stretch it out to size and fasten it with pins. Leave to dry. Repeat the process when the garment has been washed. |
||||||||||||||||
Diagram explanations |
||||||||||||||||
|
||||||||||||||||
 |
||||||||||||||||
 |
||||||||||||||||
Have you finished this pattern?Tag your pictures with #dropspattern #rositashawl or submit them to the #dropsfan gallery. Do you need help with this pattern?You'll find 8 tutorial videos, a Comments/Questions area and more by visiting the pattern on garnstudio.com. © 1982-2026 DROPS Design A/S. We reserve all rights. This document, including all its sub-sections, has copyrights. Read more about what you can do with our patterns at the bottom of each pattern on our site. |
||||||||||||||||


With over 40 years in knitting and crochet design, DROPS Design offers one of the most extensive collections of free patterns on the internet - translated to 17 languages. As of today we count 324 catalogs and 12290 patterns - 12280 of which are translated into English (US/in).
We work hard to bring you the best knitting and crochet have to offer, inspiration and advice as well as great quality yarns at incredible prices! Would you like to use our patterns for other than personal use? You can read what you are allowed to do in the Copyright text at the bottom of all our patterns. Happy crafting!
Post a comment to pattern DROPS 139-2
We would love to hear what you have to say about this pattern!
If you want to leave a question, please make sure you select the correct category in the form below, to speed up the answering process. Required fields are marked *.