
Popular categories
Looking for a yarn?


Comments / Questions (74)
![]() Nicci wrote:
Nicci wrote:
Dank voor het antwoord. Wat ik echter bedoel met te veel steken is dat ik op toer 15 omslag - 4 recht gebreit heb (na toer 16 zijn dit dus 5 steken). Hier kan ik dan vervolgens toch geen omslag - 1 recht - omslag - 1 recht (totaal van 2 steken) op kwijt? Dan houd ik steken over wil het patroon niet scheef boven elkaar komen.
28.03.2013 - 14:11DROPS Design answered:
Ga door op deze manier; Er komen dus steeds meer tricotsteken tussen de eerste en de volgende omslag aan beide zijkanten
28.03.2013 - 14:48
![]() Tineke Van Bergen wrote:
Tineke Van Bergen wrote:
Klaar! Hij is prachtig geworden!
28.03.2013 - 14:02
![]() Nicci wrote:
Nicci wrote:
Ik heb eenmaal M2 in de hoogte gebreid. Ik begrijp dat ik de laatste 2 toeren van 2B, 2C en 2D steeds moet gaan herhalen en na de 2 kantsteken moet beginnen met 2A vanaf toer 1 (en vervolgens 2B zoals in de laatste 2 rijen enz). Dan kom ik echter qua stekenaantal en patroon niet meer uit...waar zit 'm de fout?
26.03.2013 - 13:46DROPS Design answered:
Beste Nicci. Als je de laatste 2 toeren moet herhalen van M2B, C en D, dan brei je M.2A en E zoals beschreven, 1e rij M2A: 2 r, begin M2A opnieuw over de volgende 2 st, M2B over de volgende 8 st, 1e rij van van M2E: brei M2D over de eerste 8 st en begin M2E opniew over de volgende 2 st. Waarom je aantal st niet correct is weet ik niet. Veel breiplezier.
28.03.2013 - 13:19
![]() SewSassy1 wrote:
SewSassy1 wrote:
Hi again. This is where I am, I have worked M.2 once, where the pattern asks to repeat the last 2 rows of M2B, C & D, do I work those without doing A 1st and E last? thank you
13.02.2013 - 19:38DROPS Design answered:
Dear Sewsassy1, when you repeat the last 2 rows in M.2B,C & D, you work M.2A and E as stated, 1st row M.2A : K2, start M.2A from beg again over next 2 sts, M2B over next 8 sts, and 1st row M.2E : work M.2D over first 8 sts then start M.2E from beg again over next 2 sts, K2. Happy knitting !
14.02.2013 - 09:12
![]() SewSassy1 wrote:
SewSassy1 wrote:
OK, that helps me visualize. Now when it refers to M.2B and the 3 sts in the middle what does this mean? I thought I had 5 sts in the middle from increasing earlier on. What happens to the 5 mid back sts? thanks
30.01.2013 - 13:46DROPS Design answered:
Dear Sewsassy, it means you will work M.2B until the 3 mid sts (mid st + 1 st either side), on these 3 sts you will work M2C (=3 sts on 1st row), then continue with M2D and M2E. on 2nd row of M2, you will have 5 sts on M2C work them as indicated. After you have worked M2 oce in height, repeat the last 2 rows of M2B, C and D until the end and M2A and M2C as stated in pattern. Happy knitting !
30.01.2013 - 14:56
![]() SewSassy1 wrote:
SewSassy1 wrote:
I would like help with this pattern starting with M.2, I do not understand what is required or where I will be with the work when I finish M.2E
30.01.2013 - 04:54DROPS Design answered:
Dear Sewsassy, after you have worked M.2E 1 time in height, just repeat the diagrams as before, you will have 1 more repeat of M2B and M2D each time. Happy knitting !
30.01.2013 - 09:44
![]() Jessica Andersen wrote:
Jessica Andersen wrote:
Mönstret på M2 stämmer inte när man ökat mittmaskerna med 5 maskor. Hur gör man? Hittar nämligen inget svar på min fråga under rubriken Rättelser.
28.12.2012 - 10:51
![]() Therese Lepold wrote:
Therese Lepold wrote:
Kann man das mittlere Muster auch als Quadratisches Tuch stricken? Wenn ja, was muß ich dann evtl. ändern. Oder gibt es ein ähnliches Muster welches man dann nehmen kann?
20.11.2012 - 23:49DROPS Design answered:
Liebe Frau Lepold, das Muster wurde so entworfen, dass es diese Form ergibt. Vielleicht finden Sie ja in unserer Musterdatenbank ein Modell, das Ihren Vorstellungen genauer entspricht.
21.11.2012 - 09:07
![]() DROPS Design NL wrote:
DROPS Design NL wrote:
We hebben de beschrijving wat aangepast n.a.v. vragen over de werkwijze. Hopelijk wordt het op deze manier duidelijker.
03.10.2012 - 12:37
![]() Cornen wrote:
Cornen wrote:
Je ne comprends pas trop car moi je me retrouve avec beaucoup de mailles en jersey endroit au début ( après les 2 mailles en mousse et le jeté) et à la fin ( avant le jeté et les 2 mailles en mousses) et ce n'est pas très joli... :-(
17.09.2012 - 11:18DROPS Design answered:
Vous devez continuer en suivant les diagrammes M.2 comme indiqué, (et sans mailles jersey après/avant les 2 m au point mousse). Ainsi, au 1er rang de M2, vous suivez ces indications, les jetés pour augmenter sont compris dans chacun des diagrammes M2A et M2E. Après les 16 rangs des diagrammes, vous reprenez dès le 1er rang. Pour toute aide personnalisée, je vous demande de bien vouloir contacter votre magasin DROPS. Il pourra vous expliquer plus facilement. Bon tricot !
17.09.2012 - 13:38
|
||||||||||||||||
Rosita#rositashawl |
||||||||||||||||
 |
 |
|||||||||||||||
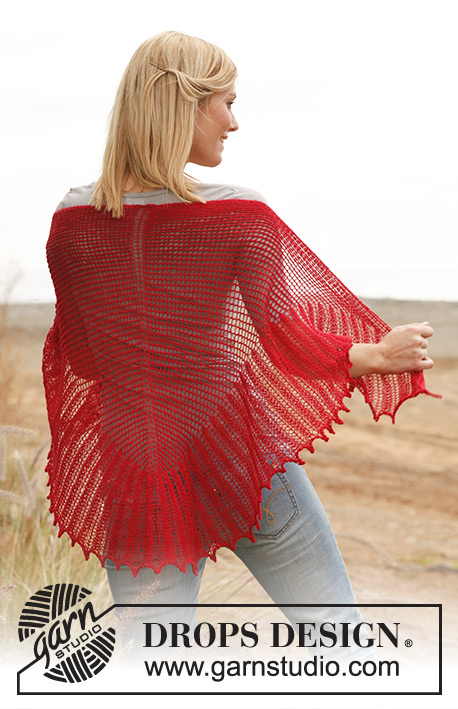
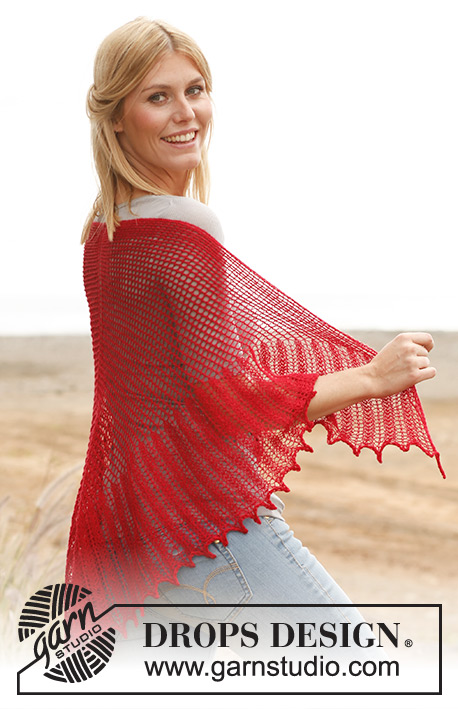
Knitted DROPS shawl with lace pattern in "Lace".
DROPS 139-2 |
||||||||||||||||
|
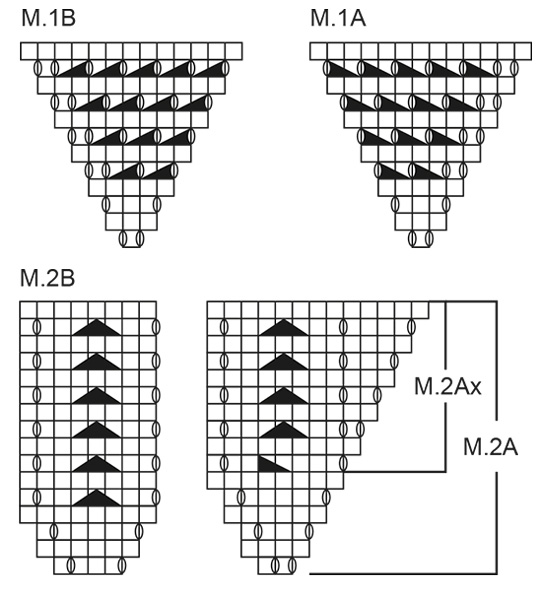
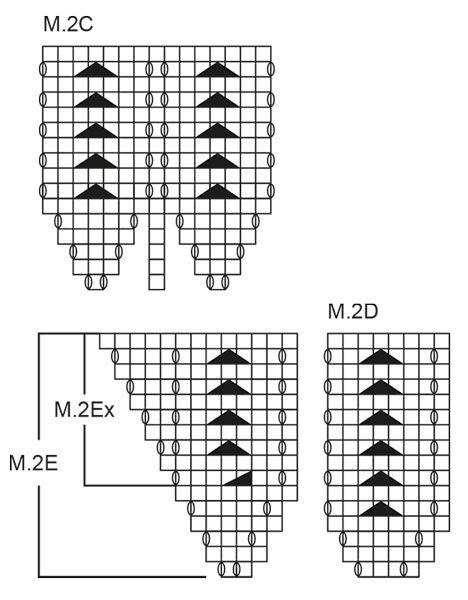
KNITTING GAUGE: This garment is to be soaked and blocked/stretched to size afterwards so the knitting gauge is not that important but to get a sense of whether you are working too loose/tight, work a test on needle size 3.5 mm / US 4 in stockinette st and get approx. 23 sts x 30 rows = 10 x 10 cm / 4" x 4". GARTER ST (back and forth on needle): K all rows. PATTERN: See diagrams M.1 and M.2. Diagrams show pattern from RS. Pattern in diagram M.1A is reversed from pattern in diagram M.1B. INCREASE TIP: Work 5 sts in 1 st as follows: K 1, 1 YO, K 1, 1 YO, K 1. NOTE: To avoid a "fragile" middle st when inc 5 sts in this st, knit up sts both through middle st on needle and middle st from previous row at the same time. --------------------------------------------------------- SHAWL: Worked back and forth on circular needle, work from mid back of neck and down. Cast on 3 sts on circular needle size 3.5 mm / US 4 with Lace. Work as follows: Row 1: K 2 sts in 1st and 2nd st, and K 1 st in 3rd st = 5 sts. Row 2: K all sts. Row 3: K 1, K 2 sts in next st, insert a marker in next st (mid st), K 2 sts in next st, K 1 = 7 sts. Row 4: K all sts. Row 5 (WS): K 2 (= edge sts), P 3 and K 2 (= edge sts). Continue as follows: 2 edge sts in GARTER ST - see explanation above, diagram M.1A, 1 mid st in stockinette st, diagram M.1B and 2 edge sts in garter st. When diagram M.1 has been worked, continue inc and pattern the same way, i.e. inc 4 sts on every row from RS. Work until the shawl measures approx. 42 cm/ 16½" – measure mid back and lightly pull when measuring (finish after 1 row from WS). Continue in pattern and on next row (= from RS) inc mid st to 5 sts (4 sts inc) – SEE INCREASE TIP. Work one more row from the WS – purl the inc sts. Continue with diagram M.2 as follows: 2 sts in garter st, diagram M.2A over the first 2 sts, insert a marker, then diagram M.2B until the 3 sts in the middle (the middle st and 1 st on each side of this st), insert a marker, work the 3 middle sts in diagram M.2C, insert a marker, continue with diagram M.2D until 4 sts remain, insert a marker, work diagram M.2E over 2 sts and the last 2 sts in garter st. Continue pattern like this until a total of 20 rows of M.2 have been worked. Continue as follows: 2 sts in garter st, diagram M.2Ax over the next 8 sts, continue the rest of the pattern as before until 10 sts remain, work M.2Ex over the next 8 sts, 2 sts in garter st. Continue like this, incorporating new sts each side in pattern until piece measures approx. 60 cm / 23½" mid back (with a light pull). Bind off with 2 strands as follows: K 2 sts, slip them back on left needle and K them twisted tog (i.e. work in back loop of st instead of front). * Work 1 more st (= 2 sts on right needle), slip them back on the left needle, K them twisted tog *, repeat from *-* until all sts have been bind off. This is done to make the edge elastic for blocking. BLOCKING: Place the shawl in lukewarm water until it is soaking wet. Carefully squeeze the water out of the shawl - do not twist the shawl - then roll the shawl in a towel and squeeze to remove more water - the shawl will now only be moist. Place the shawl on a carpet or mattress - carefully stretch it out to size and fasten it with pins. Leave to dry. Repeat the process when the garment has been washed. |
||||||||||||||||
Diagram explanations |
||||||||||||||||
|
||||||||||||||||
 |
||||||||||||||||
 |
||||||||||||||||
Have you finished this pattern?Tag your pictures with #dropspattern #rositashawl or submit them to the #dropsfan gallery. Do you need help with this pattern?You'll find 8 tutorial videos, a Comments/Questions area and more by visiting the pattern on garnstudio.com. © 1982-2026 DROPS Design A/S. We reserve all rights. This document, including all its sub-sections, has copyrights. Read more about what you can do with our patterns at the bottom of each pattern on our site. |
||||||||||||||||


With over 40 years in knitting and crochet design, DROPS Design offers one of the most extensive collections of free patterns on the internet - translated to 17 languages. As of today we count 324 catalogs and 12290 patterns - 12280 of which are translated into English (US/in).
We work hard to bring you the best knitting and crochet have to offer, inspiration and advice as well as great quality yarns at incredible prices! Would you like to use our patterns for other than personal use? You can read what you are allowed to do in the Copyright text at the bottom of all our patterns. Happy crafting!
Post a comment to pattern DROPS 139-2
We would love to hear what you have to say about this pattern!
If you want to leave a question, please make sure you select the correct category in the form below, to speed up the answering process. Required fields are marked *.