
Popular categories
Looking for a yarn?


Comments / Questions (28)
![]() Marilu wrote:
Marilu wrote:
Salve, potrebbe dirmi cortesemente se quando si arriva alla parte destra per il d'avanti: Continuare il diagramma M.2 sulle 8 m più esterne e lavorare le 5-5-6-6-6-7 m rimanenti a maglia legaccio. Domanda: faccio la treccia e poi le 6 rimanenti a m. legaccio o al contrario? Molte grazie e buona serata!
07.12.2020 - 18:53DROPS Design answered:
Buonasera Marilu, M.2 si lavora sulle stesse maglie. Buon lavoro!
07.12.2020 - 21:25
![]() Marilu wrote:
Marilu wrote:
Grazie di nuovo, come sempre gentile e chiara oltre che risponda sempre in tempo reale!!!
15.11.2020 - 19:03
![]() Marilu wrote:
Marilu wrote:
Buonasera, vorrei chiederLe cortesemente una piccola spiegazione riguardo gli aumenti quando si arriva agli scalfi (per la misura XL) Quando il lavoro misura 46-47-49-51-53-54 cm, aumentare per le maniche alla fine di ogni f per ogni lato come segue: 1 m 0-0-2-3-3-3 volte ogni 4 f. Quindi 1 m 9-9-5-2-0-0 volte a f alterni, 1m. 3 volte ogni 4 ferri? Devo fare 1m da un lato a ferri alterni =2 m. poi faccio 4 ferri e dopo aumento altri 2,poi 4 ferri ed altri 2 ? Molte grazie!
12.11.2020 - 15:45DROPS Design answered:
Buongiorno Marilu, deve aumentare 1 maglia alla fine del ferro, poi lavora il ferro di ritorno e aumenta 1 maglia, poi lavora altri 2 ferri e aumenta sul 3° (sarebbe il 4° dopo il 1° ferro) e così via. Buon lavoro!
13.11.2020 - 15:56
![]() Sophie LACAILLE wrote:
Sophie LACAILLE wrote:
Bonjour, Je lis qu'il faut tricoter le col mais je ne vois pas les explications de ce col ? Pouvez-vous m'éclairer ? Cordialement, Sophie Lacaille
14.10.2020 - 14:03DROPS Design answered:
Bonjour Mme Lacaille, le col se tricote sur M.2 (= 8 m) + les 5-6-7 m (cf taille) point mousse - cf fin du devant droit. Il s'agit d'un col châle simple tricoté un peu comme dans cette vidéo, sauf qu'après 4-5 cm, on va mettre 5 fois en attente les 2 premières m du rang sur l'envers (il reste 3 -4-5m), on tricote ensuite toutes les mailles et on les rabat. Bon tricot!
14.10.2020 - 16:29
![]() Yvonne wrote:
Yvonne wrote:
Danke,meine Fragen haben sich erledigt ;-) Bin selbst darauf gekommen. Liebe Grüsse
24.01.2018 - 19:50
![]() Yvonne wrote:
Yvonne wrote:
Hallo liebes Drops Team, ein Frage zur Zunahme Rückenteil Gr. L Nach 49 cm auf beiden Seiten am Schluss jeder R. für die Ärmel aufnehmen : bei jeder 4. R. 2 x 1 M....,danach in jeder 2 R. 5*1...... Heißt ,nach 49 cm stricke ich 3 Reihen und in der 4 Reihe nehme ich zu? Oder nehme ich direkt nach 49 cm zu,stricke 2 R. und nehme die 2*1 zu? (Gesamt 5*2) Zähle ich die Zunahmereihe als Reihe 1? Vielen herzlichen Dank. Yvonne
24.01.2018 - 17:01DROPS Design answered:
Liebe Yvonne, die Zunahmereihe ist als Reihe 1 gezählt, dh bei der 1. Reihe 1 M am Ende jeder nächsten 2 Reihen zunehmen, dann 2 Reihe über alle Maschen, und noch 1 x am Ende jeder nächsten Reihe zunehmen. Viel Spaß beim stricken!
25.01.2018 - 08:00
![]() Lis Mortensen wrote:
Lis Mortensen wrote:
Har strikket vest i m. har brugt 100g mere. Forstår ikke hvordan kraven skal sys på???. hvis jeg følger vejledningen ser det klumpet ud!
05.12.2013 - 16:04
![]() Deborah wrote:
Deborah wrote:
Grazie ora è tutto molto più chiaro!!!non vedo l'ora di cominciare! buona giornata
26.11.2013 - 08:41
![]() Deborah wrote:
Deborah wrote:
Grazie per la risposta. ciò che non mi è molto chiaro in M.1 (cominciando il lavoro con il primo ferro diritto sul diritto del lavoro), il secondo ferro deve essere lavorato tutto diritto sul rovescio oppure una maglia dir. sul diritto del lavoro e una dir. sul rovescio del lavoro?grazie e buon lavoro
25.11.2013 - 20:37DROPS Design answered:
Buonasera Deborah, deve iniziare a lavorare il dietro seguendo M.1, primo f da dx a sx, dal basso verso l'alto, per cui tutto a dir, il 2°f si legge da sx verso dx dal momento che il modello è lavorato avanti e indietro sui f, quindi deve lavorare 1 m rov, 1 m dir in modo alternato fino alla fine del f. Giri il lavoro e ricominci da capo. Buon lavoro!!
25.11.2013 - 22:34
![]() Deborah wrote:
Deborah wrote:
Salve, il modello è molto bello, ma non riesco a capire il tipo di punto. nello schema si parla di maglia legaccio ma la spiegazione in m.1 mi sembra quella di un altro punto. potrei avere dei chiarimenti grazie
25.11.2013 - 16:29DROPS Design answered:
Buongiorno Deborah, il modello è lavorato partendo dal dietro seguendo il diagramma M.1 (letto dal basso verso l'alto, da dx verso sx). Poi verranno fatti gli aumenti per le maniche, lavorando le ultime 3 m aumentate a m legaccio. Poi può seguire le istruzioni per proseguire. Ci riscriva se non è chiaro. Buon lavoro!!
25.11.2013 - 16:52
|
|||||||||||||
Wrapped Comfort Vest#wrappedcomfortvest |
|||||||||||||
 |
 |
||||||||||||
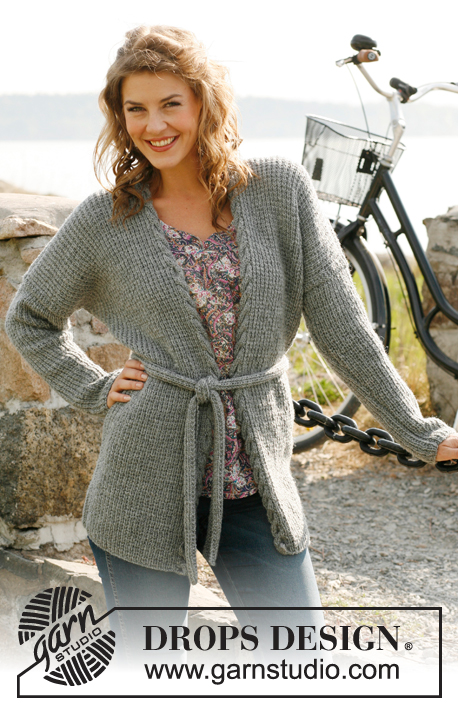
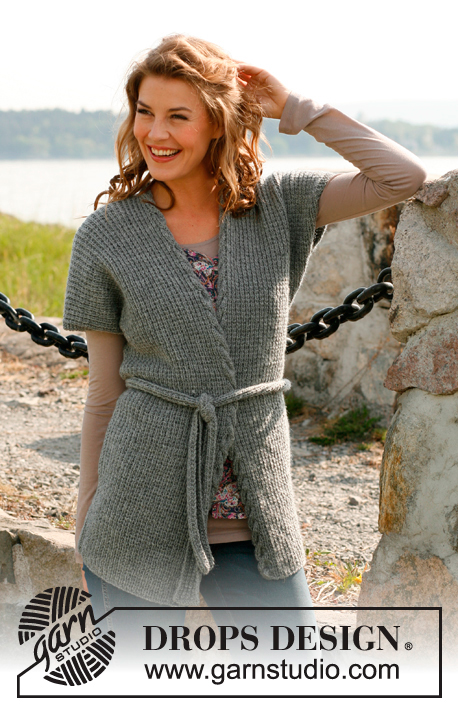
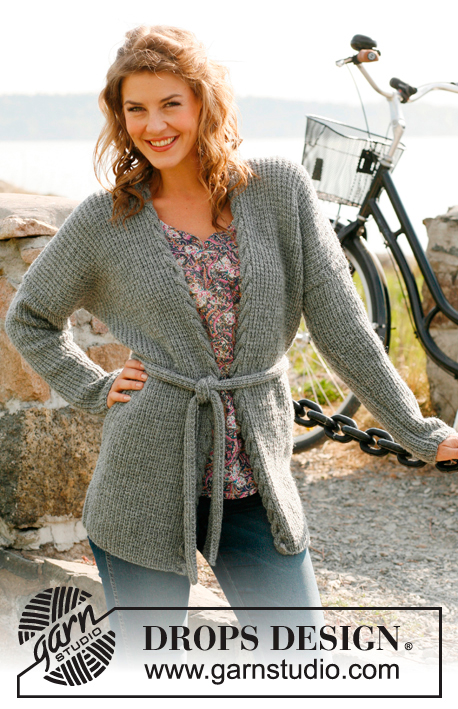
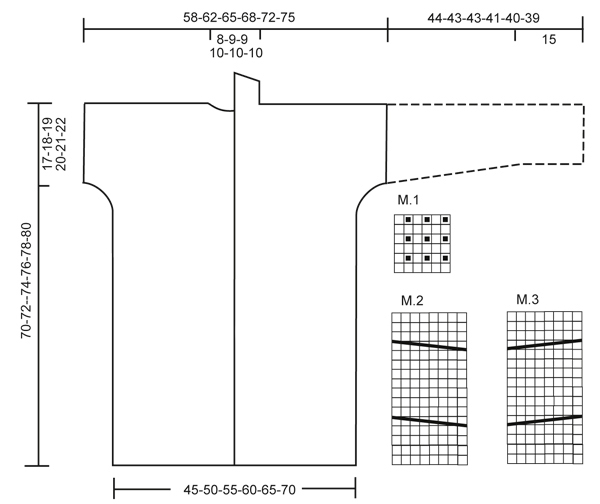
Knitted long DROPS jacket or vest with textured pattern, cable edge and belt in ”Karisma”. Size: S to XXXL.
DROPS 132-23 |
|||||||||||||
|
PATTERN: See diagram M.1 to M.3 – diagrams show pattern from RS (1st row = RS). GARTER ST (back and forth on needle): K all rows. -------------------------------------------------------- -------------------------------------------------------- BACK PIECE (jacket and vest): Worked back and forth on needle. Cast on 97-107-117-127-139-149 sts (includes 1 edge st in each side) on needle size 4 mm / US 6 with Karisma. Work diagram M.1 over all sts. REMEMBER THE GAUGE! When piece measures 46-47-49-51-53-54 cm / 18"-18½"-19¼"-20"-21"-21¼",inc for sleeves at the end of every 4th row in each side as follows: 1 st 0-0-2-3-3-3 times. Then on every other row 1 st 9-9-5-2-0-0 times, and finally 3 sts 1 time in each side (= a total of 12-12-10-8-6-6 sts inc in each side), work the inc sts in pattern, but work the last 3 inc sts in GARTER ST – see explanation above, = 121-131-137-143-151-161 sts. When piece measures 68-70-72-74-76-78 cm / 26¾"-27½"-28⅜"-29⅛"-30"-30¾", bind off the middle 17-19-19-21-21-21 sts for neck. Finish each shoulder (= 52-56-59-61-65-70 sts) separately. Bind off when piece measures 70-72-74-76-78-80 cm / 27½"-28⅜"-29⅛"-30"-30¾"-31½. RIGHT FRONT PIECE (jacket and vest): Worked back and forth on needle. Cast on 53-57-63-67-73-79 sts (includes 8 band sts towards mid front and 1 edge st in the side) on needle size 4 mm / US 6 with Karisma. Work as follows (1st row = from RS): Diagram M.2 (= 8 sts) then diagram M.1 over all sts. When piece measures 46-47-49-51-53-54 cm / 18"-18½"-19¼"-20"-21"-21¼", inc for sleeve in the side as on back piece = 65-69-73-75-79-85 sts. When piece measures approx. 70-72-74-76-78-80 cm / 27½"-28⅜"-29⅛"-30"-30¾"-31½ (adjust so that next row is worked from WS), bind off the first 52-56-59-61-65-70 sts = 13-13-14-14-14-15 sts remain on needle for neck edge. Continue diagram M.2 over the outermost 8 sts and work the remaining 5-5-6-6-6-7 sts in garter st. When edge measures approx. 4-4-4-5-5-5 cm / 1½"-1½"-1½"-2"-2"-2", slip the first 2 sts at beg of row from WS on a stitch holder after they have been worked. Repeat at beg of every row from WS a total of 5 times - continue working cables as far as possible (= 3-3-4-4-4-5 sts remain on needle). Slip all sts back on needle and bind off. LEFT FRONT PIECE (jacket and vest): Cast on and work as right front piece but reversed – work diagram M.3 instead of diagram M.2 at the edge of band. Bind off shoulder sts from RS to avoid cutting the thread before working collar. When slipping sts from stitch holder back on needle, this is done at beg of every row from RS. SLEEVE (jacket): Worked back and forth on needle. Cast on 54-54-56-56-58-60 sts (includes 1 edge st in each side) on needle size 4 mm / US 6 with Karisma. Work diagram M.1 with 1 edge st in garter st in each side. When piece measures 15 cm / 6", inc 1 st in each side, repeat inc every 9-7-6-5-4-4 rows a total of 9-11-12-14-15-16 times (the inc sts are worked in pattern) = 72-76-80-84-88-92 sts. When piece measures 44-43-43-41-40-39 cm / 17¼"-17"-17"-16⅛"-15¾"-15¼", bind off all sts (shorter measurements in the larger sizes because of wider shoulder width on body). BELT (jacket and vest): Cast on 11 sts on needle size 4 mm / US 6 and work diagram M.1 over all sts for approx. 120-130-140-150-160-170 cm / 47"-51"-55"-59"-63"-66", bind off. ASSEMBLY (jacket and vest): Sew the shoulder seams. Sew collar tog mid back, edge to edge to avoid a chunky seam. Sew collar to the back of neckline. Sew the side seams inside 1 edge st. JACKET: Sew sleeves tog inside 1 edge st and sew in sleeves. |
|||||||||||||
Diagram explanations |
|||||||||||||
|
|||||||||||||
 |
|||||||||||||
Have you finished this pattern?Tag your pictures with #dropspattern #wrappedcomfortvest or submit them to the #dropsfan gallery. Do you need help with this pattern?You'll find 12 tutorial videos, a Comments/Questions area and more by visiting the pattern on garnstudio.com. © 1982-2026 DROPS Design A/S. We reserve all rights. This document, including all its sub-sections, has copyrights. Read more about what you can do with our patterns at the bottom of each pattern on our site. |
|||||||||||||


With over 40 years in knitting and crochet design, DROPS Design offers one of the most extensive collections of free patterns on the internet - translated to 17 languages. As of today we count 324 catalogs and 12290 patterns - 12280 of which are translated into English (US/in).
We work hard to bring you the best knitting and crochet have to offer, inspiration and advice as well as great quality yarns at incredible prices! Would you like to use our patterns for other than personal use? You can read what you are allowed to do in the Copyright text at the bottom of all our patterns. Happy crafting!
Post a comment to pattern DROPS 132-23
We would love to hear what you have to say about this pattern!
If you want to leave a question, please make sure you select the correct category in the form below, to speed up the answering process. Required fields are marked *.