
Popular categories
Looking for a yarn?


Comments / Questions (54)
![]() Anne Christine Bang wrote:
Anne Christine Bang wrote:
Hei. Jeg har begynt å strikke denne jakken. På bildet ser det ut som det er en felling på forstykket opp mot halsdelen. Jeg finner ikke dette igjen på mønsteret. Heller ikke på diagrammet/ det tegnete mønsteret. Jeg vil gjerne ha jakken slik som den er vist på bildet. Er det noe jeg har oversett på mønsteret. Hvis ikke kan dere fortelle meg hvordan/ hvor ofte jeg skal felle av på forstykket slik at jeg får genseren slik som avbildet.
01.04.2019 - 20:26DROPS Design answered:
Hei Anne Christine. jakken på bildet er strikket etter oppsrkiften: Det er ingen annen felling enn den mot ermhullet. Kanskje den virker smalere øverst fordi modellen er bredere over skuldrene enn rundt livet og at jakken derfor ser ut som den smalner oppover mot skulderne. Men den gjør altså ikke det. God fornøyeløse
08.04.2019 - 13:40
![]() Utente wrote:
Utente wrote:
Quando nelle maniche (taglia M) dice di intrecciare tutte le maglie alla fine del lavoro all'incirca quante maglie devono essere rimaste?
30.04.2018 - 16:54
![]() Elisa wrote:
Elisa wrote:
Scusatemi ancora, quindi quando invece c'è scritto "intrecciare per lo scalfo ogni due ferri" cosa si intende? Grazie mille ancora
24.02.2018 - 23:07DROPS Design answered:
Buongiorno Elisa. Ogni due ferri significa che intreccia un ferro sì e uno no. Buon lavoro!
25.02.2018 - 00:59
![]() Elisa wrote:
Elisa wrote:
Scusate le molte domande, Ma quando per i pezzi davanti dice "intrecciare ad ogni ferro dal lato della spalla" cosa si intende? Come faccio a intrecciare ad ogni ferro dallo stesso lato nell'andata e nel ritorno? Non è ogni 2 ferri? Grazie
24.02.2018 - 13:07DROPS Design answered:
Bionasera Elisa, da una parte intreccia all'inizio del ferro e quando gira il lavoro intreccerà all'inizio del ferro. Buon lavoro!
24.02.2018 - 19:18
![]() Elisa wrote:
Elisa wrote:
È possibile lavorare le maniche in tondo (non avanti e indietro sui ferri)? Grazie
23.02.2018 - 14:53DROPS Design answered:
Buongiorno Elisa, sì, può lavorarle in tondo. Buon lavoro!
23.02.2018 - 15:57
![]() Luisa wrote:
Luisa wrote:
Buona sera, Quando intreccio per gli scalfi, all'inizio del ferro intreccio normalmente andando avanti come nel video, ma alla fine del ferro come devo fare? Grazie
12.01.2018 - 23:02DROPS Design answered:
Buongiorno Luisa. Per il secondo scalfo, intreccia le maglie all'inizio del ferro successivo, quindi sul rovescio del lavoro e poi prosegue lavorando le maglie sul ferro. Buon lavoro!
13.01.2018 - 06:57
![]() Sarah wrote:
Sarah wrote:
Ich bin jetzt soweit, dass ich oben am Rücken die Abnahmen für Schulter und Halsausschnitt stricken soll. Ich bin verwundert, dass ich nur am anfang 6 Maschen abketten soll dann 14 Maschen stricke, 16 abkette und den Rest normal stricke. Müsste ich nicht am Ende noch mal 6 Maschen an der Schulter abnehmen damit es symmetrisch wird?
01.03.2017 - 16:32DROPS Design answered:
Liebe Sarah, am Ende der nächste Hin-Reihe sollen Sie 6 M (Schulter) abketten, dann 14 M stricken (Schulter), 16 M abketten (= Halsausschnitt), dann bis zur Ende der Reihe stricken. Am Anfang nächster Reihe (= Rückreihe), sollen Sie dann die ersten 6 M für Schulter abketten = 14 M bleiben wie beim 1. Schulter. Viel Spaß beim stricken!
01.03.2017 - 17:26
![]() Karine wrote:
Karine wrote:
Bonjour, J'aurais voulu faire ce modèle, hors la laine Drops Vivaldi est épuisée. Puis la remplacée par Drops kid-silk rouge ? Si oui combien de pelotes 3 ou 4 ? Par avance merci pour vos conseils. Cordialement
07.12.2016 - 10:51DROPS Design answered:
Bonjour Karine, vous pouvez effectivement remplacer Vivaldi par 2 fils Kid-Silk ou bien 1 fil Brushed Alpaca Silk. Retrouvez ici comment calculer le métrage nécessaire. Bon tricot!
07.12.2016 - 11:54
![]() Martine wrote:
Martine wrote:
Hei, jeg har strikket denne en gang tidligere i sort med både Alpaca- og Vivaldi-garn, nå ønsker jeg å strikke den på nytt i marineblått, men jeg finner ingen gode alternativer til Vivaldi-garnet i marineblått. Vil denne boleroen bli god og varm, men samtidig litt pyntet om jeg kun bruker Alpaca-garnet? Kan alternativet da være og bruke Glitter-tråd i stedet? Takk for svar.
22.02.2015 - 14:32DROPS Design answered:
Hej Martine. Og Kid Silk kan du ikke bruge sammen? Du kan altid strikke en pröve med Alpaca + Glitter og se om du kan lide strukturen med den rette strikkefasthed. God fornöjelse.
05.03.2015 - 14:49Ayu wrote:
Hello, this is my first time knitting for bolero. I like to ask you, what is the different between "body" pattern and "back piece" pattern? In this bolero pattern DROPS 131-51. Thank you for the explanation.
17.05.2013 - 10:14DROPS Design answered:
Dear Ayu, Body is the bottom part of the bolero including back piece and both front pieces, you work this piece until armhole, then divide in 3 parts : right front piece, back piece and left front piece and you finish each part separetaly from armhole to shoulder. Happy knitting!
17.05.2013 - 10:29
|
|
Simply Red#simplyredbolero |
|
|
|
|
Knitted DROPS bolero with ¾ sleeves in Alpaca, Vivaldi and Glitter or Alpaca, Brushed Alpaca Silk and Glitter Size: S - XXXL.
DROPS 131-51 |
|
|
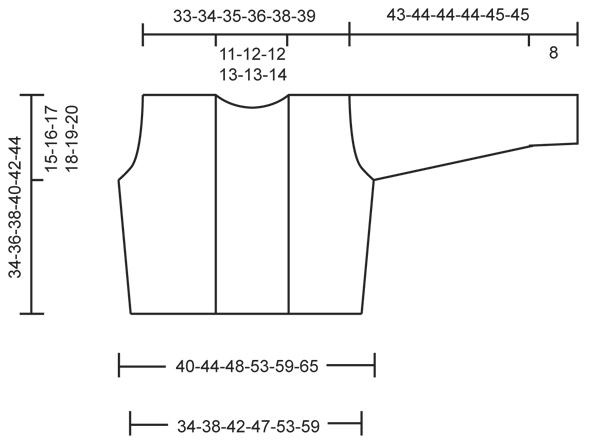
SEED ST: 1st row: * K 1, P 1 *, repeat from *-*. 2nd row: K over P and P over K. Repeat 2nd row. INCREASE TIP 1 (applies to body): Inc 1 st on each side of markers as follows: Work 2 sts in 1 st on each side of marker. INCREASE TIP 2 (applies to sleeve): Inc 1 st by making 1 YO, on next row work YO twisted (i.e. K or P in the back loop of st instead front) to avoid holes. NOTE: Work the new sts in seed st. -------------------------------------------------------- BODY: Worked back and forth on needle. Cast on 98-108-124-138-158-176 sts on circular needle size 5 mm / US 8 with 1 strand Alpaca, 1 thread Alpaca, 1 thread Vivaldi/1 thread Brushed Alpaca Silk and 1 thread Glitter. Work in seed st - see explanation above (1st row = RS). REMEMBER THE GAUGE! When piece measures 5-5-6-6-7-7 cm / 2"-2"-2⅜"-2⅜"-2¾"-2¾", insert 2 markers in the piece; 20-22-26-29-34-38 sts (= front piece) in from each side (back piece = 58-64-72-80-90-100 sts). Move the markers upwards when working. On next row, inc 1 st on each side of each markers - Read INCREASE TIP 1 above = 4 new sts. Repeat inc every 3 cm / 1⅛" a total of 5 times in all sizes = 118-128-144-158-178-196 sts. Continue until piece measures 19-20-21-22-23-24 cm / 7½"-8"-8¼"-8¾"-9"-9½", divide the piece at the markers and finish each part separately. BACK PIECE: = 68-74-82-90-100-110 sts. Now bind off for armholes in beg of every row each side as follows: 3 sts 0-1-1-2-3-4 times, 2 sts 2-1-2-2-4-4 times and 1 st 2-3-4-4-1-2 times = 56-58-60-62-64-66 sts. Continue to work until piece measures 32-34-36-38-40-42 cm / 12½"-13⅜"-14¼"-15"-15¾"-16½". Now bind off for shoulder and neck as follows: bind off the first 6 sts on row, work 14-14-15-15-16-16 sts, bind off the next (= middle) 16-18-18-20-20-22 sts for neck, work the rest of row. Now finish each shoulder separately. Bind off the first 6 sts on next row from WS = 14-14-15-15-16-16 sts remain. On next row from RS (i.e from neck) bind off 1 st. Bind off the first 6 sts on next row from WS = 7-7-8-8-9-9 sts remain. Loosely bind off all sts on next row from RS, piece now measures approx. 34-36-38-40-42-44 cm / 13⅜"-14¼"-15"-15¾"-16½"-17 ¼". Work the other shoulder the same way but reversed. RIGHT FRONT PIECE: = 25-27-31-34-39-43 sts. Bind off for armhole in the side as on back piece = 19-19-20-20-21-21 sts remain for shoulder. Continue until piece measures 32-34-36-38-40-42 cm / 12½"-13⅜"-14¼"-15"-15¾"-16½", bind off for shoulder as follows: bind off on every row from shoulder 6 sts 2 times, bind off the remaining 7-7-8-8-9-9 sts on next row. LEFT FRONT PIECE: Work as right front piece but reversed. SLEEVE: Worked back and forth with 1 thread Alpaca, 1 thread Vivaldi/1 thread Brushed Alpaca Silk and 1 thread Glitter on circular needle size 5 mm / US 8. Cast on 36-38-40-42-44-46 sts (includes 2 edge sts), and work in seed st with 1 edge st in garter st in each side. When piece measures 8 cm / 3⅛", inc 1 st inside 1 edge st in each side - Read INCREASE TIP 2 = 2 new sts on needle. Repeat inc every 3½-3½-3-2½-2-2 cm / 1¼"-1¼"-1⅛"-⅞"-¾"-¾" a total of 7-7-8-9-10-10 times = 50-52-56-60-64-66 sts. When piece measures 32-33-32-32-32-32 cm / 12½"-13"-12½"-12½"-12½"-12½", bind off for sleeve cap in beg of every row each side as follows: 3 sts 1 time, 2 sts 1-1-1-1-2-2 times, and 1 st in each side until piece measures 40-41-41-41-42-42 cm / 15¾"-16⅛"-16⅛"-16⅛"-16½"-16½". Now bind off in beg of every row each side: 2 sts 2 times and 3 sts 1 time. Loosely bind off all sts on next row from RS (piece now measures approx. 43-44-44-44-45-45 cm / 17"-17¼"-17¼"-17¼"-17¾"-17¾"). Work another sleeve. ASSEMBLY: Sew the shoulder seams tog. Sew sleeves tog inside 1 edge st and sew in sleeves. |
|
 |
|
Have you finished this pattern?Tag your pictures with #dropspattern #simplyredbolero or submit them to the #dropsfan gallery. Do you need help with this pattern?You'll find 13 tutorial videos, a Comments/Questions area and more by visiting the pattern on garnstudio.com. © 1982-2026 DROPS Design A/S. We reserve all rights. This document, including all its sub-sections, has copyrights. Read more about what you can do with our patterns at the bottom of each pattern on our site. |


With over 40 years in knitting and crochet design, DROPS Design offers one of the most extensive collections of free patterns on the internet - translated to 17 languages. As of today we count 324 catalogs and 12284 patterns - 12274 of which are translated into English (US/in).
We work hard to bring you the best knitting and crochet have to offer, inspiration and advice as well as great quality yarns at incredible prices! Would you like to use our patterns for other than personal use? You can read what you are allowed to do in the Copyright text at the bottom of all our patterns. Happy crafting!
Post a comment to pattern DROPS 131-51
We would love to hear what you have to say about this pattern!
If you want to leave a question, please make sure you select the correct category in the form below, to speed up the answering process. Required fields are marked *.