
Popular categories
Looking for a yarn?


Comments / Questions (45)
![]() Roos wrote:
Roos wrote:
Hoi, heb ik echt die naalden zonder knoop nodig of kan ik de mouwen ook op de rondbreinaald breien?
20.03.2017 - 16:01DROPS Design answered:
Hoi Roos, Je kan de mouwen natuurlijk ook op de rondbreinaald breien.
20.03.2017 - 18:14
![]() Luisa wrote:
Luisa wrote:
Con che filato poteri sostituire il Symphony e mantenere lo stesso effetto? Grazie
12.09.2016 - 11:45DROPS Design answered:
Buongiorno Luisa. Come filato sostitutivo viene consigliato il filato Melody, oppure può sostiturlo con 1 capo del filato Brushed Alpaca Silk + 1 capo del filato Baby Merino, come spiegato qui . Si ricordi di verificare la correttezza del suo campione con quello indicato nel modello. Buon lavoro!
12.09.2016 - 12:01
![]() Janny Van Klaveren wrote:
Janny Van Klaveren wrote:
Word dit vestje met dubbele draad gebreien dus als ik enkel brie met andere garen heb ik de helft benodigde bollen nodig ?in mijn maat zou dat 325gram zijn klopt dit ?
25.09.2015 - 11:17DROPS Design answered:
Hoi Janny. Ja, dit vest wordt met 2 draden gebreid, en wissel je naar 1 draad, dan kan je hier zien hoe je dat berekent. Vergeet niet om een proeflapje te breien.
25.09.2015 - 13:20
![]() Rose-Marie Bjuhr wrote:
Rose-Marie Bjuhr wrote:
Hej! Ska börja sticka denna underbara lilla jacka, men undrar en sak? Ska man verkligen sticka ärmarna med 5 strumpstickor? Tacksam för svar!
28.01.2014 - 12:21
![]() Maria wrote:
Maria wrote:
Stickar just nu den 6.e i ordningen. Mina vänner beställer och jag stickar. Har gjort den 5 cm längre så den blir som en liten chaneljacka
05.08.2013 - 15:41
![]() Iris wrote:
Iris wrote:
Sorry, das kommt davon, wenn man zu hektisch ist. Meine Frage ist unter "Kommentar" geraten
24.05.2013 - 17:38
![]() Iris wrote:
Iris wrote:
Hilfe, Hilfe, ich verstehe es nicht! Wenn ich beim Rückenteil für das Armloch in meiner Größe von 54 M 0 Mal 3 und 1 Mal 2 M auf jeder Seite abnehme, dann verbleiben doch 50M (nach Anleitung 44). Genauso beim Vorderteil: 28 M abzüglich 2, dann für den Hals 1 Mal 3; 2 Mal 2 und 4 Mal 1 M; bleiben bei mir 15 M und nicht 12. Was mache ich falsch? Danke
24.05.2013 - 12:33DROPS Design answered:
Liebe Iris, Sie machen gar nichts falsch und haben völlig Recht: da hat unsere damalige Übersetzerin einen Teil vergessen, wir bitten um Entschuldigung. Es fehlen weitere Abnahmen für das Armloch, diese haben wir nun ergänzt.
25.05.2013 - 16:13
![]() DROPS Design Deutschland wrote:
DROPS Design Deutschland wrote:
Liebe Iris, hier antworte ich gerne auf Ihre Frage im Gästebuch: "spricht etwas dagegen die blenden an den Vorderteilen gleich mitzustricken?".Die quer angestrickten Blenden verleihen etwas Stabilität, daher haben wir es bei diesem Modell so gewählt.
22.04.2013 - 08:28
![]() Nicolien wrote:
Nicolien wrote:
Dit vestje heb ik in de mooie rode kleur gemaakt. Geweldig al die instructievideo's. Ik heb er veel aan gehad.
19.02.2013 - 11:38
![]() Angela wrote:
Angela wrote:
Con quante maglie devo avviare il davanti destro di questo modello
04.02.2013 - 13:28DROPS Design answered:
Buongiorno, la giacca è lavorata in un unico pezzo fino agli scalfi, poi viene divisa...alla fine della prima parte rimangono 25-28-30-33-36-40 m. per il davanti destro a seconda delle taglie.
14.02.2013 - 10:05
|
|
Black Dahlia#blackdahliacardigan |
|
|
|
|
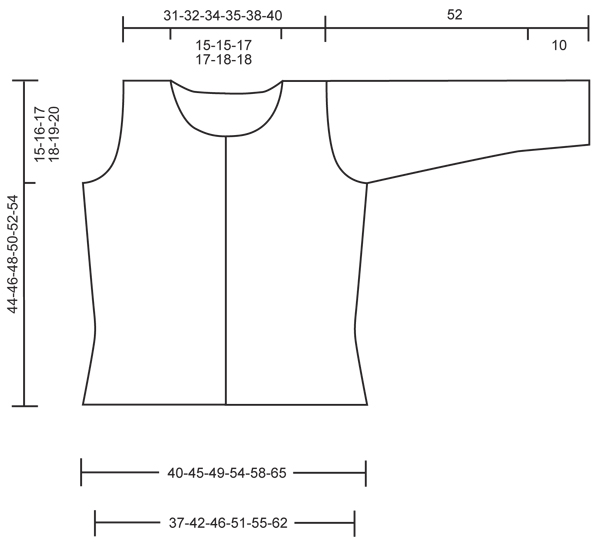
Knitted DROPS fur jacket in 2 threads "Symphony" or "Melody". Size: S - XXXL.
DROPS 134-33 |
|
|
GARTER ST (back and forth on needle): K all rows. GARTER ST (in the round): * K 1 round and P 1 round *, repeat from *-*. DECREASE TIP: Dec 1 st on each side of marker as follows: Work until 2 sts remain before marker, slip 1 st as if to K, K 1, psso, (marker), K tog the next 2 sts. INCREASE TIP: Inc 1 st on each side of marker as follows: Work 2 sts in 1 st on each side of marker. BUTTON HOLE: bind off for 1 button hole from WS on right neck edge as follows: Work until 4 sts remain, bind off the next 2 sts and cast on 2 new sts over the bind off sts on next row. -------------------------------------------------------- BODY: Worked back and forth on needle. Cast on 106-118-130-142-154-170 sts (includes 1 edge st in garter st in each side) on circular needle size 8 mm / US 11 with 2 strands Symphony. Work 4 rows in garter st - See explanation above (1st row = RS), then work in stockinette st with 1 edge st in garter st in each side. REMEMBER THE GAUGE! When piece measures 3-4-4-5-5-6 cm / 1"-1½"-1½"-2"-2"-2½", insert 2 markers in the piece; 27-30-33-36-39-43 sts (= front piece) in from each side (back piece = 52-58-64-70-76-84 sts). Move the markers upwards when working. On next row from RS, dec 1 st on each side of every marker - Read decrease tip above = 4 sts dec. Repeat dec one more time when piece measures 6-7-8-9-10-11 cm / 2½"-2¾"-3"-3½"-4"-4½" = 98-110-122-134-146-162 sts. Continue until piece measures 12-13-14-15-16-17 cm / 4¾"-5"-5½"-6"-6¼"-6¾", then inc 1 st on each side of every marker - Read increase tip above = 4 new sts. Repeat inc one more time when piece measures 21-22-23-24-25-26 cm / 8¼"-8¾"-9"-9½"-9¾"-10¼". When piece measures 29-30-31-32-33-34 cm / 11⅜"-11¾"-12¼"-12½"-13"-13⅜", bind off for armholes as follows: bind off 2-2-3-3-3-3 sts on each side of every marker (= 4-4-6-6-6-6 sts bind off in each side). Finish each part separately. BACK PIECE: = 48-54-58-64-70-78 sts. Continue to bind off for armholes at beg of every row in each side as follows: bind off 3 sts 0-0-0-1-1-2 times, 2 sts 1-1-2-2-2-2 times and 1 st 1-3-2-1-2-2 times = 42-44-46-48-52-54 sts. Continue with 1 edge st in garter st in each side until piece measures 42-44-46-48-50-52 cm / 16½"-17¼"-18"-19"-19¾"-20½". Now bind off the middle 18-18-20-20-22-22 sts for neck and finish each shoulder separately. Dec 1 st on next row from neck = 11-12-12-13-14-15 sts remain on each shoulder. Loosely bind off when piece measures 44-46-48-50-52-54 cm / 17¼"-18"-19"-19¾"-20½"-21¼". RIGHT FRONT PIECE: = 25-28-30-33-36-40 sts. Bind off for armhole in the side as on back piece - At the same time when piece measures 32-34-35-37-38-40 cm / 12½"-13½"-13¾"-14½"-15"-15¾", bind off towards the neck on every other row as follows: 3 sts 1-1-1-2-2-2 times, 2 sts 2 times in all sizes, 1 st 4-4-5-2-3-3 times = 11-12-12-13-14-15 sts remain on each shoulder. Continue until piece measures 44-46-48-50-52-54 cm / 17¼"-18"-19"-19¾"-20½"-21¼", loosely bind off all sts. LEFT FRONT PIECE: Work as right front piece but reversed. SLEEVE: Worked in the round on double pointed needles size 8 mm / US 11 with 2 strands Symphony. Cast on 28-28-30-32-32-34 sts and work 4 rounds in garter st - Read explanation above. Insert a marker at beg of round = mid under sleeve. Then work in stockinette st. When piece measures 10 cm / 4" in all sizes, inc 1 st on both sides of marker = 2 new sts on round. Repeat inc every 10-8-6-5-4-3½ cm / 4"-3"-2½"-2"-1½"-1¼" a total of 3-4-5-6-7-8 times = 34-36-40-44-46-50 sts. When piece measures 40-40-39-39-38-38 cm / 15¾"-15¾"-15¼"-15¼"-15"-15" (shorter measurements in the larger sizes because of longer sleeve cap and wider shoulder width), divide work at the marker and continue back and forth on the needle in stockinette st, while at the same time casting/binding off and dec for sleeve cap in beg of each row each side as follows: 3 sts 0-0-1-1-2-2 times, 2 sts 2-2-1-2-1-1 times, then dec each side on every 4th row 1 st 2-2-2-1-2-2 times. Continue until piece measures approx. 49-48-48-48-49-47 cm / 19¼"-19"-19"-19"-19¼"-18½", then bind off in beg every row each side as follows: 1 st 1-2-2-1-1-3 times, 2 sts 1-1-1-2-1-1 times, and 3 sts 1 time in all sizes = 10-10-12-12-14-14 sts remain. Loosely bind off all sts on next row from RS (piece measures approx. 52 cm / 20½" in all sizes). ASSEMBLY: From RS sew or graft shoulder seams with neat stitches. Sew in sleeves. FRONT BAND: Worked back and forth on circular needle size 8 mm / US 11. Pick up approx. 40-50 sts inside 1 edge st along right front edge. K 1 row from WS while at the same time adjusting no of sts to 42-44-46-48-50-52. K2 more rows then loosely bind off all sts. Work the same way along left front edge. NECK EDGE: Worked back and forth on circular needle size 8 mm / US 11. Pick up from RS approx. 70-80 sts around the neck, beg on right front band. K1 row from WS while at the same time adjusting no of sts to 72-72-78-78-84-84. NOTE: bind off for button hole at the end of row - Read explanation above. Then K2 rows, then on next row from RS loosely bind off all sts. Sew the button on to the left neck edge. |
|
 |
|
Have you finished this pattern?Tag your pictures with #dropspattern #blackdahliacardigan or submit them to the #dropsfan gallery. Do you need help with this pattern?You'll find 14 tutorial videos, a Comments/Questions area and more by visiting the pattern on garnstudio.com. © 1982-2026 DROPS Design A/S. We reserve all rights. This document, including all its sub-sections, has copyrights. Read more about what you can do with our patterns at the bottom of each pattern on our site. |


With over 40 years in knitting and crochet design, DROPS Design offers one of the most extensive collections of free patterns on the internet - translated to 17 languages. As of today we count 325 catalogs and 12298 patterns - 12288 of which are translated into English (US/in).
We work hard to bring you the best knitting and crochet have to offer, inspiration and advice as well as great quality yarns at incredible prices! Would you like to use our patterns for other than personal use? You can read what you are allowed to do in the Copyright text at the bottom of all our patterns. Happy crafting!
Post a comment to pattern DROPS 134-33
We would love to hear what you have to say about this pattern!
If you want to leave a question, please make sure you select the correct category in the form below, to speed up the answering process. Required fields are marked *.