Comments / Questions (77)
![]() Maria Cristina wrote:
Maria Cristina wrote:
È un bellissimo modello, solo che andrebbe attualizzato per poterlo lavorare con i ferri circolari, senza cuciture. Inoltre sarebbe perfetto con le maniche lunghe. Grazie, saluti.
02.05.2024 - 23:44
![]() Ruth wrote:
Ruth wrote:
Liebes Drops-Team Ich komme bei Rückenteil ab 55cm (GrößeL) nicht weiter. Muss ich Hin-Reihe 11M stricken und dann diese auf HilfsFaden(HF). R zu Ende Stricken, wenden. Rückreihe 11M stricken, auf HF, Stricken bis zu den M auf HF und davor wenden. Hin-R 11M Stricken, auf HF (= 3x11M auf HF), R bis zu den M auf HF zu Ende stricken, wenden. Rück-R 12M str, auf HF, R zu Ende str, wenden. Hin-R 25M str, auf HF. Muss ich das so stricken??? Danke für Ihre Hilfe!
05.06.2021 - 20:13DROPS Design answered:
Liebe Ruth, so sollen Sie stricken: *Hin-Reihe 11M stricken und dann diese auf HilfsFaden(HF). R zu Ende Stricken, wenden. Rückreihe 11M stricken, auf HF, Stricken bis zu den M auf HF und davor wenden.* und von *-* noch 2 Mal stricken (= es sind 3 Mal 11 Maschen auf der Hilfsfaden beidseitig und nächstes Mal noch 12 M am Anfang beide Reihen - beachten Sie, daß den Halsausschnitt auch gleichzeitig gestrickt wird. Viel Spaß beim stricken!
07.06.2021 - 08:24
![]() Anna Marie wrote:
Anna Marie wrote:
I'd like to make this with long sleeves, just as Gunilla asked in Swedish. Google translate didn't quite give me what I needed to know. Could you explain again in English, please? Thanks!
16.07.2018 - 16:03DROPS Design answered:
Dear Anna Marie, you can adjust the length of the sleeves as you'd like to - adjust the number of sts to cast on on sleeve depending on how long you'd like the sleeve to. For any individual assistance you are welcome to contact your DROPS store, even per mail or telephone. Happy knitting!
16.07.2018 - 16:15
![]() Gunilla wrote:
Gunilla wrote:
Jättefin kofta, men jag vill sticka den med långa ärmar. Kan man det?
16.03.2013 - 10:06DROPS Design answered:
Ja, det kan du godt. Du skal da saette flere masker op til aerme. Du kan beregne din laengde med stickfastheten (masker per 10 cm).
30.05.2013 - 12:24
![]() DROPS Deutsch wrote:
DROPS Deutsch wrote:
In diesem Rapport werden die 3 letzten Reihen in M2 nicht gestrickt. Weiter oben strickt man dann alle Reihen in M2.
08.09.2011 - 08:18
![]() Gabi wrote:
Gabi wrote:
Wenn ich in der Anleitung beim Muster M2 nur bis Pfeil stricken soll, wozu sind dann noch die 3 weiteren Reihen. Hinterher noch dran stricken ??? Wäre schön wenn ihr mir das erklären könnt. Danke
07.09.2011 - 18:38
![]() DROPS Design wrote:
DROPS Design wrote:
Lo celebramos contigo Angeles, y nos encantaría verlo. Cuando quieras puedes subir una foto en nuestra página de Facebook. Saludos cariñosos! :)
31.03.2011 - 00:43
![]() Angeles wrote:
Angeles wrote:
Lo he hecho con la misma lana recomendada y he seguido el patron tal cual , me ha quedado perfecto encuanto ha medidas como forma. Muchas gracias por todo las eplicaciones muy facil de seguir y de entender
30.03.2011 - 12:38
![]() DROPS Design wrote:
DROPS Design wrote:
Gorgana, it just says that the inc sts each side are for the sleeves, and that the inc sts are worked in stockinette. For further help please contact the shop where you bought the yarn.
15.03.2011 - 16:45
![]() DROPS Design wrote:
DROPS Design wrote:
It deepens on which size you are knitting.
15.03.2011 - 12:32
Monaco |
|||||||||||||||||||
|
|
|||||||||||||||||||
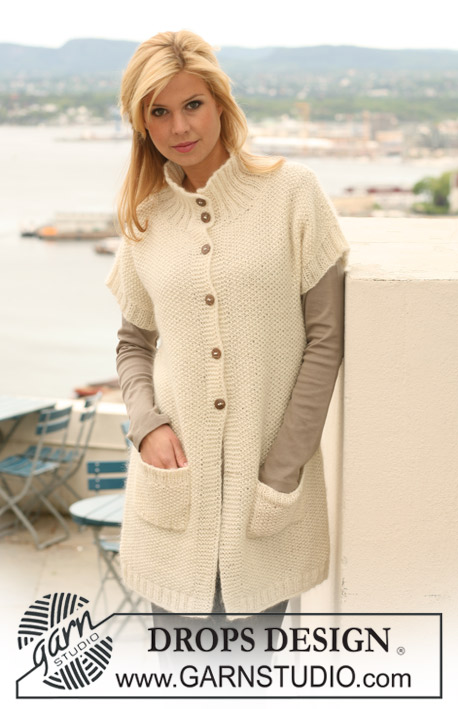
Knitted DROPS jacket with short sleeves and lace pattern in ”Classic Alpaca” or "Puna". Size S - XXXL.
DROPS 125-28 |
|||||||||||||||||||
|
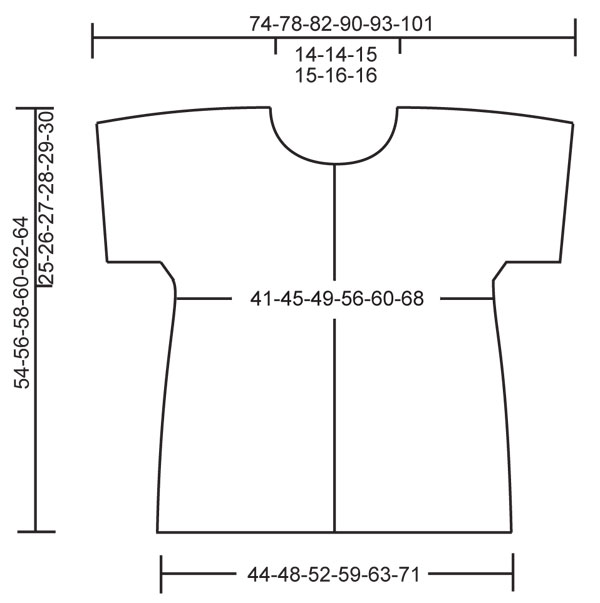
GARTER ST (back and forth on needle): K all rows. PATTERN: See diagram M.1 to M.3. Diagram shows the pattern from RS and row 1 in diagram = RS. BUTTONHOLES: Make buttonholes on right front band. 1 buttonhole = K tog second and third st from the edge and make 1 YO. Make buttonholes when piece measures: SIZE S: 8, 15, 22, 29, 36, 43 cm / 3⅛",6",8¾",11⅜",14¼",17". SIZE M: 8, 15, 23, 30, 38, 45 cm / 3⅛",6",9",11¾",15",17¾". SIZE L: 9, 17, 24, 32, 39, 47 cm / 3½",6¾",9½",12½",15¼",18½". SIZE XL: 9, 17, 25, 33, 41, 49 cm / 3½",6¾",9¾",13",16⅛",19¼". SIZE XXL: 9, 16, 23, 30, 37, 44, 51 cm / 3½",6¼",9",11¾",14½",17¼",20". SIZE XXXL: 11, 18, 25, 32, 39, 46, 53 cm / 4⅜",7",9¾",12½",15¼",18",21". -------------------------------------------------------- BODY PIECE: Worked back and forth on circular needle from mid front – REMEMBER BUTTONHOLES ON RIGHT FRONT BAND – see above. Cast on 195-211-227-259-275-307 sts (includes 5 front band sts each side towards front edge) on circular needle size 4 mm / US 6 with Classic Alpaca or Puna. Work 10 rows GARTER ST – see above (row 1 = RS). Work next row as follows from RS: 5 front band sts in garter st, M.1A until 14 sts remain, work M.1B (= 9 sts) and finish with 5 front band sts in garter st. Continue in pattern like this. REMEMBER THE GAUGE! When piece measures approx 23 cm / 9" - finish after a full vertical repeat of M.1 – K 4 rows with front bands in garter st (row 1 = RS) AT THE SAME TIME dec 3 sts evenly on first and 3rd row (do not dec on front bands) = 189-205-221-253-269-301 sts. Now work M.2 with 5 front band sts in garter st each side. When you have knitted row marked with arrow in M.2 in diagram work 4 rows garter st on all sts (row 1 = RS) – AT THE SAME TIME on row 1 dec 4 sts evenly and on row 3 dec 3 sts evenly (do not dec on front bands) = 182-198-214-246-262-294 sts. After the garter st rows slip the 49-53-57-65-69-77 sts each side towards mid front on separate stitch holders = 84-92-100-116-124-140 sts left on needle for back piece. BACK PIECE: = 84-92-100-116-124-140 sts. READ ALL OF THE FOLLOWING SECTION BEFORE CONTINUING! Cast on 1 new st each side (= for seam) = 86-94-102-118-126-142 sts. AT THE SAME TIME work next row as follows from RS: 1 edge st, M.3A until 5 sts remain, M.3B (= 4 sts) and finish with 1 edge st. AT THE SAME TIME cast on 1 new st at the end of the first 2 rows in M.3. Repeat the inc at the end of every row each side a total of 4-4-4-6-6-7 times, then cast on 31-31-31-29-29-28 sts at the end of the next 2 rows = 156-164-172-188-196-212 sts – NOTE: work inc sts in stockinette st until all inc are complete. Now continue as follows: 4 garter sts (= sleeve edge), M.3A until 8 sts remain, M.3B (= 4 sts) and finish with 4 garter sts (= sleeve edge). When piece measures 42-44-46-48-50-52 cm / 16½"-17¼"-18"-19"-19¾"-20½" – adjust to after 1 or 3 rows stockinette st after a row with hole – work 4 rows garter st on all sts (row 1 = RS). Now work M.2 with 4 garter sts each side until finished measurements. READ ALL OF THE FOLLOWING SECTION BEFORE CONTINUING! AT THE SAME TIME when piece measures 51-53-55-57-59-61 cm / 20"-21"-21⅝"-22½"-23¼"-24" slip sts at the beg of every row each side on a stitch holder for shaped shoulder as follows: 10-10-11-13-14-15 sts 4-3-3-4-3-3 times (work sts before slipping them on stitch holder to avoid having to cut the thread), 0-13-12-0-13-16 sts 1 time and then 23-24-25-26-26-28 sts 1 time – NOTE: when slipping sts on stitch holder, slip the first st on next row and tighten thread before continuing to avoid holes in transition. AT THE SAME TIME when piece measures 52-54-56-58-60-62 cm / 20½"-21¼"-22"-22¾"-23⅝"-24⅜" bind off the middle 26-26-28-28-30-30 sts for neck and complete each shoulder/sleeve separately. Bind off 2 sts on next row from neck. When all sts have been slipped on stitch holder and dec for neck are complete piece measures approx 54-56-58-60-62-64 cm / 21¼"-22"-22¾"-23⅝"-24⅜"-25¼" from bottom edge to shoulder. RIGHT FRONT PIECE: = 49-53-57-65-69-77 sts. READ ALL OF THE FOLLOWING SECTION BEFORE CONTINUING! Cast on 1 new st towards the side (= for seam) = 50-54-58-66-70-78 sts. Work next row as follows from RS: 5 front band sts in garter st, M.3A (IN SIZE S + L + XL repeat M.3A until 5 sts remain, finish with M.3B (= 4 sts) and 1 edge st. IN SIZE M + XXL + XXXL repeat M.3A until 1 st remain, finish with 1 edge st). AT THE SAME TIME cast on new sts at the end of every row towards the side as described for back piece = 85-89-93-101-105-113 sts. Continue pattern with 5 front band sts in garter st towards front edge and 4 garter sts towards the side (= sleeve edge). When piece measures approx 42-44-46-48-50-52 cm / 16½"-17¼"-18"-19"-19¾"-20½" – adjust to back piece - work 4 rows garter st on all sts, then work M.2 with 5 front band sts in garter st towards front edge and 4 garter sts towards the side. AT THE SAME TIME when piece measures 48-50-52-54-56-58 cm / 19"-19¾"-20½"-21¼"-22"-22¾" slip the 12-12-13-13-14-14 sts towards mid front on a stitch holder for neck. Bind off to shape the neckline at the beg of every row from mid front as follows: 3 sts 1 time, 2 sts 2 times and 1 st 3 times. AT THE SAME TIME when piece measures 51-53-55-57-59-61 cm / 20"-21"-21⅝"-22½"-23¼"-24" slip sts on a stitch holder for shaped shoulder from the side as described for back piece. When all sts have been slipped on stitch holder and dec for neck are complete piece measures approx 54-56-58-60-62-64 cm / 21¼"-22"-22¾"-23⅝"-24⅜"-25¼" from bottom edge to shoulder. LEFT FRONT PIECE: Like right front piece but mirrored. NOTE: Do not make buttonholes! ASSEMBLY: Slip the 63-67-70-78-81-89 sts from stitch holder on one shoulder on circular needle size 4 mm / US 6 and work back and forth as follows: K 1 row from RS – NOTE: To avoid a hole in transition pick up 1 st between the 2 sts in transitions and K this tog with first st on left needle. Bind off loosely on next row with K sts from WS. Repeat in the same way along the 3 other shoulder pieces. Sew shoulder seams inside bind off row – make sure seam isn’t too tight. Sew under arm seams inside 1 edge st. Sew buttons on left front piece. NECKLINE: Pick up from RS approx 70 to 85 sts round neck (includes sts from stitch holders at front) on circular needle size 6 mm / US 10 with 2 strands Classic Alpaca or Puna. Work GARTER ST back and forth on needle until neckline measures approx 7-7-8-8-9-9 cm / 2¾"-2¾"-3⅛"-3⅛"-3½"-3½", then bind off loosely with K from WS. Sew the press button at the top of neckline to keep it in place. |
|||||||||||||||||||
Diagram explanations |
|||||||||||||||||||
|
|||||||||||||||||||
 |
|||||||||||||||||||
 |
|||||||||||||||||||
Have you finished this pattern?Tag your pictures with #dropspattern or submit them to the #dropsfan gallery. Do you need help with this pattern?You'll find 20 tutorial videos, a Comments/Questions area and more by visiting the pattern on garnstudio.com. © 1982-2026 DROPS Design A/S. We reserve all rights. This document, including all its sub-sections, has copyrights. Read more about what you can do with our patterns at the bottom of each pattern on our site. |
|||||||||||||||||||


Post a comment to pattern DROPS 125-28
We would love to hear what you have to say about this pattern!
If you want to leave a question, please make sure you select the correct category in the form below, to speed up the answering process. Required fields are marked *.