
Popular categories
Looking for a yarn?


Comments / Questions (32)
![]() Daniela wrote:
Daniela wrote:
Buongiorno, Vorrei utilizzare i ferri circolari con il filo.. le istruzioni sono le stesse? Penso siano diverse Perché trovo difficoltà nell'unire i vari pezzi dello schema. Grazie mille
27.09.2019 - 15:53DROPS Design answered:
Buongiorno Daniela. Le spiegazioni prevedono già l’uso dei circolari. Dovrà solo cucire i lati e il colletto sul dietro. Buon lavoro!
28.09.2019 - 19:40
![]() Agnieszka wrote:
Agnieszka wrote:
O ile mniej oczek nabierac na rozmiar xs?
23.01.2019 - 19:46DROPS Design answered:
Witaj Agnieszko! Weź sweter, który ma rozmiar jakiego potrzebujesz (i podobny fason). Na początku wykonaj próbkę i zobacz ile oczek wchodzi na 10 cm próbki. Wtedy będziesz wiedzieć o ile oczek mniej trzeba nabrać. Powodzenia!
24.01.2019 - 16:19
![]() Ola wrote:
Ola wrote:
Ile motkow popieram kupic na kardigan w rozmiarze xs
27.07.2017 - 18:52DROPS Design answered:
Witaj Olu, na rozmiar XS trzeba kupić ok. 750 g włóczki Eskimo tj. 15 motków (1 motek ma 50 g). Miłej pracy nad robótką!
28.07.2017 - 11:36
![]() Denis wrote:
Denis wrote:
Salve! Sono principiante e non riesco a capire, inziando il dietro come trasferire (unire) in un ferro tutte le maglie in attesa delle maniche! Da tutte e due i lati del davanti desto e davanti sinistro oppure li unisco e avvio nuove maglie nel punto dove c'è il colletto? Grazie
15.03.2017 - 15:29DROPS Design answered:
Buongiorno Denis, deve prima lavorare 2 ferri a grana di riso sulle maglie di ogni davanti, poi le riporta tutte sullo stesso ferro e avvia il numero di maglie indicato per la sua taglia tra i due davanti (sarà il dietro). Da lì in poi lavorerà tutto insieme. Buon lavoro!
15.03.2017 - 15:33
![]() Inger Helene wrote:
Inger Helene wrote:
Hei. Jeg tror jeg har fulgt oppskriften riktig, men lurer allikevel på om jeg har misforstått noe. Jeg har kommet til delen "kant rundt ermene", hvor det står: "Strikk opp 44-44-50-50-56-56 m innenfor 1 kantm nederst på ermet", men det er ingen ermer (kun skuldre, så vidt jeg kan se) på jakken så langt. Hvordan skal det egentlig se ut når man er ferdig med delen "bakstk."? Det jeg har fått virker ikke riktig. Det ser heller ikke ut til at monteringen vil gå uten at noe blir vrengt.
05.11.2015 - 15:40DROPS Design answered:
Hej Inger, Jo du har økt til ermer i hver side, det er de yderste masker du bruger til at strikke op i. God fornøjelse!
20.11.2015 - 15:02
![]() Patrizia Gasperini wrote:
Patrizia Gasperini wrote:
Questo modello puo' essere fatto anche con i ferri normali se si posso seguire le stesse istruzioni? grazie e Buone Feste Patrizia
26.12.2014 - 14:53DROPS Design answered:
Buongiorno Patrizia. Può lavorare con i ferri normali, senza cambiare istruzioni. Il lavoro diventerà un po' pesante e le maglie saranno un po' fitte sui ferri quando inizierà a lavorare sul dietro. Buon lavoro e Buone Feste!
26.12.2014 - 16:16
![]() Patrizia Gasperini wrote:
Patrizia Gasperini wrote:
Questo modello puo' essere fatto anche con i ferri normali se si posso seguire le stesse istruzioni? grazie e Buone Feste Patrizia
26.12.2014 - 14:52DROPS Design answered:
Buongiorno Patrizia. Può lavorare con i ferri normali, senza cambiare istruzioni. Il lavoro diventerà un po' pesante e le maglie saranno un po' fitte sui ferri quando inizierà a lavorare sul dietro. Buon lavoro e Buone Feste!
26.12.2014 - 16:15
![]() Elena wrote:
Elena wrote:
Salve! sul davanti sinistro la spiegazione dice:"poi alla fine del ferro successivo avviare 11-10-9..m", le devo avviare sempre dalla parte della manica o al contrario verso lo scollo? è un altro aumento per allungare la manica (come le 10+10m precedenti)giusto?Grazie!
04.10.2014 - 09:51DROPS Design answered:
Buongiorno Elena. Sì è corretto, le ulteriori 11-10-9... m sono maglie per la manica. Buon lavoro!
04.10.2014 - 10:51
![]() Jane wrote:
Jane wrote:
Knitted larger size by acident but lovely and cosy - ideal for winter. daughter says its my daytime dressing gown
04.09.2014 - 21:27
![]() Drops Design wrote:
Drops Design wrote:
Du strikker de forkortede pinde fra halsen og ind, så du har flest pinde mod halsen. God fornøjelse!
25.03.2011 - 09:05
|
|
Nola#nolacardigan |
|
 |
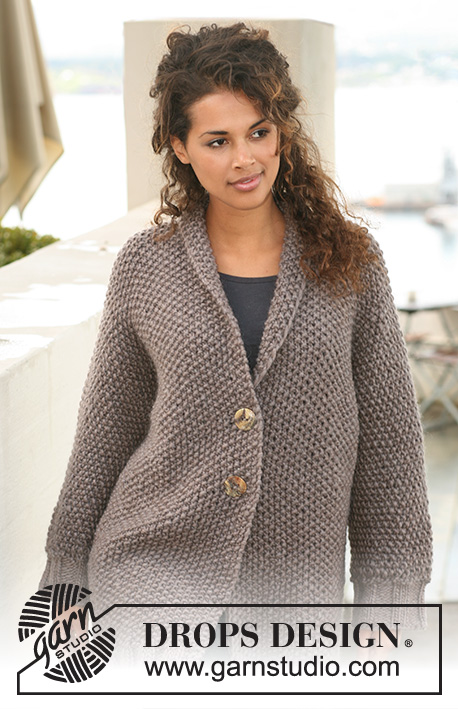 |
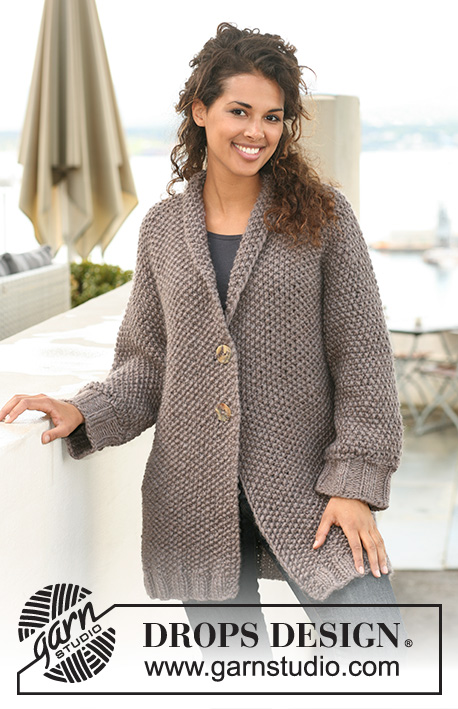
DROPS jacket in seed st in ”Snow”. Size S to XXXL.
DROPS 122-11 |
|
|
GARTER ST (back and forth on needle): K all rows. SEED ST: Row 1: * K1, P1 *, repeat from *-*. Row 2: K over P and P over K. Repeat Row 2. INCREASING TIP: Inc 1 st by making 1 YO. On next row K YO into back of loop to avoid a hole. BUTTONHOLES: Make buttonholes on right front piece. 1 buttonhole = bind off 3rd and 4th st towards front edge and cast on 2 new sts on next row. Make buttonhole when piece measures: Size S: 39 and 47 cm / 15½" and 18½". Size M: 40 and 48 cm / 16" and 19". Size L: 41 and 49 cm / 16¼" and 19¼". Size XL: 42 and 50 cm / 16½" and 19½". Size XXL: 43 and 51 cm / 17" and 20". Size XXXL: 44 and 52 cm / 17½" and 20½". ---------------------------------------------------------- The jacket is worked in one piece, back and forth on circular needle in order to fit in all sts. Beg at the bottom on left front piece. LEFT FRONT PIECE: Cast on 40-46-46-46-52-52 sts (includes 1 edge st at the side) on needle size 9 mm / US 13 with Snow. Continue as follows (first row = RS): 1 edge st, * P3, K3 *, repeat from *-* and finish with 3 GARTER STS - see above. When rib measures approx 6 cm / 2½" continue in SEED ST - see above – with 1 edge st at the side, AT THE SAME TIME on first row dec 9-13-11-9-12-9 sts evenly = 31-33-35-37-40-43 sts. Continue in seed st until piece measures 62 cm / 24½". REMEMBER THE GAUGE! Insert a marker in piece. Now cast on 10 sts at the end of every row from WS for sleeve. Repeat the inc a total of 2 times. Then at the end of next row from WS cast on 11-10-9-8-6-4 sts = 62-63-64-65-66-67 sts. Continue in seed st on all sts until piece measures 20-21-22-23-24-25 cm / 8"-8¼"-8¾"-9"-9½"-9¾" from marker (adjust so that next row is from RS). Now insert a new marker in piece (= mid shoulder). Work the first 51-52-53-53-54-55 sts at the side (= sleeve + shoulder) and slip them on a stitch holder. Work the remaining 11-11-11-12-12-12 sts towards front edge and beg next row from mid front (= from WS). Continue in seed st on the 11-11-11-12-12-12 sts, AT THE SAME TIME work shortened rows as follows (first row = from WS): * work back and forth on the first 6 sts, work back and forth on all sts *, repeat from *-* for approx 7-7-7-8-8-8 cm / 2¾"-2¾"-2¾"-3"-3"-3", measured on the shorter side. Bind off. RIGHT FRONT PIECE: Work right front piece in the same way, but mirrored. Make sure to have 3 garter sts towards front edge and P3 + 1 edge st at the side when working rib. NOTE! Remember BUTTONHOLES - see above. BACK PIECE: Slip sts from left front piece back on needle = 51-52-53-53-54-55 sts. Work 2 rows seed st on sts on needle. Put piece aside. Slip sts from right front piece back on needle = 51-52-53-53-54-55 sts. Work 2 rows seed st on sts on needle. Now slip both front pieces on the same needle and cast on 12-12-12-14-14-14 sts between the 2 pieces = 114-116-118-120-122-124 sts. Continue in seed st back and forth on all sts until piece measures approx 16-17-18-19-20-21 cm / 6¼"-6¾"-7"-7½"-8"-8¼" from marker on shoulder (adjust to front piece). Now bind off 11-10-9-8-6-4 sts each side. Then bind off at the beg of every row each side: 10 sts 2 times = 52-56-60-64-70-76 sts. Insert a marker in piece. Continue in seed st until piece measures 56 cm / 22" from marker (adjust to front piece). On next row from WS inc 13-15-17-19-19-19 sts evenly - see INCREASING TIP = 65-71-77-83-89-95 sts. Continue in rib as follows (from RS): 1 edge st, * K3, P3 *, repeat from *-* and finish with K3 and 1 edge st. Continue until rib measures 6 cm / 2½". Bind off with K over K and P over P. SLEEVE EDGES: Worked back and forth on needle. Pick up 44-44-50-50-56-56 sts inside 1 edge round sleeve. K 1 row from WS, K 1 row from RS and continue in rib K3/P3 with 1 edge st each side until rib measures approx 8 cm / 3". Bind off with K over K and P over P. ASSEMBLY: Sew sleeve and side seams inside 1 edge st. Sew collar tog mid back and sew to neck on back piece. Sew on buttons. |
|
 |
|
Have you finished this pattern?Tag your pictures with #dropspattern #nolacardigan or submit them to the #dropsfan gallery. Do you need help with this pattern?You'll find 13 tutorial videos, a Comments/Questions area and more by visiting the pattern on garnstudio.com. © 1982-2026 DROPS Design A/S. We reserve all rights. This document, including all its sub-sections, has copyrights. Read more about what you can do with our patterns at the bottom of each pattern on our site. |
|


With over 40 years in knitting and crochet design, DROPS Design offers one of the most extensive collections of free patterns on the internet - translated to 17 languages. As of today we count 324 catalogs and 12267 patterns - 12257 of which are translated into English (US/in).
We work hard to bring you the best knitting and crochet have to offer, inspiration and advice as well as great quality yarns at incredible prices! Would you like to use our patterns for other than personal use? You can read what you are allowed to do in the Copyright text at the bottom of all our patterns. Happy crafting!
Post a comment to pattern DROPS 122-11
We would love to hear what you have to say about this pattern!
If you want to leave a question, please make sure you select the correct category in the form below, to speed up the answering process. Required fields are marked *.