
Popular categories
Looking for a yarn?


Comments / Questions (31)
![]() Hanne Olsen wrote:
Hanne Olsen wrote:
"Når arbejdet måler 15-17 cm tages der ... ind ..." Skal her måles fra bunden af øreklapperne eller fra den reelle hue-kant? Venlig hilsen Hanne
24.01.2019 - 12:47DROPS Design answered:
Hei Hanne. Dette er målt fra den reelle luekanten, feks fra midt foran. God fornøyelse.
25.01.2019 - 07:54
![]() Francesconi Isabelle wrote:
Francesconi Isabelle wrote:
Ca y'est ! j'ai terminé ! Super ! Le bonnet est très joli, j'adore ! Merci encore pour votre aide.... Bonne journée, à bientôt !
05.01.2019 - 12:20
![]() Francesconi Isabelle wrote:
Francesconi Isabelle wrote:
Encore merci beaucoup pour vos réponses rapides et explications ! j'ai encore besoin de votre aide et vous remercie d'avance pour votre soutien.... Alors voilà, j'en arrive à 17 cm de hauteur totale (à partir de la jonction des caches oreille) diminuer 1 m env dans chaque section envers = 77-91 m = diminuer 1 m envers sur l'envers avant chacune des 13 torsades ? et répéter ceci tous les cm 3 fois ?
04.01.2019 - 14:33DROPS Design answered:
Bonjour Mme Francesconi, tout à fait, vous tricotez 2 m ens à l'env dans chacune des sections en mailles envers entre les torsades, et vous répétez ces diminutions encore 2 fois tous les 1 cm (= à 18 cm puis à 19 cm). Bon tricot!
04.01.2019 - 15:18
![]() Francesconi Isabelle wrote:
Francesconi Isabelle wrote:
Merci beaucoup pour votre réponse, en plus rapide ! J'ai un autre petit souci : Je me retrouve avec l'endroit des caches oreille à l'intérieur du cercle (si je peux m'exprimer ainsi) Est-ce bien cela ? car on reprend bien les caches oreille sur l'endroit ? Faut-il voir l'endroit sur l'extérieur ? J'ai l'impression de tricoter à l'envers. Merci d'avance pour vos prochaines explications. Isabelle
03.01.2019 - 19:45DROPS Design answered:
Bonjour Mme Francesconi, les torsades doivent être effectivement sur l'endroit (jersey endroit = endroit de l'ouvrage), et les mailles entre les torsades sont en jersey envers, vu sur l'endroit. Bon tricot!
04.01.2019 - 12:55
![]() Francesconi Isabelle wrote:
Francesconi Isabelle wrote:
Je ne comprends pas les explications. A partir du point fantaisie. Ni le diagramme. Une fois le point fantaisie réalisé, je fais quoi ? au rang arrière ? on fait ce point tous les 2 rangs ? Merci de votre réponse.
02.01.2019 - 23:07DROPS Design answered:
Bonjour Mme Francesconi, quand vous avez 20 m pour le cache-oreille, tricotez sur l'endroit ainsi: 2 m point mousse, 2 m env, M.1, 4 m env, M.1, 2 m env, 2 m point mousse. M.1 se lit de droite à gauche en commençant en bas sur l'endroit (= rang 1 et 5: 4 m end sur l'end - rang 3= torsade et rangs 2,4 et 6: 4 m env sur l'env). En même temps, à 4 cm, vous augmentez 2 fois 1 m de chaque côté, à 2 m point mousse des bords= 24 m, tricotez 1 rang env après la dernière augmentation, mettez en attente et tricotez une 2ème pièce identique. Bon tricot!
03.01.2019 - 08:46
![]() Lisa wrote:
Lisa wrote:
Hallo, ist es so gewollt, dass am Hinterkopf nur 4 Maschen angeschlagen werden? Mit kommt die Mütze sehr klein vor.
12.02.2018 - 20:05DROPS Design answered:
Liebe Lisa, es ist ja so gewollt, es wird 22 M für vorne angeschlagen. Beachten Sie, daß Ihre Maschenprobe stimmt, dann soll die Mütze anpassen. Viel Spaß beim stricken!
13.02.2018 - 08:48Spela wrote:
Hello I have a problem with this pattern. I made 2 sts + 24 sts from ear flap + 22 sts + 24 sts from ear flap + 2 sts. Do I start knitting in round at this point. If I do that the hat is to small and ear flaps are to close together. Shoudn t be some more sts after second ear flap? Is the hat longer on the back of the had? Thank you Spela
24.01.2016 - 20:38DROPS Design answered:
Dear Spela, beg of round will be between the 2 sts worked at the beg and end of this row - space between earflaps is larger on the middle front than on the back side of hat. Happy knitting!
25.01.2016 - 14:21
![]() Babeta wrote:
Babeta wrote:
Díky za skvělý návod, moc mi pomohl.
17.01.2016 - 07:55DROPS Design answered:
Díky za zprávu - jsme rádi, že jsou vám návody k užitku a potěše!
17.01.2016 - 16:52
![]() Marit Frøiland wrote:
Marit Frøiland wrote:
Jeg får det ikke til å stemme med at øreklaffene kun skal være 6 cm høye? Og at det skal økes etter 4 cm, arbeidet er jo over 5 cm etter de første økningene! Det er noe som ikke stemmer her. Mvh Marit
05.02.2013 - 22:38DROPS Design answered:
Du skal öke m SAMTIDIG med at du strikker mönster og öker med kast. Du öker ved 4 og 6 cm
06.02.2013 - 15:32
![]() Drops Design France wrote:
Drops Design France wrote:
Bonsoir Sophie, le modèle explique effectivement dès le début du bonnet, je cite : "...= 74-86 m. Début du tour = milieu dos. Mesurer désormais à partir d'ici !"
19.01.2012 - 21:14
|
|||||||
Flying Ace |
|||||||
 |
 |
||||||
Knitted DROPS hat with cables in ”Nepal”.
DROPS 123-13 |
|||||||
|
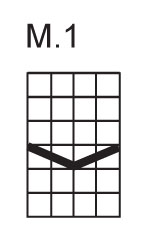
GARTER ST (back and forth on needle): K all rows. GARTER ST (in the round): K 1 round, P 1 round. INCREASING TIP: Inc by making 1 YO, on next row K YO into back of loop to avoid a hole. PATTERN: See diagram M.1 (= 4 sts). Diagram shows the pattern from RS. -------------------------------------------------------- EAR FLAP: Worked back and forth on double pointed needles. REMEMBER THE GAUGE! Cast on 8-8 sts on double pointed needles size 5 mm / US 8 with Nepal. K 1 row from WS and K 1 row RS, AT THE SAME TIME inc 1 st inside 2 sts each side – SEE INCREASING TIP! K 1 row from WS. Repeat the inc on every row from RS a total of 4-4 times = 16-16 sts. Work next row from RS as follows: 2 GARTER STS – see above – P2, K1, 1 YO, K1, 1 YO, P4, 1 YO, K1, 1 YO, K1, P2, 2 garter sts = 20-20 sts. Work next row as follows from WS (work YO into back of loop to avoid a hole): 2 garter sts, K2, P4, K4, P4, K2 and 2 garter st. Continue in PATTERN - see above – from RS as follows: 2 garter sts, P2, M.1, P4, M.1, P2 and 2 garter sts. AT THE SAME TIME when piece measures 4 cm / 1½" inc 1 st each side inside the 2 garter sts. P inc sts from RS and K them from WS. Repeat the inc when piece measures 6 cm / 2⅜" = 24-24 sts, finish with 1 row from WS. Slip sts on a stitch holder. Make 1 more ear flap in the same way. HAT: Worked in the round. Cast on 2-5 sts on circular needle size 5 mm / US 8 with Nepal. Work one of the ear flaps in on needle (continue in pattern on the 24-24 sts), cast on 22-28 new sts, work the other ear flap in on needle and cast on 2-5 new sts = 74-86 sts. Beg of round = mid back. Now measure piece from here. Continue as follows on the new sts: P 1 round, K 1 round, P 1 round, AT THE SAME TIME continue in pattern on ear flaps as before (= 4 rows garter st on the new sts mid front and mid back). On next round inc as follows: Size S/M: P2, 1 YO, K1, 1 YO, K1, P4, M.1, P4, M.1, P4, K1, 1 YO, K1, 1 YO, * P4, 1 YO, K1, 1 YO, K1 *, repeat from *-* a total of 3 times, P4, K1, 1 YO, K1, 1 YO, P4, M.1, P4, M.1, P4, K1, 1 YO, K1, 1 YO, P2 = 88 sts. Size L/XL : K1, 1 YO, P4, 1 YO, K1, 1 YO, K1, P4, M.1, P4, M.1, P4, K1, 1 YO, K1, 1 YO, * P4, 1 YO, K1, 1 YO, K1 *, repeat from *-* a total of 4 times, P4, K1, 1 YO, K1, 1 YO, P4, M.1, P4, M.1, P4, K1, 1 YO, K1, 1 YO, P4, 1 YO, K1 = 104 sts. All sizes: Continue in M.1 on all K-sections and P all P-sections (K YO into back of loop on round 1) = 11-13 repeats of M.1. NOTE! Beg M.1 on the same row as on ear flaps to make cable pattern identical in all repeats. Continue in M.1 and P sts. When piece measures 15-17 cm / 6"-6¾"" dec P1 in each P-section = 77-91 sts. Repeat the dec when piece measures 16-18 cm/ 6¼"-7" and again at 17-19 cm /6¾"-7½" = 55-65 sts. Change to double pointed needles when sts no longer fit circular needle. When piece measures 18-20 cm / 7"-8" K tog all P-sts with the K st next to it = 44-52 sts. On next row K2 tog all the way round = 22-26 sts. K 1 round without dec. On next K2 tog all the way round = 11-13 sts. Hat measures approx 20-22 cm / 8"-8¾" (measured mid front). Cut the thread, pull it through remaining sts, tighten tog and fasten. ASSEMBLY: Make a pompom with a diameter of approx 5 cm / 2" with Nepal and attach to the top of hat. |
|||||||
Diagram explanations |
|||||||
|
|||||||
 |
|||||||
Have you finished this pattern?Tag your pictures with #dropspattern or submit them to the #dropsfan gallery. Do you need help with this pattern?You'll find 12 tutorial videos, a Comments/Questions area and more by visiting the pattern on garnstudio.com. © 1982-2026 DROPS Design A/S. We reserve all rights. This document, including all its sub-sections, has copyrights. Read more about what you can do with our patterns at the bottom of each pattern on our site. |
|||||||


With over 40 years in knitting and crochet design, DROPS Design offers one of the most extensive collections of free patterns on the internet - translated to 17 languages. As of today we count 324 catalogs and 12290 patterns - 12280 of which are translated into English (US/in).
We work hard to bring you the best knitting and crochet have to offer, inspiration and advice as well as great quality yarns at incredible prices! Would you like to use our patterns for other than personal use? You can read what you are allowed to do in the Copyright text at the bottom of all our patterns. Happy crafting!
Post a comment to pattern DROPS 123-13
We would love to hear what you have to say about this pattern!
If you want to leave a question, please make sure you select the correct category in the form below, to speed up the answering process. Required fields are marked *.