
Popular categories
Looking for a yarn?


Comments / Questions (30)
![]() Shirlee Doft wrote:
Shirlee Doft wrote:
I figured it out. I had just never seen it printed that way before. I'm use to seeing how many stitches to cast on , not 8-8st etc. One Question, though, do I have to use double pointed needles to cast on? Can I use straight needles, or even circular Thank you
08.12.2023 - 20:10
![]() Shirlee Doft wrote:
Shirlee Doft wrote:
I don't understand what is meant by" cast on 8-8 sts on double pointed needles -------" Do I cast on 8 sts, one right after the other ? 8 different times? on one needle? I can't get by this first step. Is there a video to see this? Please be detailed, I am totally lost.
08.12.2023 - 17:24DROPS Design answered:
Dear Shirlee, the sequence of numbers indicates which number corresponds to which size. In this case, you cast on 8 stitches at the beginning, regardless of the size. For example, in the HAT you cast on 2-5 sts, that is, 2 sts for size S/M and 5 sts for size L/XL. For more information, please check the following lesson: https://www.garnstudio.com/lesson.php?id=79&cid=19. Happy knitting!
10.12.2023 - 18:51
![]() Weisskopf Gisela wrote:
Weisskopf Gisela wrote:
Guten Tag, für die Grösse 56 stimmt die Erklärung nach dem Abschnitt: Bei der nächsten Runde wird wie folgt in den versch. Grösse aufgenommen. Die Maschenzahl stimmt mit der Grösse 52 überein aber nicht für Grösse 56. Können Sie mir bitte behilflich sein. Besten Dank. Mit freundlichen Grüßen
25.11.2023 - 19:29DROPS Design answered:
Liebe Frau Weisskopf, in die 1. Größe soll man insgesamt 14 Maschen zunehmen = 88 Maschen in Größe 52/56 cm und in die 2. Größe soll man insgesamt 18 Maschen zunehmen = 104 Maschen in Größe 58/60 cm. Viel Spaß beim stricken!
27.11.2023 - 09:02
![]() Mullier wrote:
Mullier wrote:
Bonjour, je réalise ce bonnet même laine taille L/XL, je rencontre 3 difficultés. - Difficile de faire correspondre les torsades du bonnet après les rangs de point mousse avec celles des cache-oreilles comme sur votre photo. S.V.P. Merci de m'aider. Cdlt
12.10.2020 - 18:14DROPS Design answered:
(suite): le 2ème cache-oreille: 4 m env, M.1, 4 m env, M.1, 4 m env + les 2 dernières m du 2ème cache-oreille = 1 m end, 1 jeté, 1 m end, 1 jeté, et les 5 dernières mailes du tour: 4 m env, 1 jeté, 1 m end. = vous avez 104 m. N'hésitez pas à mettre des marqueurs pour délimiter chaque zone si besoin. Bon tricot!
13.10.2020 - 11:16
![]() Mullier wrote:
Mullier wrote:
Bonjour, je réalise ce bonnet même laine taille L/XL, - vous apportez une correction ci-dessus après assemblage mais elle reste identique à l'explication. S.V.P. Merci de m'aider. Cdlt
12.10.2020 - 18:04
![]() Mullier wrote:
Mullier wrote:
Bonjour, je réalise ce bonnet même laine taille L/XL, je rencontre 3 difficultés. -Impossible de réaliser la 1ère torsade du bonnet puisqu'elle est divisée en deux et que le tour se termine après les 2 premières mailles S.V.P. Merci de m'aider. Cdlt
12.10.2020 - 18:03DROPS Design answered:
(suite): puis 1m end, 1 jeté, 1 m end , 1 jeté (= les 2 dernières m du 1er cache-oreille + 2 jetés), tricotez maintenant: *4 m env, 1 jeté, 1 m end, 1 jeté, 1 m end *, répéter de *-* 4 fois fois au total, , 4 m env (= les 28 mailles montées entre les 2 cache-oreilles), tricotez maintenant les 2 premières mailles du 2ème cache-oreille: 1 m end, 1 jeté, 1 m end, 1 jeté (= les 2 m point mousse du 1er cache-oreille + les 28 m + les 2 m point mousse du 2ème cache-oreille = 32 m+ 12 jetés)...
13.10.2020 - 11:17
![]() Mullier wrote:
Mullier wrote:
Bonjour, je réalise ce bonnet même laine taille L/XL, je rencontre 3 difficultés. -Impossible de réaliser la 1ère torsade du bonnet puisqu'elle est divisée en deux et que le tour se termine après les 2 premières mailles S.V.P. Merci de m'aider. Cdlt
12.10.2020 - 18:02DROPS Design answered:
Bonjour Mme Mullier, quand vous avez vos 86 mailles, elles se présentent ainsi: 5 m, les 24 m du 1er cache-oreille, 28 m, les 24 m du 2ème cache-oreille et 5 m = 5+24+28+24+5= 86. Vous allez les tricoter ainsi: (cf questions suivantes): 1 m end, 1 jeté, 4 m env (= les 5 premières m du tour), 1 jeté, 1 m end, 1 jeté, 1 m end (= les 2 m point mousse du 1er cache-oreille + 2 jetés), tricotez ensuite les 16 m suivantes du 1er cache-oreille: (= 4 m env, M.1, 4 m env, M.1, 4 m env) comme avant...
13.10.2020 - 10:56
![]() Sonja wrote:
Sonja wrote:
Meine Frage nach der Erklärung für die englischen Abkürzung hat sich erledigt. Konnte die deutsche Anleitung finden. :-)
12.02.2019 - 11:15
![]() Sonja wrote:
Sonja wrote:
Wo kann ich denn bitte eine Erklärung zu den englischen Abkürzungen finden? Außer YO sind sie mir leider nicht bekannt.
12.02.2019 - 11:10DROPS Design answered:
Liebe Sonja, alle unsere Modellen sind auf Deutsch erhältlich, ändern Sie die Sprache mit dem Menü unter dem Foto. Viel Spaß beim stricken!
12.02.2019 - 11:43
![]() Hanne Olsen wrote:
Hanne Olsen wrote:
"Når arbejdet måler 15-17 cm tages der ... ind ..." Skal her måles fra bunden af øreklapperne eller fra den reelle hue-kant? Venlig hilsen Hanne
24.01.2019 - 12:47DROPS Design answered:
Hei Hanne. Dette er målt fra den reelle luekanten, feks fra midt foran. God fornøyelse.
25.01.2019 - 07:54
|
|||||||
Flying Ace |
|||||||
 |
 |
||||||
Knitted DROPS hat with cables in ”Nepal”.
DROPS 123-13 |
|||||||
|
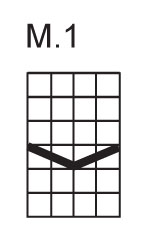
GARTER ST (back and forth on needle): K all rows. GARTER ST (in the round): K 1 round, P 1 round. INCREASING TIP: Inc by making 1 YO, on next row K YO into back of loop to avoid a hole. PATTERN: See diagram M.1 (= 4 sts). Diagram shows the pattern from RS. -------------------------------------------------------- EAR FLAP: Worked back and forth on double pointed needles. REMEMBER THE KNITTING TENSION! Cast on 8-8 sts on double pointed needles size 5 mm with Nepal. K 1 row from WS and K 1 row RS, AT THE SAME TIME inc 1 st inside 2 sts each side – SEE INCREASING TIP! K 1 row from WS. Repeat the inc on every row from RS a total of 4-4 times = 16-16 sts. Work next row from RS as follows: 2 GARTER STS – see above – P2, K1, 1 YO, K1, 1 YO, P4, 1 YO, K1, 1 YO, K1, P2, 2 garter sts = 20-20 sts. Work next row as follows from WS (work YO into back of loop to avoid a hole): 2 garter sts, K2, P4, K4, P4, K2 and 2 garter st. Continue in PATTERN - see above – from RS as follows: 2 garter sts, P2, M.1, P4, M.1, P2 and 2 garter sts. AT THE SAME TIME when piece measures 4 cm inc 1 st each side inside the 2 garter sts. P inc sts from RS and K them from WS. Repeat the inc when piece measures 6 cm = 24-24 sts, finish with 1 row from WS. Slip sts on a stitch holder. Make 1 more ear flap in the same way. HAT: Worked in the round. Cast on 2-5 sts on circular needle size 5 mm with Nepal. Work one of the ear flaps in on needle (continue in pattern on the 24-24 sts), cast on 22-28 new sts, work the other ear flap in on needle and cast on 2-5 new sts = 74-86 sts. Beg of round = mid back. Now measure piece from here. Continue as follows on the new sts: P 1 round, K 1 round, P 1 round, AT THE SAME TIME continue in pattern on ear flaps as before (= 4 rows garter st on the new sts mid front and mid back). On next round inc as follows: Size 52/56: P2, 1 YO, K1, 1 YO, K1, P4, M.1, P4, M.1, P4, K1, 1 YO, K1, 1 YO, * P4, 1 YO, K1, 1 YO, K1 *, repeat from *-* a total of 3 times, P4, K1, 1 YO, K1, 1 YO, P4, M.1, P4, M.1, P4, K1, 1 YO, K1, 1 YO, P2 = 88 sts. Size 58/60: K1, 1 YO, P4, 1 YO, K1, 1 YO, K1, P4, M.1, P4, M.1, P4, K1, 1 YO, K1, 1 YO, * P4, 1 YO, K1, 1 YO, K1 *, repeat from *-* a total of 4 times, P4, K1, 1 YO, K1, 1 YO, P4, M.1, P4, M.1, P4, K1, 1 YO, K1, 1 YO, P4, 1 YO, K1 = 104 sts. All sizes: Continue in M.1 on all K-sections and P all P-sections (K YO into back of loop on round 1) = 11-13 repeats of M.1. NOTE! Beg M.1 on the same row as on ear flaps to make cable pattern identical in all repeats. Continue in M.1 and P sts. When piece measures 15-17 cm dec P1 in each P-section = 77-91 sts. Repeat the dec when piece measures 16-18 and 17-19 cm = 55-65 sts. Change to double pointed needles when sts no longer fit circular needle. When piece measures 18-20 cm K tog all P-sts with the K st next to it = 44-52 sts. On next row K2 tog all the way round = 22-26 sts. K 1 round without dec. On next K2 tog all the way round = 11-13 sts. Hat measures approx 20-22 cm (measured mid front). Cut the thread, pull it through remaining sts, tighten tog and fasten. ASSEMBLY: Make a pompom with a diameter of approx 5 cm with Nepal and attach to the top of hat. |
|||||||
Diagram explanations |
|||||||
|
|||||||
|
|||||||
Have you finished this pattern?Tag your pictures with #dropspattern or submit them to the #dropsfan gallery. Do you need help with this pattern?You'll find 13 tutorial videos, a Comments/Questions area and more by visiting the pattern on garnstudio.com. © 1982-2025 DROPS Design A/S. We reserve all rights. This document, including all its sub-sections, has copyrights. Read more about what you can do with our patterns at the bottom of each pattern on our site. |
|||||||


With over 40 years in knitting and crochet design, DROPS Design offers one of the most extensive collections of free patterns on the internet - translated to 17 languages. As of today we count 314 catalogues and 11822 patterns translated into English (UK/cm).
We work hard to bring you the best knitting and crochet have to offer, inspiration and advice as well as great quality yarns at incredible prices! Would you like to use our patterns for other than personal use? You can read what you are allowed to do in the Copyright text at the bottom of all our patterns. Happy crafting!
Post a comment to pattern DROPS 123-13
We would love to hear what you have to say about this pattern!
If you want to leave a question, please make sure you select the correct category in the form below, to speed up the answering process. Required fields are marked *.