
Popular categories
Looking for a yarn?


Comments / Questions (94)
![]() Hanneke wrote:
Hanneke wrote:
Ja, dat ga ik nu maar doen. Ik brei liever op de ouderwetse (voor mij) manier met de naald onder mijn arm. Dit gaat veeeeel sneller ;)
16.02.2016 - 08:02
![]() Outi wrote:
Outi wrote:
Kuvan mittojen perusteellapienin koko on minulle muuten sopiva mutta vartalonympäryksen kohdalle pitäisi lisätä 8cm. Jos valitsen isomman koon, tulee neuleesta todella suuri. Osaatteko neuvoa, miten saan laskettua kavennukset uudelleen vyötäröltä ylöspäin?
25.10.2015 - 12:58DROPS Design answered:
Voit aina tuoda neuleesi paikalliselle DROPS liikkeellesi. He auttavat sinua mielellään. Mikäli läheltäsi ei löydy DROPS-jälleenmyyjää, voit varmasti kysyä neuvoa myös muista käsityöliikkeistä.
28.10.2015 - 15:47
![]() Chrysdel wrote:
Chrysdel wrote:
J'ai envie de me faire ce modèle, que je trouve magnifique, depuis pas mal de temps maintenant. Ca y est je me lance, je commande ma laine aujourd'hui, en espérant que le résultat sera à la hauteur de votre photo.
24.05.2015 - 15:38
![]() Fiona wrote:
Fiona wrote:
Sleeve armhole shaping, the pattern states ' then 2 sts each side untill sleeve measures 56-57-58 cm', how many times do i cast off? One more time or on each row?
25.04.2015 - 21:31DROPS Design answered:
Dear Fiona, depending on how many row you will need to get the correct measurement for your size, you cast off 2 sts at the beg of each row (from RS + from WS) until sleeve measures 56-57-58 cm from cast on row. Happy knitting!
27.04.2015 - 10:32
![]() Chaunavel wrote:
Chaunavel wrote:
Quelle longueur doit avoir l'aiguille circulaire utilisée pour loger 699 mailles? j'en ai déjà cassé une et le travail est à refaire... Merci de m'aider;je tiens beaucoup à réaliser ce joli modèle!
07.02.2015 - 11:44DROPS Design answered:
Bonjour Mme Chauvanel, on utilise dans ce modèle une aiguille circulaire de 80 cm (pour le dos et les devants) et une de 40 cm. Bon tricot!
08.02.2015 - 18:50
![]() Roswitha Gosens wrote:
Roswitha Gosens wrote:
Het aantal steken dat opgezet moet worden is wel heel erg veel. Dat kan volgens mij niet kloppen. Kunt u dit nakijken? Bij voorbaat dank. Roswitha Gosens
27.01.2015 - 10:40DROPS Design answered:
Hoi Roswitha. Het patroon klopt. De onderkant moet zo zijn. En bij het breien van M.1 minder je veel steken (lees verder in het patroon). Veel breiplezier
27.01.2015 - 11:25
![]() Anna-Lena Jawette wrote:
Anna-Lena Jawette wrote:
Jag stickar Drops modell 123-1 och har kommit till mönster (M1), varvet där jag ska göra 9 maskor till 3 med hjälp av hjälpstickor. Jag förstår inte hur det går till. Har försökt sätta 3 maskor på hjälpsticka bakom, och 3 maskor direkt på annan hjälpsticka och sedan hur ska jag sticka de 3 m tillsammans är för mig en gåta. Snälla kan ni inte lägga in en video på detta varv/moment. Har suttit i flera dagar för att försöka klura ut hur det är tänkt men jag förstår inte. Anna-Lena
12.01.2015 - 08:44DROPS Design answered:
Hej Anna Lena. Begynd med at saette de förste 3 m paa hjaelpepinden bakom og 3 foran arbejdet. Du har nu 3 m paa hjaelpepinden foran, 3 paa "hovedpinden" i midten og 3 paa hjaelpepinden bakom arbejdet. Du skal nu tage ind ved at strikke 3 m sammen til 1. Strik den 1e m paa pinden foran, 1e m paa midter pinden og 1e m paa bagerse pind sammen. Jeg kan godt forstaa det er lidt svaert förste gang, men pröv igen. Haaber det lykkes ;-)
13.01.2015 - 14:09
![]() Maria Lundholm wrote:
Maria Lundholm wrote:
Modell Z-513. Ska jag verkligen lägga upp 699 maskor till denna kofta som jag tänker sticka? Har gjort det och det får plats 2 storvuxna kvinnor i den koftan i såfall. Maria
29.11.2014 - 10:30DROPS Design answered:
Hej Maria. Ja, det er korrekt. Den skal vaere meget vid i underkanten, men som du kan laese saa har du allerede taget mere end 150 m ind naar du er faerdig med M.1 förste gang.
01.12.2014 - 15:32
![]() Anette Kloster wrote:
Anette Kloster wrote:
Hej. Jeg har netop bestilt garn til denne cardigan. Jeg er dog lidt i tvivl om, hvilken størrelse jeg skal vælge. Jeg bruger normalt medium /large (str. 42) Vil jo bare være rigtig ærgerligt, hvis den blev alt for lille eller alt for stor.
25.11.2014 - 18:56DROPS Design answered:
Hej Anette, Du finder jakkens mål i måleskitsen nederst i opskriften. Så vælg den størrelse som passer til dine mål. God fornøjelse!
26.11.2014 - 15:16
![]() Lucie wrote:
Lucie wrote:
Un super joli modèle de jaquette très élaboré, que je suis en train de tricoter actuellement. Le début avec ce nombre important de mailles a été difficile, mais j'en suis à 18 cm après 8 jours de tricot, j'espère finir dans 2 mois. Je n'ose imaginer les calculs mathématiques que la créatrice à dû faire. Bravo ! Le tricot c'est aussi des maths !
05.09.2014 - 23:30
|
||||||||||||||||
Niagara Falls |
||||||||||||||||
|
|
||||||||||||||||
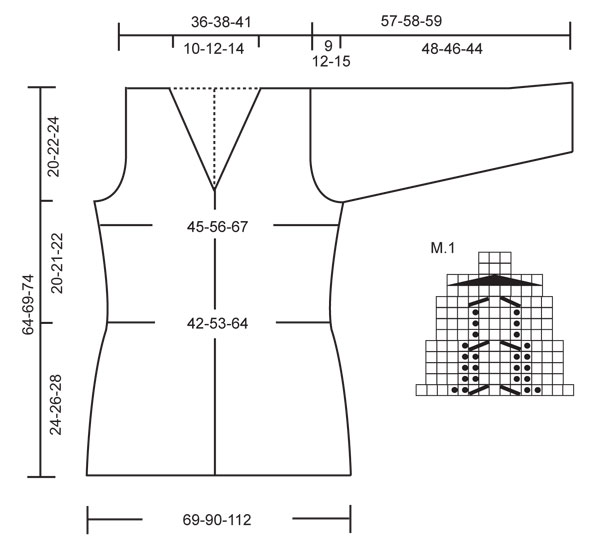
Knitted DROPS jacket with rib-pattern in ”Alpaca”. Size S - XXXL.
DROPS 123-1 |
||||||||||||||||
|
GARTER ST, back and forth on needle: K all rows. PATTERN: See diagram M.1. Diagram shows the pattern from RS. DECREASING TIP: Dec as follows after front band + K3 + P3: Slip 1 st as if to K, K1, psso. Dec as follows before P3 + K3 + front band: K2 tog. BUTTONHOLES: Make buttonholes on right front band. 1 buttonhole = bind off 3rd and 4th st from mid front and cast on 2 new sts on next row. Make buttonholes when piece measures: SIZE S/M: 8, 14, 20, 26, 32, 38, 44 cm / 3⅛",5½",8",10¼",12½",15",17¼". SIZE L/XL: 10, 16, 22, 28, 34, 40, 46 cm / 4",6¼",8¾",11",13⅜",15¾",18". SIZE XXL/XXXL: 8, 15, 22, 29, 36, 43, 50 cm / 3⅛",6",8¾",11⅜",14¼",17",19¾". -------------------------------------------------------- JACKET: Worked back and forth on circular needle from mid front. Cast on 699-915-1131 sts (includes 6 front band sts each side) on circular needle size 3 mm / US 2or3 with Alpaca. Work front bands in GARTER ST – see above – throughout. P 1 row from WS with 6 front band sts each side and continue in rib as follows (from RS): 6 front band sts, * K3, P3 *, repeat from *-* and finish with K3 and 6 front band sts. Continue like this until piece measures approx 2-3-4 cm / ¾"-1⅛"-1½". Now continue as follows (from RS): 6 front band sts, 12 sts in rib as before, * M.1, 39 sts in rib as before *, repeat from *-* and finish with M.1, 12 sts in rib as before and 6 front band sts. After 1 vertical repeat of M.1 there are 543-711-879 sts on needle. Continue with K over K and P over P until piece measures 7-8-9 cm / 2¾"-3⅛"-3½". Now continue as follows (from RS): 6 front band sts, 6 sts in rib as before, * M.1, 27 sts in rib as before *, repeat from *-* and finish with M.1, 6 sts rib as before and 6 front band sts. Remember BUTTONHOLES - see above. After M.1 there are 387-507-627 sts on needle. Continue with K over K and P over P until piece measures 12-13-14 cm / 4¾"-5⅛"-5½". Now continue as follows (from RS): 6 front band sts, * M.1, 15 sts in rib as before *, repeat from *-* and finish with M.1 and 6 front band sts. After M.1 there are 231-303-375 sts on needle. Continue with K over K and P over P until piece measures approx 17-18-19 cm / 6¾"-7"-7½". On next row from RS inc 1 st in each P-section by making 1 YO after P3 = 267-351-435 sts. On next row (from WS) work all YO into back of loop to avoid a hole. Continue with K over K and P over P until piece measures 24-26-28 cm / 9½"-10¼"-11". On next row from RS dec 1 st in each P-section by P tog the last 2 P sts = 231-303-375 sts. Work 1 row from WS with K over K and P over P. Now insert a marker in the 62nd-80th-98th st from each side (back piece = 107-143-179 sts). Continue as follows (from RS): 6 front band sts, K3, P3, stockinette st on the next 39-57-75 sts AT THE SAME TIME dec 4-8-13 sts evenly, P3, K3, P3, K3 (marker sits in the middle of these sts), P3, K3, P3, stockinette st on the next 87-123-159 sts AT THE SAME TIME dec 6-15-25 sts evenly, P3, K3, P3, K3 (marker sits in the middle of these sts), P3, K3, P3, stockinette st on the next 39-57-75 sts AT THE SAME TIME dec 4-8-13 sts evenly, P3, K3 and 6 front band sts. There are now 217-272-324 sts on needle. Continue with K over K, P over P and stockinette st over stockinette st, and front bands as before. When piece measures 27-29-31 cm / 10⅝"-11⅜"-12¼" inc 1 st before and after rib-section (= 21 sts) each side (= 4 inc). Inc by making 1 YO. On next row work YO into back of loop and continue to work inc sts in stockinette st. Repeat the inc on every 6 cm / 2⅜" a total of 3 times = 229-284-336 sts. Continue as before until piece measures 44-47-50 cm / 17¼"-18½"-19¾". Now bind off 9 sts each side (i.e. st with markers + 4 sts each side of marker) for armhole and complete each piece separately. BACK PIECE: = 99-126-152 sts. Continue back and forth on needle with K over K, P over P and stockinette st over stockinette st. AT THE SAME TIME bind off for armhole at beg of every row each side: 2 sts 2-4-8 times and 1 st 2-9-11 times = 87-92-98 sts. Now continue in stockinette st on all sts. When piece measures 62-67-72 cm / 24⅜"-26⅜"-28⅜" bind off the middle 19-24-30 sts for neck and complete each shoulder separately. Continue in stockinette st and bind off to shape the neckline at the beg of every row from mid front: 1 st 2 times = 32 sts left on shoulder. Piece measures approx 64-69-74 cm / 25¼"-27⅛"-29⅛". Bind off remaining sts. RIGHT FRONT PIECE: = 56-70-83 sts. Continue back and forth on needle with K over K, P over P and stockinette st over stockinette st. AT THE SAME TIME bind off for armhole at the side as described for back piece. AT THE SAME TIME when piece measures 46-48-52 cm / 18"-19"-20½" work 2 rows back and forth on the 6 front band sts only. Now dec for neck and inc for collar as follows: Inc 1 st by making 1 YO inside 6 front band sts, on next row K YO into back of loop to avoid a hole, and then include inc sts in garter st on front band. Dec 1 st inside front band + K3/P3 - See DECREASING TIP! Inc 1 st and dec 1 st on approx every 1 cm / ⅜" a total of 12-15-18 times = 18-21-24 front band sts. When piece measures 64-69-74 cm / 25¼"-27⅛"-29⅛" bind off 32 sts for shoulder, work the 18-21-24 front band sts and now continue with collar as follows (Row 1 = from RS): * Work back and forth on 8-10-12 sts only, work back and forth on all sts *, repeat from *-* until collar measures approx 6-7-8 cm / 2⅜"-2¾"-3⅛" (measured where shortest). Bind off. LEFT FRONT PIECE: Like right front piece, but mirrored. SLEEVE: Worked in the round. Cast on 91-103-103 sts on circular needle size 3 mm / US 2or3 with Alpaca. K 1 round. Insert a marker at beg of round = mid under sleeve. Continue as follows: P2, * K3, P3 *, repeat from *-* and finish with K3 and P2. Continue like this until piece measures 2-3-4 cm / ¾"-1⅛"-1½". Now continue as follows: 17-23-23 stockinette sts, rib as before on the next 21 sts, M.1, rib as before on the next 21 sts and 17-23-23 stockinette sts. AT THE SAME TIME when piece measures approx 3 cm / 1⅛" inc 2 sts mid under sleeve (i.e. 1 st each side of marker). Repeat the inc on every 2.5-2-1.5 cm / 1"-¾"-½" a total of 18-19-25 times (work inc sts in stockinette st). After M.1 continue with K over K, P over P and stockinette st over stockinette st until piece measures 7-8-9 cm / 2¾"-3⅛"-3½". Now continue as follows: stockinette st to the rib, 15 sts in rib as before, M.1, 15 sts in rib as before and stockinette st to the end of round. After M.1 continue with K over K, P over P and stockinette st over stockinette st until piece measures 12-13-14 cm / 4¾"-5⅛"-5½". Now continue as follows: stockinette st to the rib, 9 sts in rib, M.1, 9 sts in rib and stockinette st to the end of round. After M.1 continue with stockinette st each side and 21 sts in rib mid upper sleeve. When all inc and dec are complete there are 91-105-117 sts on needle. Continue until piece measures 48-46-44 cm / 19"-18"-17¼" (less for the larger sizes because of longer sleeve cap and wider shoulders). Now bind off 8 sts mid under sleeve (i.e. 4 sts each side of marker) and continue back and forth on needle. AT THE SAME TIME bind off for sleeve cap at the beg of every row each side: 2 sts 4-5-5 times and 1 st 4-8-13 times, then 2 sts each side until sleeve measures 56-57-58 cm / 22"-22½"-22¾". Now bind off 4 sts at beg of the next 2 rows and bind off remaining sts. Piece measures approx 57-58-59 cm / 22½"-22¾"-23¼". ASSEMBLY: Sew shoulder seams. Set in sleeves. Sew tog collar mid back and sew to neck on back piece. Sew on buttons. |
||||||||||||||||
Diagram explanations |
||||||||||||||||
|
||||||||||||||||
 |
||||||||||||||||
Have you finished this pattern?Tag your pictures with #dropspattern or submit them to the #dropsfan gallery. Do you need help with this pattern?You'll find 21 tutorial videos, a Comments/Questions area and more by visiting the pattern on garnstudio.com. © 1982-2026 DROPS Design A/S. We reserve all rights. This document, including all its sub-sections, has copyrights. Read more about what you can do with our patterns at the bottom of each pattern on our site. |
||||||||||||||||


With over 40 years in knitting and crochet design, DROPS Design offers one of the most extensive collections of free patterns on the internet - translated to 17 languages. As of today we count 324 catalogs and 12290 patterns - 12280 of which are translated into English (US/in).
We work hard to bring you the best knitting and crochet have to offer, inspiration and advice as well as great quality yarns at incredible prices! Would you like to use our patterns for other than personal use? You can read what you are allowed to do in the Copyright text at the bottom of all our patterns. Happy crafting!
Post a comment to pattern DROPS 123-1
We would love to hear what you have to say about this pattern!
If you want to leave a question, please make sure you select the correct category in the form below, to speed up the answering process. Required fields are marked *.