
Popular categories
Looking for a yarn?


Comments / Questions (136)
![]() Els wrote:
Els wrote:
Ik heb de trui in een mooie kleur groen gebreid. Gisteren droeg ik hem voor 't eerst. Nog nooit heb ik zoveel opmerkingen over een breisel van mezelf gekregen! Het kabelpatroon is ook zo mooi!
17.01.2014 - 07:54
![]() Diny wrote:
Diny wrote:
Volgens mij klopt het telpatroon niet. als alleen de naalden op de goede kant zijn aangegeven en de teruggaande naalden dus gebreid moeten worden zoals het zich voordoet wordt het motief 90 naalden hoog, is 30 cm. dat past niet als je pas bij 39 cm van het voorpand er mee begint.
15.01.2014 - 23:35DROPS Design answered:
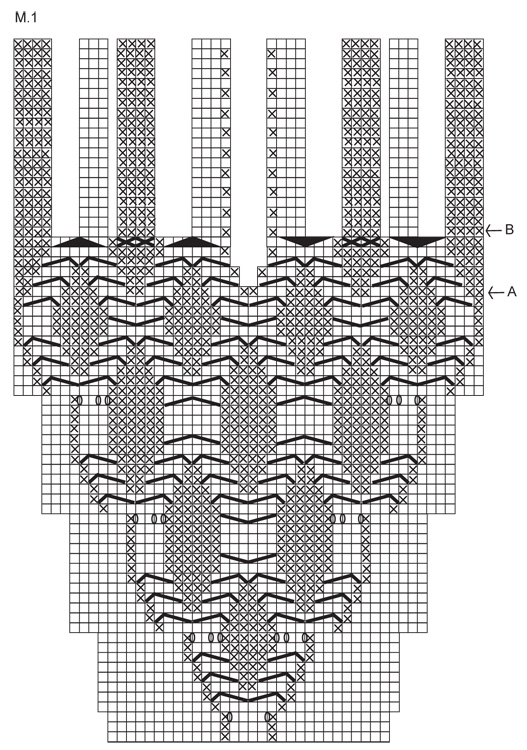
Hoi Diny. Het telpatroon klopt. Hij geeft het patroon weer van de goede kant, maar zowel de heengaande als de terugg nld zijn weergegeven. Je kan in de FAQ lezen onder punt 2 hoe je onze telpatronen moet lezen.
16.01.2014 - 11:07
![]() Veronique wrote:
Veronique wrote:
Bonjour, à quoi correspondent les tailles S M L etc... Je n'ai pas trouvé de tableaux avec les correspondance de tailles 36 38 40 etc. Merci
20.12.2013 - 10:58DROPS Design answered:
Bonjour Véronique, les tailles sont différentes en fonction de chaque pays, nous avons donc opté pour des schémas de mesures fiables. Ainsi, pour trouver votre taille, mesurez un pull analogue dont vous aimez la forme et comparez ces mesures avec celles du schéma qui se trouve à la fin des explications. Bon tricot!
20.12.2013 - 13:59
![]() Anja wrote:
Anja wrote:
Sehe ich das richtig, dass man beim Vorderteil beidseitig den Kragen ganz lang und schmal (15 Maschen und ca 7 cm) hochstrickt, um ihn am Ende im Nacken zusammenzunähen? Vielen Dank für Ihre Hilfe! Anja
09.11.2013 - 14:58DROPS Design answered:
Liebe Anja, ja genau so wird es gemacht!
09.11.2013 - 17:00
![]() Anja Kureck wrote:
Anja Kureck wrote:
Das mit den Umschläge habe ich glaub ich doch verstanden, man muss tatsächlich Maschen zunehmen, oder? Noch eine Frage zu den Halsabnahmen. Dort steht, man soll 1 Masche vor dem Bündchen abnehmen und dies (für Größe M) 4 Mal wiederholen. Heißt das wie immter TOTAL 4 Mal, also insgesamt 4 Maschen abnehmen, oder 4 Mal wiederholen, also 5 Maschen abnehmen? Im letzteren Fall komme ich dann aber nicht auf 38, sondern auf 37 Maschen. Vielen Dank nochmal!
01.11.2013 - 17:44DROPS Design answered:
Liebe Anja, mit total 4 x meinen wir insgesamt 4 x also nicht zusätzlich 4 x wiederholen, das wären total 5 x. So stimmt die Maschenzahl.
04.11.2013 - 18:21
![]() Anja Kureck wrote:
Anja Kureck wrote:
Mir ist die Sache mit dem Umschlag (z. B. in der dritten Reihe von M1) nicht ganz klar. Stickt man den Umschlag in der nächsten Reihe mit einer Masche zusammen? Wenn ja, mit der Masche davor oder danach? Wenn man ihn einzeln strickt, würden die Maschen ja immer mehr werden, ich nehme an, das ist nicht so gemeint, oder? Vielen Dank!
01.11.2013 - 16:26DROPS Design answered:
Liebe Anja, der Umschlag wird einzeln gestrickt und die Maschenzahl wird zunächst auch grösser, aber in der Reihe vor Pfeil B wird die Maschenzahl wieder reduziert. Da sich das Muster zusammenzieht, bleibt das Strickstück dennoch flach.
04.11.2013 - 09:27
![]() Paula-K wrote:
Paula-K wrote:
Thanks but that's not the decrease I meant. It says to decrease 1 st for neck inside the 15 sts in rib & repeat I don't understand where to place these sts without affecting the rib pattern.
15.10.2013 - 17:34DROPS Design answered:
Dear Paula K, sorry for misunderstanding. Inside mean here to work the dec either before the 15 sts (seen from RS = left front piece) or after the 15 sts (see from RS= right front piece) so that it won't affect the rib pattern. Happy knitting!
15.10.2013 - 18:04
![]() Paula-K wrote:
Paula-K wrote:
At -B I don't understand where to make the decreases. If inside the rib pattern won't that alter the pattern? Do you mean between the st.st & rib sections?
13.10.2013 - 12:43DROPS Design answered:
Dear Mrs Paula K, for front piece, dec are done on the row just before the arrow B : you work tog sts from both cables (6 sts become 3 sts) and between the 2 cables you P2 tog twice, and continue then working sts as in diagram (=right part of diagram/left front piece is: P4,K3,P4,K3, 1 garter st). Happy knitting!
14.10.2013 - 09:06
![]() Pascale wrote:
Pascale wrote:
Bonjour, pouvez-vous me conseiller pour la taille ? Je fais habituellement du 40, est-ce que ça correspond à M ou L ? merci
27.09.2013 - 22:48DROPS Design answered:
Bonjour Pascale, en bas de page, à la fin des explications, vous trouverez un schéma avec les mesures du pull terminé, comparez avec l'un de vos pull de forme similaire pour trouver la taille qui vous correspond. Bon tricot!
28.09.2013 - 09:52
![]() Lena wrote:
Lena wrote:
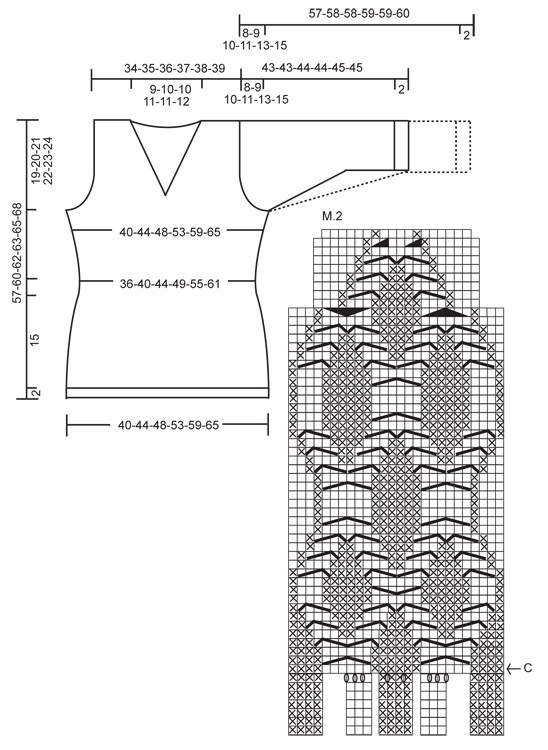
Bei der Anleitung für die Ärmel wird einmal ausdrücklich darauf hingewiesen, dass etwas GLEICHZEITIG abgearbeitet werden soll. Bezieht sich dieses GLEICHZEITIG darauf, dass parallel zu M2 Maschen aufgenommen werden sollen oder soll das aussagen, dass nach Ende von M2 links und rechts gleichzeitig Maschen aufgenommen werden sollen? Danke!
21.07.2013 - 22:43DROPS Design answered:
Liebe Lena, M2 wird zunächst fertig gestrickt, dann wird mit der Aufnahme begonnen.
22.07.2013 - 13:35
|
||||||||||||||||||||||||||||||||||
Viking Knots#vikingknotssweater |
||||||||||||||||||||||||||||||||||
 |
 |
|||||||||||||||||||||||||||||||||
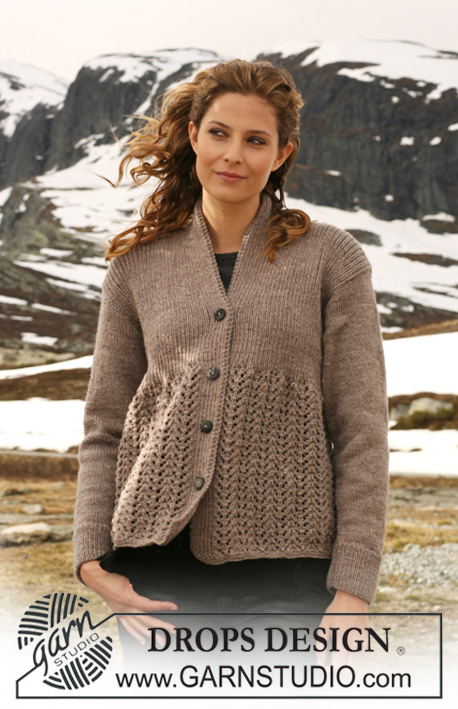
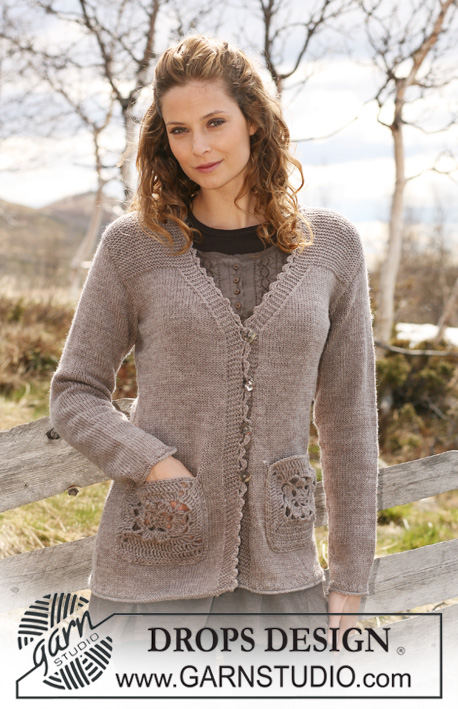
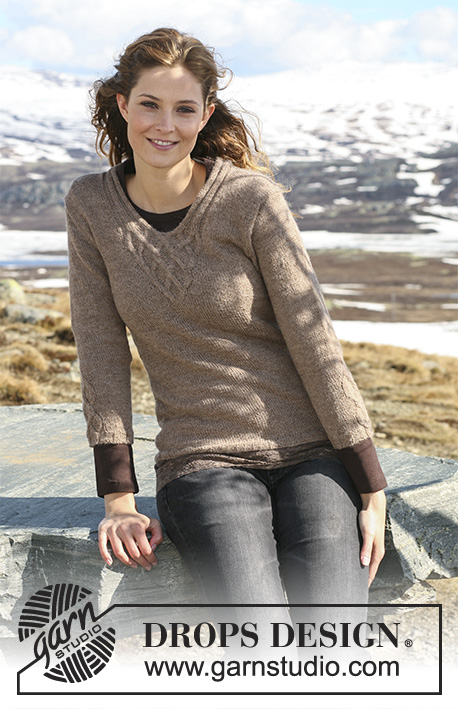
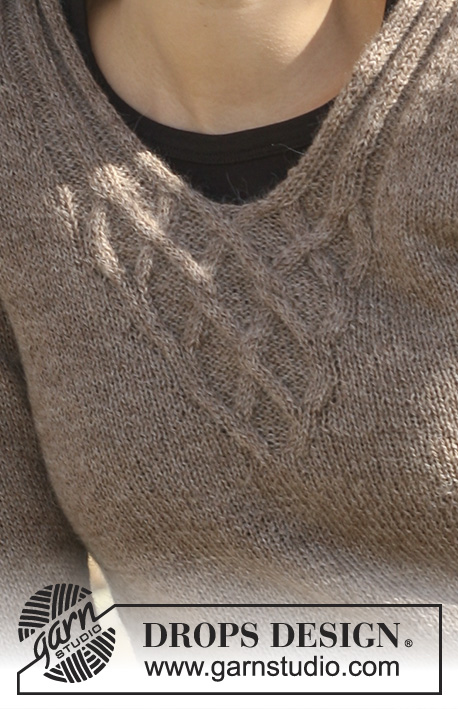
DROPS jumper with cables in ”Alpaca” with 3/4 sleeves or long sleeves. Size S - XXXL.
DROPS 114-8 |
||||||||||||||||||||||||||||||||||
|
PATTERN: See diagram M.1 and M.2. Diagram shows the pattern from RS. -------------------------------------------------------- -------------------------------------------------------- BACK PIECE: Worked back and forth on needle. Cast on 107-121-135-142-163-177 sts (includes 1 edge st each side) on needle size 2.5 mm / US 1 with Alpaca. Work rib as follows (first row = RS): 1 edge st, * K3, P4 *, repeat from *-* and finish with 1 edge st. When rib measures 2 cm / ¾" K 1 row from RS, AT THE SAME TIME dec 9-13-17-12-19-19 sts evenly = 98-108-118-130-144-158 sts. Change to needle size 3 mm / US 2or3. P 1 row from WS and continue in stockinette st with 1 edge st each side. When piece measures 9 cm / 3½" dec 1 st each side, repeat the dec on every 2 cm / ¾" a total of 5 times = 88-98-108-120-134-148 sts. When piece measures 20-21-21-20-20-21 cm / 8"-8¼"-8¼"-8"-8"-8¼" inc 1 st each side, repeat the inc on every 3-3-3.5-4-4.5-4.5 cm / 1⅛"-1⅛"-1¼"-1½"-1¾"-1¾" a total of 5 times = 98-108-118-130-144-158 sts. When piece measures 38-40-41-41-42-44 cm / 15"-15¾"-16⅛"-16⅛"-16½"-17¼" bind off 4 sts each side for armhole and bind off for armhole each side on every other row: 4 sts 0-0-0-1-1-2 times, 2 sts 2-3-5-6-8-9 times and 1 st 0-2-2-1-2-2 times = 82-84-86-88-92-94 sts. Continue in stockinette st on all sts. When piece measures 54-57-59-60-62-65 cm / 21¼"-22½"-23¼"-23⅝"-24⅜"-25½" bind off the middle 32-34-34-36-38-40 sts for neck and complete each shoulder separately. Bind off 1 st on neckline on every other row 2 times = 23-23-24-24-25-25 sts left on shoulder. Bind off loosely when piece measures 57-60-62-63-65-68 cm / 22½"-23⅝"-24⅜"-24¾"-25½"-26¾". FRONT PIECE: Cast on and work like back piece until piece measures 20-21-21-20-20-21 cm / 8"-8¼"-8¼"-8"-8"-8¼". On next row inc 1 st each side, repeat the inc on every 3-3-3.5-4-4.5-4.5 cm / 1⅛"-1⅛"-1¼"-1½"-1¾"-1¾" a total of 5 times = 98-108-118-130-144-158 sts. Continue in stockinette st with 1 edge st each until piece measures 33-34-35-36-39-40 cm / 13"-13⅜"-13¾"-14¼"-15¼"-15¾". Now continue as follows (from RS): 1 edge st, 33-38-43-49-56-63 stockinette sts, M.1 (= 30 sts), 33-38-43-49-56-63 stockinette sts and 1 edge st. AT THE SAME TIME when piece measures 38-40-41-41-42-44 cm / 15"-15¾"-16⅛"-16⅛"-16½"-17¼" bind off for armhole each side as described for back piece. Continue up to arrow-A in M.1. On next row from RS bind off for neck as follows: work the first 24 sts of M.1, bind off 2 sts (= mid front) and work the remaining 24 sts of M.1 (work remaining sts in stockinette st as before). Insert a marker in piece, and now complete each side separately. LEFT FRONT PIECE: Continue back and forth on needle in stockinette st and M.1 as before – remember to bind off for armhole at the side! AT THE SAME TIME on next row from mid front dec 1 st for neck. Continue to arrow-B in diagram for M.1. Now continue with 15 sts rib as shown in M.1, work remaining sts in stockinette st as before. AT THE SAME TIME dec 1 st for neck inside the 15 sts in rib, and repeat the dec on every 4th row 3-4-4-5-6-7 times = 38-38-39-39-40-40 sts. Continue until piece measures 11-12-12-13-13-14 cm / 4⅜"-4¾"-4¾"-5⅛"-5⅛"-5½" from marker (adjust to length of armhole on back piece). Now bind off 23-23-24-24-25-25 sts from shoulder towards neckline = 15 sts left on needle. Continue back and forth on needle in rib as before on these 15 sts. Bind off loosely with K over K and P over P after approx 7-7-7-8-8-8 cm / 2¾"-2¾"-2¾"-3⅛"-3⅛"-3⅛" (measured from shoulder). RIGHT FRONT PIECE: Like left front piece but mirrored. ASSEMBLY: Sew shoulder seams. 3/4 SLEEVES: Worked back and forth on needle. LEFT SLEEVE: Cast on 65-65-72-72-72-79 sts on needle size 2.5 mm / US 1 with Alpaca. Work rib as follows (first row = RS): 1 edge st, * P4, K3 *, repeat from *-* on 21-21-28-28-28-28 sts, M.2 (= 18 sts), K3, *P4, K3 *, repeat from *-* on the next 21-21-21-21-21-28 sts and 1 edge st. Continue like this up to Arrow-C in M.2. There are now 73-73-80-80-80-87 sts on needle. Change to needle size 3 mm / US 2or3. Continue as follows (from RS): 1 edge st, 21-21-28-28-28-28 stockinette sts, M.2 (= 26 sts), 24-24-24-24-24-31 stockinette sts and 1 edge st. Work 1 vertical repeat of M.2 like this = 65-65-72-72-72-79 sts on needle. Insert a marker, and now measure piece from here. Continue in stockinette st with 1 edge st each side. AT THE SAME TIME when piece measures approx 2 cm / ¾" from marker inc 1 st each side, repeat the inc on every 1.5-1-1-0.5-0.5-0.5 cm / ⅝"-⅜"-⅜"-¼" -¼" -¼" a total of 8-11-11-14-17-17 times = 81-87-94-100-106-113 sts. When piece measures 17-16-16-15-14-12 cm / 6¾"-6¼"-6¼"-6"-5½"-4¾" from marker (less for the larger sizes because of longer sleeve cap and wider shoulder) bind off 4 sts each side. Bind off for sleeve cap at the beg of every row: 2 sts 4-5-5-5-4-4 times each side and 1 st 3-3-5-5-11-14 times each side, then 2 sts each side until piece measures 24-24-25-25-26-26 cm / 9½"-9½"-9¾"-9¾"-10¼"-10¼", now bind off 4 sts each side 1 time, and bind off remaining sts. Piece measures a total of approx 43-43-44-44-45-45 cm / 17"-17"-17¼"-17¼"-17¾"-17¾". RIGHT SLEEVE: Cast on 65-65-72-72-72-79 sts on needle size 2.5 mm / US 1 with Alpaca. Work rib as follows (first row = from RS): 1 edge st, * K3, P4 *, repeat from *-* on 21-21-21-21-21-28 sts, K3, M.2 (= 18 sts), * K3, P4 *, repeat from *-* on the next 21-21-28-28-28-28 sts and 1 edge st. Continue like this up to Arrow-C in M.2. There are now 73-73-80-80-80-87 sts on needle. Change to needle size 3 mm / US 2or3 and continue as follows (from RS): 1 edge st, 24-24-24-24-24-31 stockinette sts, M.2 (= 26 sts), 21-21-28-28-28-28 stockinette sts and 1 edge st. Work 1 vertical repeat of M.2 like this = 65-65-72-72-72-79 sts on needle. Insert a marker, and now measure piece from here. Continue as described for Left Sleeve. LONG SLEEVES: Worked back and forth on needle. LEFT SLEEVE: Cast on 58-58-65-65-65-72 sts on needle size 2.5 mm / US 1 with Alpaca. Work rib as follows (first row = RS): 1 edge st, * P4, K3 *, repeat from *-* on 21-21-21-21-21-28 sts, M.2 (= 18 sts), K3, * P4, K3 *, repeat from *-* on the next 14-14-21-21-21-21 sts and 1 edge st. Continue like this up to Arrow-C in M.2. There are now 66-66-73-73-73-80 sts on needle. Change to needle size 3 mm / US 2or3 and continue as follows (from RS): 1 edge st, 21-21-21-21-21-28 stockinette sts, M.2 (= 26 sts), 17-17-24-24-24-24 stockinette sts and 1 edge st. Work 1 vertical repeat of M.2 like this = 58-58-65-65-65-72 sts on needle. Insert a marker, and now measure piece from here. Continue in stockinette st with 1 edge st each side. AT THE SAME TIME when piece measures approx 1-2-2-1-1-1 cm / ⅜"-¾"-¾"-⅜"-⅜"-⅜" from marker inc 1 st each side, repeat the inc on every 2.5-1.5-1.5-1.5-1-1 cm / ⅞"-½"-½"-½"-⅜"-⅜" a total of 12-15-15-18-21-21 times = 82-88-95-101-107-114 sts. When piece measures 31-31-30-30-28-27 cm / 12¼"-12¼"-11¾"-11¾"-11"-10⅝" from marker (less for the larger sizes because of longer sleeve cap and wider shoulder) bind off for 4 sts each side for sleeve cap and bind off for sleeve cap at the beg of every row: 2 sts 4-5-5-5-4-4 times each side and 1 st 3-3-5-5-11-14 times each side, then bind off 2 sts each side until piece measures 38-39-39-40-40-41 cm / 15"-15¼"-15¼"-15¾"-15¾"-16⅛", now bind off 4 sts each side 1 time, and bind off remaining sts. Piece measures a total of approx 57-58-58-59-59-60 cm / 22½"-22¾"-22¾"-23¼"-23¼"-23⅝". RIGHT SLEEVE: Cast on 58-58-65-65-65-72 sts on needle size 2.5 mm / US 1 with Alpaca. Work rib as follows (first row = RS): 1 edge st, * K3, P4 *, repeat from *-* on 14-14-21-21-21-21 sts, K3, M.2 (= 18 sts), * K3, P4 *, repeat from *-* on the next 21-21-21-21-21-28 sts and 1 edge st. Continue like this up to Arrow-C in M.2. There are now 66-66-73-73-73-80 sts on needle. Change to needle size 3 mm / US 2or3 and continue as follows (from RS): 1 edge st, 17-17-24-24-24-24 stockinette sts, M.2 (= 26 sts), 21-21-21-21-21-28 stockinette sts and 1 edge st. Work 1 vertical repeat of M.2 like this = 58-58-65-65-65-72 sts on needle. Insert a marker, and now measure piece from here. Continue as described for Left Sleeve. ASSEMBLY: Sew shoulder seams. Set in sleeves. Sew sleeve and side seams inside 1 edge st. Sew rib on neck tog mid back and sew to back piece. |
||||||||||||||||||||||||||||||||||
Diagram explanations |
||||||||||||||||||||||||||||||||||
|
||||||||||||||||||||||||||||||||||
 |
||||||||||||||||||||||||||||||||||
 |
||||||||||||||||||||||||||||||||||
Have you finished this pattern?Tag your pictures with #dropspattern #vikingknotssweater or submit them to the #dropsfan gallery. Do you need help with this pattern?You'll find 17 tutorial videos, a Comments/Questions area and more by visiting the pattern on garnstudio.com. © 1982-2026 DROPS Design A/S. We reserve all rights. This document, including all its sub-sections, has copyrights. Read more about what you can do with our patterns at the bottom of each pattern on our site. |
||||||||||||||||||||||||||||||||||


With over 40 years in knitting and crochet design, DROPS Design offers one of the most extensive collections of free patterns on the internet - translated to 17 languages. As of today we count 324 catalogs and 12290 patterns - 12280 of which are translated into English (US/in).
We work hard to bring you the best knitting and crochet have to offer, inspiration and advice as well as great quality yarns at incredible prices! Would you like to use our patterns for other than personal use? You can read what you are allowed to do in the Copyright text at the bottom of all our patterns. Happy crafting!
Post a comment to pattern DROPS 114-8
We would love to hear what you have to say about this pattern!
If you want to leave a question, please make sure you select the correct category in the form below, to speed up the answering process. Required fields are marked *.