
Popular categories
Looking for a yarn?


Comments / Questions (136)
![]() Catherine Gautherot wrote:
Catherine Gautherot wrote:
Pouvez vous me donner les explications pour triciter le col de ce pull. Elles ne figurent pas dans le texte. Merci
27.02.2022 - 14:27DROPS Design answered:
Bonjour, le col se tricote sur le devant droit et gauche. Les explications à ce sujet sont incluses dans leurs sections respectives. Bon tricot!
27.02.2022 - 16:28
![]() Undine wrote:
Undine wrote:
Danke, aber das geht leider an meiner Frage vorbei. Es gibt kein einziges Modell in der Nadelstärke, das geeignet wäre. Schade... Bleib meine Anregung, das Modell zeitnah zu überarbeiten.
26.01.2022 - 09:12
![]() Undine wrote:
Undine wrote:
Ich würde diesen Ausschnitt so gerne für ein Topdown Modell verwenden. Gibt es ein schlichtes mit V-Ausschnitt wozu der Viking Knoten passen würde? Ansonsten meine Anregung, dieses Modell demnächst zu überarbeiten und zu modernisieren. Das wäre toll ;-)
25.01.2022 - 18:13DROPS Design answered:
Liebe Undine, hier finden Sie unsere Modellen für Pullover von oben nach unten mit V-Halsausschnitt, sicher kann Ihnen ein davon inspirieren. Viel Spaß beim stricken!
26.01.2022 - 08:49
![]() Sawnuy wrote:
Sawnuy wrote:
Sehr geehrte Damen, Habe ich richtig verstanden? Nach 9 cm auf beiden Seiten je 1 M. abk. Ist es nicht abnehmen? Vielen Dank
25.11.2021 - 20:40DROPS Design answered:
Liebe Swanuy, ja genau, hier soll man lieber abnehmen. Viel Spaß beim stricken!
26.11.2021 - 07:31
![]() ;artina Kewel wrote:
;artina Kewel wrote:
Ich habe den Pulli nach Anleitung begonnen, aber das Bündchen klappt sich immer nach oben um. Was kann ich tun?
20.03.2021 - 18:35DROPS Design answered:
Liebe Frau Kewel, Sie können den Pullover mit Stecknadeln auf einer geeigneten Unterlage spannen, anfeuchten (z.B. mit einer Sprühflasche für Blumen) und trocknen lassen, danach entfernen Sie die Stecknadeln, dann sollte sich der Rand nicht mehr rollen.
22.03.2021 - 07:54
![]() Y Langbroek wrote:
Y Langbroek wrote:
Ik snap het telpatroon van het voorpand niet. Er staat dat je moet meerderen, maar de volgende regel van het telpatroon geeft niet aan wat je met die vermeerderingen moet doen. Bijvoorbeeld in de 11e naald van het patroon zijn de eerste meerderingen; 3 meerderingen op 5 steken. Het telpatroon gaat dan gewoon door met 5 steken i.p.v. 8. Hoe breid je die extra steken?
22.02.2021 - 18:28DROPS Design answered:
Dag Y Langbroek,
De meerderingen zijn in het telpatroon opgenomen in de vorm van omslagen die je op de volgende naald gedraaid breit (pictogram 3 in de lijst). Op de volgende naald zie je boven de meerderingen lege vakjes, dus deze brei je recht aan de goede kant en averecht aan de verkeerde kant en de omslagen brei je dan dus gedraaid averecht.
23.02.2021 - 12:29
![]() Mrs Traude Graham wrote:
Mrs Traude Graham wrote:
Thank you for your prompt answer! I understand the total length of the jumper. I also understand the numbers on the inside of the vertical black line, except there are two spaces , one above the 15, and one below the 19etc, which I suppose I have to add, and then subtract from the total length and guess how much each is? Another small niggle: I misunderstood what you call "piece" (..when piece measures...); I thought it was the total length, and not the length above the ribbing.
23.10.2020 - 18:11DROPS Design answered:
Dear Mrs Graham, 15 cm applies in all sizes for the decreases (start 7 cm after rib + every 2nd com e total of 5 times = 15 cm) - then you work some cm without decreasing/increasing (first "empty space" then increase 5 times before armhole = 38 to 44 cm - 15-2= there will be 21 - 27 cm after last decrease before cast off for armhole?. Hope this helps. Happy knitting!
26.10.2020 - 07:28
![]() Mrs Traude Graham wrote:
Mrs Traude Graham wrote:
Hi, I am trying to interpret the measurements on the left of the diagram. There are some lines with measurements at the bottom, and at the top, but the two in between have nothing against them. Another difficulty for me : there are 6 sizes, but when it comes to decreases and increasa there are only four number combinations given. Could you please clarify?
23.10.2020 - 16:29DROPS Design answered:
Dear Mrs Graham, the measurements on the very left ie 57 to 68 cm is matching the total height of jumper, then the diferent measurements are matching each different part. If a measurement is not in chart, it might be explained in the written pattern. Which decreases/increases are you talking about? There might be the same number in some size or the same number applying to all sizes, but feel free to give more information so that we can help you and you will be sure. Happy knitting!
23.10.2020 - 16:51
![]() Ale wrote:
Ale wrote:
Buongiorno, Non capisco come va fatta la ripetizione del motivo M2 in verticale nelle maniche. Si passa da 73 a 65 maglie, in che modo? A cosa si riferiscono le 65 maglie? Grazie
14.04.2020 - 12:55DROPS Design answered:
Buongiorno Ale. 65 è il numero di maglie che rimane sui ferri dopo aver lavorato tutto il diagramma M2 in verticale. Il diagramma M2 inizia su 26 maglie e per via delle diminuzioni nel diagramma stesso, finisce su 18 maglie. In questo modo le maglie della manica passano da 73 a 65. Buon lavoro!
14.04.2020 - 14:15
![]() Petra wrote:
Petra wrote:
AFWERKING: Naai de schoudernaden dicht. Naai de mouwen in het lijf. Naai de mouw- en zijnaden dicht in de kant st. *Naai het boord samen middenachter en naai het boord aan de hals van het achterpand.* Ik kan nergens in het patroon iets over een boord vinden!
05.03.2020 - 21:46DROPS Design answered:
Dag Petra,
Bij beide voorpanden heb je, nadat je hebt afgekant voor de schouder, een stukje doorgebreid over 15 steken. Dit is het stukje boord wat bedoeld wordt.
10.03.2020 - 19:43
|
||||||||||||||||||||||||||||||||||
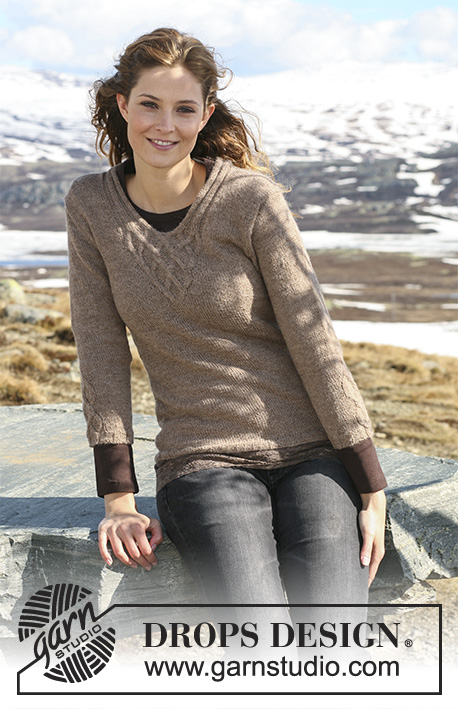
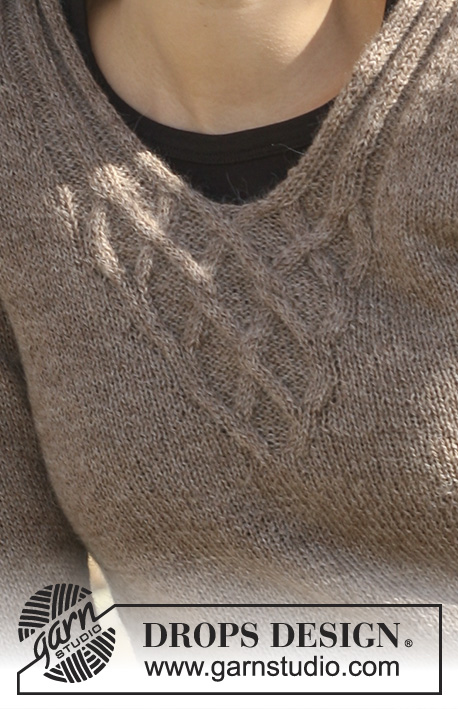
Viking Knots#vikingknotssweater |
||||||||||||||||||||||||||||||||||
 |
 |
|||||||||||||||||||||||||||||||||
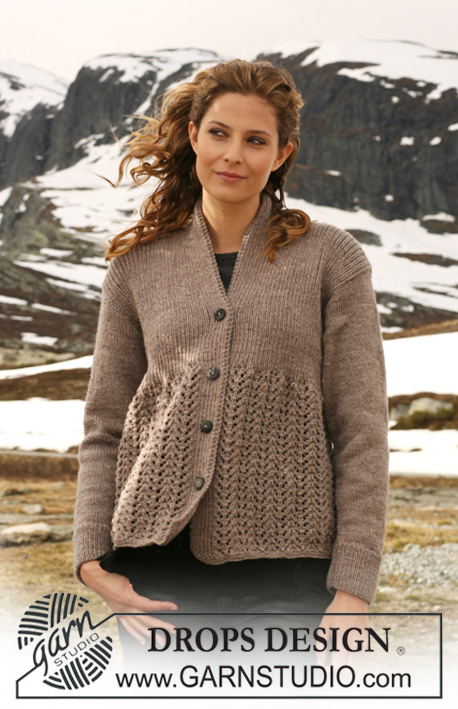
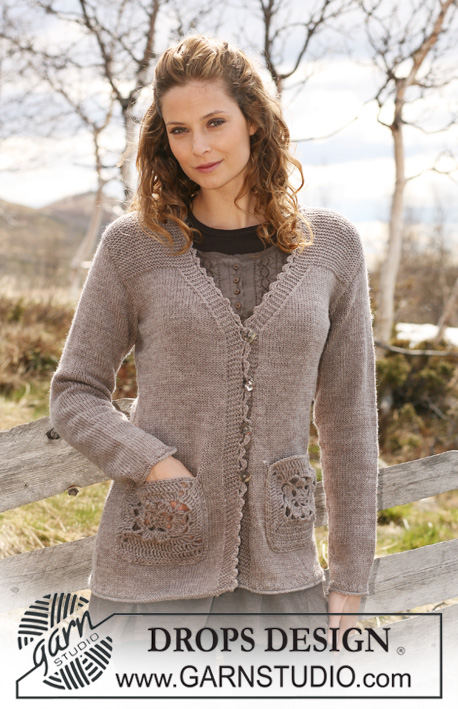
DROPS jumper with cables in ”Alpaca” with 3/4 sleeves or long sleeves. Size S - XXXL.
DROPS 114-8 |
||||||||||||||||||||||||||||||||||
|
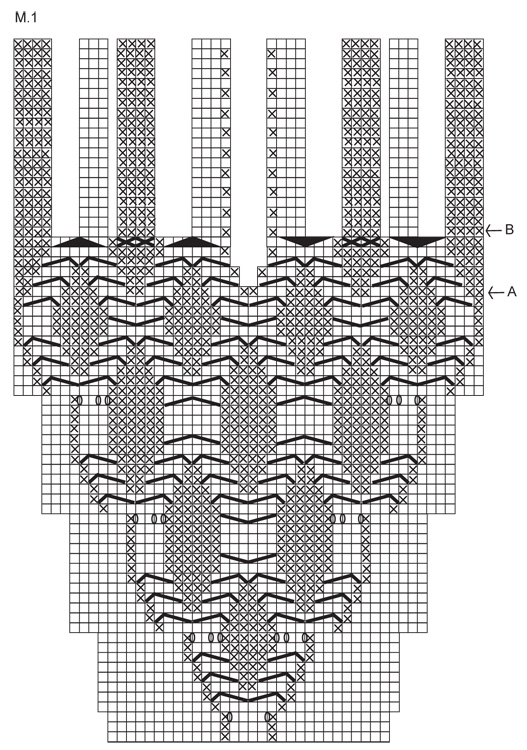
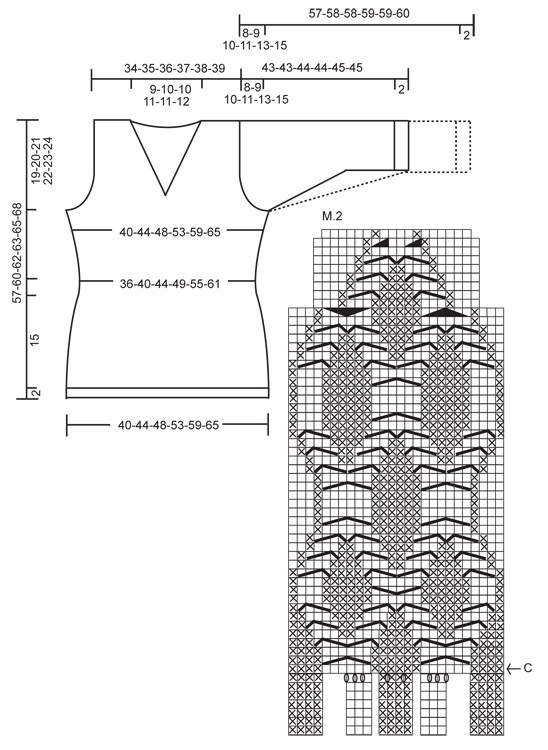
PATTERN: See diagram M.1 and M.2. Diagram shows the pattern from RS. -------------------------------------------------------- -------------------------------------------------------- BACK PIECE: Worked back and forth on needle. Cast on 107-121-135-142-163-177 sts (includes 1 edge st each side) on needle size 2.5 mm / US 1 with Alpaca. Work rib as follows (first row = RS): 1 edge st, * K3, P4 *, repeat from *-* and finish with 1 edge st. When rib measures 2 cm / ¾" K 1 row from RS, AT THE SAME TIME dec 9-13-17-12-19-19 sts evenly = 98-108-118-130-144-158 sts. Change to needle size 3 mm / US 2or3. P 1 row from WS and continue in stockinette st with 1 edge st each side. When piece measures 9 cm / 3½" dec 1 st each side, repeat the dec on every 2 cm / ¾" a total of 5 times = 88-98-108-120-134-148 sts. When piece measures 20-21-21-20-20-21 cm / 8"-8¼"-8¼"-8"-8"-8¼" inc 1 st each side, repeat the inc on every 3-3-3.5-4-4.5-4.5 cm / 1⅛"-1⅛"-1¼"-1½"-1¾"-1¾" a total of 5 times = 98-108-118-130-144-158 sts. When piece measures 38-40-41-41-42-44 cm / 15"-15¾"-16⅛"-16⅛"-16½"-17¼" bind off 4 sts each side for armhole and bind off for armhole each side on every other row: 4 sts 0-0-0-1-1-2 times, 2 sts 2-3-5-6-8-9 times and 1 st 0-2-2-1-2-2 times = 82-84-86-88-92-94 sts. Continue in stockinette st on all sts. When piece measures 54-57-59-60-62-65 cm / 21¼"-22½"-23¼"-23⅝"-24⅜"-25½" bind off the middle 32-34-34-36-38-40 sts for neck and complete each shoulder separately. Bind off 1 st on neckline on every other row 2 times = 23-23-24-24-25-25 sts left on shoulder. Bind off loosely when piece measures 57-60-62-63-65-68 cm / 22½"-23⅝"-24⅜"-24¾"-25½"-26¾". FRONT PIECE: Cast on and work like back piece until piece measures 20-21-21-20-20-21 cm / 8"-8¼"-8¼"-8"-8"-8¼". On next row inc 1 st each side, repeat the inc on every 3-3-3.5-4-4.5-4.5 cm / 1⅛"-1⅛"-1¼"-1½"-1¾"-1¾" a total of 5 times = 98-108-118-130-144-158 sts. Continue in stockinette st with 1 edge st each until piece measures 33-34-35-36-39-40 cm / 13"-13⅜"-13¾"-14¼"-15¼"-15¾". Now continue as follows (from RS): 1 edge st, 33-38-43-49-56-63 stockinette sts, M.1 (= 30 sts), 33-38-43-49-56-63 stockinette sts and 1 edge st. AT THE SAME TIME when piece measures 38-40-41-41-42-44 cm / 15"-15¾"-16⅛"-16⅛"-16½"-17¼" bind off for armhole each side as described for back piece. Continue up to arrow-A in M.1. On next row from RS bind off for neck as follows: work the first 24 sts of M.1, bind off 2 sts (= mid front) and work the remaining 24 sts of M.1 (work remaining sts in stockinette st as before). Insert a marker in piece, and now complete each side separately. LEFT FRONT PIECE: Continue back and forth on needle in stockinette st and M.1 as before – remember to bind off for armhole at the side! AT THE SAME TIME on next row from mid front dec 1 st for neck. Continue to arrow-B in diagram for M.1. Now continue with 15 sts rib as shown in M.1, work remaining sts in stockinette st as before. AT THE SAME TIME dec 1 st for neck inside the 15 sts in rib, and repeat the dec on every 4th row 3-4-4-5-6-7 times = 38-38-39-39-40-40 sts. Continue until piece measures 11-12-12-13-13-14 cm / 4⅜"-4¾"-4¾"-5⅛"-5⅛"-5½" from marker (adjust to length of armhole on back piece). Now bind off 23-23-24-24-25-25 sts from shoulder towards neckline = 15 sts left on needle. Continue back and forth on needle in rib as before on these 15 sts. Bind off loosely with K over K and P over P after approx 7-7-7-8-8-8 cm / 2¾"-2¾"-2¾"-3⅛"-3⅛"-3⅛" (measured from shoulder). RIGHT FRONT PIECE: Like left front piece but mirrored. ASSEMBLY: Sew shoulder seams. 3/4 SLEEVES: Worked back and forth on needle. LEFT SLEEVE: Cast on 65-65-72-72-72-79 sts on needle size 2.5 mm / US 1 with Alpaca. Work rib as follows (first row = RS): 1 edge st, * P4, K3 *, repeat from *-* on 21-21-28-28-28-28 sts, M.2 (= 18 sts), K3, *P4, K3 *, repeat from *-* on the next 21-21-21-21-21-28 sts and 1 edge st. Continue like this up to Arrow-C in M.2. There are now 73-73-80-80-80-87 sts on needle. Change to needle size 3 mm / US 2or3. Continue as follows (from RS): 1 edge st, 21-21-28-28-28-28 stockinette sts, M.2 (= 26 sts), 24-24-24-24-24-31 stockinette sts and 1 edge st. Work 1 vertical repeat of M.2 like this = 65-65-72-72-72-79 sts on needle. Insert a marker, and now measure piece from here. Continue in stockinette st with 1 edge st each side. AT THE SAME TIME when piece measures approx 2 cm / ¾" from marker inc 1 st each side, repeat the inc on every 1.5-1-1-0.5-0.5-0.5 cm / ⅝"-⅜"-⅜"-¼" -¼" -¼" a total of 8-11-11-14-17-17 times = 81-87-94-100-106-113 sts. When piece measures 17-16-16-15-14-12 cm / 6¾"-6¼"-6¼"-6"-5½"-4¾" from marker (less for the larger sizes because of longer sleeve cap and wider shoulder) bind off 4 sts each side. Bind off for sleeve cap at the beg of every row: 2 sts 4-5-5-5-4-4 times each side and 1 st 3-3-5-5-11-14 times each side, then 2 sts each side until piece measures 24-24-25-25-26-26 cm / 9½"-9½"-9¾"-9¾"-10¼"-10¼", now bind off 4 sts each side 1 time, and bind off remaining sts. Piece measures a total of approx 43-43-44-44-45-45 cm / 17"-17"-17¼"-17¼"-17¾"-17¾". RIGHT SLEEVE: Cast on 65-65-72-72-72-79 sts on needle size 2.5 mm / US 1 with Alpaca. Work rib as follows (first row = from RS): 1 edge st, * K3, P4 *, repeat from *-* on 21-21-21-21-21-28 sts, K3, M.2 (= 18 sts), * K3, P4 *, repeat from *-* on the next 21-21-28-28-28-28 sts and 1 edge st. Continue like this up to Arrow-C in M.2. There are now 73-73-80-80-80-87 sts on needle. Change to needle size 3 mm / US 2or3 and continue as follows (from RS): 1 edge st, 24-24-24-24-24-31 stockinette sts, M.2 (= 26 sts), 21-21-28-28-28-28 stockinette sts and 1 edge st. Work 1 vertical repeat of M.2 like this = 65-65-72-72-72-79 sts on needle. Insert a marker, and now measure piece from here. Continue as described for Left Sleeve. LONG SLEEVES: Worked back and forth on needle. LEFT SLEEVE: Cast on 58-58-65-65-65-72 sts on needle size 2.5 mm / US 1 with Alpaca. Work rib as follows (first row = RS): 1 edge st, * P4, K3 *, repeat from *-* on 21-21-21-21-21-28 sts, M.2 (= 18 sts), K3, * P4, K3 *, repeat from *-* on the next 14-14-21-21-21-21 sts and 1 edge st. Continue like this up to Arrow-C in M.2. There are now 66-66-73-73-73-80 sts on needle. Change to needle size 3 mm / US 2or3 and continue as follows (from RS): 1 edge st, 21-21-21-21-21-28 stockinette sts, M.2 (= 26 sts), 17-17-24-24-24-24 stockinette sts and 1 edge st. Work 1 vertical repeat of M.2 like this = 58-58-65-65-65-72 sts on needle. Insert a marker, and now measure piece from here. Continue in stockinette st with 1 edge st each side. AT THE SAME TIME when piece measures approx 1-2-2-1-1-1 cm / ⅜"-¾"-¾"-⅜"-⅜"-⅜" from marker inc 1 st each side, repeat the inc on every 2.5-1.5-1.5-1.5-1-1 cm / ⅞"-½"-½"-½"-⅜"-⅜" a total of 12-15-15-18-21-21 times = 82-88-95-101-107-114 sts. When piece measures 31-31-30-30-28-27 cm / 12¼"-12¼"-11¾"-11¾"-11"-10⅝" from marker (less for the larger sizes because of longer sleeve cap and wider shoulder) bind off for 4 sts each side for sleeve cap and bind off for sleeve cap at the beg of every row: 2 sts 4-5-5-5-4-4 times each side and 1 st 3-3-5-5-11-14 times each side, then bind off 2 sts each side until piece measures 38-39-39-40-40-41 cm / 15"-15¼"-15¼"-15¾"-15¾"-16⅛", now bind off 4 sts each side 1 time, and bind off remaining sts. Piece measures a total of approx 57-58-58-59-59-60 cm / 22½"-22¾"-22¾"-23¼"-23¼"-23⅝". RIGHT SLEEVE: Cast on 58-58-65-65-65-72 sts on needle size 2.5 mm / US 1 with Alpaca. Work rib as follows (first row = RS): 1 edge st, * K3, P4 *, repeat from *-* on 14-14-21-21-21-21 sts, K3, M.2 (= 18 sts), * K3, P4 *, repeat from *-* on the next 21-21-21-21-21-28 sts and 1 edge st. Continue like this up to Arrow-C in M.2. There are now 66-66-73-73-73-80 sts on needle. Change to needle size 3 mm / US 2or3 and continue as follows (from RS): 1 edge st, 17-17-24-24-24-24 stockinette sts, M.2 (= 26 sts), 21-21-21-21-21-28 stockinette sts and 1 edge st. Work 1 vertical repeat of M.2 like this = 58-58-65-65-65-72 sts on needle. Insert a marker, and now measure piece from here. Continue as described for Left Sleeve. ASSEMBLY: Sew shoulder seams. Set in sleeves. Sew sleeve and side seams inside 1 edge st. Sew rib on neck tog mid back and sew to back piece. |
||||||||||||||||||||||||||||||||||
Diagram explanations |
||||||||||||||||||||||||||||||||||
|
||||||||||||||||||||||||||||||||||
 |
||||||||||||||||||||||||||||||||||
 |
||||||||||||||||||||||||||||||||||
Have you finished this pattern?Tag your pictures with #dropspattern #vikingknotssweater or submit them to the #dropsfan gallery. Do you need help with this pattern?You'll find 17 tutorial videos, a Comments/Questions area and more by visiting the pattern on garnstudio.com. © 1982-2026 DROPS Design A/S. We reserve all rights. This document, including all its sub-sections, has copyrights. Read more about what you can do with our patterns at the bottom of each pattern on our site. |
||||||||||||||||||||||||||||||||||


With over 40 years in knitting and crochet design, DROPS Design offers one of the most extensive collections of free patterns on the internet - translated to 17 languages. As of today we count 324 catalogs and 12290 patterns - 12280 of which are translated into English (US/in).
We work hard to bring you the best knitting and crochet have to offer, inspiration and advice as well as great quality yarns at incredible prices! Would you like to use our patterns for other than personal use? You can read what you are allowed to do in the Copyright text at the bottom of all our patterns. Happy crafting!
Post a comment to pattern DROPS 114-8
We would love to hear what you have to say about this pattern!
If you want to leave a question, please make sure you select the correct category in the form below, to speed up the answering process. Required fields are marked *.