
Popular categories
Looking for a yarn?


Comments / Questions (13)
![]() Alex wrote:
Alex wrote:
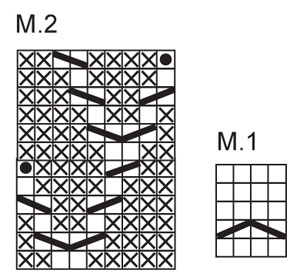
With the M1 and M2 patterns please can you just confirm to me that the pattern M1 goes over 5 rows (so the blanks are all K) and the only change is in row 2 where you have the slip 2 sts on needle behind piece, k2 k2 from needle and that M2 pattern is 12 rows long?
08.03.2018 - 15:34DROPS Design answered:
Dear Alex, that's right, M.1 is worked over 4 sts and 5 rows. On round 2 work 3rd symbol, ie: slip 2 sts on cable needle in front of piece, K2, K2 from cable needle. M.2 is 12 rows. Happy knitting!
08.03.2018 - 15:41
![]() Alex wrote:
Alex wrote:
Hi, sorry for being a bit dumb, but I am fairly new, is the M1 pattern an invisible stitch increase please. And the M2, I am very confused about, I looked on you tube, can you direct me to videos please
08.03.2018 - 14:59DROPS Design answered:
Dear Alex, start reading diagrams from the bottom corner on the right side towards the left on every round. You will find related videos showing each technique for the cables in the diagram. In round 2 in M.1 work: slip 2 sts on cable needle in front of piece, K2, K2 from cable needlee. Read M.2 the same way checking each symbol under diagram key. Happy knitting!
08.03.2018 - 15:38
![]() Cora W. wrote:
Cora W. wrote:
Soll beim Stricken der Abnahmen der Mütze (ab 24cm Länge) pro Runde je eine Abnahme in M1 erfolgen oder sollen alle Abnahmen in einer Runde erfolgen und dann bis zu einer Länge von 27cm weiter gestrickt werden? Vielen Dank!
05.12.2017 - 10:53DROPS Design answered:
Liebe Cora, nach 24 cm nehmen Sie die Maschen in M.1 ab, dh die 4 M in M.1 so stricken: (2 M rechts zusammen x 2) = 2 M werden in jedem M.1 abgenommen, dh 8 M werden insgesamt abgenommen = 46-50 M bleiben noch. Die Maschen dann weiter stricken wie sie erscheinen, und nach 27 cm, 1 Rd rechts stricken und alle Maschen (2 M rechts zs) stricken. Viel Spaß beim stricken!
05.12.2017 - 11:26
![]() PATRICIA wrote:
PATRICIA wrote:
Bonjour, Je trouve les explications incompréhensibles à partir du rang 6 avec M1/M2. Ce n'est pas clair.
05.09.2016 - 18:03DROPS Design answered:
Bonjour Patricia, quand vous tricotez M.1 et M.2, répétez les diagrammes en hauteur, c'est-à-dire que quand M.1 est terminé, reprenez au 1er rang de M.1 et continuez M.2 - quand M.2 est terminé 1 fois en hauteur, reprenez au 1er rang, et continuez M.1 comme avant, et ainsi de suite. Bon tricot!
06.09.2016 - 08:43
![]() Agnes wrote:
Agnes wrote:
Hei! I flettene over to masker strikkes det 1m rett,1 maske vrang med hjelpepinne. I videoene om hvordan strikke flette uten hjelpepinne, strikkes det kun rettmasker. Hva skal jeg bruke i oppskriften? Ser en forskjell? Jeg har problemer med å strikke vrang på grunn av maskenes plassering, når jeg strikker flette over to masker uten hjelpepinne. hva skal jeg gjøre?
25.04.2016 - 17:23DROPS Design answered:
Hej Agnes. Videoen er en standard der viser hvordan du fletter. Du skal fölge mönstret som det staar: sett 2 m på hj.p foran arb, strikk 2 rett, strikk 2 rett fra hj.p, sett 1 m på hj.p bak arb, 1 r, 1 vr fra hj.p og sett 1 m på hj.p foran arb, 1 vr 1 r fra hj.p.
26.04.2016 - 13:54
![]() Carol Crosbie wrote:
Carol Crosbie wrote:
What is the direction for the V symbol in the graph? The upside down V is the cable, but there is not a definition in the above legend for the V. Thanks
14.11.2012 - 00:42DROPS Design answered:
Dear Mrs Crosbie, there are 2 symbols : \ and / which are forming this "V". Happy Knitting!
14.11.2012 - 09:22
![]() Drops Design France wrote:
Drops Design France wrote:
Bonjour Sylvie, le diagramme est juste tel qu'il est présenté. Pour toute aide, n'hésitez pas à demander à votre distributeur ou à vous adresser sur le forum DROPS.
03.10.2011 - 09:06Sylvie wrote:
Je n'arrive pas à remproduire ce patron tel que demandé. Y'a-t-il un erreur dans ce patron?
02.10.2011 - 05:09
![]() Marie-Louise wrote:
Marie-Louise wrote:
Modèle très agréable à tricoter et qui monte vite
05.11.2009 - 16:13
![]() Elisabeth wrote:
Elisabeth wrote:
Rigtig flot Eskimo er bestemt noget lækkert garn at strikke med
30.06.2009 - 06:17
|
|||||||||||||||||||
Winter Bloom |
|||||||||||||||||||
|
|
|||||||||||||||||||
Set comprises: Knitted DROPS hat and wrist warmers with cables in ”Snow”.
DROPS 116-41 |
|||||||||||||||||||
|
HAT: PATTERN: See diagram M.1 and M.2 Worked in the round on double pointed needles. Cast on 62-66 sts on double pointed needles size 8 mm / US 11 with Snow. Continue as follows: * K4, P2-3, K2, P3, K2, P4-5, K4, P2, K2, P2, K2, P2 *, repeat from *-* until piece measures 4 cm / 1½" (= 2 times). Continue as follows: M.1 (= 4 sts), P2-3, M.2 (= 9 sts), P2-3, M.1, P10, M.1, P2-3, M.2, P2-3, M.1, P10. Continue in pattern like this, AT THE SAME TIME when piece measures 17 cm / 6¾" dec 1 st in each P10-section, and repeat the dec on every 2 cm / ¾" a total of 4 times (dec at the beg and the end of P-section alternately) = 54-58 sts. When piece measures 24 cm / 9½" K2 tog on all sts in all repeats of M.1 = 46-50 sts. When piece measures 27 cm / 10⅝" K2 tog all the way round = 23-25 sts. Pull thread through remaining sts and fasten. ---------------------------------------------------------- WRIST WARMERS: PATTERN: See diagram M.1 and M.2 Worked in the round on double pointed needles. Cast on 27 sts on double pointed needles size 8 mm / US 11 with Snow. Continue as follows: K4, P3, K2, P3, K2, P5, K4, P4 until piece measures 4 cm / 1½". Now continue as follows: M.1 (= 4 sts), P3, M.2 (= 9 sts), P3, M.1, P4. Continue in pattern like this until piece measures 20 cm / 8", and now continue as follows: K4, P3, K2, P3, K2, P5, K4, P4. Bind off with K over K and P over P when piece measures 24 cm / 9½". |
|||||||||||||||||||
Diagram explanations |
|||||||||||||||||||
|
|||||||||||||||||||
 |
|||||||||||||||||||
Have you finished this pattern?Tag your pictures with #dropspattern or submit them to the #dropsfan gallery. Do you need help with this pattern?You'll find 12 tutorial videos, a Comments/Questions area and more by visiting the pattern on garnstudio.com. © 1982-2026 DROPS Design A/S. We reserve all rights. This document, including all its sub-sections, has copyrights. Read more about what you can do with our patterns at the bottom of each pattern on our site. |
|||||||||||||||||||


With over 40 years in knitting and crochet design, DROPS Design offers one of the most extensive collections of free patterns on the internet - translated to 17 languages. As of today we count 324 catalogs and 12290 patterns - 12280 of which are translated into English (US/in).
We work hard to bring you the best knitting and crochet have to offer, inspiration and advice as well as great quality yarns at incredible prices! Would you like to use our patterns for other than personal use? You can read what you are allowed to do in the Copyright text at the bottom of all our patterns. Happy crafting!
Post a comment to pattern DROPS 116-41
We would love to hear what you have to say about this pattern!
If you want to leave a question, please make sure you select the correct category in the form below, to speed up the answering process. Required fields are marked *.