
Popular categories
Looking for a yarn?


Comments / Questions (46)
![]() Gunilla wrote:
Gunilla wrote:
Kan mönstret andras till en jumper
03.01.2019 - 08:30DROPS Design answered:
Hei Gunilla. Se svar over
03.01.2019 - 09:19
![]() Anna wrote:
Anna wrote:
Jag behöver hjälp! Vad betyder: ” 4 m 1-1-1-1-2-2 ggr, 3 m 0-0-1-2-3 ggr” osv när det gäller avmaskning för ärmhål? /nybörjaren
05.12.2017 - 18:12DROPS Design answered:
Hej Anna, Börja med att markera den str du stickar genom hela mönstret. Du maskar av 4 m 1 gång om du stickar en av de första 4 str eller 2 ggr om du stickar en av de 2 största str. Sedan 3m 1(L) eller 2m(XL+XXL) eller 3m(XXXL).
06.12.2017 - 13:49
![]() Christel wrote:
Christel wrote:
Bei mir klappt das untere Bündchen (Krausrippe) nach oben. Was kann ich nach dem Zusammen nähen noch dagegen tun ?
04.07.2017 - 23:53DROPS Design answered:
Liebe Christel, Sie können die Jacke mit Stecknadeln auf einer geeigneten Unterlage spannen, anfeuchten (z.B. mit einer Sprühflasche für Blumen) und trocknen lassen, danach entfernen Sie die Stecknadeln, dann sollte sich der Rand nicht mehr nach oben klappen. Viel Spaß beim stricken!
05.07.2017 - 08:37
![]() Kerstin Gustafsson wrote:
Kerstin Gustafsson wrote:
Hej. Jag skulle vilja sticka 111-18 men förlänga ärmarna till lång ärm. Vill sticka en kofta nerifrån o upp med isydd ärm i enkel slätstickning och 111-18 är det närmaste jag kommer. Fungerar det att göra så tror ni?
02.08.2016 - 16:30DROPS Design answered:
Hej Kerstin. Det tror jeg sagtens du kan. God fornöjelse
01.09.2016 - 12:57
![]() Anita Ludvigsen wrote:
Anita Ludvigsen wrote:
Hej! Jag har stickat modell 111-18, en kofta med 3/4 ärm och är mycket nöjd med den. Jag skulle vilja sticka en till, men med lång ärm. Har ni något förslag på beskrivning till en lång ärm? Med vänlig hälsning Anita Ludvigsen
12.01.2016 - 11:31DROPS Design answered:
Hej. Om du använder vår sökmotor på första sidan och skriver in "kofta" som sökord och söker i kategorin "Dam" och garn "Alpaca" så får du upp alla koftor gjorda i alpaca till dam, där hittar du helt säkert någon! Lycka till!
12.01.2016 - 11:53
![]() Christina wrote:
Christina wrote:
Jeg har problemer med ærmegabet i str. S, når man skal tage 3 masker ind, skal man ved str. S ikke tage ind, strikker man så bare uden at tage ind, eller springer man til næste gang man skal tage ind?
31.08.2015 - 17:21DROPS Design answered:
Hej Christina. Du hopper over baade de 3 og de 2 masker og gaar direkte videre med at lukke 1 m af 3 gangen.
02.09.2015 - 17:00
![]() Barbara wrote:
Barbara wrote:
Hallo, Ich habe ein Problem bei den Ärmeln, wenn ich wie angegeben abnehme, sind sie zu kurz und am Ende sind keine Maschen mehr da, so dass ch nicht auf die anggebene Länge von 41 cm komme, obwohl die Maße bei den anderen Teilen stimmten. Wo könnte mein Fehler liegen? Danke
10.08.2015 - 21:44DROPS Design answered:
Liebe Barbara, welche Größe stricken Sie?
16.08.2015 - 18:44
![]() Mathilde wrote:
Mathilde wrote:
Bonjour, Je suis maintenant bloquée sur les manches au moment de rabattre. Il est noté dans les explications pour la taille M : "6 fois 1, puis 2 m". Cela veut-il dire que je dois uniquement rabattre 2 mailles ou réaliser 6 fois 2 mailles ? De plus, pourriez-vous m'indiquer le nombre de mailles qu'il doit me rester lorsque je dois rabattre toutes les mailles restantes ? Un grand merci pour votre aide. Bonne journée
27.07.2015 - 09:36DROPS Design answered:
Bonjour Mathilde, pour les manches en taille M, on rabat 1 x 4 m, 3 x 2 m, 6x 1 m puis on rabat 2 m de chaque côté jusqu'à ce que la manche mesure 41 cm de hauteur totale (le nombre de rangs/de mailles rabattues dépendra de votre tension en hauteur), rabattez ensuite 1 fois 3 m de chaque côté puis les mailles restantes au rang suivant. Bon tricot!
27.07.2015 - 17:59
![]() Mathilde wrote:
Mathilde wrote:
Un grand merci pour votre réponse ! Je me suis rendue compte de mon erreur car j'ai mal lu la version imprimée. Avec toutes mes excuses.
23.06.2015 - 19:58
![]() Mathilde wrote:
Mathilde wrote:
Bonjour, Dans les explications du devant gauche du gilet, je dois former les emmanchures comme le dos. Néanmoins, les emmanchures pour la taille M : 1x 4m, 1x 3m, 2x 2m, 3x 1m = 14 mailles. Ainsi, je ne tombe pas sur les 52m restantes mais 49m. Faut-il que je retire les 3x 1m de l'emmenchures ? Merci de votre coup de pouce. Je ne sais pas trop comment gérer cette partie.
22.06.2015 - 23:32DROPS Design answered:
Bonjour Mathilde, en taille M, on rabat pour les emmanchures: 1 fois 4 m, (0 fois 3 m), 2 fois 2 m et 3 fois 1 m soit un total de 11 m. On a 63 m pour le devant droit - 11 m pour l'emmanchure = 52 m. Bon tricot!
23.06.2015 - 10:08
|
|
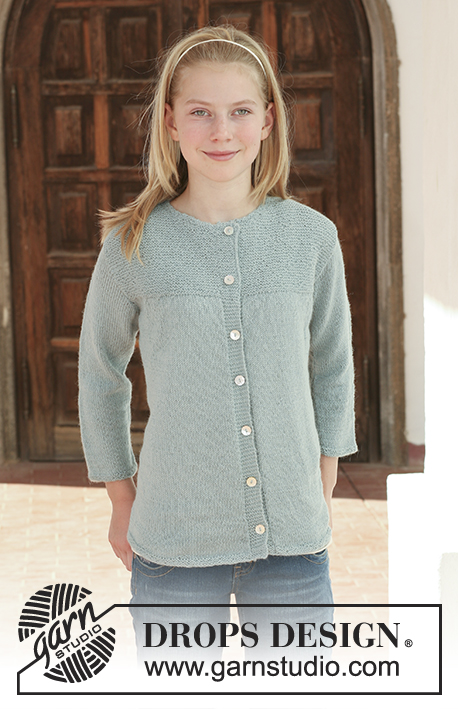
Quiet Lake#quietlakecardigan |
|
|
|
|
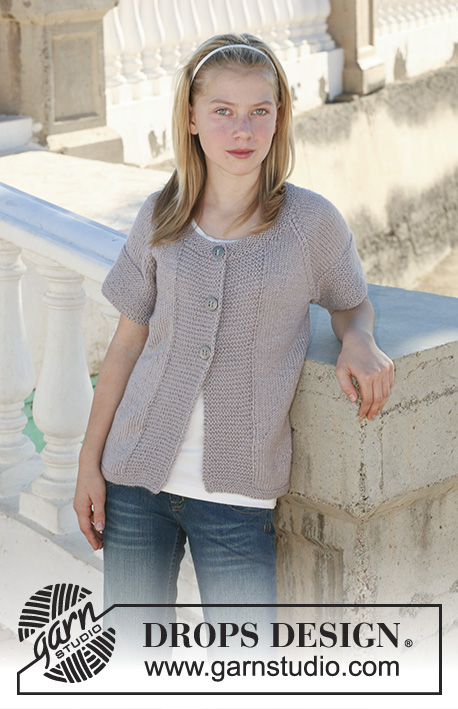
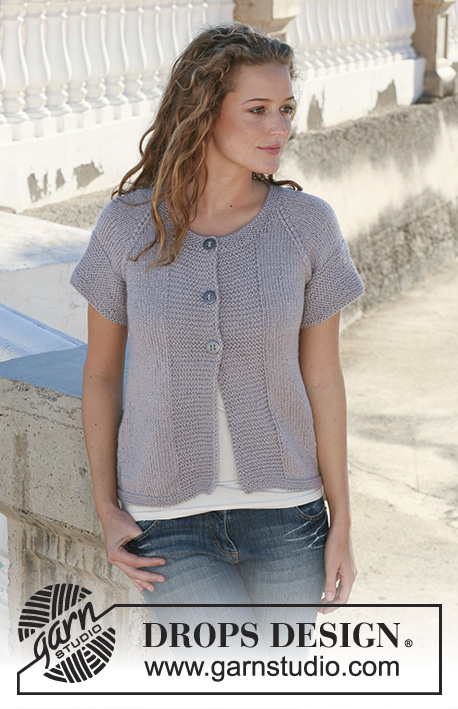
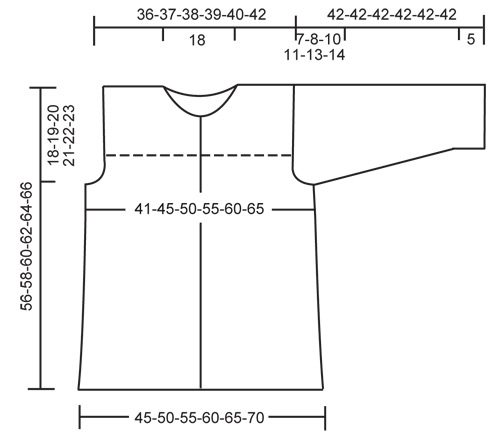
DROPS jacket with 3/4 sleeves in ”Alpaca”. Size S - XXXL.
DROPS 111-18 |
|
|
GARTER ST (back and forth on needle): K all rows. BUTTONHOLES: Make buttonholes on right front band. 1 buttonhole = bind off 4th and 5th st from mid front and cast on 2 new sts on return row. Make buttonholes when piece measures: SIZE S: 5, 13, 20, 28, 35 and 43 cm / 2",5⅛",8",11",13¾" and 17". SIZE M: 5, 13, 21, 29, 37 and 45 cm / 2",5⅛",8¼",11⅜",14½" and 17¾" SIZE L: 6, 14, 22, 30, 38 and 46 cm / 2⅜",5½",8¾",11¾",15" and 18". SIZE XL: 6, 15, 23, 32, 40 and 48 cm / 2⅜",6",9",12½",15 ¾" and 19". SIZE XXL: 6, 15, 24, 33, 41 and 49 cm / 2⅜",6",9½",13",16⅛" and 19¼", SIZE XXXL: 6, 15, 24, 33, 42 and 51 cm / 2⅜",6",9½",13",16½" and 20", NOTE: The last buttonhole is made on neckline. ---------------------------------------------------------- ---------------------------------------------------------- BACK PIECE: Worked back and forth on needle. Cast on 112-122-134-146-158-170 sts (includes 1 edge st each side) on needle size 3 mm / US 2or3 with Alpaca. Work 6 rows garter st – see above – and continue in stockinette st. REMEMBER THE KNITTING GAUGE! When piece measures 6 cm / 2⅜" dec 1 st on each side and repeat the dec on every 5 cm / 2" a total of 6 times = 100-110-122-134-146-158 sts. When piece measures 38-39-40-41-42-43 cm / 15-15¼"-15¾"-16⅛"-16½" bind off for armhole each side at the beg of every row: 4 sts 1-1-1-1-2-2 times, 3 sts 0-0-1-2-2-3 times, 2 sts 0-2-2-3-3-3 times and 1 st 3-3-4-4-5-6 times = 86-88-92-94-96-100 sts. When piece measures 42-44-46-48-50-52 cm / 16½"-17¼"-18"-19"-19¾"-20½" dec 4 sts evenly on row = 82-84-88-90-92-96 sts. Now complete piece in garter st. When piece measures 54-56-58-60-62-64 cm / 21¼"-22"-22¾"-23⅝"-24⅜"-25¼" bind off the middle 38 sts for neck and complete each shoulder separately. Bind off on every row from neckline: 1 st 2 times = 20-21-23-24-25-27 sts left on shoulder. Bind off when piece measures 56-58-60-62-64-66 cm / 22"-22¾"-23⅝"-24⅜"-25¼"-26". LEFT FRONT PIECE: Worked back and forth on needle. Cast on 64-69-75-81-87-93 sts (includes 1 edge st at the side and 8 front band sts towards mid front) on needle size 3 mm / US 2or3 with Alpaca. Work 6 rows garter st and continue in stockinette st with 8 front band sts towards mid front in garter st. When piece measures 6 cm / 2⅜" dec at the side as described for back piece = 58-63-69-75-81-87 sts. When piece measures 38-39-40-41-42-43 cm / 15-15¼"-15¾"-16⅛"-16½" bind off for armhole at the side as described for back piece = 51-52-54-55-56-58 sts. When piece measures 42-44-46-48-50-52 cm / 16½"-17¼"-18"-19"-19¾"-20½" dec 3 sts evenly on row (do not dec on front band) = 48-49-51-52-53-55 sts. Now complete piece in garter st on all sts, but to mark the front band P the 9th st from mid front on every row. When piece measures 50-52-54-55-57-59 cm / 19¾"-20½"-21¼"-21⅝"-22½"-23¼" slip 16 sts towards mid front on a stitch holder for neck and bind off to shape the neckline at the beg of every row from mid front: 2 sts 3 times and 1 st 6 times = 20-21-23-24-25-27 sts left on shoulder. Bind off when piece measures 56-58-60-62-64-66 cm / 22"-22¾"-23⅝"-24⅜"-25¼"-26". RIGHT FRONT PIECE: Like left front piece, but mirrored, and remember BUTTONHOLES – see above. SLEEVE: Worked back and forth on needle. Cast on 58-60-62-64-66-68 sts (includes 1 edge st each side) on needle size 3 mm / US 2or3 with Alpaca. Work 6 rows garter st and continue in stockinette st. When piece measures 5 cm / 2" inc 1 st each side, and repeat the inc on every 10-8-7-6-5-4 row a total of 10-12-13-15-16-18 times = 78-84-88-94-98-104 sts. When piece measures 35-34-32-31-29-28 cm / 13¾"-13⅜"-12½"-12¼"-11⅜"-11" – less for the larger sizes because of longer sleeve cap and wider shoulder - bind off for sleeve cap each side at the beg of every row: 4 sts 1 time, 2 sts 3 times, 1 st 5-6-10-12-15-17 times, then 2 sts each side until piece measures 41 cm / 16⅛", now bind off 3 sts each side 1 time and bind off remaining sts. Piece measures approx 42 cm / 16½". ASSEMBLY: Sew shoulder seams. NECKLINE: Pick up approx 110 to 120 sts round neckline (incl sts on stitch holders mid front) on needle size 3 mm / US 2or3 with Alpaca. K 5 rows, AT THE SAME TIME on row 2 make 1 buttonhole in line with the others on front band. Bind off loosely after 5 rows. FURTHER ASSEMBLY: Set in sleeves. Sew side and sleeve seams inside 1 edge st. Sew on buttons. |
|
 |
|
Have you finished this pattern?Tag your pictures with #dropspattern #quietlakecardigan or submit them to the #dropsfan gallery. Do you need help with this pattern?You'll find 18 tutorial videos, a Comments/Questions area and more by visiting the pattern on garnstudio.com. © 1982-2026 DROPS Design A/S. We reserve all rights. This document, including all its sub-sections, has copyrights. Read more about what you can do with our patterns at the bottom of each pattern on our site. |


With over 40 years in knitting and crochet design, DROPS Design offers one of the most extensive collections of free patterns on the internet - translated to 17 languages. As of today we count 325 catalogs and 12298 patterns - 12288 of which are translated into English (US/in).
We work hard to bring you the best knitting and crochet have to offer, inspiration and advice as well as great quality yarns at incredible prices! Would you like to use our patterns for other than personal use? You can read what you are allowed to do in the Copyright text at the bottom of all our patterns. Happy crafting!
Post a comment to pattern DROPS 111-18
We would love to hear what you have to say about this pattern!
If you want to leave a question, please make sure you select the correct category in the form below, to speed up the answering process. Required fields are marked *.