
Popular categories
Looking for a yarn?


Comments / Questions (207)
![]() Anne-Line wrote:
Anne-Line wrote:
Hello! I am knitting size L and doing the left front. At 39 cm I am supposed to increase for the collar every 4th row 9 times. I will then have 45 stitches. In my head it must be 49 stitches, am I thinking wrong? Best regards, Anne-Line
23.02.2024 - 13:47DROPS Design answered:
Dear Anne-Line, remember to cast off for armhole on the side as for back piece, ie cast off at the beginning of every row from armhole 2 sts 2 times + 1 stitch 1 time = 5 sts are cast off, so that you have: 41 sts - 5 sts cast off for armhole + 9 sts increased for collar = 45 sts. Happy knitting!
23.02.2024 - 14:09
![]() Anne-Line wrote:
Anne-Line wrote:
Hej! Jag stickar storlek L och är nu på vänster framstycke och har 41 m. Det står att jag skall öka för krage innanför 2 m vart 4e varv 9 gånger. Jag skall då få totalt 45 m. Jag får inte det att stämma. Om jag ökar 1 m 9 gånger så borde jag få 49 m.... Tänker jag fel? Med vänliga hälsnignar, Anne-Line
22.02.2024 - 13:17DROPS Design answered:
Hei Anne-Line. Husk du skal også felle til ermhull som du gjorde på bakstykket. Slik står det i oppskriften: Det avm i sidan för ärmhål som på bakst. Altså til ermhull felles det 5 masker = 41 - 5 = 36 masker, mens det økes til krage 1 maske 9 ganger = 9 masker + 36 masker = 45 masker. mvh DROPS Design
26.02.2024 - 14:00
![]() Ingeborg wrote:
Ingeborg wrote:
Zou de naam van de kleuren die gebruikt worden in dit patroon aangepast kunnen worden naar de kleurnamen die op dit moment gebruikt worden? Dit voorkomt verwarring :) Alvast bedankt!
15.12.2023 - 14:08DROPS Design answered:
Dag Ingeborg,
Het is aangepast hoor, dankjewel voor het doorgeven en veel breiplezier!
15.12.2023 - 19:41
![]() Mireille wrote:
Mireille wrote:
Bonjour. Conseillez vous de tricoter la 1ère maille des rangs pour ce modèle ?
13.03.2023 - 23:04DROPS Design answered:
Bonjour Mirelle, les 2 premières mailles du dos/des devants (côté ouverture du gilet) se tricotent au point de riz, avec 4 fils (pour plus de maintien) - cette vidéo montre cette technique avec 2 fils (le reste des mailles étant tricoté avec 1 seul fil), procédez de la même façon avec 4 fils pour les 2 premières/dernières mailles des deux devants et tricotez les mailles restantes avec 2 fils. Bon tricot!
14.03.2023 - 10:05
![]() Gerda wrote:
Gerda wrote:
Klopt het dat ik al knoopsgaten moet breien terwijl ik nog met het eerste gedeelte bezig ben? Bij voorpand staat:denk om de knoopsgaten, maar die brei je toch al veel eerder? Bij cm 26 en 34 cm en dat is voordat je bij de armsgaten bent. Klopt dit?
08.02.2023 - 10:45DROPS Design answered:
Dag Gerda,
De knoopsgaten brei je in het rechter voorpand. Bij het rechter voorpand staat dat je deze hetzelfde breit als het linker voorpand, maar dan met knoopsgaten. (Je breit knoopsgaten op de hoogtes zoals aangegeven in jouw maat.) Dus ik begrijp eigenlijk je vraag niet.
08.02.2023 - 11:10
![]() Fulvia Avalle wrote:
Fulvia Avalle wrote:
Relativamente al modello 112 - 4 Pearl of the fall: Non riesco a capire se le due maglie di vivagno da lavorare con filato doppio sono a legaccio o a grana di riso. Mi sembra che siano a grana di riso, ma allora come si fa a mantenere la sequenza corretta di dritti e rovesci nella riga successiva? Grazie
14.11.2022 - 23:39DROPS Design answered:
Buonasera Fulvia, le 2 maglie di vivagno all'inizio si lavorano a legaccio come il bordo e poi a grana di riso come indicato. Buon lavoro!
15.11.2022 - 22:03
![]() Annie Hartvig Pedersen wrote:
Annie Hartvig Pedersen wrote:
Check lige garnforbrug - kan det virkelig passe med 22 ngl alpaca i næst største str? Synes det lyder mere rimeligt med halvdelen ?
27.05.2022 - 19:50DROPS Design answered:
Hei Annie. Husk det skal strikkes med dobbelt tråd, 1 tråd av hver farge. Ved perlestrikk vil det være et litt høyere garnforbruk enn om det bare er glattstrikket. mvh DROPS Design
30.05.2022 - 09:02
![]() Ekaterina wrote:
Ekaterina wrote:
Hello! Can you help me to understand : in collar , increase in each side of 3 markets =6 new sts? Are Every 2 new sts near or one st between there?
15.04.2022 - 16:43DROPS Design answered:
Dear Ekaterina, you increase 1 st at each side of the 3 markers. Work 1 YO before the stitch with the marker, work the stitch with the markerstitch, 1 YO after the stitch with the markerstitch. Happy knitting!
15.04.2022 - 19:48
![]() Mankonelo wrote:
Mankonelo wrote:
Hi, Are the increases on either side of the three markers on the collar a once off? Thanx
15.11.2021 - 14:42DROPS Design answered:
Dear Mankonelo, correct, the increases at the 3 markers are worked only one time on collar, then you continue over all stitches to the required length. Happy knitting!
16.11.2021 - 08:21
![]() Astrid Strijbos wrote:
Astrid Strijbos wrote:
Ik wil dit patroon op gewone rechte naalden breien. Kan dat? Ik kan helaas niet zoeken op de site op breien met rechte naalden. Ik zie veel rondbreinaalden.
08.09.2021 - 14:49DROPS Design answered:
Dag Astrid,
Dit patroon kun je inderdaad wel met rechte naalden breien. Er moeten dan wel een paar aanpassingen gedaan worden. Om een patroon aan te passen om op rechte naalden te breien hebben we een instructie gemaakt. Deze vind je hier.
12.09.2021 - 18:02
|
|
Pearl of the Fall#pearlofthefallcardigan |
|
|
|
|
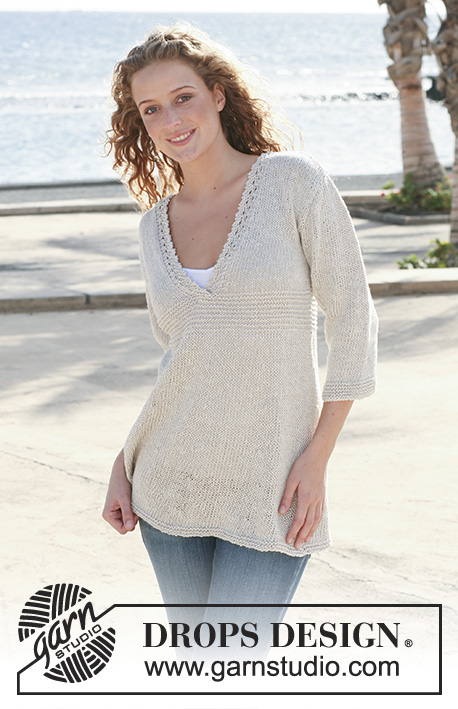
DROPS jacket in seed st in ”Alpaca” with collar. Size S - XXXL.
DROPS 112-4 |
|
|
GARTER ST (back and forth on needle): K all rows. GARTER ST (in the round): K 1 round, P 1 round. SEED ST: Row 1: * K1, P1 *, repeat from *-*. Row 2: K over P and P over K. Repeat 2nd row. INCREASING TIP: Inc 1 st by making 1 YO. On return row work YO into back of loop to avoid a hole. BUTTONHOLES: Make buttonholes on right front band. Buttonhole = bind off 3rd and 4th st from mid front and cast on 2 new sts on return row. Make buttonholes when piece measures: SIZE S: 24 and 32 cm / 9½" and 12½". SIZE M: 26 and 34 cm / 10¼" and 13⅜". SIZE L: 28 and 36 cm / 11" and 14¼". SIZE XL: 30 and 38 cm / 11¾" and 15". SIZE XXL: 32 and 40 cm / 12½" and 15¾". SIZE XXXL: 34 and 42 cm/13⅜" and 16½". -------------------------------------------------------- JACKET: Worked back and forth on circular needle from mid front. Cast on 136-148-160-176-196-216 sts on circular needle size 5.5 mm / US 9 with 1 thread of each color. Work 6 rows garter st – SEE ABOVE - AT THE SAME TIME work 2 sts each side in 2 threads of each color(= 4 threads) for a firmer edge. Insert 2 markers in piece, 37-40-43-47-52-57 sts in from each side (back piece = 62-68-74-82-92-102 sts). Continue in seed st – SEE ABOVE – on all sts (continue to work 2 sts each side in 4 threads until finished measurements). REMEMBER THE KNITTING GAUGE! When piece measures 8 cm / 3⅛" dec 1 st on each side of both markers and repeat the dec when piece measures 15 cm / 6" = 128-140-152-168-188-208 sts. Continue in seed st. When piece measures 22 cm / 8¾" inc 1 st on each side of both markers and repeat the inc on every 4-4-4.5-5-5.5-6 cm / 1½"-1½"-1¾"-2"-2¼"-2⅜" a total of 3 times = 140-152-164-180-200-220 sts. When piece measures 35-36-37-38-39-40 cm / 13¾"-14¼"-14½"-15"-15¼"-15¾" bind off 6 sts each side for armhole (= 3 sts on each side of both markers) and now complete each piece separately. BACK PIECE: = 58-64-70-78-88-98 sts. bind off to shape the armhole each side at the beg of every row: 2 sts 0-1-2-3-5-7 times and 1 st 0-0-1-2-2-2 times = 58-60-60-62-64-66 sts. When piece measures 54-56-58-60-62-64 cm / 21¼"-22"-22¾"-23⅝"-24⅜"-25¼" bind off the middle 12-14-16-18-18-20 sts for neck and bind off 1 st on neckline on next row = 22-22-21-21-22-22 sts left on each shoulder. Bind off when piece measures 56-58-60-62-64-66 cm / 22"-22¾"-23⅝"-24⅜"-25¼"-26". LEFT FRONT PIECE: = 35-38-41-45-50-55 sts. READ ALL OF THE FOLLOWING SECTION BEFORE CONTINUING! Bind off for armhole at the side as described for back piece. AT THE SAME TIME when piece measures 37-38-39-40-41-42 cm / 14½"-15"-15¼"-15¾"-16⅛"-16½’, inc 1 st for lapel inside 2 edge sts towards mid front on every 4th row – SEE INCREASING TIP – a total of 8-8-9-9-10-10 times (incorporate the inc sts in seed st as you go along) = 43-44-45-46-48-49 sts. When piece measures 47-49-51-53-55-57 cm / 18½"-19¼"-20"-21"-21⅝"-22½" work 2 rows garter st on 16-17-18-19-20-21 sts towards mid front with 4 threads and then bind off the same 16-17-18-19-20-21 sts on next row from RS = 27-27-27-27-28-28 sts left on row. Insert a marker. Continue in seed st, AT THE SAME TIME bind off to shape the neckline on every other row: 1 st 5-5-6-6-6-6 times = 22-22-21-21-22-22 sts left on shoulder. Bind off when piece measures 56-58-60-62-64-66 cm / 22"-22¾"-23⅝"-24⅜"-25¼"-26". RIGHT FRONT PIECE: Like left front piece, but mirrored. Remember BUTTONHOLES – see above. SLEEVE: Worked in the round on double pointed needles. Cast on 34-36-36-38-40-42 sts on double pointed needles size 5.5 mm / US 9 with 1 thread of each color. Insert a marker at beg of round (= mid under sleeve). Work 6 rounds garter st – SEE ABOVE – and continue in seed st. When piece measures 5 cm / 2" inc 1 st on each side of marker and repeat the inc on every 3-3-2.5-2.5-2-2 cm / 1⅛"-1⅛"-⅞"-⅞"-¾"-¾" a total of 13-14-16-16-17-18 times = 60-64-68-70-74-78 sts. Work inc sts in seed st. When piece measures 49-48-48-46-45-43 cm / 19¼"-19"-19"-18"-17¾"-17" (less on the larger sizes because of longer sleeve cap and wider shoulder) bind off 6 sts mid under arm (= 3 sts on each side of marker) and complete piece back and forth on needle. AT THE SAME TIME bind off to shape the sleeve cap each side at the beg of every row: 2 sts 3-3-3-2-1-0 times, 1 st 2-3-4-9-14-20 times, then 2 sts each side until piece measures 55-55-56-56-57-57 cm / 21⅝"-21⅝"-22"-22"-22½"-22½", now bind off 3 sts each side 1 time and bind off remaining sts on next row. Piece measures approx 56-56-57-57-58-58 cm / 22"-22"-22½"-22½"-22¾"-22¾". ASSEMBLY: Sew shoulder seams. Set in sleeves. COLLAR: Pick up between 46 and 56 sts (an even number) on needle size 5.5 mm / US 9 with 2 threads of each color(= 4 threads) from RS. Beg by marker on left front piece, continue round neckline on back piece and finish by marker on right front piece. Work seed st until collar measures 3 cm / 1⅛". Now insert a marker on each shoulder and a marker mid back and inc 1 st on each side of all 3 markers on next row, work inc sts in seed st. Continue until collar measures 14-14-15-16-16-17 cm / 5½"-5½"-6"-6¼"-6¼"-6¾" and bind off. Sew collar to lapel each side. Sew on buttons. |
|
 |
|
Have you finished this pattern?Tag your pictures with #dropspattern #pearlofthefallcardigan or submit them to the #dropsfan gallery. Do you need help with this pattern?You'll find 22 tutorial videos, a Comments/Questions area and more by visiting the pattern on garnstudio.com. © 1982-2026 DROPS Design A/S. We reserve all rights. This document, including all its sub-sections, has copyrights. Read more about what you can do with our patterns at the bottom of each pattern on our site. |


With over 40 years in knitting and crochet design, DROPS Design offers one of the most extensive collections of free patterns on the internet - translated to 17 languages. As of today we count 324 catalogs and 12290 patterns - 12280 of which are translated into English (US/in).
We work hard to bring you the best knitting and crochet have to offer, inspiration and advice as well as great quality yarns at incredible prices! Would you like to use our patterns for other than personal use? You can read what you are allowed to do in the Copyright text at the bottom of all our patterns. Happy crafting!
Post a comment to pattern DROPS 112-4
We would love to hear what you have to say about this pattern!
If you want to leave a question, please make sure you select the correct category in the form below, to speed up the answering process. Required fields are marked *.