
Popular categories
Looking for a yarn?


Comments / Questions (127)
![]() Louise wrote:
Louise wrote:
I am having a hard time figuring out the Killian pattern. Where it says increase st. on each side of market, inc 1 st on ea. side of marker every other row 50x's . The question is how many stitches should I have when done. I am making size four. Thank you for your response. Louise Maheux
11.11.2019 - 22:35DROPS Design answered:
Dear Louise, the marker should follow the stitch all the way, you should increase on each side of the stitch with the marker all the way = dotted diagonal line on the chart. Increasing 50 times on each side of this stitch will give you 50 more stitches before the stitch with marker (bottom edge) and 50 more stitches after the stich with marker (front piece). Happy knitting!
12.11.2019 - 08:38
![]() Mimi wrote:
Mimi wrote:
Merci pour cette réponse précise. Vous êtes des effes du tricot.
21.10.2019 - 10:21
![]() Vanessa B wrote:
Vanessa B wrote:
Liebes Team, Meien Frage: Wir der Markierungsfaden im Vorder - und Rückenteil ganz rechts bei den neu aufgenommenen Maschen gesetzt? Oder zwischen den neu aufgenommenen Maschen und den alten? Herzliche Grüße, Vanessa
20.10.2019 - 13:15DROPS Design answered:
Liebe Vanessa, die Markierung (bei der jacke) wird in die 2. Maschen auf der rechten Seiten eingesetzt, diese Markierung soll in diese Masche bleiben, Sie nehmen dann beidseitig dieser Masche - see gestrichte Linie in der Maßskizze. Viel Spaß beim stricken!
21.10.2019 - 12:25
![]() Mimi wrote:
Mimi wrote:
Bonjour, Merci pour ce beau modèle. Lorsqu à la fin de la demie veste on rabat donc 51 mailles à partir dell encolure et on continue en point mousse sur - cm, ce que jai fait . Mais cela donne un décrochement et non un arrondi comme surr le photo. Pourquoi.
19.10.2019 - 15:12DROPS Design answered:
Bonjour Mimi, quand vous rabattez les 51 première mailles sur l'endroit (devant), cette partie correspond au bas du gilet = soit environ 15 cm (+ 1 cm sur les 39 m restantes (bordure devant) = 16 cm indiqués dans le schéma des mesures en taille 1/3 mois. Bon tricot!
21.10.2019 - 09:54
![]() Sharon wrote:
Sharon wrote:
I love both these patterns (b29-15 Tamzyn and b18-25 Killian. However, both use size US 2 or 3 needles and I would love to make this little jacket using a worsted yarn (US 6-8). I can’t find a similar pattern to these that use worsted (or bulky). Do you have a similar pattern I could use......they are such darling little jackets. Thanks!
08.10.2019 - 17:04DROPS Design answered:
Dear Sharon, you will find all our baby jacket patterns here, use filters to find the matching patterns. Happy knitting!
08.10.2019 - 17:09
![]() Ingelise Irming wrote:
Ingelise Irming wrote:
Kan ikke tyde hvordan der skal lukkes af til halsen, kan godt læse opskriften men ikke forstå hvordan!!!
05.09.2019 - 20:29DROPS Design answered:
Hej, jo du strikker de 2 sidste masker sammen inden de 9-10 -10-10-12 masker du har på tråden (mod bagstykket) på hver 4.pind. God fornøjelse!
06.09.2019 - 11:18
![]() Gaby wrote:
Gaby wrote:
Hallo liebes Dropsteam Ich hab den Ärmel gestrickt und verstehe nicht wie das mit dem Vorder und Rückentei gemacht wird. Soll Ich ich nur auf einer Seite die andegeben Maschenzahl aufnehmen? Bei mir waren es 50 M. aber dann fehlt ja ein Teil und die angeben Maschen 108 stimmt nicht.Lg Gaby
22.02.2019 - 23:41DROPS Design answered:
Liebe Gaby, wenn der Ärmel fertig ist, haben Sie 58 M, dann schlagen Sie am Ende der Hinreihe 50 M für das Rückenteil. Dann stricken Sie krausrechts weiter, und gleichzeitig bei der nächsten Hinreihe setzen Sie einen Markierer in der 2. Masche (auf der rechten Seite, von der vorderseite gesehen) und nehmen Sie jetzt in jeder 2. Runde 1 Masche auf beiden Seite der Masche mit dem Markierer (die gepunktete Linie in der Maßskizze) für das Vorderteil zu. dh die Maschen vor und nach dem Markierer wird zunehmen, so bekommen Sie das Vorderteil. Viel Spaß beim stricken!
25.02.2019 - 08:18
![]() Evelyne wrote:
Evelyne wrote:
Bonjour .pourriez vous me donner une précision concernant la veste sur la partie dos et devant.il faut faire un jete de chaque côté du marqueur mis à la 2ieme maille tous les 2 rangs.Dois je le faire toujours à partir de la 2ieme maille des 2rangs ou c est le marqueur du début qui reste le repere?merci à vous pour cette precision.
21.02.2019 - 12:31DROPS Design answered:
Bonjour Evelyne, le marqueur doit rester dans cette maille jusqu'à la fin, et vous augmenterez de chaque côté de cette maille avec le marqueur (ligne pointillé sur le schéma), vous aurez donc d'abord 1 maille avant celle avec le marqueur, puis 2 mailles, 3 mailles, 4 mailles et ainsi de suite. Bon tricot!
21.02.2019 - 16:22
![]() Angie C wrote:
Angie C wrote:
Just wondering if anyone has joined the backs using 3 needle cast off instead of sewing them together?
13.02.2019 - 01:04DROPS Design answered:
Dear Angie, we have no information if anyone did that, however it is a good idea, you can certainly try. Happy Knitting!
13.02.2019 - 01:36
![]() Angie C wrote:
Angie C wrote:
I am totally enjoying myself working on the Killian jacket! I had a few tense moments trying to figure out the neck decreases---thought I had to work decreases on the 10 stitches on the holder until I finally got it! Unravelling 16 rows was a bummer but it's all a learning experience and I'm having a blast! Thanks so much for a really interesting and challenging pattern!
13.02.2019 - 01:01
|
||||
Killian#killianset |
||||
|
|
||||
Set of knitted domino jacket in garter st in DROPS Fabel and pants in rib st in DROPS Alpaca for baby and children
DROPS Baby 18-25 |
||||
|
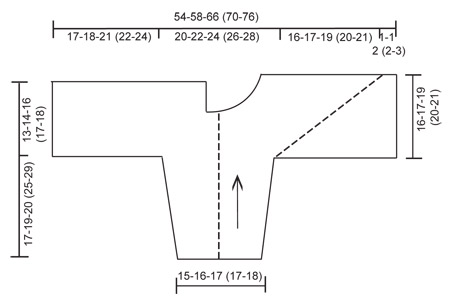
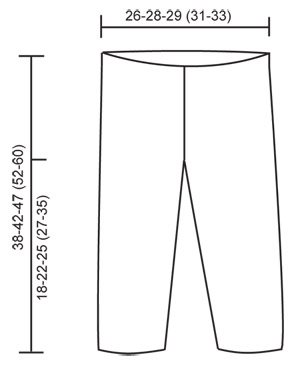
JACKET: INCREASING TIP: Inc 1 st on each side of st with marker by making 1 YO. On return row work YO into back of st in order to avoid a hole. ---------------------------------------------------------- JACKET: Worked from side to side from sleeve towards the middle of jacket, in 2 pieces sewn tog mid back afterwards. RIGHT HALF: Worked back and forth on circular needle in garter st. Cast on 36-38-40 (40-42) sts on circular needle size 3 mm [US 2or3] with Fabel and work garter st. REMEMBER THE KNITTING GAUGE! When piece measures 6-6-5 (5-6) cm [2⅜"-2⅜"-2" (2"-2⅜")] inc 1 st each side and repeat the inc on every 8th row a total of 6-7-9 (11-13) times = 48-52-58 (62-68) sts. Continue until piece measures 17-19-20 (25-29) cm [6¾"-7½"-8" (9¾"-11⅜")] – adjust so that next row is from RS. BODY PIECE: K 1 row from RS, at the end of row cast on 41-43-50 (53-58) sts (= towards back piece) = 89-95-108 (115-126) sts. NOW MEASURE PIECE FROM HERE! Work return row. Insert a marker from RS in the second st on row (= right side of piece) and continue in garter st, AT THE SAME TIME inc 1 st on each side of st with marker on every other row a total of 38-40-46 (48-50) times – SEE INCREASING TIP. AT THE SAME TIME when piece measures 8½-9-10½ (11-12) cm [3¼"-3½"-4¼" (4⅜"-4¾")] continue on the last 60-65-74 (79-86) sts only on the left side of piece as seen from the RS (= back piece). Slip remaining sts on a stitch holder. BACK PIECE: Continue until piece measures 13-14-16 (17-18) cm [5⅛"-5½"-6¼" (6¾"-7")] (from where sts were cast on for back piece), and bind off. FRONT PIECE: Slip sts from stitch holder back on needle, but leave 9-10-10 (10-12) sts towards back piece on stitch holder for neckline. Continue to inc on every other row, AT THE SAME TIME bind off 1 st towards neckline on every 4th row a total of 6-7-7 (7-7) times. AT THE SAME TIME when piece measures 14-15-17 (18-19) cm [5½"-6"-6¾" (7"-7½")] (from where inc for front pieces beg) bind off for 3-4-4 (5-5) buttonholes as follows (from neckline, i.e. from WS): work 2 sts, bind off 2 sts, * work 12-9-11 (9-10) sts, bind off 2 sts *, repeat from *-* a total of 2-3-3 (4-4) times, and then work remaining sts on row. On return row cast on 2 new sts over the bind off sts. After dec and inc are complete there are 90-93-109 (115-121) sts on row. Now bind off 51-52-62 (66-70) sts from WS from neckline and down along front band = 39-41-47 (49-51) sts left on row. Continue in garter st back and forth on these sts for approx 1-1-2 (2-3) cm [⅜"-⅜"-¾" (¾"-1⅛")] (fold piece double by shoulder to measure front piece to back piece) and bind off. LEFT HALF: Like right half, but without buttonholes – this half is assembled with WS out. ASSEMBLY: Place the 2 halves towards each other and sew tog mid back – edge to edge in order to avoid a chunky seam. Fold jacket double and sew under arm and side seams in outer loops of sts. Sew on buttons. NECKLINE: Pick up 55 to 75 sts (incl sts on stitch holders) round neckline on circular needle size 3 mm [US 2or3] with Fabel. Work 3 rows garter st back and forth on needle and bind off. ---------------------------------------------------------- PANTS: INCREASING TIP: Inc 1 st on each side of the 2 K sts mid back (marker sits between these 2 sts). Inc by working 2 sts in 1 st and incorporate inc sts in rib as you go along. DECREASING TIP: Dec 1 st on each side of marker mid front. Dec as follows before marker: K2 tog. Dec as follows after marker: slip 1 st as if to K, K1, psso. LEG: Worked in the round on double pointed needles. Cast on 56-60-64 (68-72) sts on double pointed needles size 3 mm [US 2or3] with Alpaca. Insert a marker at beg of round = inside of leg. Continue as follows: K1, * P2 / K2 *, repeat from *-* and finish with P2 and K1. When piece measures 4-6-4 (4-5) cm = 1½"-2⅜"-1½" (1½"-2") inc 1 st on each side of marker by K 2 sts in 1 st on every 5-6-8 (9-12) round a total of 8 times = 72-76-80 (84-88) sts. When leg measures 16-20-23 (25-33) cm [6¼"-8"-9" (9¾"-13")] divide the piece by marker and continue back and forth on needle (to make it easier to slip both legs on the same circular needle afterwards), AT THE SAME TIME cast on 1 new st each side for seam = 74-78-82 (86-90) sts. When piece measures 18-22-25 (27-35) cm [7"-8¾"-9¾" (10⅝"-13¾")] bind off 5 sts each side (= 1 edge st, K1, P2 and K1) = 64-68-72 (76-80) sts. Put piece aside and knit the other leg in the same way. PANTS: Slip both legs on the same circular needle size 3 mm [US 2or3] = 128-136-144 (152-160) sts. Insert 1 marker mid front and 1 marker mid back (both markers should sit between 2 K sts). Continue in rib, K2 / P2, AT THE SAME TIME inc mid back and dec mid front as follows: INC MID BACK: Inc 2 sts – SEE INCREASING TIP. Repeat the inc on every 4th round a total of 4 times. DEC MID FRONT: Dec 2 sts – SEE DECREASING TIP. Repeat the dec on every 4th round a total of 8 times. After all inc and dec are complete there are 120-128-136 (144-152) sts on round. Continue in rib until piece measures 38-42-47 (52-60) cm [15"-16½"-18½" (20½"-23⅝")], bind off. ASSEMBLY: Sew inside of legs at the top inside 1 edge st. Sew opening between legs, front of leg towards back of leg. |
||||
Diagram explanations |
||||
|
||||
 |
||||
 |
||||
Have you finished this pattern?Tag your pictures with #dropspattern #killianset or submit them to the #dropsfan gallery. Do you need help with this pattern?You'll find 14 tutorial videos, a Comments/Questions area and more by visiting the pattern on garnstudio.com. © 1982-2026 DROPS Design A/S. We reserve all rights. This document, including all its sub-sections, has copyrights. Read more about what you can do with our patterns at the bottom of each pattern on our site. |
||||


With over 40 years in knitting and crochet design, DROPS Design offers one of the most extensive collections of free patterns on the internet - translated to 17 languages. As of today we count 325 catalogs and 12298 patterns - 12288 of which are translated into English (US/in).
We work hard to bring you the best knitting and crochet have to offer, inspiration and advice as well as great quality yarns at incredible prices! Would you like to use our patterns for other than personal use? You can read what you are allowed to do in the Copyright text at the bottom of all our patterns. Happy crafting!
Post a comment to pattern DROPS Baby 18-25
We would love to hear what you have to say about this pattern!
If you want to leave a question, please make sure you select the correct category in the form below, to speed up the answering process. Required fields are marked *.