
Popular categories
Looking for a yarn?


Comments / Questions (13)
![]() Monica Lund wrote:
Monica Lund wrote:
Hei, Jeg strikker disse vottene i str. 3-5 år. Dere sier her i oppskriften at måling starter etter vrangborden. Men på slutten av oppskriften står det at hele votten måler 17cm på 3-5 år. Det må vel være det siste som er korrekt? 17cm er inkludert vrangborden? Ønsker dere ett Godt nytt år
28.12.2025 - 18:54DROPS Design answered:
Hei Monica. Ja, ca 17 cm gjelder hele votten i str. 3/5 år- Vrangborden måler ca 7 cm og etter vrangborden strikkes det 3 omganger før man starter på diagrammene (3 omganger + 29 omganger med M.1 = 32 omganger = 10 cm iflg oppgitt strikkefasthten). Etter vrangborden starter målingen når man skal sette tommel- maskene på 1 tråd og når det skal settes 1 merketråd midt i M.2 i hver side / fellinger. mvh DROPS Design
12.01.2026 - 10:26
![]() Rachel wrote:
Rachel wrote:
Insert 1 marker in the middle of M.2 at one side (= thumb gusset). Continue to inc.1 sts each side of the gusset on every other round: 4-5-5 times = 9-11-11 thumb sts – incorporate new sts into M.3 as going along (Make sure the pattern is the same on the thumb as it is in the palm of the hand). Which color do I increase with? And how to I incorporate those 3 stitches to M3? Do I start with black then two white?
19.03.2025 - 22:37DROPS Design answered:
Dear Rachel, you can use the colour for the new stitch to increase with, so that you will get the colour ready on next round - work the middle stitch of thumb as the first stitch in M.3 then work the first increase before this stitch as a new repeat reading from the left and the first increase after this stitch as the next stitch reading from the right. Happy knitting!
20.03.2025 - 10:06
![]() Helga Nixon wrote:
Helga Nixon wrote:
When the piece measures 4-5-6 cm / 1½''-2''-2 3/8'' put the thumb sts on a stitch holder and on the next round cast on 1 new st behind the thumb sts = 40-44-48 sts – continue with M.2 at the side above the thumb. If I do 1 stitch I will only have 4 stitches and not 44? What am I doing wrong?
16.11.2024 - 19:52DROPS Design answered:
Dear Mrs Nixon, you will slip the 10 sts increased for the thumb + the middle of these stitches (the one with a marker), so when you slip the 11 sts on a thread for thumb, you need to cast on 1 stitch for thumb, in other words; after increases you have: 44+10=54 sts, you slip 11 sts on a thread=43 sts and you cast on 1 stitch over stitches for thumb = 44 sts back on needle. Happy knitting!
18.11.2024 - 09:13
![]() Ruth Østergaard Christoffersen wrote:
Ruth Østergaard Christoffersen wrote:
Jeg er ved at strikke luffer drops Children 12 -13. Hvad betyder i mønster M. 2 ( = 5 m) Venlig Hilsen Ruth Christoffersen
30.09.2024 - 11:42
![]() Ingebeth Melhus wrote:
Ingebeth Melhus wrote:
Tommelen er alt for trang til 12-13 år. Jeg la opp 22masker.
27.02.2024 - 19:44
![]() Caroline wrote:
Caroline wrote:
Bonjour, J'essaye de tricoter les moufles en jacquard en taille 3-5 ans. J'ai tricoté les côtes avec des aiguilles numéro 3. Il n'est pas écrit de passer aux aiguilles 2,5 quand on commence le jersey. Est-ce une erreur ? Merci.
22.01.2021 - 11:11DROPS Design answered:
Bonjour Caroline, en fait, on n'a pas besoin d'aiguilles 2,5 pour les moufles, elles ont été retirées des fournitures, merci pour votre retour. Les moufles se tricotent entièrement avec les aiguilles 3. Bon tricot!
22.01.2021 - 16:06
![]() Selina wrote:
Selina wrote:
In der Anleitung steht Ich soll in der Mitte von M2 einen Makierungsfaden anbringen, verstanden. Dann weiter auf beiden Seiten alle R abketten : 1M 8 Mal =8M. Den Teil verstehe ich nicht. Wird nicht wie beim Socken Stricken zusammengestrickt? Lg aus Berlin
17.12.2020 - 15:21DROPS Design answered:
Liebe Selina, also ja die Abnahmen werden beidseitig von den mittleren Maschen von M. 2 gestrickt, dh 2 maschen rechts zusammen mit Natur, die mittelre Masche wie in M.2, 1 M abheben, 1 re, die abgehobene M darüber ziehen mit natur. und so bei den 2 Markierungen = 4 M werden pro Runde abgenommen. Viel Spaß beim stricken!
17.12.2020 - 17:15
![]() Selam wrote:
Selam wrote:
How do I do this= "Insert 1 marker in the middle of M.2 at one side (= thumb gusset). Continue to inc.1 sts each side of the gusset on every other round: 4-5-5 times = 9-11-11 thumb sts – incorporate new sts into M.3 as going along (Make sure the pattern is the same on the thumb as it is in the palm of the hand)." if I start at m2 from 5 it will increase to 7 sts how do I incorporate it to M3 when M1 comes next? ? please help!
13.01.2019 - 17:22DROPS Design answered:
Dear Selam, you increase after the first sts in off white, and before the last st in off white = on each side of the middle sts. The sts in each end are black, the 2 sts either side of the middle sts are white (black circle). So you inc 1 sts on each side of the middle sts and then work these 3 sts in M.3 leaving 1 black and 1 white sts in each side. So only the middle st and the increases are worked in M.3. Happy knitting!
14.01.2019 - 11:45
![]() Selam wrote:
Selam wrote:
How do I do this= "Insert 1 marker in the middle of M.2 at one side (= thumb gusset). Continue to inc.1 sts each side of the gusset on every other round: 4-5-5 times = 9-11-11 thumb sts – incorporate new sts into M.3 as going along (Make sure the pattern is the same on the thumb as it is in the palm of the hand)." if I start at m2 from 5 it will increas to 7 sts how do I incorporate it to M3 when M1 comes next? ? please help!
09.01.2019 - 22:18
![]() Maja Lauritsen wrote:
Maja Lauritsen wrote:
Forstår ikke opskriften. Når man begynder mønster M2. Derefter M1= start ved pilen for ønsket str. efter M1 strikkes der færdig med sort. ???? øhhh er det så ikke M3 over 15-17-19 masker. (det sorte indgår vel i M1 afhængig af str?) og derefter udtagning til tommeltot. Midt i M2 skal der tages ud på hver side af tommelfingermaske. forstår jeg godt men skal jeg så strikke en halv M1? Syns billedet viser et fint M2 mønster hele vejen op. Kan jeg simpelthen ikke fatte.
24.11.2018 - 20:01DROPS Design answered:
Hei Maja. Den informasjonen refererer til når M.1 er ferdig i høyden. alstå når mønsteret er ferdig strikket, fortsettes med sort til ferdige mål. Du strikker slik: M.2, M.1, M.2, M.3, der M.2 er sidene av votten, M.1 er mønsteret oppå hånden og M.3 er mønsteret inni hånden. God fornøyelse.
26.11.2018 - 12:00
|
|||||||
DROPS Children 12-13 |
|||||||
 |
 |
||||||
DROPS Nordic Hat, scarf and gloves
DROPS Children 12-13 |
|||||||
|
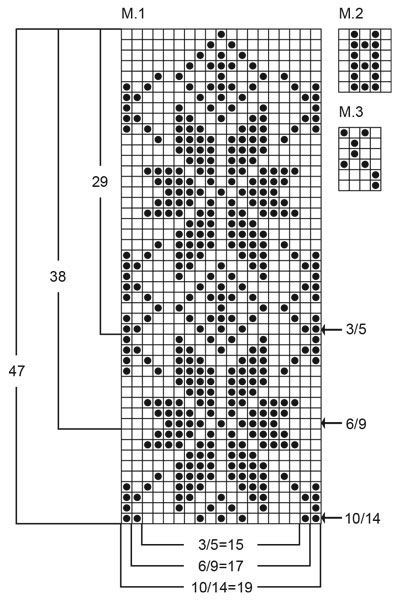
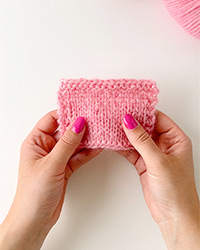
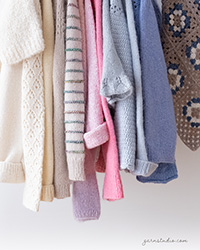
HAT: Gauge: 11 sts x 15rows on needles size 8 mm / US 11 in stockinette sts = 10 x 10 cm / 4" x 4". Rib: *K1, P1*, repeat *-* Hat: Cast on 104-114-124 sts on double pointed needles size 3 mm/US 2or3 and Karisma. Work rib for 12 cm/4¾", change to Ull-Flamé and double pointed needles size 8 mm/US 11. Continue in stockinette st - at the same time on 1st round K2 tog around = 52-57-62 sts. On next round dec 2 sts evenly = 50-55-60 sts. When hat measure 14,5-15-15,5 cm/5¾"-6"-6¼" place 5 markers around with 10-11-12 sts between each marker. Now dec on right side of all markers by K2 tog, on every 4th round a total of 3-3-3 times and then on every other round a total of 3-4-5 times = 20 sts left on needle.On next round K2 tog around, cut the yarn, pull yarn through rem sts, pull tight and fasten. Hat measure approx 25-27-29 cm/9¾"-10½"-11½" in height. Fold up rib edge. SCARF: Gauge: 14 sts x 28 rows on needles size 6 mm / US 10 in Fishermans rib = 10 x 10 cm / 4" x 4". Fishermans rib: 1st row (RS): K1 edge st, * K1, 1 yo, slip 1 st as if to purl*, repeat *-* until 2 sts rem on needle, end with K1 and K1 edge st. 2nd row (WS): K1 edge st, * 1 yo, slip 1 st as if to purl, K next st and yo tog *, repeat *-* until 2 sts rem on row, end with 1 yo, slip 1 st as if to purl and K1 edge st. 3rd row (RS): K1 edge st, * K next st and yo tog, 1 yo, slip 1 st as if to purl *, repeat *-* until 2 sts rem on row, end with K next st and yo tog and K1 edge st. Repeat row 2-3. Scarf: Loosely cast on 19-23-27 sts needles size 6 mm / US 10 with off white Alaska . Work fishermans rib - see explanation above. When work measure 120-140-160 cm /47"-55"-63" bind off loosely. MITTENS: Knitting gauge: 23 sts x 32 row on needle size 3 mm / US 2or3 in stockinette sts = 10 x 10 cm / 4" x 4". Rib: * K2, P2 *, repeat from *-*. Pattern: See diagrams M.1 to M.3, work all of the pattern in stockinette sts. Decrease tips: Dec as follows before the marker: K2 tog. Dec as follows after the marker: Slip 1 st as if to K, K1, psso. Mitten: Cast on 44-48-52 sts on double pointed needles size 3 mm / US 2or3 with black and work Rib as follows: 7 rounds in black, 1 round in off white, 2 rounds in black, 1 round in off white, 2 rounds in black, 1 round in off white 2 rounds in black. K 1 round in black at the same time dec 4 sts evenly = 40-44-48 sts. Now measure from here onwards! Continue in stockinette as follows: 1 round in black, 1 round in off white and 1 round in black. Work the next round as follows: diagram M.2 (= 5 sts), diagram M.1 – Beg. at the arrow for the size you wish (= 15-17-19 sts, after M.1 continue with black), M.2 (= 5 sts) and then M.3 over 15-17-19 sts. Insert 1 marker in the middle of M.2 at one side (= thumb gusset). Continue to inc.1 sts each side of the gusset on every other round: 4-5-5 times = 9-11-11 thumb sts – incorporate new sts into M.3 as going along (Make sure the pattern is the same on the thumb as it is in the palm of the hand). When the piece measures 4-5-6 cm / 1½"-2"-2⅜" put the thumb sts on a stitch holder and on the next round cast on 1 new st behind the thumb sts = 40-44-48 sts – continue with M.2 at the side above the thumb. When the piece measures 9,5-12-15 cm / 3¾"-4¾"-6" insert 1 marker in the middle of M.2 each side. Continue to dec. 1 st each side of the markers on every round – see dec tips: 8-9-10 times = 8 sts left on needle. Cut the yarn, pull through remaining sts and sew tight. The total gloves measures approx. 17-20-23 cm / 6¾"-8"-9". Thumb: Put 9-11-11 sts from the holder back on needle and pick up addition 3-5-5 sts behind the thumb = 12-16-16 sts. Work diagram M.3 – continue so the pattern continues from where sts were put on stitch holder. When the thumb measures 3,5-4,5-5,5 cm / 1¼"-1¾"-2¼" K2 tog around. Cut the yarn, pull through remaining sts and sew tight. Make another mitten, but mirrored. |
|||||||
Diagram explanations |
|||||||
|
|||||||
 |
|||||||
Have you finished this pattern?Tag your pictures with #dropspattern or submit them to the #dropsfan gallery. Do you need help with this pattern?You'll find 22 tutorial videos, a Comments/Questions area and more by visiting the pattern on garnstudio.com. © 1982-2026 DROPS Design A/S. We reserve all rights. This document, including all its sub-sections, has copyrights. Read more about what you can do with our patterns at the bottom of each pattern on our site. |
|||||||


With over 40 years in knitting and crochet design, DROPS Design offers one of the most extensive collections of free patterns on the internet - translated to 17 languages. As of today we count 324 catalogs and 12190 patterns - 12180 of which are translated into English (US/in).
We work hard to bring you the best knitting and crochet have to offer, inspiration and advice as well as great quality yarns at incredible prices! Would you like to use our patterns for other than personal use? You can read what you are allowed to do in the Copyright text at the bottom of all our patterns. Happy crafting!
Post a comment to pattern DROPS Children 12-13
We would love to hear what you have to say about this pattern!
If you want to leave a question, please make sure you select the correct category in the form below, to speed up the answering process. Required fields are marked *.