
Popular categories
Looking for a yarn?


Comments / Questions (18)
![]() Jeannette Van Hulten wrote:
Jeannette Van Hulten wrote:
Drops 91 - 12 De 2 voorhanden Hoe kan ik de mindering doen bij het schuine deel midden voor. Daar staat nl. Minderen 0-0-1-1-1. Maar hoe vaak moet dat? Dat staat er niet bij. Als er 0 staat dan zou er niets geminderd worden??
21.11.2024 - 14:28
![]() Eri Lind wrote:
Eri Lind wrote:
Jeg tænker at trøjen bliver rigtig flot. Jeg må sige at jeg synes den er svær at strikke. Det var selvfølgelig selvvalgt da jeg lavede den talje lang i stedet for fuld længde. Det sværeste var antallet jeg skulle samle op til kraven, det ville have været en hjælp hvis der stod at det ville svare f.eks til ca hver maske eller hver anden eller nogeti den stil.
17.11.2024 - 16:39
![]() Angela wrote:
Angela wrote:
Maja hatte die gleiche Frage, aber ich habe bisher keine Antwort darauf gefunden. Beim Hals sollen in den mittleren 11 Links-Abschnitten Zunahmen erfolgen. Da ich aber eine gerade Anzahl an Linkdabschnitten habe, frage ich mich, ob ich dann statt 11 Maschen 10 oder 12 zunehmen soll. Oder habe ich die Anleitung falsch verstanden und die Beschreibung bezieht sich auf die Rückseite?
02.10.2022 - 14:44DROPS Design answered:
Liebe Angela, in den mittleren 11 li. partien (vom Rippenmuster 4 re, 4 li) sollen Sie je 1 linke Masche zunehmen = so strickenSie wie zuvor mit 4 re, 4 links dann stricken Sie 11 Mal 5 li, 4 rechts, dann stricken Sie wieder mit 4 li, 4 rechts wie zuvor. Viel Spaß beim stricken!
03.10.2022 - 09:27
![]() Margaretha Tingstedt wrote:
Margaretha Tingstedt wrote:
Hej! Jag håller på att sticka den ena ärmen, strl S. Alla utökningar är gjorda, 64 maskor. Enligt beskrivningen ska man sticka till 49 cm innan man börjar med avmaskning för ärmkullen. Ärmen mäter redan nu 52 cm. Kan jag börja med avmaskningen redan nu? När ärmen är klar ska den mäta 57 cm men kommer då att bli 60 cm. Det känns som att den blir alldeles för lång. Har ni något tips att ge mig? Med hopp om hjälp Margaretha
27.01.2020 - 23:02DROPS Design answered:
Hei Margaretha. Mulig du har økt med litt lengre avstand enn hva det står i oppskriften, derfor er ermet ditt allerede 52 cm. Om du vil slippe å rekke opp ermet og strikke den med riktig cm, kan du fortsette og da få en erm som er 3 cm lengre og enkelt brette opp nederst kant. Du kan også strikke ermet ferdig (3 cm for lang) og klippe av 3 cm på vrangborden, slik at vrangborden blir 12 cm. Se evnt video: Forlænge strikkede ærmer og ryg-&forstk, men du gjøre den bare kortere. God Fornøyelse!
10.02.2020 - 14:05
![]() Cynthia Leive wrote:
Cynthia Leive wrote:
Hi! How do you shape the center edge on both front pieces? There is obviously shaping to create a “v” but no instructions for this part. Thanks.
24.02.2019 - 18:51DROPS Design answered:
Dear Mrs Leive, there are no decrease for neck in the first 2 sizes (and only 1 in the 3 largest sizes), the neck will shape it self when working the front pieces and ribbed edge. Happy knitting!
25.02.2019 - 10:54Jody McBee wrote:
I am shaping the left front above the armhole bind off. Where do the shaping decreases occur? At the front edge of the piece? Are there any decreases at the armhole edge after the bind off for the armhole? Not clear in the pattern at all.
24.04.2018 - 02:53DROPS Design answered:
Dear Mrs McBee, armhole shaping will be worked on left front piece as on back piece but only towards armhole, ie on left front piece bind off at the beg of row from RS (= on the left side seen from RS): when piece measures 52-53-54-55-56 cm bind off 3-4-5-6-8 sts 1 time and then 1 st on every other row – see binding off tips – a total of 4-6-7-9-10 times = 22-23-24-25-26 sts left for the shoulder. Happy knitting!
24.04.2018 - 09:10
![]() Lena wrote:
Lena wrote:
Hej, dette forstår jeg ikke..... Når forkanten måler 5 cm tages der 1 m ud i hver af de midterste 11 vrang-partier..... Hvor er midten?
13.09.2016 - 21:38DROPS Design answered:
Hej Lena. Du har x antal rib (4 r og 4 vr) paa din p. Tael hvor mange gange 4 vr du har (4 vrang = 1 vrang parti) og marker de 11 midterste vrang partier paa pinden. Det er dem du tager ud i.
14.09.2016 - 11:36
![]() Nadia wrote:
Nadia wrote:
Merci et bonne fête de fin d'année à toute votre équipe.
10.12.2014 - 19:28
![]() Nadia wrote:
Nadia wrote:
Bonjour, Au départ de la bordure à combien de cm ou de rangs doit on effectuer les boutonnières et à combien d'espacement pour chacune. Merci
09.12.2014 - 17:56DROPS Design answered:
Bonjour Nadia, les boutonnières ne se trouvent pas dans la bordure du devant, on utilise les arceaux de la bordure au crochet comme boutonnière - les boutons sont cousus ainsi: le 1er à 30 cm de l'épaule, et les 2 autres espacés de 9 cm les uns des autres vers le bas de la veste. Bon tricot!
10.12.2014 - 09:58Maia wrote:
Front Band/Collar is WS not RS. But, English US & UK crochet edging is completely different in this pattern. Couldn't figure out why the UK version didn't look like the picture.
19.09.2014 - 09:05DROPS Design answered:
Dear Maia, you inc on front band collar in the P sections seen from RS - Crocheted edge will be checked. Thank you. Happy knitting!
19.09.2014 - 10:01
|
|
DROPS 91-12 |
|
|
|
|
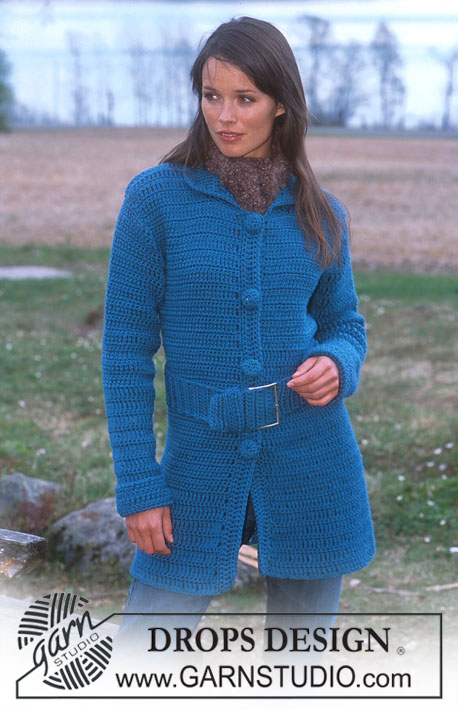
DROPS cardigan in Alaska with wide band edge
DROPS 91-12 |
|
|
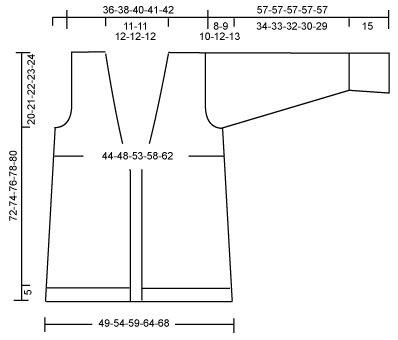
Gauge: 17 sts x 22 rows on larger needles in stockinette st = 10 x 10 cm. Rib: * K 4, P 4 *, repeat * - *. Knitting tips (for armhole): All decs are made on right side rows. Dec 1 st inside of 5 sts in stockinette st as follows: After 5 sts: slip 1 st as if to knit, K 1, psso. Before 5 sts: K 2 tog. Back: Cast on 86-94-102-110-118 sts on smaller needles and knit rib as follows: Sizes S, L, XXL: K 1 (edge st knit in garter st), P 4, * K 4, P 4 *, end with K 1 (edge st knit in garter st). Sizes M, XL: K 1 (edge st knit in garter st), * K 4, P 4 * to last 5 sts, K 4, K 1 (edge st knit in garter st) When the rib measures 5 cm change to larger needles and stockinette st. When the piece measures 15 cm dec 1 st at each side every 5 cm a total of 5 times = 76-84-92-100-108 sts. When the piece measures 52-53-54-55-56 cm bind off 3-4-5-6-8 sts at each side. Then dec 1 st at each side every other row – see knitting tips above: 4-6-7-9-10 times = 62-64-68-70-72 sts. When the piece measures 70-72-74-76-78 cm bind off the center 16-16-18-18-18 sts for the neck. On the next row dec 1 st at each neck edge = 22-23-24-25-26 sts remain on each shoulder. Bind off when the piece measures 72-74-76-78-80 cm. Left front: Cast on 34-38-42-46-50 sts on smaller needles and knit rib as follows (beginning of row is side edge): Sizes S, L, XXL: K 1 (edge st knit in garter st), * K 4, P 4 *, finish with K 1 (edge st knit in garter st). Sizes M, XL: K 1 (edge st knit in garter st), P 4, * K 4, P 4*, finish with K 1 (edge st knit in garter st). When the rib measures 5 cm change to larger needles and stockinette st. When the piece measures 15 cm dec 1 st at the side every 5 cm a total of 5 times = 29-33-37-41-45 sts. When the piece measures 50-51-52-53-54 cm dec 0-0-1-1-1 sts at the center front (dec inside of edge st). When the piece measures 52-53-54-55-56 cm bind off for armhole at the side as on back. After all shaping is complete 22-23-24-25-26 sts remain on shoulder. Bind off when the piece measures 72-74-76-78-80 cm. Right front: Knit the same as the left, reversing all shaping. Sleeve: Cast on 42-42-42-50-50 sts on smaller needles and knit rib, keeping 1 edge st at each side in garter st. When the rib measures 15 cm change to larger needles and stockinette st, decreasing 0-0-0-2-2 sts on 1st row = 42-42-42-48-48 sts. When the piece measures 16-16-16-17-17 cm inc 1 st at each side every 3-2.5-2-2-1.5 cm a total of 11-13-15-14-16 times = 64-68-72-76-80 sts. When sleeve measures 49-48-47-45-44 cm bind off for sleeve cap at each side every other row: 4 sts 1 time, 3 sts 1 time, 2 sts 2-2-3-2-2 times and 1 st 1-2-2-5-6 times, then bind off 2 sts at each side until piece measures 56 cm, and then bind off 3 sts at each side 1 time. The piece measures 57 cm. Bind off the remaining sts. Assembly: Sew shoulder seams. Buttonband/Neckband: Pick up on smaller circular needles: 276-284-292-300-308 sts along right front, back neck and down along left front. Knit rib, keeping 4 sts in garter st at each edge and begin and end rib with K 4 as seen from the right side. When buttonband measures 5 cm inc each P 4 to P 5 over the 11 purl ribs at neck (as seen from the right side). When button bands measures 12 cm bind off all sts in rib. Crocheted edge: Crochet around entire buttonband as follows: 1 sc in first st at lower edge on right front, * ch 4, 1 dc in the 1st ch, skip over 3 sts, fasten with 1 sc in the next st *, repeat * - *. Crochet around lower edge of sleeves in the same manner. Sew in sleeves. Sew sleeve and side seams using edge sts as a seam allowance. Sew 3 buttons to left front where buttonband is picked up. The top button should be approx. 30 cm from shoulders and approx. 9 cm between buttons. Use holes in crocheted edge on right front as buttonholes. |
|
 |
|
Have you finished this pattern?Tag your pictures with #dropspattern or submit them to the #dropsfan gallery. Do you need help with this pattern?You'll find 18 tutorial videos, a Comments/Questions area and more by visiting the pattern on garnstudio.com. © 1982-2026 DROPS Design A/S. We reserve all rights. This document, including all its sub-sections, has copyrights. Read more about what you can do with our patterns at the bottom of each pattern on our site. |


With over 40 years in knitting and crochet design, DROPS Design offers one of the most extensive collections of free patterns on the internet - translated to 17 languages. As of today we count 324 catalogs and 12290 patterns - 12280 of which are translated into English (US/in).
We work hard to bring you the best knitting and crochet have to offer, inspiration and advice as well as great quality yarns at incredible prices! Would you like to use our patterns for other than personal use? You can read what you are allowed to do in the Copyright text at the bottom of all our patterns. Happy crafting!
Post a comment to pattern DROPS 91-12
We would love to hear what you have to say about this pattern!
If you want to leave a question, please make sure you select the correct category in the form below, to speed up the answering process. Required fields are marked *.