
Popular categories
Looking for a yarn?


|
|
DROPS 91-11 |
|
|
|
|
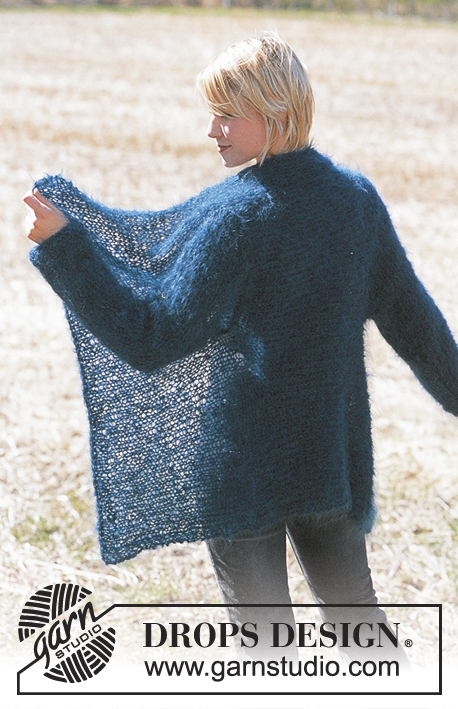
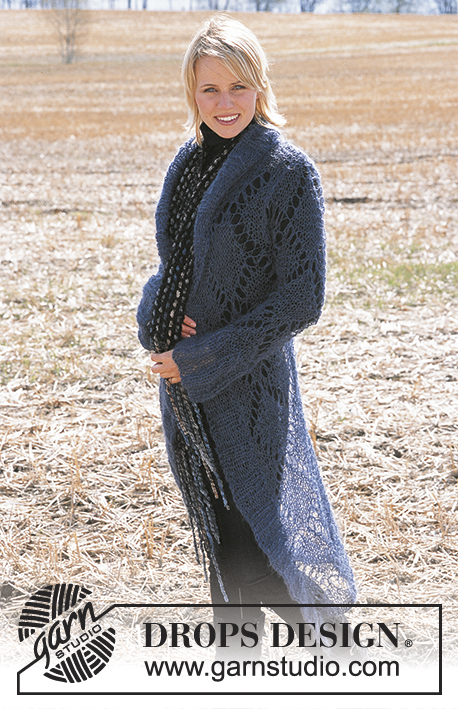
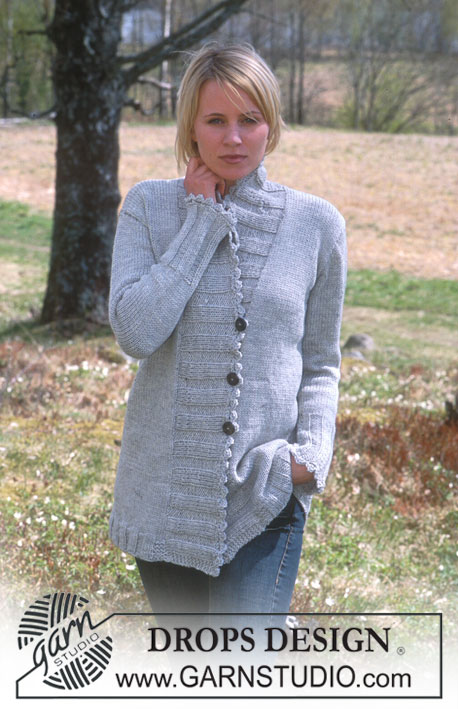
DROPS Long Crocheted Cardigan with belt in Alaska, Scarf in Puddel
DROPS 91-11 |
|
|
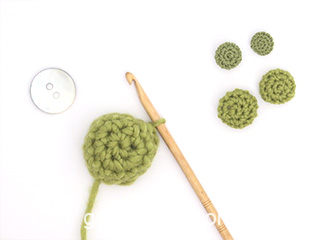
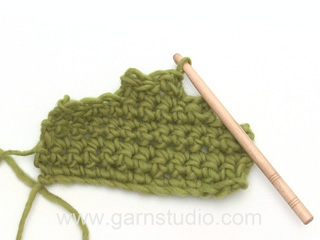
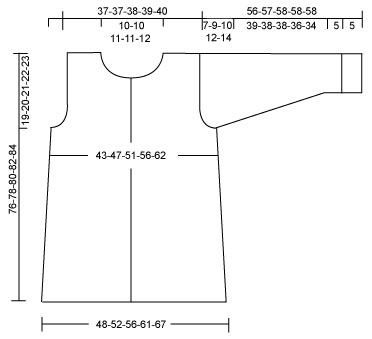
Crochet gauge: 12 sc/tr in width and approx. 4 structure rows in height (that is, 1 row sc + 1 row tr x 4) = 10 x 10 cm. Crochet tips: Replace the first sc of each sc row with ch 1 and the first tr of each tr row with ch 4. Each sc row ends with 1 sc in the ch 4 at the start of the previous row and each tr row ends with 1 tr in the ch 1 at the start of previous row. Structure pattern: * 1 row sc, 1 row tr*, repeat * - * to finished measurements. Crochet in every sc/tr from previous row and not in between. Decreasing tips: Dec only on tr rows as follows: At the start of row: replace each tr to be decreased/bound off with 1 sl st. At the end of row: turn piece when tr to be decreased/bound off remain and crochet back. Crab Stitrh: Crochet a row of sc from left to right (reverse crochet). BACK Ch 79-84-91-99-108 fairly loosely. First row crochet as follows: 1 tr in 5th ch from hook, then 1 tr in each of the next 2 ch, * skip over 1 ch, 1 tr in each of the next 3 *, repeat * - * across row (in sizes M + XXL you will end with 1 tr in each of the last 4 ch instead of the last 3 ch) = 58-62-67-73-80 tr, turn the work. Now crochet the Structure pattern – see instructions above. When the piece measures 15 cm - adjust so that the next row is a tr row - dec 1 tr at each side – see decreasing tips above. Repeat dec when the piece measures approx. 30 and 45 cm = 52-56-61-67-74 sc/tr. When the piece measures approx. 57-58-59-60-61 cm bind off for armhole at each side every tr row – see decreasing tips: 3 tr 1-1-1-1-2 times, 2 tr 0-1-1-2-2 times and 1 tr 1-1-3-3-3 times = 44-44-45-47-48 sc/tr. When the piece measures approx. 73-75-77-79-81 cm (1 structure pattern remains), crochet 1 row over only 16-16-16-17-17 sc/tr at each side (do not crochet over the center 12-12-13-13-14 sc/tr = neckband). Crochet 1 row back, cut yarn and fasten. The piece measures approx. 76-78-80-82-84 cm. LEFT FRONT Ch 40-43-47-51-55 fairly loosely. First row crochet as follows: 1 tr in 5th ch from hook, then 1 tr in each of the next 2 ch, * skip over 1 ch, 1 tr in each of the next 3 ch *, repeat * - * across row (in size S you will end with 1 tr in each of the last 4 ch instead of the 3 last ch) = 29-31-34-37-40 tr, turn the work. Now crochet Structure pattern as on back. When the piece measures approx. 20, 35 and 50 cm dec at the side edge as on the back = 26-28-31-34-37 sc/tr. When the piece measures approx. 57-58-59-60-61 cm – adjust to matrh back – bind off for armhole at the side as on back = 22-22-23-24-24 sc/tr. When the piece measures approx. 66-68-70-72-74 cm bind off the outermost 4 tr at center front edge for neck – see decreasing tips above. Continue to bind off for the neck every tr row: 2 tr 0-0-1-1-1 time and 1 tr 2-2-1-1-1 times = 16-16-16-17-17 sc/tr remain on shoulder. Continue until front is the same length as back, cut yarn and fasten. RIGHT FRONT Crochet the same as the left, reversing all shaping. SLEEVE Ch 42-42-43-43-45 fairly loosely. First row crochet as follows: 1 tr in 5th ch from hook, * skip over 1 ch, 1 tr in each of the next 3 ch *, repeat * - * across row (in sizes S + M you will end with 1 tr in each of the last 4 ch instead of the last 3 ch and in sizes L + XL you will end with 1 tr in each of the last 5 ch instead of the last 3 ch) = 30-30-31-31-32 tr, turn the work. Now crochet Structure pattern as on Body. When the piece measures 5 cm put a marker at each side (= cuff) – measure the work from here. When the piece measures 10 cm inc at each side by crocheting 1 extra sc/tr in the next to outermost sc/tr at each side every 9-6-5-4-3.5 cm a total of 5-7-8-9-10 times = 40-44-47-49-52 sc/tr. When the piece measures 49-48-48-46-44 cm bind off for sleeve cap at each side every tr row – see decreasing tips: 4 tr 1 time and 3 tr 1 time, then bind off 2 tr at each side until the piece measures approx. 56-57-58-58-58 cm, cut yarn and fasten. ASSEMBLY Sew shoulder seams edge to edge. Buttonband: Crochet approx. 78 - 90 sc along left front (there should be approx. 2 sc in each tr and 1 sc in each sc). The buttonband should be even (not too tight or loose), adjust number of sc so that it lies flat. Continue with 1 row sc, 1 row tr and 1 row sc, then cut yarn and fasten. Repeat along right front. Collar: Crochet approx. 40 - 46 sc around the neck (but not over buttonbands) – start from right side. Then crochet Structure pattern. When the collar measures approx. 3 cm inc 5 sc/tr evenly distributed from shoulder to shoulder at back of the neck = approx. 45 - 51 sc/tr. When the collar measures approx. 10-10-10-13-13 cm – adjust to end after tr row – cut yarn and fasten. Finished edge: Crochet 1 row sc around edge of cardigan. Start at lower edge on right front, crochet up along buttonband, around the collar and then down along buttonband on left front – crochet approx. 1 sc in each sc/tr. Then crochet 1 row crab stitrh around only the collar – see instructions above. CROCHETED BUTTONS Ch 2. Round 1: 6 sc in the first of the 2 ch, finish with 1 sl st in den first sc Round 2: Ch1, 2 sc in each sc from previous row, end with 1 sl st in 1st sc at start of row (= 12 sc). Rounds 3 + 4: Ch 1, 1 sc in each sc, end with 1 sl st in first sc at start of row (= 12 sc). Round 5: Ch 1, 1 sc in every other sc, end with 1 sl st in first sc at start of row (= 6 sc). Insert button into crocheted pouch, pull yarn tight around opening and fasten tight. Sew buttons evenly distributed on left button band - the top button should be approx. 1 cm from top edge and bottom button approx. 30 cm from bottom edge. For buttonholes use openings between tr on right button band. Sew in sleeves. Sew sleeve and side seams in one, sewing edge to edge. Fold up the bottom 5 cm of each sleeve and tack in place so it stays folded. BELT Ch 13. First row crochet as follows: 1 dc in 4th ch from hook, then 1 dc in each of the following 9 ch = 11 dc. Now crochet Structure pattern as on the cardigan, but instead of tr rows crochet dc rows (sc rows as before). When belt measures approx. 2 cm loop the end of belt through belt buckle and crochet end to belt by crocheting sc/dc on the next row through both layers. Continue with Structure pattern until belt measures approx. 85-90-95-100-105 cm - or to desired length. Finish last row by decreasing 1 sc/dc at each side = 9 sc/dc (dec 1 sc/st by crocheting together 2 sc or 2 dc), cut yarn and fasten. For holding the end of belt in place, crochet a loop as follows: ch 21 and join into a ring with 1 sl st in 1st ch. Then crochet 3 rows sc, cut yarn and fasten. Thread belt through loops. SCARF: Measurement: Approx. 15 x 80 cm or [6 x 311/2 in.] Materials: DROPS Puddel from Garnstudio 100 g colour no. 03, brown Knitting needles: DROPS 7 mm US10½ or size needed to obtain correct gauge. Gauge: 10 sts x 14 rows st st with 7 mm US10½ ndls = 10 x 10 cm [4 x 4 in.] With 2 ndls 7 mm US10½ cast on 15 sts with Puddel. The 2 ndls assure a loose cast-on. Pull out one of the ndls and k 1 row [= wrong side]. Thereafter work st st, starting with a k row. Work until the scarf meas approx. 79 cm, ending with a right side row. K the next row. Bind off loosely. |
|
|
|
|
Have you made this or any other of our designs? Tag your pictures in social media with #dropsdesign so we can see them! Do you need help with this pattern?You'll find tutorial videos, a Comments/Questions area and more by visiting the pattern on garnstudio.com. © 1982-2024 DROPS Design A/S. We reserve all rights. This document, including all its sub-sections, has copyrights. Read more about what you can do with our patterns at the bottom of each pattern on our site. |


With over 40 years in knitting and crochet design, DROPS Design offers one of the most extensive collections of free patterns on the internet - translated to 17 languages. As of today we count 304 catalogs and 11422 patterns - 11417 of which are translated into English (US/in).
We work hard to bring you the best knitting and crochet have to offer, inspiration and advice as well as great quality yarns at incredible prices! Would you like to use our patterns for other than personal use? You can read what you are allowed to do in the Copyright text at the bottom of all our patterns. Happy crafting!
Comments / Questions (10)
Hej, vilken härligt generös sajt för glada virkare! Jag vill gärna virka den fina koftan. Tål dock inte ull och jag får inga förslag på annat garn i er konverterare. Vad föreslår ni? Gärna en annan naturfiber och något som är mjukt. Glada hälsningar från Anneli
05.05.2020 - 16:51DROPS Design answered:
Hej Anneli, jo det forslag som kommer op i Paris skulle passe dig. DROPS Paris er 100 % bomuld :)
06.05.2020 - 08:35Hej. Vill väldigt gärna virka denna men mer som en jacka utan bältet. Har ni ett liknande mönster? Knapparna är underbara!
08.08.2019 - 13:36DROPS Design answered:
Hej Lena, jo men du kan virka den utan bältet :)
09.08.2019 - 08:34Me gustaría q me aclareiscel patrón de relieve donde picar la aguja crochet en el punto alto doble y en el punto bajo. Gracias
31.01.2015 - 12:09DROPS Design answered:
Hola Mazu, los pts altos dobles se trabajan de esta manera (los puntos bajos igual):
06.03.2016 - 11:24Hej!! Jag är sugen på att virka denna men funderar på vilken stl jag bör välja, M el L finns det några ungefärliga mått för de olika stl så man kan mäta lite på sig själv. Typ bröstvidd, armlängd o längd på själva "kappan"? Mvh Martina
21.10.2014 - 10:19DROPS Design answered:
Hej Martina, nederst i varje beskrivning hittar du måttskissen för plaggets mått. Jämför gärna måtten med ett plagg du gillar ha på. Lycka till!
22.10.2014 - 13:24Probleme sur les manches si bonjour si je pars de 45m augmente de 10 de chaque cote je n'arrive pas a vos 52m du modele je ne comprend pas comment faire
06.08.2013 - 09:11DROPS Design answered:
Bonjour Mme Fratnono, la chaînette de base de la manche est de 45 ml (dernière taille), mais au 1er rang, on saute régulièrement des ml pour terminer le 1er rang avec 32 DB, soit + 2 x 10 augm = 52 m. Bon crochet !
06.08.2013 - 09:59Thanks so much for clarification! I want this to turn out perfect! :)
14.11.2012 - 17:57Another question that I just need clarification on: On the sleeve, I marked at 5cm and it says measure the work from here. Then the following line says when the piece measures 10cm start the increases. Does it mean 10cm from the beginning, or 10cm from where I marked?
14.11.2012 - 16:05DROPS Design answered:
Dear Mrs Brunner, you mark the first 5 cm for the cuff, this part will be then folded at the end. You have to take all further measurements from this marker. Happy Knitting!
14.11.2012 - 16:53I am currently working on this beautiful sweater for my daughter. I'm confused in the sleeve section and wonder if there's a typo. It has the smallest size going the longest length before binding off for sleeve cap. That would only leave 7 cm between starting the binding off and the total length of the sleeve, not allowing enough rows for binding off. Is it possible those numbers (49-48-48-46-44) are written backwards and for a small I should start binding off at 44cm?
14.11.2012 - 15:47DROPS Design answered:
Dear Mrs Brunner, pattern match the measurement chart. For the smallest size, you will have a shorter sleeve cap but a longer sleeve. Happy Knitting!
14.11.2012 - 16:51Kjempefin jakke! Tok ikke så lang tid å lage heller;)
06.08.2007 - 18:24mönster till koftan
26.09.2006 - 19:30