
Popular categories
Looking for a yarn?


Comments / Questions (10)
![]() Shu wrote:
Shu wrote:
Bonjour, je suis bientôt à la fin du projet et j’ai remarqué que sur la photo du modèle les derniers rangs sont différents et n’ont pas l’air d’être un simple point jersey, il y a une bordure. Or je ne vois aucune explication a ce sujet dans le patron? Peut-être que je me trompe mais j’espère que vous pourrez m’aider à ce sujet.
12.03.2026 - 11:06
![]() Pauline Price wrote:
Pauline Price wrote:
What size is the model wearing? Thank you
02.02.2026 - 14:31DROPS Design answered:
Hi Pauline, There is a size chart at the end of the pattern with all the measurements for the different sizes. Regards, Drops Team.
03.02.2026 - 07:39
![]() Sarah wrote:
Sarah wrote:
Do you have this pattern as a pdf? Thanks!
27.01.2026 - 04:21DROPS Design answered:
Hi Sarah, click on the printer icon (top right corner) in the pattern and then choose ‘SAVE AS PDH’ instead of printer name from the drop-down menu. Happy knitting!
30.01.2026 - 08:14
![]() Mariarosa Davi wrote:
Mariarosa Davi wrote:
Sto realizzando il modello DROPS 261-7 e segnalo alcune imprecisioni: 1. A partire da "Quando il lavoro misura 13-14 cm...." si indica un modulo di 4 ferri con 6 aumenti (4 al primo ferro e 2 al quarto ) da ripetere 5 volte, quindi con aumento di 30 punti. I punti finali indicati risultano però 20 (da 64-70 a 84-90 maglie). Il disegno non mostra la curva degli aumenti sul retro del cappuccio (ai lati del segnapunti centrale) indicati nel 4. ferro del modulo sopra ricordato.
11.01.2026 - 09:19DROPS Design answered:
Buongiorno Mariarosa, grazie per la segnalazione, abbiamo corretto il testo: sul ferro 4 non ci sono aumenti. Buon lavoro!
11.01.2026 - 14:08
![]() Byzantine Dixie wrote:
Byzantine Dixie wrote:
My sister would like for me to make this for her. I don't knit, I only crochet. I have an idea how I might crochet something like this but would sure love to have a pattern. I don't want to disappoint my sister! Would you have or could you recommend something similar for crochet? Thanks
08.01.2026 - 19:56DROPS Design answered:
Hi Byzantine, Our only pattern for a crocheted hooded scarf is this one: https://www.garnstudio.com/search.php?action=search&w=crocheted+hooded+scarf&lang=us Regards, Drops Team.
09.01.2026 - 06:53
![]() Laura wrote:
Laura wrote:
Hola. Según el patrón, ¿para hacer los cordones se necesitaría 9 hilos de cada calidad de 320 cm., cada uno para un cordón, y lo mismo para el otro, o sea 5760 cm. en total? Gracias
22.12.2025 - 00:22DROPS Design answered:
Hola Laura, sí, necesitas 2880 cm de cada calidad o 5760 cm en total.
28.12.2025 - 19:01
![]() Valérie wrote:
Valérie wrote:
Bonjour "tricoter 0-1 fois le rang 3" ? cela signifie quoi ?
21.12.2025 - 18:08DROPS Design answered:
Bonjour Valerie, si vous tricotez la taille S/M, vous ne tricotez pas le rang 3 encore une fois, mais continuez votre travail a partir de la phrase suivante dans les explications. Si vous faites la taille L/XL, vous repetez le rang 3 encore une fois. Bon tricot!
29.01.2026 - 15:17
![]() Irma wrote:
Irma wrote:
Patroon drops , moet dit patroon, zie tekening 2x breien?
17.11.2025 - 11:20DROPS Design answered:
Dag Irma,
Nee, je volgt de beschrijving en op het einde, vouw je de gecreëerde lap dubbel, dan heb je een vorm zoals op de tekening onderaan. Dus op de tekening onderaan het patroon is hij al dubbel gevouwen. Op een van de foto's kun je ook goed zien hoe hij dubbel gevouwen is en waar hij samen genaaid wordt.
22.11.2025 - 09:38
![]() Sofia wrote:
Sofia wrote:
Det ser ut att stå fel på varv 4 i den danska beskrivningen. Kollade den norska och den svenska beskrivningen och enligt dem ökar man 2 maskor på varv1-4. Sen upprepas varv 3-4 2 ggr = tot 8 ökningar på varje sida om 8 mittenmaskor. Men i den danska beskrivningen står inga ökningar på varv 4.
15.11.2025 - 10:47DROPS Design answered:
Hei Sofia. Dette er nå rettet opp i. Takk for tilbakemeldignen. mvh DROPS Design
24.11.2025 - 14:00
![]() Ditte Rebecca Nymann wrote:
Ditte Rebecca Nymann wrote:
Jeg kan ikke få udtagningerne på pind 3 og 4 til at passe. Der står =2 taget ud ved hver pind, men pind 4 skal der ikke tages ud på? Ellers er den jo magen til pind 2. Når jeg så har strikket 8 pinde har jeg kun taget 6 masker ud på hver side afmarkeringen og ikke 8.
14.11.2025 - 19:04DROPS Design answered:
Hei Ditte. Her er det noe feil i den danske teksten. Dette skal vi får ordnet asap. Ta en titt på den norske teksten i mens: 4.PINNE (= vrangen): Strikk 2 kantmasker i-cord, strikk vrang til det gjenstår 4 masker før merket (kastene fra forrige pinne strikkes vridd hver sin vei), øk 1 maske, strikk vrang til det er strikket 4 masker forbi merket, øk 1 maske, strikk vrang til det gjenstår 2 masker på pinnen, strikk 2 kantmasker i-cord (= 2 masker økt). mvh DROPS Design
24.11.2025 - 09:06
|
||||
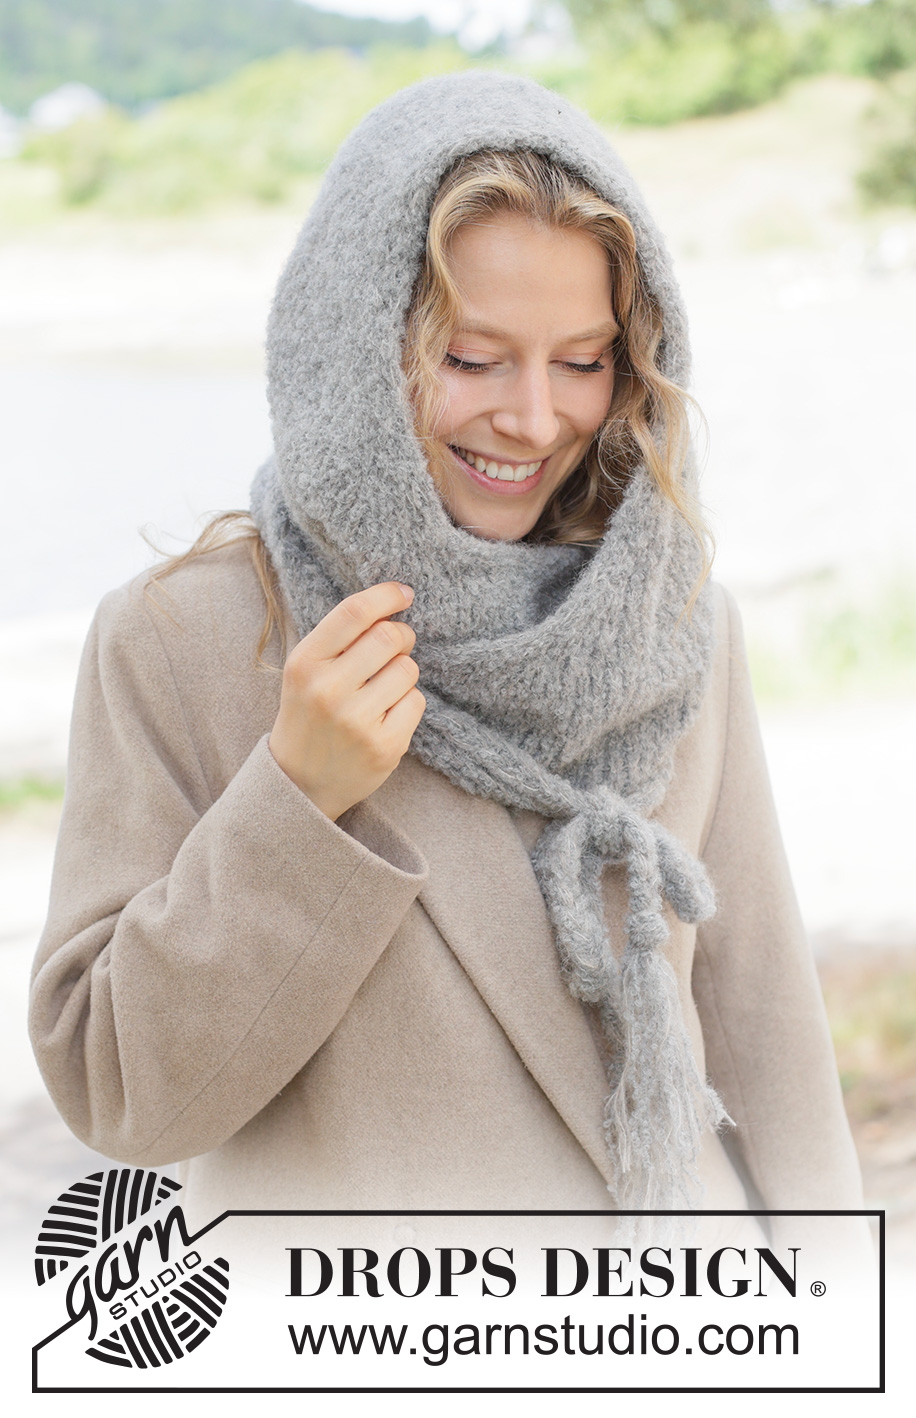
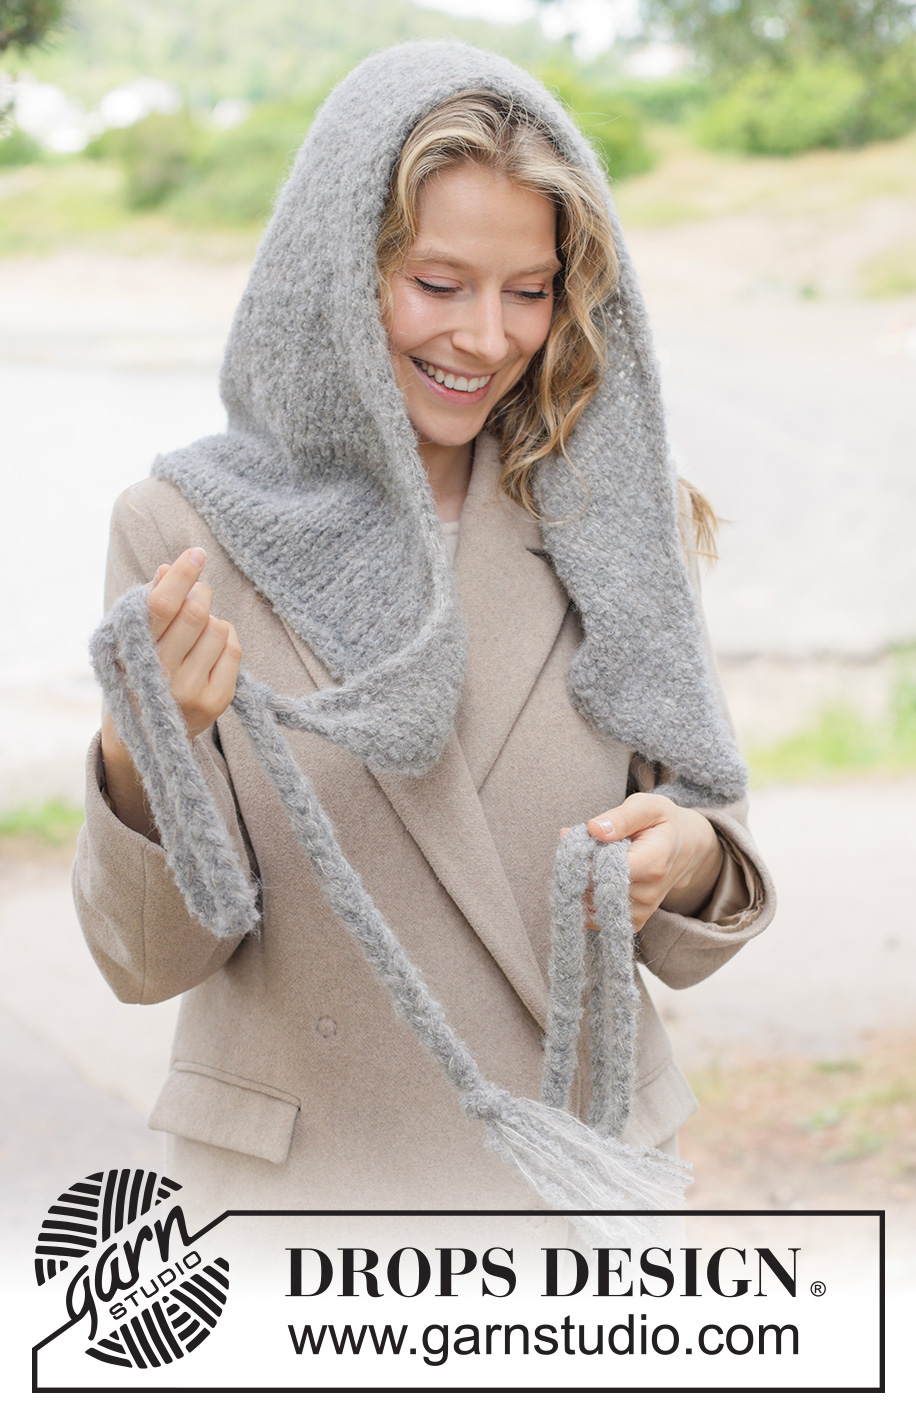
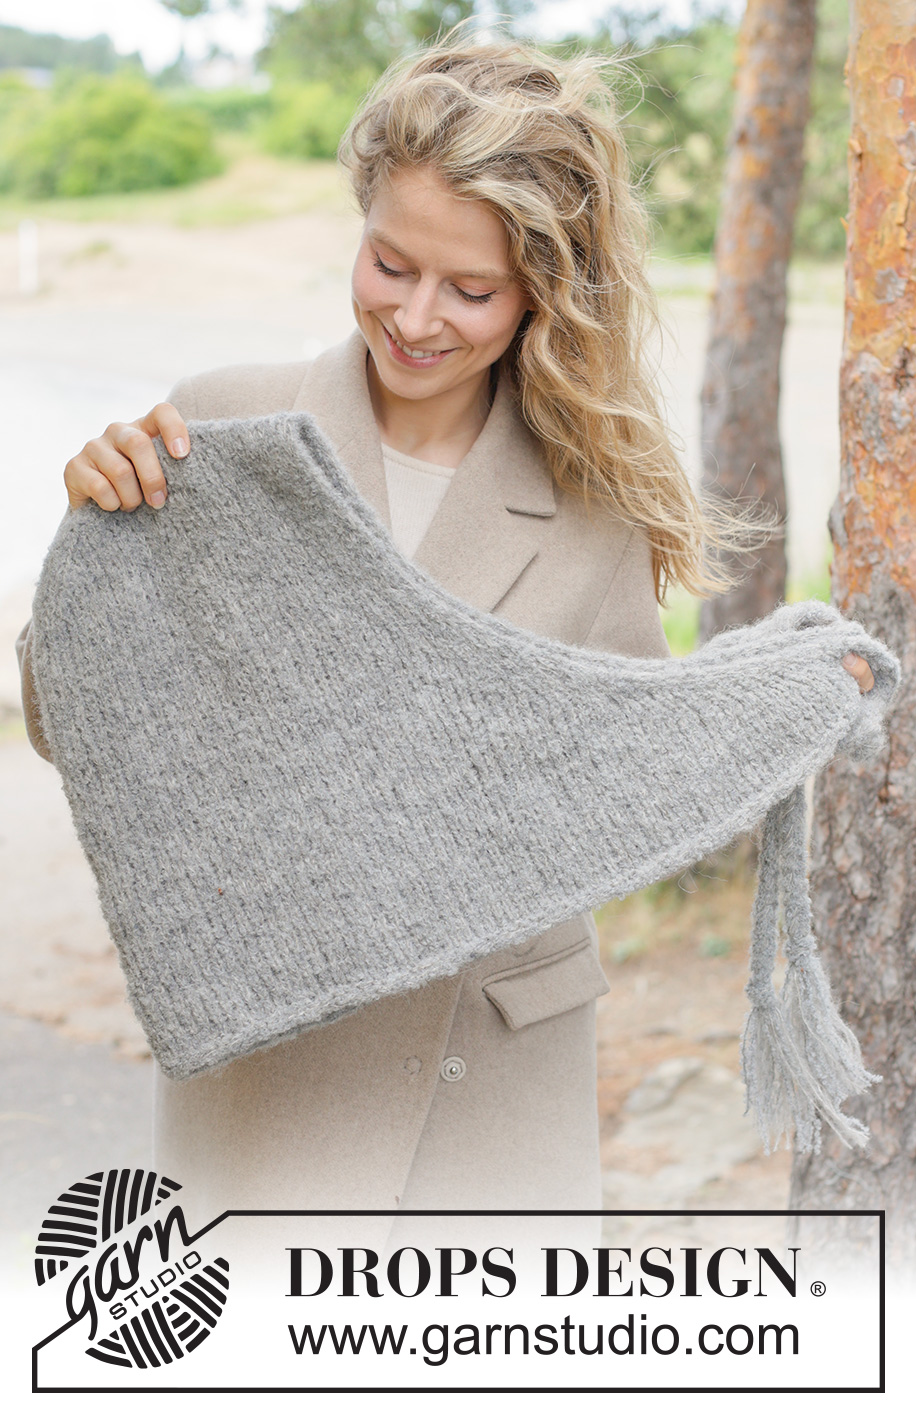
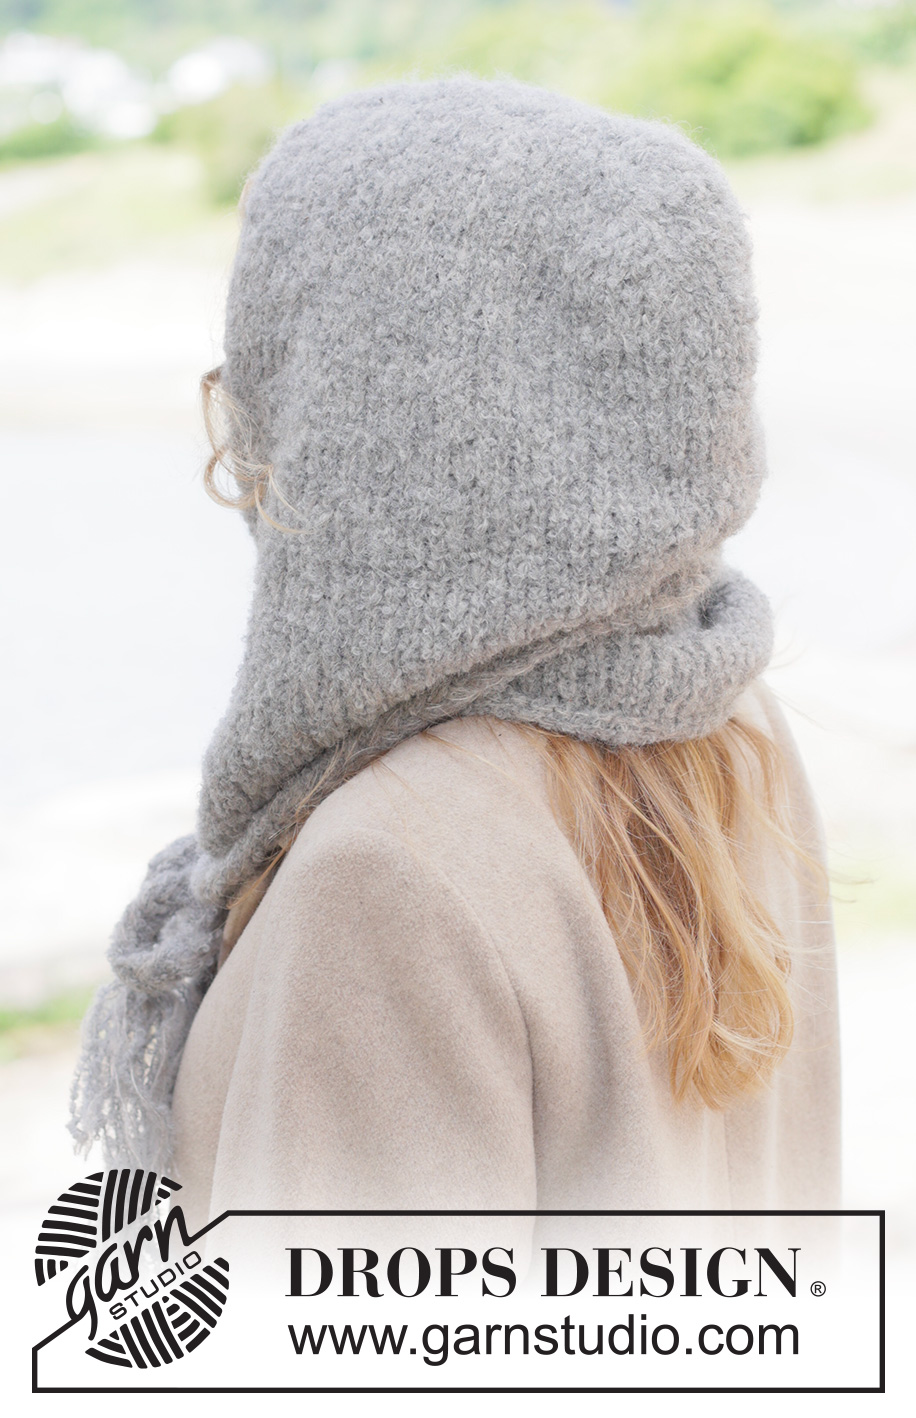
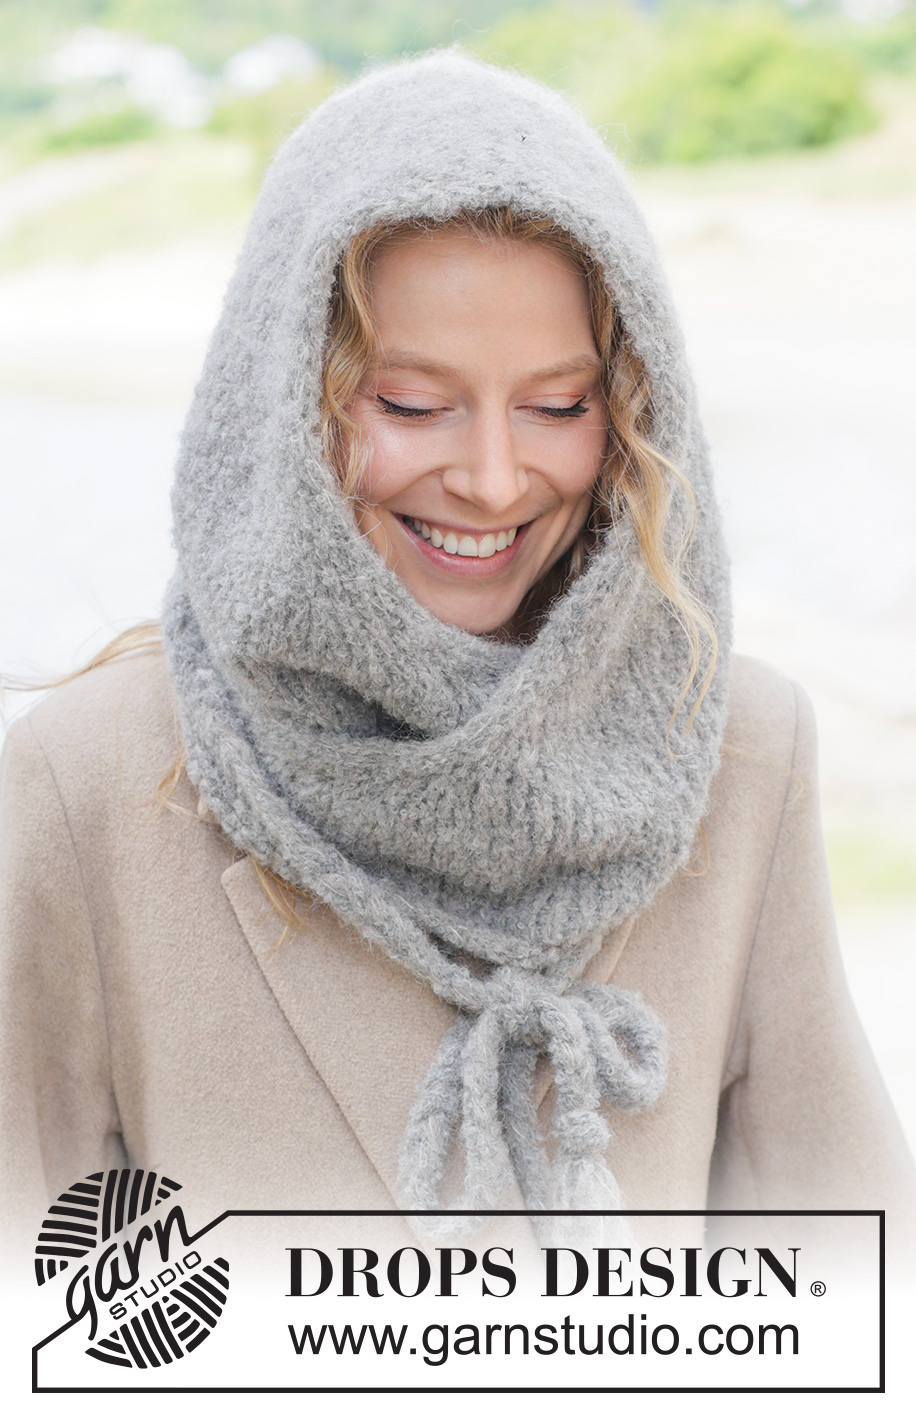
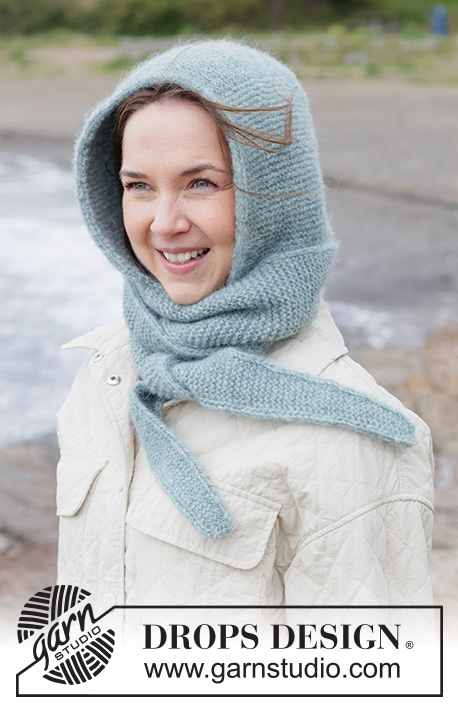
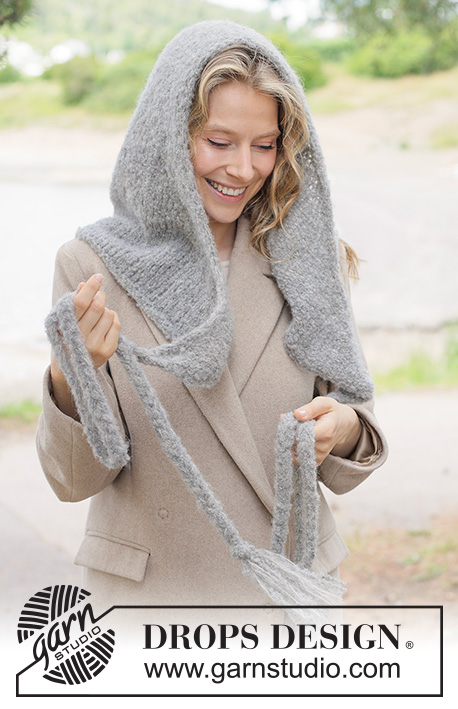
Soft Shelter Hood#softshelterhood |
||||
 |
 |
|||
Knitted hooded scarf in DROPS Alpaca Bouclé and DROPS Brushed Alpaca Silk. The piece is worked top down in stockinette stitch, with plaited ties.
DROPS 261-7 |
||||
|
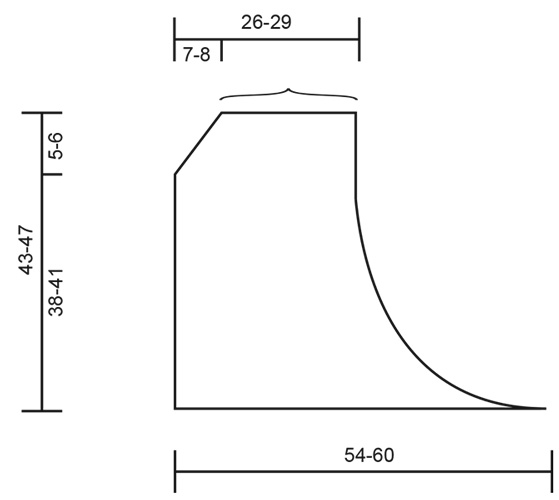
------------------------------------------------------- EXPLANATIONS FOR THE PATTERN: ------------------------------------------------------- INCREASE TIP: Increase 1 stitch by making 1 yarn over, which is worked as follows on the next round: BEFORE MARKER (when increasing on top of hat) / AT THE BEGINNING OF THE ROW (when increasing on each side of hat): Purl through the back loop to avoid a hole. Then work the new stitch in stockinette stitch. AFTER MARKER (when increasing on top of hat) / AT THE END OF THE ROW (when increasing on each side of hat): Slip the yarn over off the left needle and replace it the other way round (insert the left needle through the back when replacing it). Purl through the front loop to avoid a hole. Then work the new stitch in stockinette stitch. 2 EDGE STITCHES I-CORD: BEGINNING OF ROW: Slip 1 stitch purl-wise with the strand in front of the piece, knit 1. END OF ROW: Work until there are 2 stitches left on the row, slip 1 stitch purl-wise with the strand in front of the piece, knit 1. Work like this from both the right and wrong side. ------------------------------------------------------- START THE PIECE HERE: ------------------------------------------------------- HOODED SCARF –SHORT OVERVIEW OF THE PIECE: The piece is worked back and forth with circular needle, top down, then the hood is sewn together. 2 plaited ties are worked to finish. HOODED SCARF: Cast on 48-52 stitches with circular needle size 7 MM = US 10.75, 1 strand DROPS Alpaca Bouclé and 1 strand DROPS Brushed Alpaca Silk (2 strands). Purl 1 row from the wrong side. Insert 1 marker in the middle of the row (24-26 stitches on each side). Work as follows: ROW 1 (right side): Work 2 EDGE STITCHES I-CORD – read explanation above, knit until there are 4 stitches left before the marker, increase 1 stitch – read INCREASE TIP, knit to 4 stitches past the marker, increase 1 stitch, knit until there are 2 stitches left on the row, work 2 edge stitches I-cord (= 2 increased stitches). ROW 2 (wrong side): Work 2 edge stitches I-cord, purl until there are 4 stitches left before the marker (remember to work the yarn overs twisted as described under INCREASE TIP), increase 1 stitch, purl to 4 stitches past the marker, increase 1 stitch, purl until there are 2 stitches left on the row, work 2 edge stitches I-cord (= 2 increased stitches). ROW 3 (right side): Work 2 edge stitches I-cord, knit until there are 4 stitches left before the marker (remember to work the yarn overs twisted), increase 1 stitch, knit to 4 stitches past the marker, increase 1 stitch, knit until there are 2 stitches left on the row, work 2 edge stitches I-cord (= 2 increased stitches). ROW 4 (wrong side): Work 2 edge stitches I-cord, purl until there are 4 stitches left before the marker (remember to work the yarn overs twisted), increase 1 stitch, purl to 4 stitches past the marker, increase 1 stitch, purl until there are 2 stitches left on the row, work 2 edge stitches I-cord (= 2 increased stitches). Work ROWS 3 and 4, 2-2 more times (4-4 rows worked), 8-8 increased stitches on each side of the marker = 64-68 stitches. Work ROW 3, 0-1 more time = 64-70 stitches. Continue with stockinette stitch and 2 edge stitches I-cord on each side. Remember to maintain the knitting gauge. When the piece measures 13-14 cm = 5⅛"-5½" from the cast-on edge, increase 2 stitches each side as follows: ROW 1 (right side): Work 2 edge stitches I-cord, knit 1, increase 1 stitch, knit 3, increase 1 stitch, knit until there are 6 stitches left, increase 1 stitch, knit 3, increase 1 stitch, knit 1, work 2 edge stitches I-cord (= 4 increased stitches). ROW 2 (wrong side): Work 2 edge stitches I-cord, purl until there are 2 stitches left (yarn overs twisted), 2 edge stitches I-cord. ROW 3 (right side): Work 2 edge stitches I-cord, knit until there are 2 stitches left, 2 edge stitches I -cord. ROW 4 (wrong side): Work 2 edge stitches I-cord, purl until there are 2 stitches left, 2 edge stitches I-cord. Work ROWS 1 to 4 a total of 5-5 times (20-20 rows worked) = 84-90 stitches. The piece measures approx. 26-27 cm = 10¼"-10⅝" from the cast-on edge. Now increase as follows: ROW 1 (right side): Work 2 edge stitches I-cord, knit 1, increase 1 stitch, knit 3, increase 1 stitch, knit until there are 6 stitches left, increase 1 stitch, knit 3, increase 1 stitch, knit 1, work 2 edge stitches I-cord (= 4 increased stitches). ROW 2 (wrong side): Work 2 edge stitches I-cord, purl until there are 2 stitches left (yarn overs twisted), 2 edge stitches I-cord. Work ROWS 1 and 2 a total of 12-14 times (24-28 rows worked) = 132-146 stitches. The piece measures approx. 42-46 cm = 16½"-18" from the cast-on edge. On the next row work a hole in each side for the plaited ties, working as follows: ROW 1 (right side): Work 2 edge stitches I-cord, bind off 2 stitches, knit until there are 4 stitches left on the row, bind off 2 stitches, work 2 edge stitches I-cord. ROW 2 (wrong side). Work 2 edge stitches I-cord, cast on 2 stitches above the bind-off stitches, knit until there are 2 stitches left on the row, cast on 2 stitches, work 2 edge stitches I-cord. On the next row (right side) bind off slightly loosely with knit. The piece measures approx. 43-47 cm = 17"-18½" from the cast-on edge. ASSEMBLY: Lay the hood flat and sew the top – see illustration. TIES: Cut 9 strands DROPS Alpaca Bouclé and 9 strands DROPS Brushed Alpaca Silk (18 strands), each 320 cm = 126" long. Lay the strands together and thread them through the hole on one side of the scarf. Fold the strands double = 36 strands, each 160 cm = 63" in length. Divide the strands into 3 bunches of 12 strands and plait them together. When the plait measures 100-110 cm =39⅜"-43⅜", tie a knot and trim the strands 12-14 cm = 4¾"-5½" from the knot. Work a second tie like this, through the second hole. |
||||
Diagram explanations |
||||
|
||||
 |
||||
Have you finished this pattern?Tag your pictures with #dropspattern #softshelterhood or submit them to the #dropsfan gallery. Do you need help with this pattern?You'll find 14 tutorial videos, a Comments/Questions area and more by visiting the pattern on garnstudio.com. © 1982-2026 DROPS Design A/S. We reserve all rights. This document, including all its sub-sections, has copyrights. Read more about what you can do with our patterns at the bottom of each pattern on our site. |
||||


With over 40 years in knitting and crochet design, DROPS Design offers one of the most extensive collections of free patterns on the internet - translated to 17 languages. As of today we count 324 catalogs and 12291 patterns - 12281 of which are translated into English (US/in).
We work hard to bring you the best knitting and crochet have to offer, inspiration and advice as well as great quality yarns at incredible prices! Would you like to use our patterns for other than personal use? You can read what you are allowed to do in the Copyright text at the bottom of all our patterns. Happy crafting!
Post a comment to pattern DROPS 261-7
We would love to hear what you have to say about this pattern!
If you want to leave a question, please make sure you select the correct category in the form below, to speed up the answering process. Required fields are marked *.