
Popular categories
Looking for a yarn?


Comments / Questions (40)
![]() Hson wrote:
Hson wrote:
Jag tycker detta mönster är ovanligt krångligt med framkanterna som ska stickas först som ändå blir för korta för att mötas i nacken. Finns det något "enklare" mönster på kofta hos er där jag kan applicera detta honeycomb mönstret på? Och varför måste omslagen stickas vridet avigt på olika sätt efter och före markören och V-halsökn, det blir väl ingen skillnad i mönstret? Vänlig hälsning 😊
02.10.2024 - 22:50DROPS Design answered:
Hej. Du hittar alla våra mönster med bikupemönster här, så här kanske du hittar ett annat mönster du vill göra. Lycka till!
14.10.2024 - 14:20
![]() Hson wrote:
Hson wrote:
Detta mönster menade jag. Det står Honeycomb, är inte det samma sak som Bikupmönster? Men på en video ser bikupemönstret helt annorlunda ut än detta.
22.03.2024 - 13:31DROPS Design answered:
Hej, det er flere måder at strikke honeycomb / bikupmönster på, vi har ikke en video på dette, så her er du nødt til at følge de 2 diagram-forklaringer i opskriften :)
03.04.2024 - 14:01
![]() Isabelle Calleau wrote:
Isabelle Calleau wrote:
Bonjour, est-il possible d'utiliser une laine du groupe C seule ? la brushed alpaca silk ? Merci
09.02.2024 - 18:27DROPS Design answered:
Bonjour Mme Calleau, tout à fait dans la mesure où vous avez le même échantillon, notez juste que la texture sera différente du modèle photographié en raison des propriétés différentes des laines utilisées. Bon tricot!
12.02.2024 - 07:12
![]() Kirsty Oakes wrote:
Kirsty Oakes wrote:
Hi, could you use Drops Soft Tweed instead of Sky, in addition to Kid-Silk? Thank you.
15.11.2023 - 14:16DROPS Design answered:
Dear Mrs Oakes, sure you can as Sky and Soft Tweed both belong to same yarn group, just use the yarn converter to get the new amount required in Soft Tweed for your size - and work together with Kid-Silk as in the pattern. Happy knitting!
16.11.2023 - 09:17
![]() Lone wrote:
Lone wrote:
Smuk trøje. Jeg er desværre allerede gået i stå ved start på bærestykket. Jeg strikker str. M og har 74 masker. Jeg skal sætte 4 mærker men Fordelingen giver 70 masker. Hvad skal de 4 der er i overs? Mh Lone
05.11.2023 - 20:32DROPS Design answered:
Hej Lone, har du talt de masker med du sætter mærkerne i?
09.11.2023 - 15:04
![]() Eef wrote:
Eef wrote:
Hoe zit het precies bij het meerderen voor de mouw en voor/achterpand, wanneer je dit om en om doet ? Op sommige toeren heb ik 3 steken over en moet ik hier een kabel maken. Echter is er dan geen "extra" steek voor of na de markeerder, zoals eerder in de tekeningen. Moet ik hier wel een kabel maken?
03.09.2023 - 16:15DROPS Design answered:
Dag Eef,
Als er niet genoeg steken zijn om een kabel te maken, dan maak je geen kabel, zodat het meerderen mooi doorloopt. Op een van de foto's is de raglanlijn ook te zien.
04.09.2023 - 20:16
![]() Eef wrote:
Eef wrote:
Blijf ik na a1/a5 helemaal doorlopen te hebben nog steeds meerderen voor de v hals aan de kant van de voorbiessteken ? Of meerder ik daarna enkel nog voor de mouwen en de panden?(bij de markeringen)
26.08.2023 - 15:17DROPS Design answered:
Dag Eef,
Je meerdert voor de v-hals zo vaak als staat aangegeven voor jouw maat, onafhankelijk van hoe ver je met de telpatronen bent.
27.08.2023 - 16:59
![]() Eef wrote:
Eef wrote:
Ik heb een vraag over de eerste naald bij de pas. Hier staat dat je moet meerderen voor en na de markeringen. In de uitleg staat dat je 4 raglansteken hebt. En 1 steek voor en na deze 4 steken meerdert. Echter op de eerste naald heb je de 7 voorbiessteken, dan meerderen voor de hals, maar er zijn aan deze kant van de markeerder nog geen 2 steken waarvoor je kan meerderen. Kan ik uitgelegd krijgen hoe ik dit moet doen ?
19.08.2023 - 09:16DROPS Design answered:
Dag Eef,
Je meerdert direct voor en na de markeerdraadsteek. Bij elke raglanlijn heb je dus steeds 1 steek tussen de meerderingen en niet 4. Met 4 raglansteken worden de 4 verschillende raglans bedoeld, dat is natuurlijk verwarrend.
20.08.2023 - 15:37
![]() Eef wrote:
Eef wrote:
Ik heb een vraag over de eerste naald bij de pas. Hier staat dat je moet meerderen voor en na de markeringen. In de uitleg staat dat je 4 raglansteken hebt. En 1 steek voor en na deze 4 steken meerdert. Echter op de eerste naald heb je de 7 voorbiessteken, dan meerderen voor de hals, maar er zijn aan deze kant van de markeerder nog geen 2 steken waarvoor je kan meerderen. Kan ik uitgelegd krijgen hoe ik dit moet doen ?
19.08.2023 - 09:15
![]() Es wrote:
Es wrote:
Voor mij is het niet duidelijk welk patroon ik nu over welk gedeelte moet breien ? Brei ik a1 en a5 over de voorkant, a2 over de mouw en a3 en a4 over het achterpand ?
14.07.2023 - 17:58
|
||||||||||
Northern Mermaid Cardigan#northernmermaidcardigan |
||||||||||
 |
 |
|||||||||
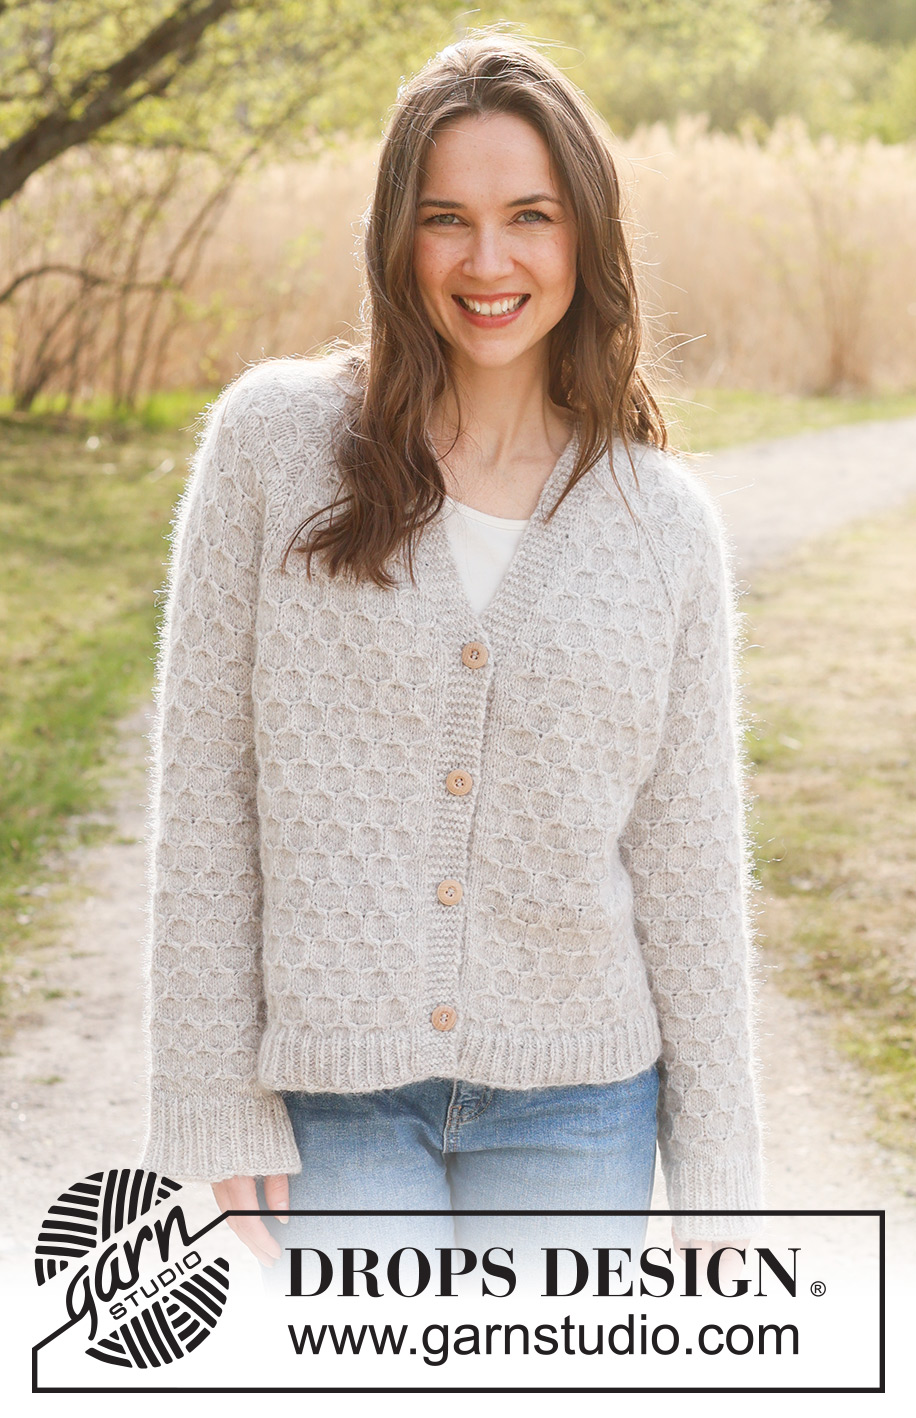
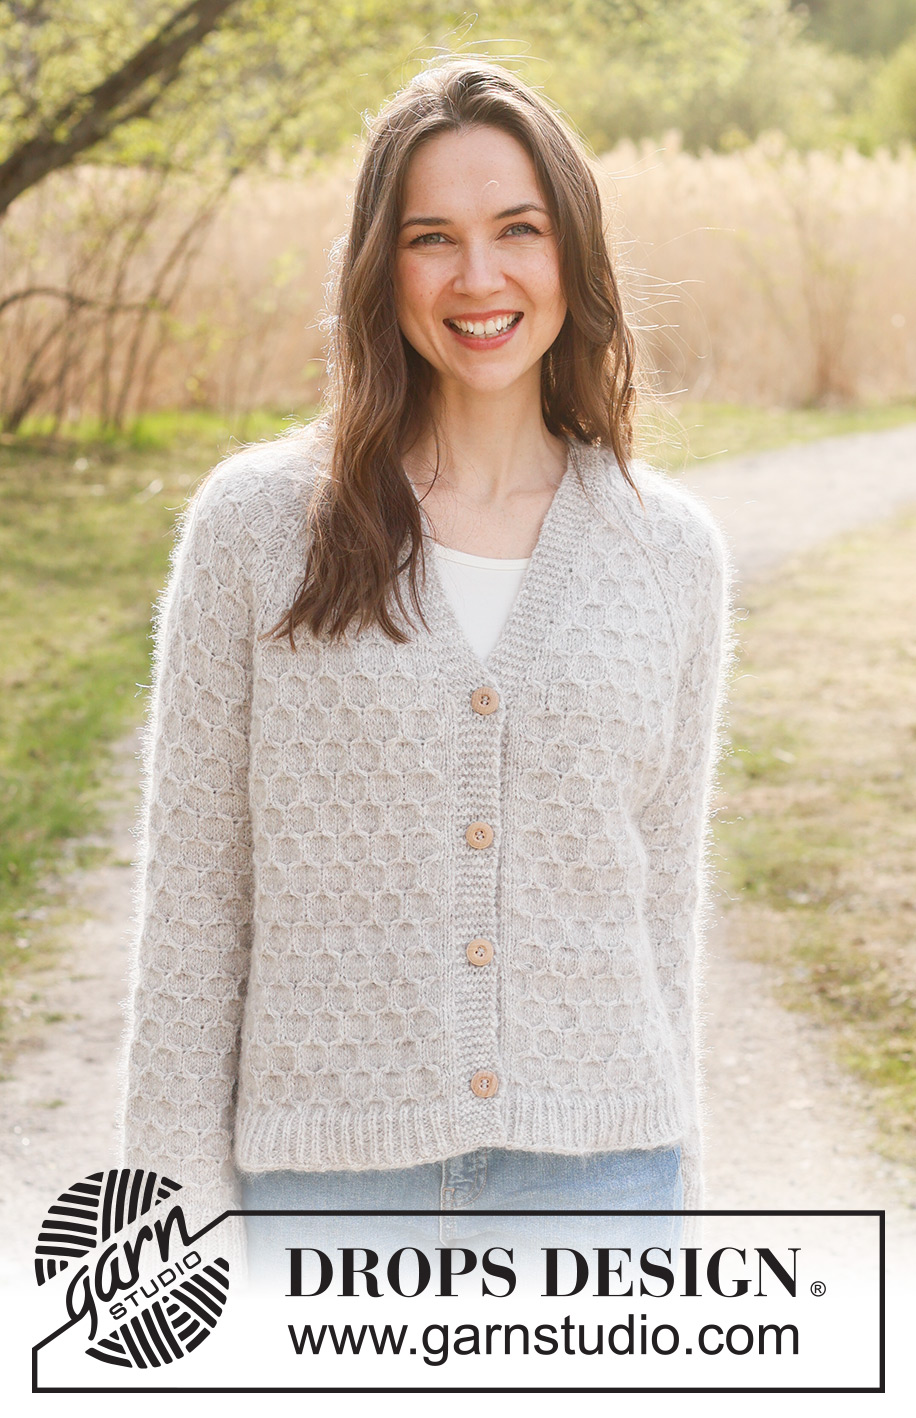
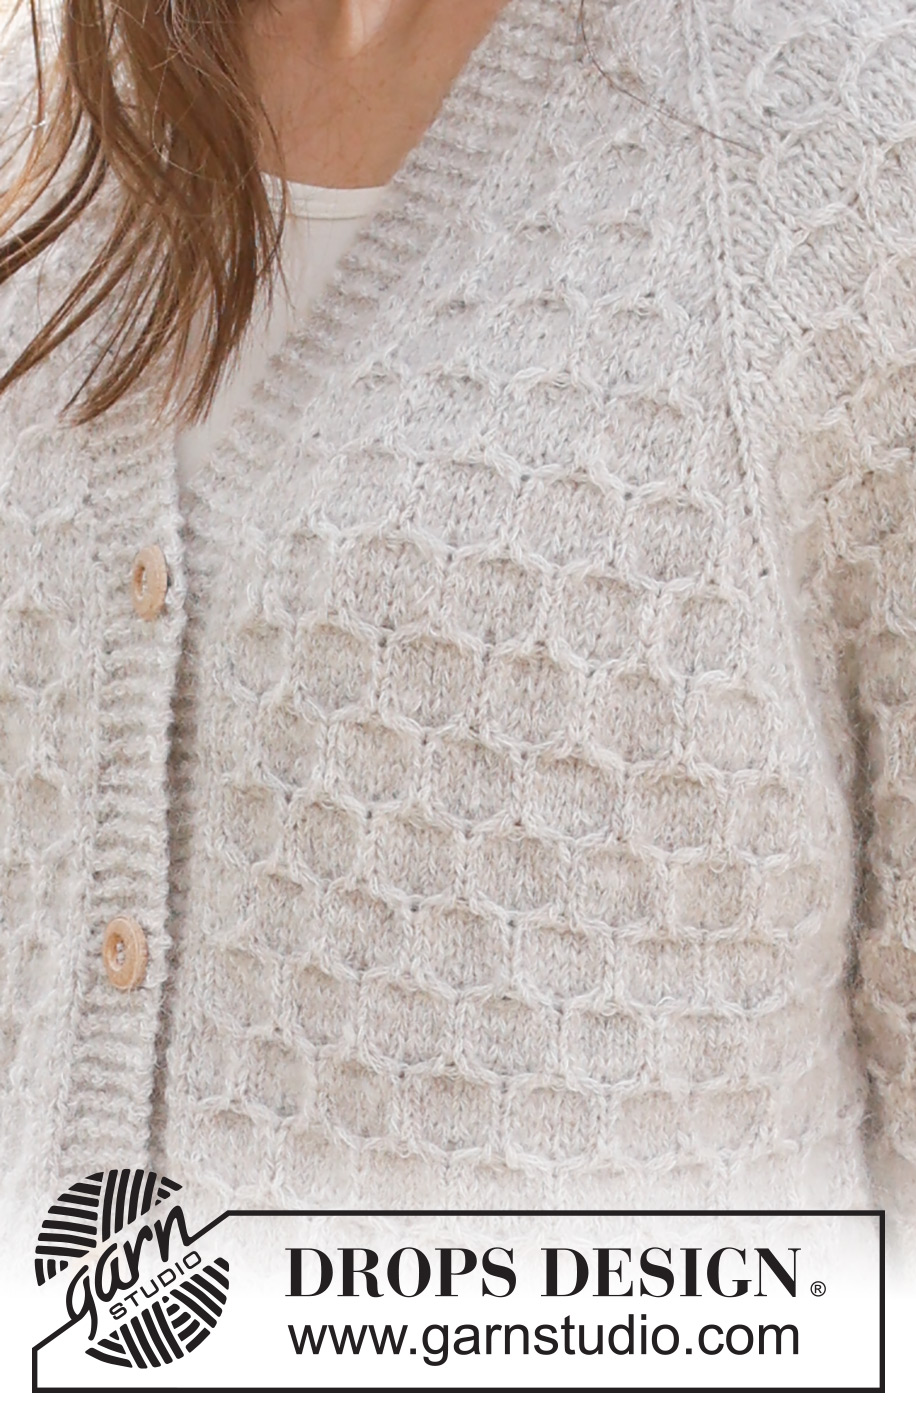
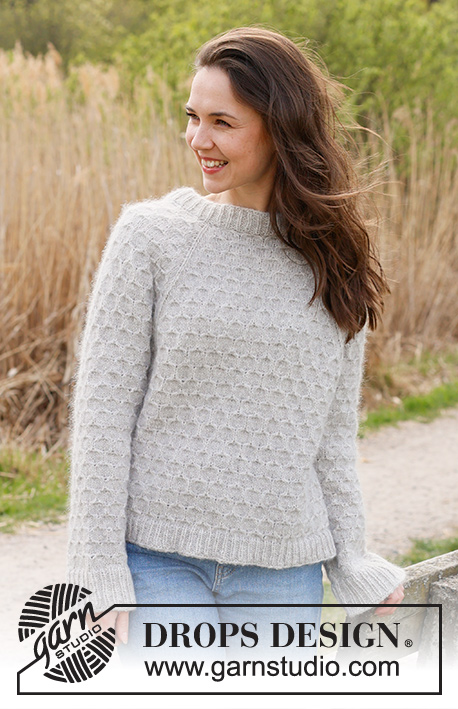
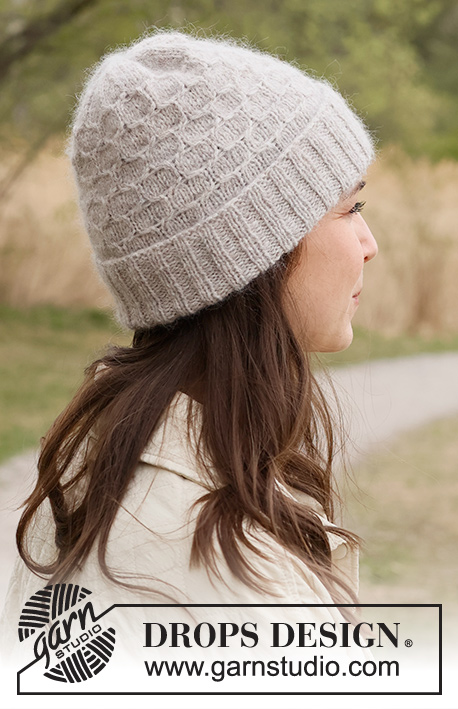
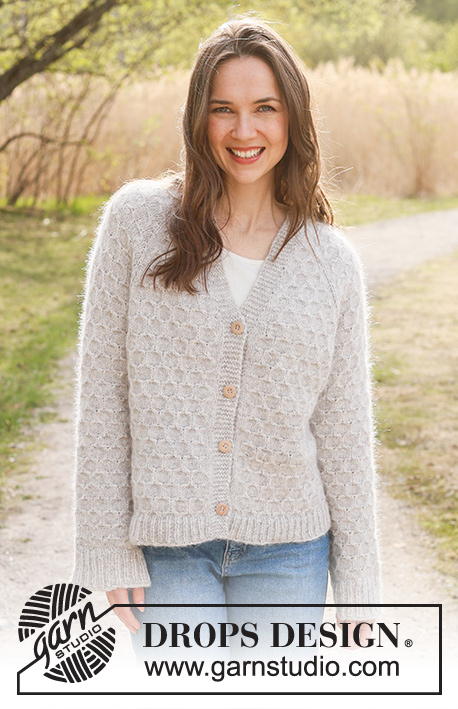
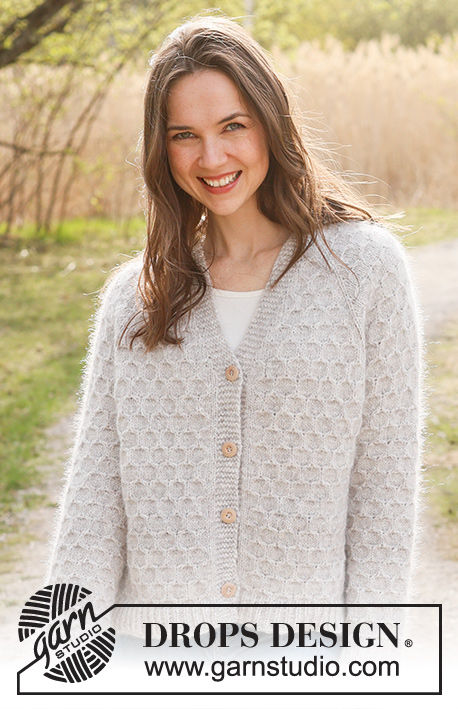
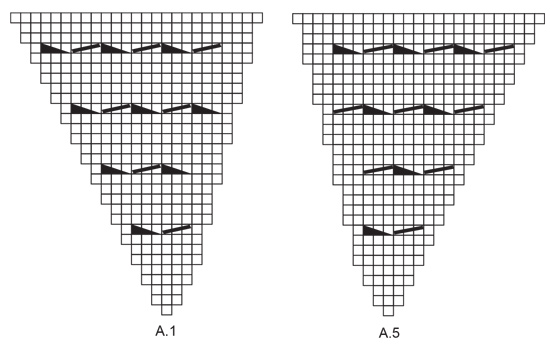
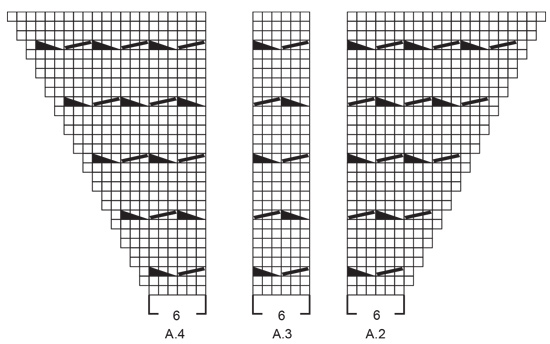
Knitted jacket in DROPS Sky / DROPS Merino Extra Fine and DROPS Kid-Silk. The piece is worked top down with raglan, V-neck and honeycomb pattern. Sizes XS/S - XXXL.
DROPS 236-5 |
||||||||||
|
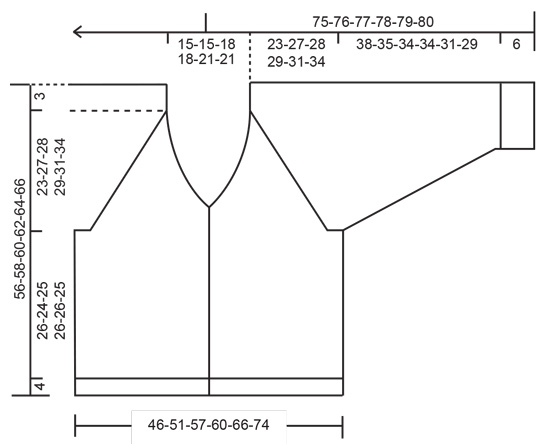
------------------------------------------------------- EXPLANATIONS FOR THE PATTERN: ------------------------------------------------------- RIDGE/GARTER STITCH (worked back and forth): Knit all rows. 1 ridge = knit 2 rows. PATTERN: See diagrams A.1 to A.5. The diagrams show all rows in the pattern from the right side. As you increase for raglan and V-neck, work the new stitches into the pattern as shown in the diagrams, i.e. work them in stockinette stitch until they fit the 3 or 6 stitches in the pattern. RAGLAN: All increases are worked from the right side! Increase 1 stitch before/after the 4 marker-stitches (in each transition between the body and sleeves). Increase 1 stitch by making 1 yarn over. The yarn overs are worked as follows from the wrong side: BEFORE MARKER: Purl the back loop. No hole. AFTER MARKER: Slip the yarn over off the left needle and replace it twisted (insert the left needle through the back when replacing it). Purl the front loop. No hole. V-NECK: All increases are worked from the right side! Increase 1 stitch after/before the bands. Increase 1 stitch by making 1 yarn over. The yarn overs are worked as follows from the wrong side: BEFORE THE BAND: Purl the back loop. No hole. AFTER THE BAND: Slip the yarn over off the left needle and replace it twisted (insert the left needle through the back when replacing it). Purl the front loop. No hole. BUTTONHOLES: Work buttonholes on the right band (when the garment is worn). Work from the right side when there are 4 stitches left on the row as follows: Make 1 yarn over, knit 2 together and knit 2. On the next row (wrong side), knit the yarn over to leave a hole. The first buttonhole is worked 1 cm = ⅜" after the final increase for the V-neck. Then work the other 3-3-4-4-4-4 buttonholes with approx. 9-10-7-7½-6½-7 cm = 3½"-4"-2¾"-2⅞"-2½"-2¾" between each one. DECREASE TIP (for sleeves): Decrease 1 stitch on either side of the marker as follows: Start 2 stitches before the marker, knit 2 together, marker, slip 1 stitch as if to knit, knit 1 and pass the slipped stitch over the knitted stitch. ------------------------------------------------------- START THE PIECE HERE: ------------------------------------------------------- JACKET – SHORT OVERVIEW OF THE PIECE. Start by working 2 bands in garter stitch – which are later sewn onto the neck-line. Then cast on stitches between the bands for the neck-line and work the yoke back and forth, from mid-front and top down. Stitches are increased for raglan and V-neck. The yoke is divided for body and sleeves and the body continued back and forth with circular needle. The sleeves are worked in the round with double pointed needles/short circular needle. RIGHT BAND (when the garment is worn): Cast on 7-7-7-9-9-9 stitches with circular needle size 3.5 MM = US 4 and 1 strand of each quality (2 strands). Work GARTER STITCH – read description above, for 13-13-14-14-16-16 cm = 5⅛"-5⅛"-5½"-5½"-6¼"-6¼". Finish after a row from the wrong side. Lay the piece to one side. LEFT BAND: Cast on 7-7-7-9-9-9 stitches with circular needle size 3.5 MM = US 4 and 1 strand of each quality (2 strands). Work garter stitch for 13-13-14-14-16-16 cm = 5⅛"-5⅛"-5½"-5½"-6¼"-6¼", finish after a row from the right side, do not cut the strand. Cast on 60-60-66-66-72-72 stitches at the end of the row, then knit the 7-7-7-9-9-9 stitches from the right band = 74-74-80-84-90-90 stitches. Change to circular needle size 5 MM = US 8. Purl 1 row from the wrong side, working the 7-7-7-9-9-9 band stitches on each side in garter stitch. REMEMBER THE KNITTING GAUGE! YOKE: Insert 4 markers without working the stitches. These are used when increasing to RAGLAN – read description above. Count 8-8-8-10-10-10 stitches, insert marker-1 in the next stitch, count 12 stitches, (sleeve) insert marker-2 in the next stitch, count 30-30-36-36-42-42 stitches (back piece), insert marker-3 in the next stitch, count 12 stitches (sleeve), insert marker-4 in the next stitch. There are 8-8-8-10-10-10 stitches left after the last marker. Work the first row from the right side as follows: 7-7-7-9-9-9 band stitches in garter stitch, increase 1 stitch for the V-NECK – read description above, work A.1, increase 1 stitch for RAGLAN on each side of marker-1 – read description above (marker stitch is worked in stockinette stitch), A.2, A.4, increase 1 stitch for raglan on each side of marker-2, A.2, work A.3 3-3-4-4-5-5 times, A.4, increase 1 stitch for raglan on each side of marker-3, A.2, A.4, increase 1 stitch for raglan on each side of marker-4, A.5, increase 1 stitch for the V-neck, 7-7-7-9-9-9 band stitches in garter stitch. Continue this pattern back and forth, increasing for raglan and V-neck simultaneously as described below; therefore read the next 2 sections before continuing! RAGLAN: Increase on each side of the 4 marker-stitches, on each row from the right side (8 stitches increased) a total of 19-19-19-25-22-16 times, including the first increase. The new stitches are worked into the pattern as shown in the diagrams – read PATTERN in the explanations above. Then continue to increase for raglan, but every other increase is only on the front and back pieces (4 stitches increased). You now increase every 2nd row on the body (every row from the right side) and every 4th row on the sleeves (every 2nd row from the right side). Increase like this 12-18-18-12-18-30 times on the body (6-9-9-6-9-15 times on the sleeves). A total of 31-37-37-37-40-46 times on the body and 25-28-28-31-31-31 times on the sleeves. V-NECK: Increase for the V-neck inside the bands every 2nd row 3 times, including the first increase. Then increase every 4th row 12-12-15-15-18-18 times. After the last increase there are 328-364-376-392-416-440 stitches. Continue working without further increases until the yoke measures 23-27-28-29-31-34 cm = 9"-10⅝"-11"-11⅜"-12¼"-13⅜" from the cast-on edge at the back – remember the BUTTONHOLES on the right band – read description above. AT THE SAME TIME on the last row from the right side decrease 4 stitches by working the marker-stitches as follows: Marker-stitches 2 and 4: Knit the marker-stitch and the next stitch twisted together. Marker-stitches 1 and 3: Start 1 stitch before the marker-stitch, knit 2 together = 324-360-372-388-412-436 stitches. On the next row (wrong side) divide for the body and sleeves: Work the first 54-60-63-65-71-77 stitches as before (right front piece), place the next 62-68-68-74-74-74 stitches on a thread for the sleeve, cast on 4-4-10-16-16-22 stitches (in side under sleeve), work 92-104-110-110-122-134 stitches (back piece), place the next 62-68-68-74-74-74 stitches on a thread for the sleeve, cast on 4-4-10-16-16-22 stitches (in side under sleeve), work the last 54-60-63-65-71-77 stitches as before (left front piece). The piece measures approx. 26-30-31-32-34-37 cm = 10¼"-11¾"-12¼"-12½"-13⅜"-14½" from the shoulder. The body and sleeves are finished separately – the piece is now measured from here. BODY: = 208-232-256-272-296-332 stitches. Work pattern as follows: 7-7-7-9-9-9 band stitches in garter stitch, 1 stockinette stitch, work A.3 until there are 8-8-8-10-10-10 stitches left, (match the pattern to the pattern on the yoke), 1 stockinette stitch, 7-7-7-9-9-9 band stitches in garter stitch. Continue this pattern for 26-24-25-26-26-25 cm = 10¼"-9½"-9¾"-10¼"-10¼"-9¾" – finish after row 4 or 10 in A.3. Knit 1 row from the right side and decrease 19-22-22-22-25-31 stitches evenly spaced = 189-210-234-250-271-301 stitches. Change to circular needle size 3.5 MM = US 4. Work rib as follows from the wrong side: 7-7-7-9-9-9 band stitches in garter stitch, * purl 1, knit 2 *, work from *-* until there are 8-8-8-10-10-10 stitches left, purl 1, 7-7-7-9-9-9 band stitches in garter stitch. Continue this rib for 4 cm = 1½". Bind off a little loosely with knit from the right side. The jacket measures approx. 56-58-60-62-64-66 cm = 22"-22¾"-23⅝"-24⅜"-25¼"-26" from the shoulder down. SLEEVES: Place the 62-68-68-74-74-74 stitches from the thread on the one side of the piece on short circular needle/double pointed needles size 5 MM = US 8 and knit up 1 stitch in each of the new stitches cast on under the sleeve = 66-72-78-90-90-96 stitches. Insert a marker in the middle of the new stitches under the sleeve. Work A.3 in the round (make sure it matches A.3 on the yoke). When the sleeve measures 4-4-4-3-2-3 cm = 1½"-1½"-1½"-1⅛"-¾"-1⅛" decrease 2 stitches on each side of the marker – read DECREASE TIP. Decrease like this every 6-5½-3½-2½-2½-1½ cm = 2⅜"-2⅛"-1¼"-1"-1"-½" a total of 6-6-9-12-12-15 times = 54-60-60-66-66-66 stitches. The stitches which do not fit into the pattern while decreasing are worked in stockinette stitch. Continue working until the sleeve measures 38-35-34-34-31-29 cm = 15"-13¾"-13⅜"-13⅜"-12¼"-11⅜" from the division, finishing after round 4 or 10 in A.3 (continue with stockinette stitch if necessary or to desired length - 6 cm = 2⅜" left). Change to double pointed needles size 3.5 MM = US 4 and work rib (knit 1, purl 2) for 6 cm = 2⅜". Loosely bind off with knit. The sleeve measures approx. 44-41-40-40-37-35 cm = 17¼"-16⅛"-15¾"-15¾"-14½"-13¾" from the division. Work the other sleeve in the same way. ASSEMBLY: Sew the bands together mid-back then sew them to the neck-line. Sew the buttons onto the left band. |
||||||||||
Diagram explanations |
||||||||||
|
||||||||||
 |
||||||||||
 |
||||||||||
 |
||||||||||
Have you finished this pattern?Tag your pictures with #dropspattern #northernmermaidcardigan or submit them to the #dropsfan gallery. Do you need help with this pattern?You'll find 31 tutorial videos, a Comments/Questions area and more by visiting the pattern on garnstudio.com. © 1982-2026 DROPS Design A/S. We reserve all rights. This document, including all its sub-sections, has copyrights. Read more about what you can do with our patterns at the bottom of each pattern on our site. |
||||||||||


With over 40 years in knitting and crochet design, DROPS Design offers one of the most extensive collections of free patterns on the internet - translated to 17 languages. As of today we count 324 catalogs and 12245 patterns - 12235 of which are translated into English (US/in).
We work hard to bring you the best knitting and crochet have to offer, inspiration and advice as well as great quality yarns at incredible prices! Would you like to use our patterns for other than personal use? You can read what you are allowed to do in the Copyright text at the bottom of all our patterns. Happy crafting!
Post a comment to pattern DROPS 236-5
We would love to hear what you have to say about this pattern!
If you want to leave a question, please make sure you select the correct category in the form below, to speed up the answering process. Required fields are marked *.