
Popular categories
Looking for a yarn?


Comments / Questions (129)
![]() Petra wrote:
Petra wrote:
I’d like to Knie the vest “visit Vienna” but I’m using a different wool. I’d like to use a cotton. In my gauge using 20 stitches with a 4.5 needle or a 5.5 needle I am at least 3 stitches too many. Can I easily reduce the Stich amount you have given in the pattern?
16.12.2023 - 23:38DROPS Design answered:
Dear Petra, do you have a cotton yarn already chosen? You could use DROPS Muskat as a substitute. If you have worked the gauge with the chosen cotton yarn, you can check on how to calculate the pattern according to your gauge here: https://www.garnstudio.com/lesson.php?id=25&cid=19. Happy knitting!
17.12.2023 - 19:13
![]() Randi Graungaard wrote:
Randi Graungaard wrote:
Ska jag ha samma antal maskor om jag vill sticka på runt upp till ärmarna Alltså bakstyckets och framstyckets totala antal - eller bör jag dra bort kantmaskorna? Alltså 238 maskor för storlek L
30.11.2023 - 18:33
![]() PILAR VILLAVERDE wrote:
PILAR VILLAVERDE wrote:
No entiendo cuando hay que hacer las disminuciones de las sisas
21.11.2023 - 04:15DROPS Design answered:
Hola Pilar, las disminuciones para la sisa comienzan cuando la labor mide 25-26-27-28-29-30 cm. Primero cierras 4-4-4-6-8-10 puntos al inicio de la siguiente fila, tanto por el lado derecho como por el lado revés. Después trabajar 2 filas (1 por el lado derecho y 1 por el lado revés) con el patrón establecido en la siguiente fila. En la siguiente fila por el lado derecho, disminuyes 1 punto a cada lado como se explica en TIP-2 PARA LAS DISMINUCIONES (disminuyes 1 punto al inicio y 1 punto al final de la fila). Repetir esta disminución siempre por el lado derecho hasta haber disminuido a cada lado 1-3-5-6-8-10 veces en total (incluyendo la primera vez ahora explicada).
26.11.2023 - 23:18
![]() Yolanda wrote:
Yolanda wrote:
Quiero saber como encontrar las medidas en cm de vuestros patrones para saber cual es la talla que tengo que elegir
01.11.2023 - 13:34DROPS Design answered:
Hola Yolanda, después de las explicaciones del patrón y los diagramas, puedes encontrar el esquema de medidas, con todas las medidas de la prenda en cm. Para más información puedes leer la siguiente lección: https://www.garnstudio.com/lesson.php?id=24&cid=23.
05.11.2023 - 19:06
![]() Marianne Rasmussen wrote:
Marianne Rasmussen wrote:
Kære Drops! Jeg forstår ikke diagrammet - mangler der ikke noget ? Det er jo bare et blankt diagram med nogle tal i siden - det fremgår da på ingen måde hvornår man strikker drejet ret fra retsidens, drejet vrang fra vrangen eller vrang fra retsiden, ret fra vrangen🤔🤔🤔
29.10.2023 - 10:54DROPS Design answered:
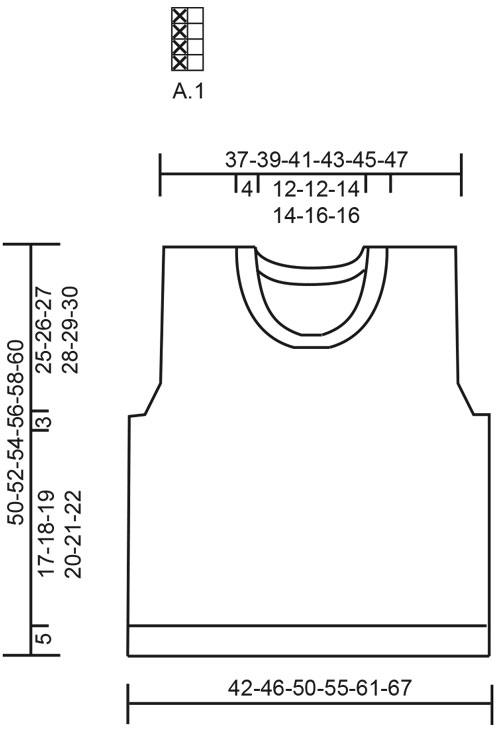
Hei Marianne. Nei, det mangler ingenting. Målskissen du ser, viser cm målene på vesten. Over målskissen ser du diagrammet (A.1), den viser deg hvordan strukturen i vesten skal strikke. Når du skal strikke A.1, er det forklart i oppskriften. A.1 viser alle pinnene i mønsteret sett fra retten. Usikker på hvordan lese et diagram? Gå til: Tips & Hjælp / DROPS lektioner / Læs en opskrift / Hvordan læses strikkediagrammer. Usikker på hvordan strikke drejet ret fra retsiden og drejet vrang fra vrangen, ta en titt på hjelpevideoene som er linket til oppskriften (nederst, under Behøver du hjælp med opskriften?). mvh DROPS Design
30.10.2023 - 09:42
![]() Mie Henriette Lund Steinhart wrote:
Mie Henriette Lund Steinhart wrote:
Opskriften siger der skal strikkes i retstrik men på billederne ligner det glatstrik. Kan I bekræfte hvilken en det er?
28.08.2023 - 18:12DROPS Design answered:
Hej Mie, vesten skal strikkes i glatstrik. Det står når du kommer til det glatstrikkede, i stykket som står beskrevet under Bagstykket :)
08.09.2023 - 15:17
![]() Graf Marlene wrote:
Graf Marlene wrote:
Warum bekomme ich keine Antwort auf die Frage vom 10.Juli 2023 ?.. Habe das Problem gefunden und die Arbeit fertig gestrickt. Mfg Mg
20.07.2023 - 13:22DROPS Design answered:
Liebe Frau Graf, Entschuldigung für die (wegen Sommerurlaub) verspäte Antwort . Viel Spaß beim stricken!
27.07.2023 - 11:25
![]() Graf Marlene wrote:
Graf Marlene wrote:
Abnahme Tipp3: welche Anleitung gilt für Rückenteil? Welche für Vorderteil ? Wie nimmt man die Schulter in einfacher Erklärung ab ? Danke für die baldige Antwort mfg mg
10.07.2023 - 12:36DROPS Design answered:
Liebe Frau Graf, die Abnahmen werden am Anfang einer Hin-Reihe von Halsausschnitt (rechte Schulter Vorderteil / linke Schulter Rückenteil) gestrickt (= 1 Randmasche kraus rechts, 2 M glatt rechts, 1 Masche abnehmen); und am Ende einer Hin-Reihe (linke Schulter Vorderteil / rechte Schulter Rückenteil) gestrickt (= stricken Sie bis 5 Maschen übrig sind, 1 Masche abnehmen, und wie zuvor stricken). Viel Spaß beim stricken!
27.07.2023 - 10:18
![]() Graf Marlene wrote:
Graf Marlene wrote:
Anleitungen sehr kompliziert erklärt für Anfängerin unverständlich
10.07.2023 - 11:37
![]() OBERSON wrote:
OBERSON wrote:
Bonjour, Je voudrais tricoter ce pull mais dans une autre laine. Car je voudrais une couleur plus vive que celles existantes en Puna. Je n'ai pas trouvé l'équivalence dans le convertisseur. Merci d'avance pour de votre conseil. Gaëlle
08.05.2023 - 15:53DROPS Design answered:
Bonjour Mme Oberson, consultez les nuanciers des différents fils du groupe de fils B, alternatives pour Puna, et utilisez le convertisseur pour calculer la nouvelle quantité. Votre magasin saura vous conseiller si besoin, même par mail ou téléphone. Bon tricot!
08.05.2023 - 16:13
|
|||||||
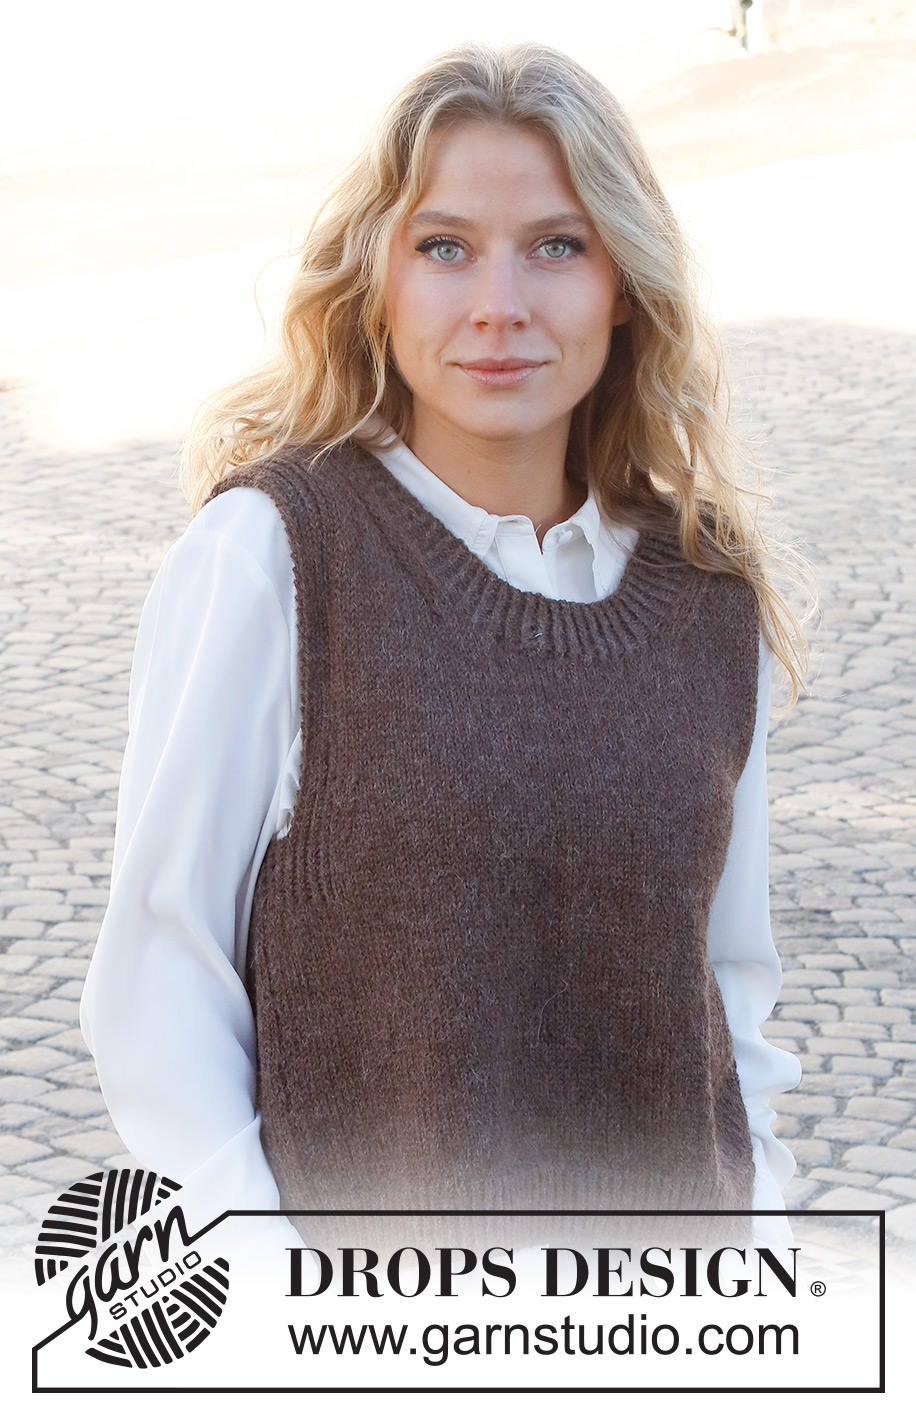
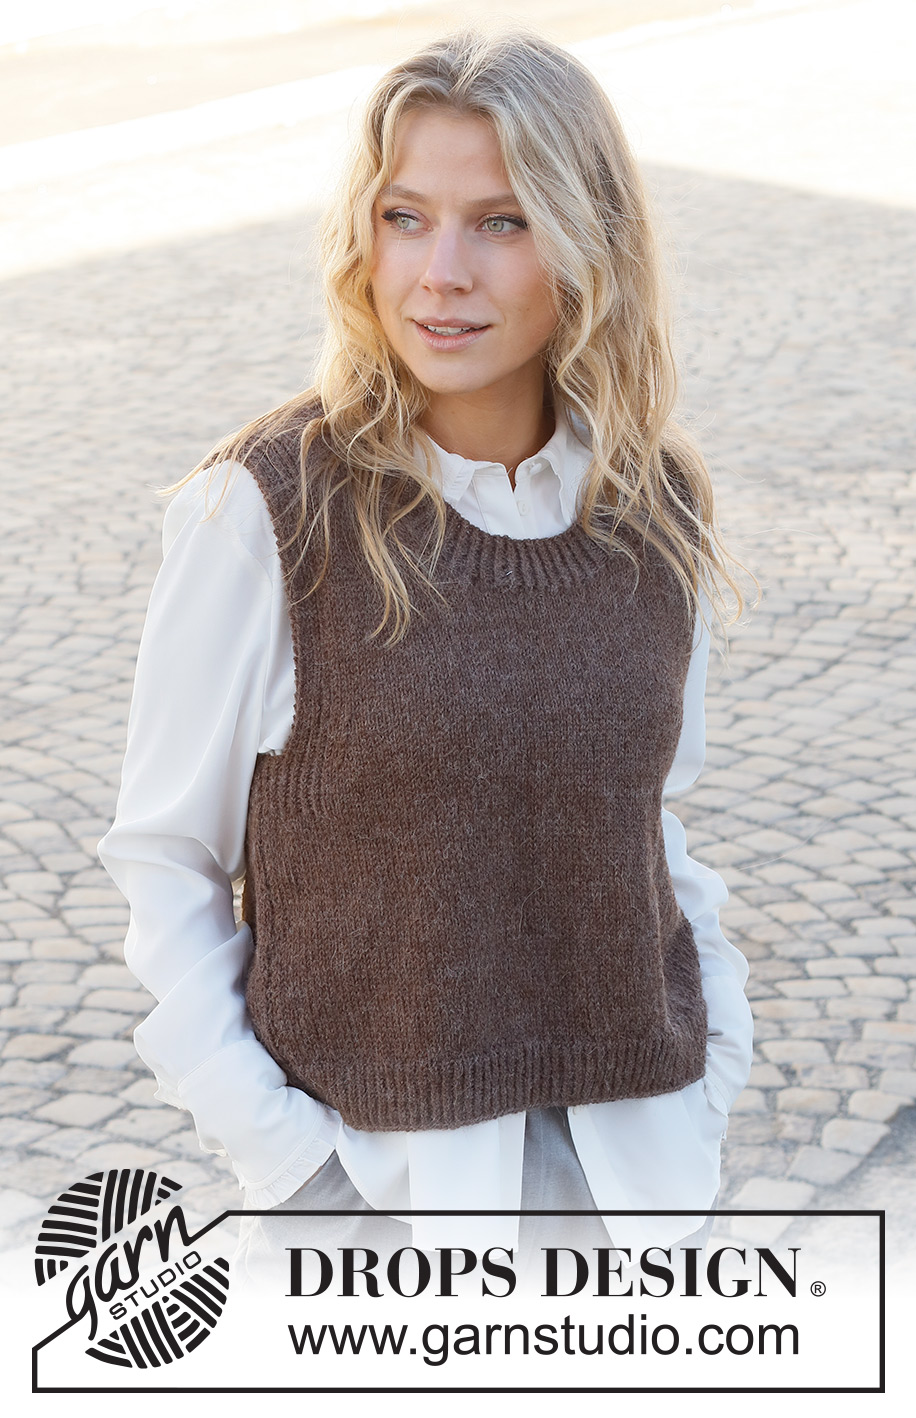
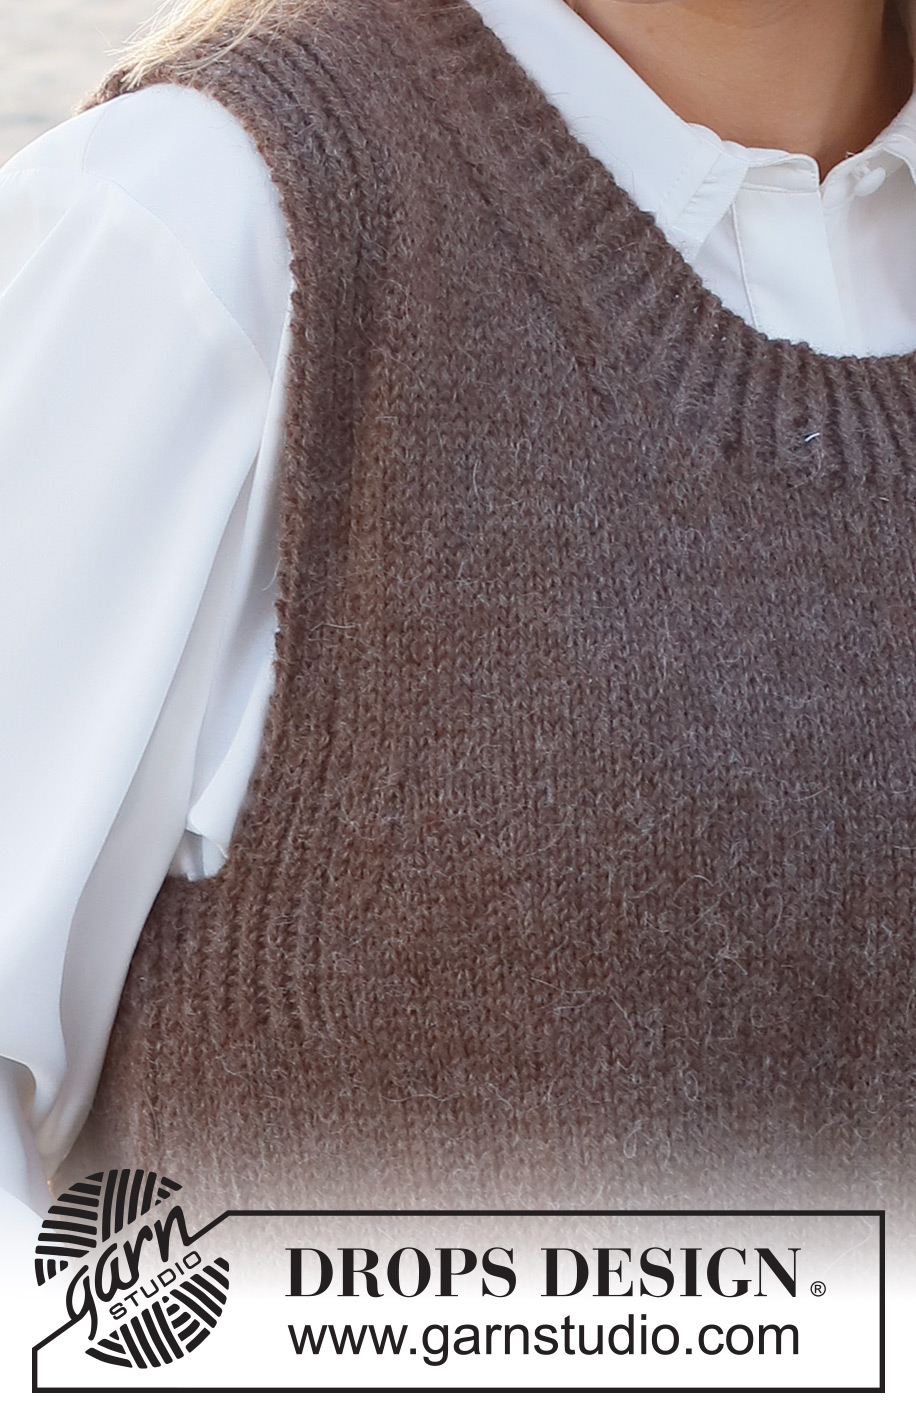
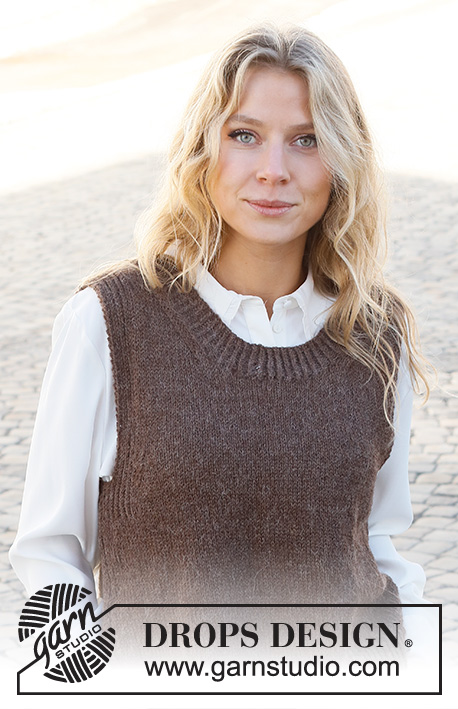
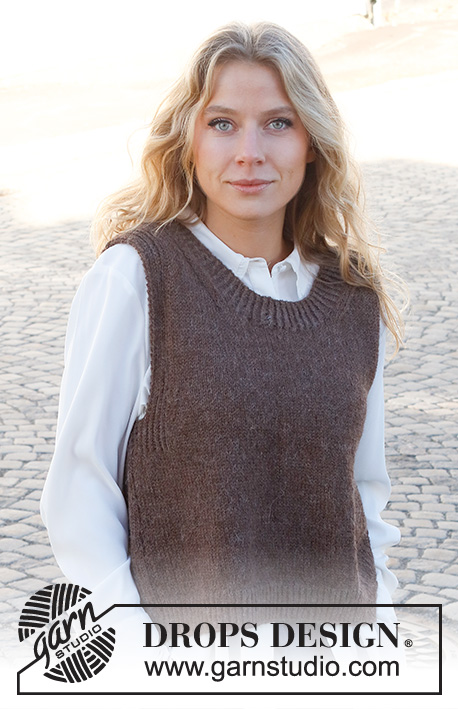
Visit Vienna#visitviennaslipover |
|||||||
 |
 |
||||||
Knitted vest in DROPS Puna. The piece is worked with ribbed edges. Sizes S - XXXL.
DROPS 227-9 |
|||||||
|
------------------------------------------------------- EXPLANATIONS FOR THE PATTERN: ------------------------------------------------------- RIDGE/GARTER STITCH (worked back and forth): Knit all rows. 1 ridge = knit 2 rows PATTERN: See diagram A.1. The diagram shows all rows in the pattern from the right side. DECREASE TIP-1 (evenly spaced): To work out how to decrease evenly, count the total number of stitches on needle (e.g. 103 stitches) minus the edge stitches (e.g. 2 stitches) and divide the remaining stitches by the number of decreases to be made (e.g. 17) = 5.9. In this example decrease by knitting together approx. each 5th and 6th stitch. Do not decrease the edge stitches. DECREASE TIP-2 (armholes): All decreases are worked from the right side! Decrease at the beginning of row: Work the first 11 stitches as before, slip 1 stitch as if to knit, knit 1 and pass the slipped stitch over the knitted stitch (= 1 stitch decreased). Decrease at the end of row: Work until there are 13 stitches left, knit 2 together and work to end of row (= 1 stitch decreased). DECREASE TIP-3 (neck): All decreases are worked from the right side! After the neck: Work 1 edge stitch in garter stitch, 2 stitches in stockinette stitch, slip 1 stitch as if to knit, knit 1 and pass the slipped stitch over the knitted stitch (= 1 stitch decreased). Before the neck: Work until there are 5 stitches left, knit 2 together and work to end of row (= 1 stitch decreased). BINDING-OFF TIP: To avoid the bind-off edge being tight you can bind off with a larger size needle. If the edge is still tight, make 1 yarn over after approx. each 4th stitch at the same time as binding off; the yarn overs are bind off as normal stitches. ------------------------------------------------------- START THE PIECE HERE: ------------------------------------------------------- VEST – SHORT OVERVIEW OF THE PIECE: The piece is worked in sections, back and forth on the needle and then sewn together. The neck is worked to finish. BACK PIECE: Cast on 103-113-121-133-149-163 stitches (including 1 edge stitch on each side) with circular needle size 3.5 MM = US 4 and DROPS Puna. Purl 1 row from the wrong side, then work rib from the right side as follows: 1 edge stitch in GARTER STITCH – read description above, work A.1 until there are 2 stitches left, work the first stitch in A.1 (so the pattern is symmetrical) and 1 edge stitch in garter stitch. Continue this rib back and forth for 5 cm = 2" – adjust so the next row is from the right side. Knit 1 row where you decrease 17-19-19-21-25-27 stitches evenly spaced – read DECREASE TIP-1 = 86-94-102-112-124-136 stitches. Change to circular needle size 4.5 MM = US 7. Purl 1 row from the wrong side. Continue with stockinette stitch and 1 edge stitch in garter stitch on each side. REMEMBER THE KNITTING GAUGE! When the piece measures 22-23-24-25-26-27 cm = 8¾"-9"-9½"-9¾"-10¼"-10⅝", work pattern as follows from the right side: 1 edge stitch in garter stitch, A.1 over the next 12-12-12-14-16-18 stitches, stockinette stitch until there are 13-13-13-15-17-19 stitches left, purl 1, A.1 over the next 11-11-11-13-15-17 stitches and 1 edge stitch in garter stitch. Continue this pattern. When the piece measures 25-26-27-28-29-30 cm = 9¾"-10¼"-10⅝"-11"-11⅜"-11¾" (the rib on each side measures 3 cm = 1⅛" – adjust to work next row from the right side), work as follows: Bind off the first 4-4-4-6-8-10 stitches for the armholes at the beginning of the next 2 rows (bind off with knit) = 78-86-94-100-108-116 stitches. The next row from the right side is worked as follows: 1 edge stitch in garter stitch, pattern as before over the next 8 stitches, work stockinette stitch until there are 9 stitches left, pattern over the next 8 stitches and 1 edge stitch in garter stitch. Continue this pattern. On the next row from the right side, decrease 1 stitch on each side for the armholes – read DECREASE TIP-2! Decrease like this each row from the right side a total of 1-3-5-6-8-10 times = 76-80-84-88-92-96 stitches. When the piece measures 46-48-50-52-54-56 cm = 18"-19"-19¾"-20½"-21¼"-22", bind off the middle 36-36-40-40-44-44 stitches for the neck and each shoulder (= 20-22-22-24-24-26 stitches) is finished separately. On the next row from the right side, decrease 1 stitch for the neck – read DECREASE TIP-3! Decrease like this each row from the right side a total of 2 times = 18-20-20-22-22-24 stitches. Continue with pattern and stockinette stitch until the piece measures 50-52-54-56-58-60 cm = 19¾"-20½"-21¼"-22"-22¾"-23⅝". Bind off with knit over knit and purl over purl. Work the other shoulder in the same way. FRONT PIECE: Cast on and work as for the back piece. When the piece measures 35-37-37-39-39-41 cm = 13¾"-14½"-14½"-15¼"-15¼"-16⅛" (there are 76-80-84-88-92-96 stitches on the needle), place the middle 18-18-20-20-24-24 stitches on a thread for the neck and each shoulder (= 29-31-32-34-34-36 stitches) is finished separately On the next row from the right side, decrease 1 stitch for the neck – remember DECREASE TIP-3! Decrease like this each row from the right side a total of 11-11-12-12-12-12 times = 18-20-20-22-22-24 stitches. Continue with pattern and stockinette stitch until the piece measures 50-52-54-56-58-60 cm = 19¾"-20½"-21¼"-22"-22¾"-23⅝". Bind off with knit over knit and purl over purl. Work the other shoulder in the same way. ASSEMBLY: Sew the shoulder seams inside the bind-off edge. Sew the side seams inside the 1 edge stitch. NECK: Start from the right side at one shoulder seam and knit up 120 to 148 stitches (including the stitches from the thread) inside the 1 edge stitch, with short circular needle size 3.5 MM = US 4 and DROPS Puna. The number of stitches must be divisible by 2; make sure the neck is neither too loose nor too tight. Work A.1 in the round over all stitches for 4½ cm = 1⅝". Bind off with knit-twisted over knit-twisted and purl over purl – read BINDING-OFF TIP. |
|||||||
Diagram explanations |
|||||||
|
|||||||
 |
|||||||
Have you finished this pattern?Tag your pictures with #dropspattern #visitviennaslipover or submit them to the #dropsfan gallery. Do you need help with this pattern?You'll find 27 tutorial videos, a Comments/Questions area and more by visiting the pattern on garnstudio.com. © 1982-2026 DROPS Design A/S. We reserve all rights. This document, including all its sub-sections, has copyrights. Read more about what you can do with our patterns at the bottom of each pattern on our site. |
|||||||


With over 40 years in knitting and crochet design, DROPS Design offers one of the most extensive collections of free patterns on the internet - translated to 17 languages. As of today we count 325 catalogs and 12298 patterns - 12288 of which are translated into English (US/in).
We work hard to bring you the best knitting and crochet have to offer, inspiration and advice as well as great quality yarns at incredible prices! Would you like to use our patterns for other than personal use? You can read what you are allowed to do in the Copyright text at the bottom of all our patterns. Happy crafting!
Post a comment to pattern DROPS 227-9
We would love to hear what you have to say about this pattern!
If you want to leave a question, please make sure you select the correct category in the form below, to speed up the answering process. Required fields are marked *.