
Popular categories
Looking for a yarn?


Comments / Questions (53)
![]() Henriette Gadeberg wrote:
Henriette Gadeberg wrote:
Jeg er nået til forstykket, og har lige strikket første pind fra retten og fra vrangen. Nu skal jeg i gang med mønster A.2a osv skal jeg nu vende om på hvilken side jeg strikker mønster på? Umiddelbart ser det sådan ud, jeg har strikket ret/vrang på retsiden af de to forstykker, men første pind af A.2a ser ud til enten at være vrangsiden eller ren ret fra retsiden. Jeg er forvirret, kan I hjælpe?
23.08.2019 - 17:34DROPS Design answered:
Hej Henriette, hvis du har strikket ret og vrang mønsteret på retpinden så skal du fortsætte med det, så må du hellere strikke en pind mere inden du starter med ind og udtagningerne. God fornøjelse!
30.09.2019 - 12:03
![]() Jost wrote:
Jost wrote:
Dann sind bei der Rückseite zwischen A.1a und A.1b 2 li. Maschen. Ist das dann richtig.
21.08.2019 - 15:33DROPS Design answered:
Liebe Frau Jost, bei A.1a, A.1b (x 1 in der Breite) stricken Sie: Hinreihe: 3 M re (= A.1a), 2 M re (= A.1b) - bei der Rückreihe stricken Sie: 1 M li, 1 M re (= A.1b), 1 M li, 1 M re, 1 M li (= A.1a). Viel Spaß beim stricken!
21.08.2019 - 15:47
![]() Jost wrote:
Jost wrote:
Guten Tag, Ich möchte nur wissen ob die Reihe mit li. Maschen nach Anschlag schon die 1. Reihe von Diagramm A.1a und A.1b ist? Dann würden die Rückreihen bei beiden Schultern also immer links gestrickt? Wenn nicht, dann würden ja zwischen A.1 und A.1b 2 li Maschen gestrickt Bei A3 dann aber in der Hinreihe re. Maschen und bei Rückreihe 1 re-1li?
21.08.2019 - 12:05DROPS Design answered:
Liebe Frau Jost, die allererste Reihe nach Anschlag (= Li von der Rückseite) ist nicht im Diagram beschrieben, dh nach dieser Reihe stricken Sie die 1. Reihe (= Hinreihe) wie im Diagram gezeigt. In A.1 stricken Sie die 1. Reihe rechts, dann die Rückreihe mit abweckselnd 1 M glatt, 1 M kraus rechts. Viel Spaß beim stricken!
21.08.2019 - 13:25
![]() Regina Jost wrote:
Regina Jost wrote:
Ich möchte nur wissen ob die Diagramme immer mit den Hinreihen beginnen in der Zeichnung. dann würde ich also nach der Rückreihe mit linken Maschen mit der 2.Reihe im beginnen.
20.08.2019 - 19:43DROPS Design answered:
Liebe Frau Jost, alle Reihen sind im Diagram gezeigt, dh die Hin- sowie die Rückreihen. Hier lesen Sie mehr über Diagramme. Viel Spaß beim stricken!
21.08.2019 - 08:20
![]() Jost wrote:
Jost wrote:
Guten Tag, Muss ich bei A.1a und A.1b ab der 2. Reihe Diagramm weiterstricken nach der Rückreihe mit li. Maschen? Dann wenn beider Schultern abgesrtickt werden bei A3 bei Hinreihe re. Maschen beginnen?
20.08.2019 - 13:31DROPS Design answered:
Liebe Frau Jost, nach den 2 ersten Reihen stricken Sie die verkürzten Reihen im Muster wie zuvor dh mit A.1a und A.1b. A.3 wird später über die mittleren Maschen vom Vorderteil gestrickt (nach dem die neuen Maschen für die Armlöcher angeschlagen sind). Viel Spaß beim stricken!
20.08.2019 - 15:05
![]() Susan Sørensen wrote:
Susan Sørensen wrote:
Hvordan starter man op på mønstret på forstykket? I diagrammet skal man starte på en vrangpind, med indtagninger og udtagninger, men i selve opskriften står der man skal starte fra retsiden?
19.08.2019 - 15:07DROPS Design answered:
Hei Susan. Siste pinne som strikkes på høyre og venstre skulder er fra vrangen. Når høyre skulder strikkes sammen med venstre skulder er første pinne fra retten. Det strikkes også 1. pinne av A.1b og det legges opp nye masker for ermehull. Man har da 79-83-91-99-107-115 masker på pinne. Strikk pinnen tilbake fra vrangen. OG nå skal det strikkes fra retten og 1. pinne på diagrammene A.2a, A.2.b, A.2c, A.3, A.4a, A.4b og A.4c . God Fornøyelse!
20.08.2019 - 13:03
![]() Susan Sørensen wrote:
Susan Sørensen wrote:
Spørgsmål 1. I har lavet en rettelse på højre skulder på bagstykket. Er det ikke det samme samme på højre skulder på forstykket, ellers passer det da heller ikke? Spørgsmål 2 Som jeg ser det skal man på første pind tage ind fra retsiden i begyndelse af arbejdet når man har samlede skuldrene. Men i diagrammet står der man skal samle maske op og tage ind på vrangpinden det kan vil ikke passe?
18.08.2019 - 13:31DROPS Design answered:
Hej Susan, jo hvis du strikker højre skulder ovenfra og ned, så skal du have flere pinde i højre side af arbejdet, altså ud mod ærmet. Det vil sige at arbejdet bliver kortere i venstre side, altså mod V-halsen. God fornøjelse!
10.09.2019 - 15:33
![]() Susan Sørensen wrote:
Susan Sørensen wrote:
Hvordan sætter man højre og venstre skulder sammen så det passer med mønstret, jeg kan ikke se det for mig. Jeg er sluttet som skrevet med begge skuldre og skal samle det til forstykket
16.08.2019 - 14:22DROPS Design answered:
Hej Susan, Du ser nøjagtig hvordan vi samler, når du læser det første stykke under FORSTYKKET - god fornøjelse! :)
30.09.2019 - 11:55
![]() Regina Jost wrote:
Regina Jost wrote:
Guten Tag. Welches andere Garn könnte ich für dieses Modell auch verwenden. Komme mit Garnumrechener nicht weiter dan das Modell ja mit 2 verschiedenen Garnen gestrickt wirdMöchte nur mit einer Sorte Wolle stricken. Welche Menge würden Sie mir dann Empfehlen für Größe M. LG
13.08.2019 - 19:12DROPS Design answered:
Liebe Frau Jost, wenn Sie selber aussrechnen möchten, dann finden Sie hier wie man die neue Garnmenge kalkuliert, im Zweifefall fragen Sie gerne Ihr DROPS Laden nach - auch telefonisch oder per E-Mail. Viel Spaß beim stricken!
14.08.2019 - 07:52
![]() Yessica Chamorro wrote:
Yessica Chamorro wrote:
Precioso y muy novedoso
22.06.2019 - 22:42
|
||||||||||||||||
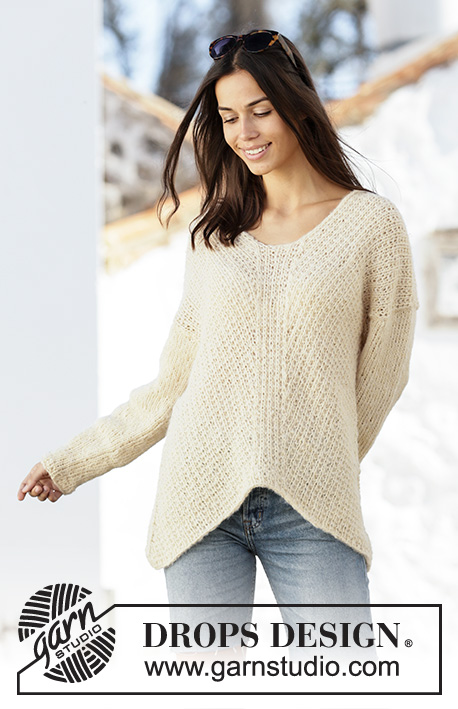
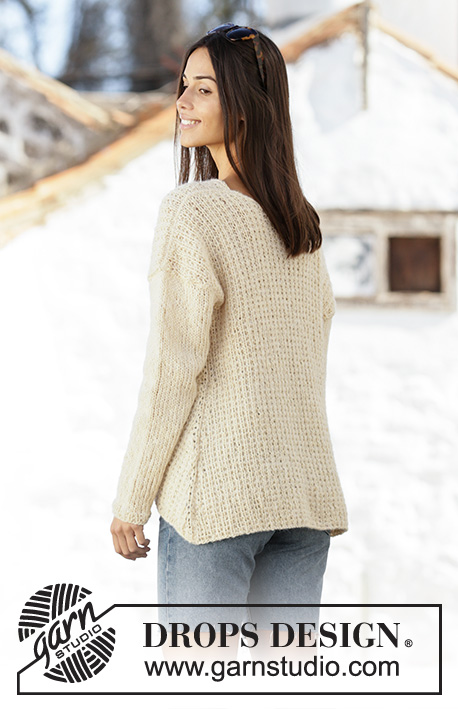
Freedom Found#freedomfoundsweater |
||||||||||||||||
 |
 |
|||||||||||||||
Knitted sweater in DROPS Alpaca and DROPS Brushed Alpaca Silk. Piece is knitted with texture at an angle with V-neck, top down. Size: S - XXXL
DROPS 201-23 |
||||||||||||||||
|
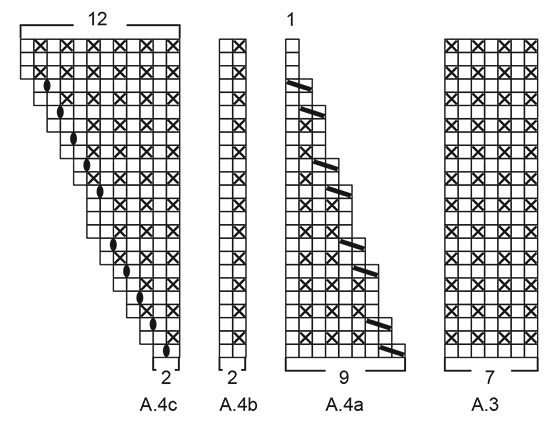
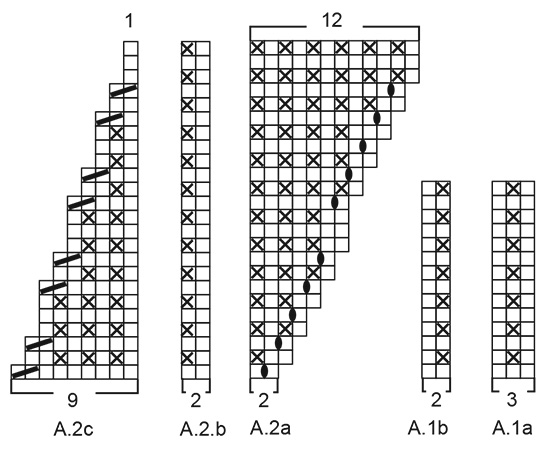
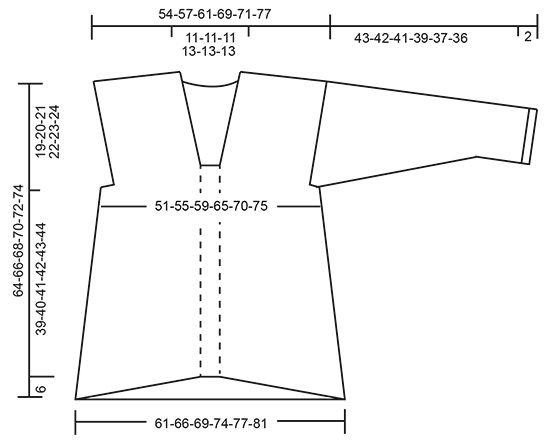
---------------------------------------------------------- EXPLANATION FOR THE PATTERN: ---------------------------------------------------------- GARTER STITCH (back and forth): Knit all rows. 1 ridge vertically = knit 2 rows. PATTERN: See diagrams A.1 to A.4. DECREASE TIP (applies to back piece): All decreases are done from the right side! Work 1 stitch in garter stitch, slip 1 stitch knitwise, knit 1, pass slipped stitch over stitch worked, work until 3 stitches remain, knit 2 together, 1 stitch in garter stitch. INCREASE TIP (applies to sides on back piece): All increases are done from the right side. Work 1 stitch in garter stitch, knit 1, 1 yarn over, work until 2 stitches remain on row, 1 yarn over, knit 1 and 1 stitch in garter stitch. On next row work yarn overs twisted to avoid holes. Then work the new stitches in pattern. INCREASE TIP (applies to sleeves): Work until 2 stitches remain before marker thread, 1 yarn over, knit 4 (marker thread is in the middle of these stitches), 1 yarn over. On next round knit yarn overs twisted to avoid holes. Then work the new stitches in stockinette stitch. ---------------------------------------------------------- START THE PIECE HERE: ---------------------------------------------------------- SWEATER - SHORT OVERVIEW OF THE PIECE: Worked back and forth in several pieces and sewn together when finished. Work sleeves in the round on double pointed needles/a short circular needle. FRONT PIECE: RIGHT SHOULDER: Cast on 33-35-39-43-45-49 stitches (including 1 edge stitch in each side) on circular needle size 5.5 mm = US 9 with 1 strand Alpaca and 1 strand Brushed Alpaca Silk (= 2 strands). Purl 1 row from wrong side. Work next row as follows from right side: Work 1 stitch in garter stitch, A.1a (= 3 stitches), repeat A.1b until 1 stitch remains (= 14-15-17-19-20-22 repetitions of 2 stitches), and finish with 1 stitch in garter stitch. When 2 rows have been worked, continue this pattern AT THE SAME TIME on next row work short rows as follows, begin from right side: Work over the first 25-27-31-31-35-37 stitches, turn, tighten yarn and work back from wrong side. Work over the first 17-19-21-21-23-25 stitches, turn, tighten yarn and work back from wrong side. Work over the first 9-9-11-11-11-13 stitches, turn, tighten yarn and work back from wrong side. Then work over all the 33-35-39-43-45-49 stitches - REMEMBER THE KNITTING GAUGE! When piece measures 17-18-19-20-21-22 cm = 6¾"-7"-7½"-8"-8¼"-8¾" along the shortest side, i.e. towards the neck (= approx. 19-20-21-22-23-24 cm = 7½"-8"-8¼"-8¾"-9"-9½" towards armhole), finish after row from wrong side. Cut the yarn. Put piece aside and work the left shoulder. LEFT SHOULDER: Cast on 33-35-39-43-45-49 stitches (including 1 edge stitch in each side) on circular needle size 5.5 mm = US 9 with 1 strand Alpaca and 1 strand Brushed Alpaca Silk (= 2 strands). Purl 1 row from wrong side. Work next row as follows from right side: Work 1 stitch in garter stitch, A.1a (= 3 stitches), work A.1b until 1 stitch remains (= 14-15-17-19-20-22 repetitions of 2 stitches), and finish with 1 stitch in garter stitch. When 3 rows have been worked, continue this pattern AT THE SAME TIME on next row work short rows as follows, begin from wrong side: Work over the first 25-27-31-31-35-37 stitches, turn, tighten yarn and work back from right side. Work over the first 17-19-21-21-23-25 stitches, turn, tighten yarn and work back from right side. Work over the first 9-9-11-11-11-13 stitches, turn, tighten yarn and work back from right side. Then work over all the 33-35-39-43-45-49 stitches. When piece measures 17-18-19-20-21-22 cm = 6¾"-7"-7½"-8"-8¼"-8¾" along the shortest side, i.e. towards the neck (= approx. 19-20-21-22-23-24 cm = 7½"-8"-8¼"-8¾"-9"-9½" towards armhole) - adjust according to right shoulder, finish after row from wrong side. Cut the yarn. FRONT PIECE: Slip right shoulder on to same circular needle size 5.5 mm = US 9 as left shoulder – make sure that the short rows are in each side of piece and that the shortest sides are against the neck = 66-70-78-86-90-98 stitches. Now work right shoulder together with left shoulder as follows - from right side: Cast on 4-4-4-4-6-6 new stitches on needle for armhole, work A.1b over the next 32-34-38-42-44-48 stitches (= 16-17-19-21-22-24 repetitions of 2 stitches), work 1 stitch in garter stitch, (= right shoulder), cast on 5 new stitches on needle (= middle piece), continue over left shoulder as follows: Work A.1b over the first 32-34-38-42-44-48 stitches (= 16-17-19-21-22-24 repetitions of 2 stitches), work 1 stitch in garter stitch and finish by casting on 4-4-4-4-6-6 new stitches on needle for armhole (= left shoulder) = 79-83-91-99-107-115 stitches. Work row back from wrong side. Then work as follows from right side: Work 1 stitch in garter stitch, work A.2a over the next 2 stitches, work A.2b over the next 24-26-30-34-38-42 stitches (= 12-13-15-17-19-21 repetitions of 2 stitches), work A.2c over the next 9 stitches, work A.3 over the next 7 stitches (= middle piece) work A.4a over the next 9 stitches, work A.4b over the next 24-26-30-34-38-42 stitches (= 12-13-15-17-19-21 repetitions of 2 stitches), work A.4c over the next 2 stitches and finish with 1 stitch in garter stitch. When A.2 and A.4 have been worked vertically, 4 stitches have been increased in total = 83-87-95-103-111-119 stitches on needle. Repeat this pattern, every time A.2 to A.4 have been worked 1 time vertically, work 1 repetition more of A.2b and A.4b in width. Work until piece measures 39-40-41-42-43-44 cm = 15¼"-15¾"-16⅛"-16½"-17"-17¼" straight up from middle piece, loosely bind off with knit over knit and purl over purl from right side. BACK PIECE: RIGHT SHOULDER: Cast on 33-35-39-43-45-49 stitches (including 1 edge stitch in each side) on circular needle size 5.5 mm = US 9 with 1 strand Alpaca and 1 strand Brushed Alpaca Silk (= 2 strands). Purl 1 row from wrong side. Work next row as follows from right side: Work 1 stitch in garter stitch, work A.1b over the remaining stitches (= 16-17-19-21-22-24 repetitions of 2 stitches). When 3 rows have been worked, continue this pattern AT THE SAME TIME on next row work short rows as follows, begin from wrong side: Work over the first 25-27-31-31-35-37 stitches, turn, tighten yarn and work back from right side. Work over the first 17-19-21-21-23-25 stitches, turn, tighten yarn and work back from right side. Work over the first 9-9-11-11-11-13 stitches, turn, tighten yarn and work back from right side. Work over all the 33-35-39-43-45-49 stitches, turn and work back from right side. Cut the yarn. Put piece aside and work the left shoulder. LEFT SHOULDER: Cast on 33-35-39-43-45-49 stitches (including 1 edge stitch in each side) on circular needle size 5.5 mm = US 9 with 1 strand Alpaca and 1 strand Brushed Alpaca Silk (= 2 strands). Purl 1 row from wrong side. Work next row as follows - from right side: Work A.1b until 1 stitch remains (= 16-17-19-21-22-24 repetitions of 2 stitches) and finish with 1 stitch in garter stitch. When 2 rows have been worked, continue this pattern AT THE SAME TIME on next row work short rows as follows, begin from right side: Work over the first 25-27-31-31-35-37 stitches, turn, tighten yarn and work back from wrong side. Work over the first 17-19-21-21-23-25 stitches, turn, tighten yarn and work back from wrong side. Work over the first 9-9-11-11-11-13 stitches, turn, tighten yarn and work back from wrong side. Work over all the 33-35-39-43-45-49 stitches, turn and work back from wrong side. Do not cut the yarns! BACK PIECE: Slip right shoulder on to same circular needle size 5.5 mm = US 9 as left shoulder – make sure that the short rows in each side of piece and that the shortest sides are against the neck = 66-70-78-86-90-98 stitches. Now work left shoulder together with right shoulder as follows - from right side: Work A.1b until 1 stitch remains on left shoulder (= 16-17-19-21-22-24 repetitions of 2 stitches), work 1 stitch in garter stitch, cast on 17-17-17-19-19-19 new stitch on needle (= neck), work A.1b until 1 stitch remains on right shoulder (= 16-17-19-21-22-24 repetitions of 2 stitches) and finish with 1 stitch in garter stitch. On next row work the new stitches in pattern. Continue this pattern, at the same time decrease 1 stitch in each side on next row from right side - read DECREASE TIP. Decrease like this every 6th row 1-1-2-2-4-4 times in total, then every 4th row 5-4-4-5-3-3 times in total = 71-77-83-91-95-103 stitches on needle. When piece measures 19-20-21-22-23-24 cm = 7½"-8"-8¼"-8¾"-9"-9½" along one armhole, cast on 4-4-4-4-6-6 new stitches at the end of the next 2 rows for armholes = 79-85-91-99-107-115 stitches. Continue pattern as before over all stitches. When piece measures 3 cm = 1⅛", increase 1 stitch in each side - read INCREASE TIP. Increase like this every 6-5½-6-6-9-12 cm = 2⅜"-2⅛"-2⅜"-2⅜"-3½"-4¾" 7-8-7-7-5-4 times in total = 93-101-105-113-117-123 stitches. Work until piece measures 62-64-66-68-70-72 cm = 24⅜"-25¼"-26"-26¾"-27½"-28⅜" from shoulder (towards the neck) and down. Bind off stitches with knit over knit and purl over purl. SLEEVE: Cast on 32-34-36-36-38-40 stitches on double pointed needles size 5.5 mm = US 9 with 1 strand Alpaca + 1 strand Brushed Alpaca Silk (= 2 strands). Work A.1b (= 2 stitches) the entire round. Work 4 rounds in total. Insert 1 marker at beginning of round = mid under sleeve. Then work in stockinette stitch in the round - REMEMBER THE KNITTING GAUGE! When piece measures 8-9-8-8-8-9 cm = 3⅛"-3½"-3⅛"-3⅛"-3⅛"-3½", increase 2 stitches mid under sleeve - READ INCREASE TIP above. Increase like this every 3-2½-2½-2-2-1½ cm = 1⅛"-1"-1"-¾"-¾"-½" 12-13-13-15-15-16 times in total = 56-60-62-66-68-72 stitches. Continue with stockinette stitch without increases until piece measures 42-41-40-37-36-34 cm = 16½"-16⅛"-15¾"-14½"-14¼"-13⅜" (shorter measurements in the larger sizes because of wider shoulders and longer sleeve cap). The piece is now split at the marker mid under sleeve and worked back and forth until finished measurements. Insert 1 marker in each side, markers mark where sleeve should be sewn into armhole. Work back and forth until piece measures 45-44-43-41-39-38 cm = 17¾"-17¼"-17"-16⅛"-15¼"-15". Then loosely bind off stitches with knit over knit and purl over purl. Work the other sleeve the same way. ASSEMBLY: Sew shoulder seams inside cast-on edge. Sew side seams inside 1 edge stitch. Sew in sleeves inside 1 edge stitch in each side on front and back piece. Marks on sleeves should fit bottom of armhole. |
||||||||||||||||
Diagram explanations |
||||||||||||||||
|
||||||||||||||||
 |
||||||||||||||||
 |
||||||||||||||||
 |
||||||||||||||||
Have you finished this pattern?Tag your pictures with #dropspattern #freedomfoundsweater or submit them to the #dropsfan gallery. Do you need help with this pattern?You'll find 25 tutorial videos, a Comments/Questions area and more by visiting the pattern on garnstudio.com. © 1982-2026 DROPS Design A/S. We reserve all rights. This document, including all its sub-sections, has copyrights. Read more about what you can do with our patterns at the bottom of each pattern on our site. |
||||||||||||||||


With over 40 years in knitting and crochet design, DROPS Design offers one of the most extensive collections of free patterns on the internet - translated to 17 languages. As of today we count 324 catalogs and 12290 patterns - 12280 of which are translated into English (US/in).
We work hard to bring you the best knitting and crochet have to offer, inspiration and advice as well as great quality yarns at incredible prices! Would you like to use our patterns for other than personal use? You can read what you are allowed to do in the Copyright text at the bottom of all our patterns. Happy crafting!
Post a comment to pattern DROPS 201-23
We would love to hear what you have to say about this pattern!
If you want to leave a question, please make sure you select the correct category in the form below, to speed up the answering process. Required fields are marked *.