Comments / Questions (15)
![]() Sheila Hadfiled wrote:
Sheila Hadfiled wrote:
Canary jacket - yoke instructions - after 1st row states there should be 117 sets on needle for sizes small mediumlarge, but I get 121 stitches. I have checked several times and the pattern fits this number - the stitches for on the diagram including the increases add up to this. Am I wrong? If so where am I going wrong?
25.02.2019 - 00:32DROPS Design answered:
Dear Mrs Hadfiled, you work over 109 sts and increase a total of 8 sts for raglan = 117 sts, but you will also make a yarn over in each A.3 (for the small cable), so that you will have 4 sts more due to these yarn overs = 121 sts, but A.3 is here worked and counted over 16 sts even if you will have sometimes 17 due to this YO. Happy knitting!
25.02.2019 - 11:31
![]() Helen Zinhagel wrote:
Helen Zinhagel wrote:
Hallo, Ik wil draag het vest 195-15 gaan breien. Als ik 97 steken opzet, moet ik er dan 10 bij doen voor de voorbies. Bij de hals staat dat in naald 5 in A.1 dat er 2 steken overblijven. Ik hou er maar 1 over. Kunt u mij schrijven wat ik fout doe. Alvast bedankt. Helen.
15.12.2018 - 13:14DROPS Design answered:
Dag Helen,
De 97 steken zijn inclusief de steken van de voorbies, dus je hoeft er niet nog 10 bij te doen. Met de instructie voor de 5e naald wordt bedoelt dat je door breit totdat je er nog 2 steken op de naald staan en die laatste 2 steken brei je recht (ipv A.1 te breien)
18.12.2018 - 10:56
![]() Flopée wrote:
Flopée wrote:
Merveilleux cardigan. Mon fils attendait avec impatience les explications. Mille mercis.
30.08.2018 - 15:29
![]() Dagmar wrote:
Dagmar wrote:
Daisy
27.07.2018 - 13:47
![]() Mida wrote:
Mida wrote:
Me encanta!! Alegre y juvenil
28.06.2018 - 09:49
Canari Jacket#canarijacket |
|||||||||||||||||||||||||
 |
 |
||||||||||||||||||||||||
Knitted jacket with raglan in DROPS Karisma. The piece is worked top down with lace pattern. Sizes S - XXXL.
DROPS 195-15 |
|||||||||||||||||||||||||
|
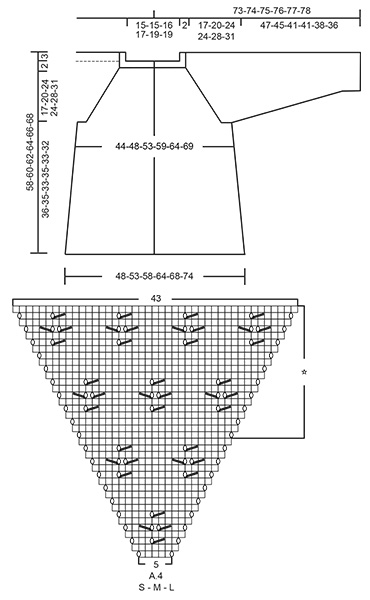
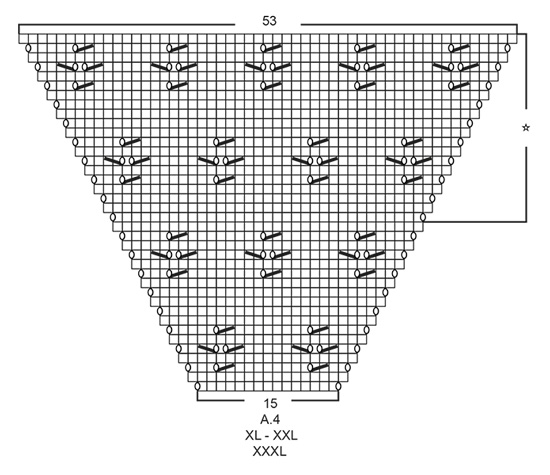
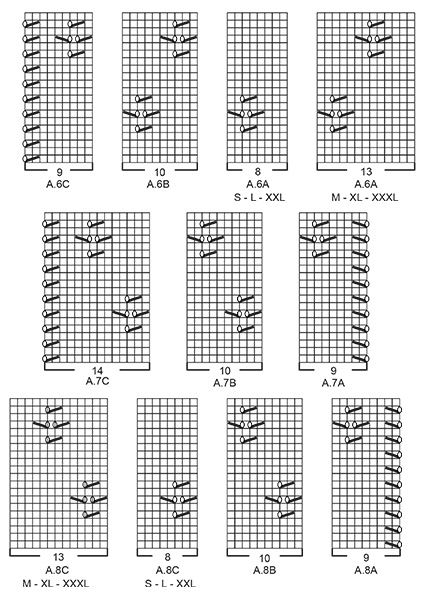
------------------------------------------------------- EXPLANATIONS FOR THE PATTERN: ------------------------------------------------------- RIDGE/GARTER STITCH (worked back and forth): 1 ridge = Knit 2 rows. RIDGE/GARTER STITCH (worked in the round): 1 ridge = 2 rounds. Knit 1 round and purl 1 round. PATTERN: See diagrams A.1 to A.8. Choose diagram for your size (applies to A.2, A.4, A.5, A.6A and A.8C). The diagrams show all the rows in the pattern seen from the right side. INCREASE TIP-1 (evenly spaced): To work out how to increase evenly, count the total number of stitches on the needle (e.g. 97 stitches) minus the bands (e.g. 10 stitches) and divide the remaining stitches by the number of increases to be made (e.g. 12) = 7.25. In this example, increase by making 1 yarn over after approx. each 7th stitch. On the next row (wrong side) purl the yarn overs twisted to avoid holes. Do not increase over the bands. INCREASE TIP-2 (for sides of body): All increases are made from the right side! Start 2 stitches before the marker thread, 1 yarn over, knit 4 (marker thread sits in the middle of these 4 stitches), 1 yarn over (= 2 stitches increased). On the next row (wrong side) purl the yarn overs twisted to avoid holes. Then work the increased stitches in stockinette stitch. DECREASE TIP (for mid under sleeve): Start 3 stitches before the marker thread, knit 2 together, knit 2 (marker thread sits in the middle of these 2 stitches), slip 1 stitch as if to knit, knit 1 and pass the slipped stitch over the knitted stitch (= 2 stitches decreased). BUTTONHOLES (top down): Work buttonholes on right band (when the garment is worn). 1 buttonhole = Work as before from the right side until there are 3 stitches left on the row, make 1 yarn over, knit 2 together and knit 1. On the next row (wrong side) knit the yarn over to leave a hole. NOTE: The first button is buttoned through a hole in A.1 on the neck, and then the next 5-5-6-6-7-7 buttonholes are worked as described above with approx. 9-9-8-8-7½-7½ cm = 3½"-3½"-3⅛"-3⅛"-2⅞"-2⅞" between each one. ------------------------------------------------------- START THE PIECE HERE: ------------------------------------------------------- JACKET - SHORT OVERVIEW OF THE PIECE: The neck, yoke and body are worked back and forth with circular needle from mid front and top down. The sleeves are worked with short circular needle/double pointed needles, top down. Be aware that all the stitch numbers on the yoke and body are given with A.3 = 16 stitches, but A.3 varies between 16 and 17 stitches. If you have just worked rounds 1-2-5 or 6 in A.3 when the number of stitches is given, you will have 4 more stitches on the needle. NECK: Cast on 97-97-101-105-113-113 stitches (including 5 band stitches in each side towards mid front) with circular needle size 3.5 mm = US 4 and Karisma. Work A.1 over all stitches on the needle, but on row 5 in A.1 you work until there are 2 stitches left on the row and finish with knit 2. When A.1 has been completed, knit 1 row from the right side where you increase 12-12-8-24-16-16 stitches evenly on row - read INCREASE TIP-1 = 109-109-109-129-129-129 stitches. Change to circular needle size 4 mm = US 6. Purl 1 row from the wrong side with 5 band stitches in GARTER STITCH in each side – read description above. Then work the yoke as described below. YOKE: The first row is worked as follows from the right side: 5 band stitches in garter stitch, work A.2 (= 3-3-3-8-8-8 stitches), A.3 (= 16 stitches), make 1 yarn over, work 12 stitches in stockinette stitch (= sleeve), 1 yarn over, work A.3 (= 16 stitches), A.4 (= 5-5-5-15-15-15 stitches), A.3 (= 16 stitches), 1 yarn over, work 12 stitches in stockinette stitch (= sleeve), 1 yarn over, A.3 (= 16 stitches), A.5 (= 3-3-3-8-8-8 stitches) and finish with 5 band stitches in garter stitch. There are now 117-117-117-137-137-137 stitches on the needle. Continue this pattern onwards; i.e. you increase on the front and back pieces in each side as shown in A.2, A.4 and A.5. On the sleeves you increase in each side of the stitches in stockinette stitch. Increase like this every 2nd round (i.e. on each row from the right side). On the next row (wrong side) the yarn overs in the diagrams are purled (to leave holes), and the increased stitches are worked into the pattern as shown in A.2, A.4 and A.5, while the yarn overs on the sleeves are purled twisted (to avoid holes), and the increased stitches are worked in stockinette stitch. REMEMBER THE KNITTING GAUGE and remember the BUTTONHOLES on the right band – read description above. When A.2, A.4 and A.5 have been worked 1 time in height there are 261-261-261-281-281-281 stitches on the needle. Continue this pattern onwards, i.e. the pattern repeats itself as shown in A.2, A.4 and A.5. Each time you have worked 20 rows in height there is room for 1 more repeat of the lace pattern in width on each front piece and 2 more repeats in width on the back piece. When you have increased a total of 24-29-34-34-39-44 times on each side of A.3 there are 301-341-381-401-441-481 stitches on the row and the piece measures approx. 19-22-26-26-30-33 cm = 7½"-8¾"-10¼"-10¼"-11¾"-13" from the cast-on edge and down mid front. The next row is worked as follows from the wrong side: Work 48-53-58-63-68-73 stitches as before (= right front piece), place the next 60-70-80-80-90-100 stitches on 1 thread for sleeve, cast on 6-6-6-8-8-10 new stitches on the needle (= in side under sleeve), work the next 85-95-105-115-125-135 stitches as before (= back piece), place the next 60-70-80-80-90-100 stitches on 1 thread for sleeve, cast on 6-6-6-8-8-10 new stitches on the needle (= in side under sleeve) and work the last 48-53-58-63-68-73 stitches as before (= left front piece). Body and sleeves are finished separately. THE PIECE IS NOW MEASURED FROM HERE! BODY: = 193-213-233-257-277-301 stitches. Insert 1 marker thread in each side, in the middle of the 6-6-6-8-8-10 stitches cast on under each sleeve. Allow the marker threads to follow your work onwards; they will be used a little later when you increase. The first row is worked as follows from the right side: 5 band stitches in garter stitch, A.6A (= 8-13-8-13-8-13 stitches), work A.6B over the next 10-10-20-20-30-30 stitches (= 1-1-2-2-3-3 repeats of 10 stitches), work A.6C (= 9 stitches), continue A.3 over the next 16 stitches, work 6-6-6-8-8-10 stitches in stockinette stitch (the marker thread sits in the middle of these 6-6-6-8-8-10 stitches), continue A.3 over the next 16 stitches, work A.7A (= 9 stitches), A.7B over the next 30-40-50-60-70-80 stitches (= 3-4-5-6-7-8 repeats of 10 stitches), A.7C (= 14 stitches), continue A.3 over the next 16 stitches, work 6-6-6-8-8-10 stitches in stockinette stitch (the marker thread sits in the middle of these 6-6-6-8-8-10 stitches), continue A.3 over the next 16 stitches, work A.8A (= 9 stitches), A.8B over the next 10-10-20-20-30-30 stitches (= 1-1-2-2-3-3 repeats of 10 stitches), work A.8C (= 8-13-8-13-8-13 stitches) and finish with 5 band stitches in garter stitch. Continue this pattern. When the piece measures 4 cm = 1½" from the division, increase 1 stitch on each side of both marker threads - read INCREASE TIP-2 = 4 stitches increased. Increase like this every 6-6-5-6-5-5 cm = 2⅜"-2⅜"-2"-2⅜"-2"-2" a total of 5 times = 213-233-253-277-297-321 stitches. Continue working until the piece measures approx. 35-34-32-34-32-31 cm = 13¾"-13⅜"-12½"-13⅜"-12½"-12¼" from the division, or to desired length, but make sure that you finish after a complete repeat of the lace pattern in height. Change to circular needle size 3.5 mm = US 4. Work 2 ridges back and forth over all stitches. Change back to circular needle size 4 mm = US 6. Bind off with knit from the right side, but make sure that the bind-off edge is not tight. The jacket measures approx. 58-60-62-64-66-68 cm = 22¾"-23⅝"-24⅜"-25¼"-26"-26¾" from the shoulder down. SLEEVE: Place the 60-70-80-80-90-100 stitches from the thread on the one side of the piece on short circular needle/double pointed needles size 4 mm = US 6 and knit up 1 stitch in each of the 6-6-6-8-8-10 new stitches cast on in the side under the sleeve = 66-76-86-88-98-110 stitches. Insert a marker thread in the middle of the 6-6-6-8-8-10 new stitches in side under sleeve and allow the marker thread to follow your work onwards; it will be used a little later when decreasing mid under sleeve. Start the round by the marker thread and work stockinette stitch in the round. When the piece measures 2-1-1-1-1-1 cm = ¾"-⅜"-⅜"-⅜"-⅜"-⅜"- decrease 2 stitches mid under sleeve – read DECREASE TIP. Decrease like this every 2nd round a total of 1-2-3-3-4-7 times = 64-72-80-82-90-96 stitches. Then decrease every 3½-2½-2-2-1½-1 cm = 1¼"-1"-¾"-¾"-½"-⅜" a total of 12-15-18-18-21-23 times = 40-42-44-46-48-50 stitches left on the needles. Continue until the piece measures 46-44-40-40-37-35 cm = 18"-16½"-15¾"-15¾"-14½"-13¾" from the division or to desired length (shorter measurements in larger sizes due to longer yoke). Change to double pointed needles size 3.5 mm = US 4 and work 2 RIDGES in the round - read description above. Change back to double pointed needles size 4 mm = US 6. Bind off with knit. Make sure the bind-off edge is not tight! The sleeve measures approx. 47-45-41-41-38-36 cm = 18½"-17¾"-16⅛"-16⅛"-15"-14¼" from the division. Work the other sleeve in the same way. ASSEMBLY: Sew buttons onto left band. |
|||||||||||||||||||||||||
Diagram explanations |
|||||||||||||||||||||||||
|
|||||||||||||||||||||||||
 |
|||||||||||||||||||||||||
 |
|||||||||||||||||||||||||
 |
|||||||||||||||||||||||||
 |
|||||||||||||||||||||||||
 |
|||||||||||||||||||||||||
Have you finished this pattern?Tag your pictures with #dropspattern #canarijacket or submit them to the #dropsfan gallery. Do you need help with this pattern?You'll find 26 tutorial videos, a Comments/Questions area and more by visiting the pattern on garnstudio.com. © 1982-2026 DROPS Design A/S. We reserve all rights. This document, including all its sub-sections, has copyrights. Read more about what you can do with our patterns at the bottom of each pattern on our site. |
|||||||||||||||||||||||||


Post a comment to pattern DROPS 195-15
We would love to hear what you have to say about this pattern!
If you want to leave a question, please make sure you select the correct category in the form below, to speed up the answering process. Required fields are marked *.