
Popular categories
Looking for a yarn?


Comments / Questions (33)
![]() J.A. Knol wrote:
J.A. Knol wrote:
Hello, I am curious why the Dutch patten is in Valse patentsteek (flat brioch stitch?) and the german is in Halb Patent stich?? And I really have tot get used to the Norwegian way of purling...it looks so complicated :-)
25.01.2019 - 11:34DROPS Design answered:
Hi J.A. Knol,
It is possible that the English rib variations have a slightly different name in the different languages, but you can just follow the explanations in the pattern, because the pattern is still the same. About the purling. Keep practising, oefing baart kunst :)
27.01.2019 - 14:04
![]() Chloé Va3 wrote:
Chloé Va3 wrote:
Bonjour. Auriez vous un tutoriel pour les manches, s'il vous plaît ? Je ne comprends pas le passage où il faut monter des mailles sous les manches. Merci :)
16.01.2019 - 15:42DROPS Design answered:
Bonjour Chloé Va3, cette vidéo montre comment tricoter un pull de haut en bas avec des emmanchures raglan, mais à partir du time code 6:55 environ, on montre comment mettre les mailles des manches en attente et comment monter celles sous la manche. Bon tricot!
17.01.2019 - 08:46
![]() Elaine Hébert wrote:
Elaine Hébert wrote:
J’ai utilisé la laine drop air bleu marine mixte, que puis-je faire pour éviter que mon chandail perde des poils de laine? Car pendant la réalisation de ce chandail je retrouvais de la mousse de ce chandail sur les planchers de la maison et sur mes vêtements
13.11.2018 - 14:34DROPS Design answered:
Bonjour Mme Hébert, ce sont les fibres "superflues" qui se sont échappées, avec le temps, ça s'atténuera et ça disparaîtra. Bon tricot!
13.11.2018 - 15:31
![]() Palacios wrote:
Palacios wrote:
Merci pour le vidéo, c est plus clair :-)
28.10.2018 - 08:45
![]() Claire wrote:
Claire wrote:
Bonjour, Je pense que vous devriez ajouter une précision concernant le point qui comporte le jeté. Ce n'est pas très clair et j'ai mis beaucoup de temps à comprendre la bonne pratique. En effet, il faut glisser la m. à l'envers puis passer le fil au dessus de l'aiguille droite et le repasser devant pour tricoter la m. suivante à l'envers. Pour le moment, on dirait qu'il faut jeté puis glisser la m. .. Ce qui ne fonctionne pas :-) Merci !!
19.09.2018 - 10:20
![]() Claire Rosset wrote:
Claire Rosset wrote:
Re-Bonjour, J'ai suivi vos conseils à la lettre et malheureusement les côtes anglaises en chaînettes sont toujours du mauvais côté (je tricote aussi en rond). Je pense que je fait une erreur sur les tours impairs (avec les jetés). Je répète *1 m envers, 1 jeté, 1m glissée à l'envers* et au tour d'après *1m envers, le jeté et la m. glissée ensemble à l'endroit" Ne devrait-on pas au premier rang tricoter les m. en endroits au lieu d'envers (vidéo fausse m. anglaises)?
18.09.2018 - 14:48DROPS Design answered:
Bonjour Mme Rosset, si vous tricotez avec le fil dans la main droite: tricotez 1 m env, laissez le fil devant l'ouvrage et glissez la m suivante à l'envers, passez le fil ensuite par-dessus l'aiguille droite et ramenez-le entre les 2 aiguilles (= le jeté va ainsi se former au-dessus de la m glissée et le fil est prêt à tricoter la m suivante à l'envers). Répétez ces 2 m tout le tour, puis au tour suivant, tricotez 1 m env, puis tricotez ensemble à l'endroit la m glissée et le jeté. Bon tricot!
18.09.2018 - 15:13
![]() Claire Rosset wrote:
Claire Rosset wrote:
Bonjour, J'avais bien commencé l'ouvrage et me suis rendue compte que du côté des demis côtes anglaise (chaînettes), j'avais au départ du point mousse (sur l'encolure..). En revanche, je n'arrive pas à faire autrement.. Je tricote 3 rangs endroit puis le motif et les "chaînettes" sont toujours du mauvais côté. Merci de votre aide.
17.09.2018 - 20:09DROPS Design answered:
Bonjour Mme Rosset, l'empiècement se tricote en rond, en tricotant 4 tours endroit pour la bordure d'encolure, on va obtenir 4 tours de jersey (voir vidéo. Quand vous tricotez ensuite en côtes anglaises, les mailles envers doivent s'aligner les unes au-dessus des autres et la maille glissée avec le jeté des tours impairs se tricotent toutes à l'endroit au tour suivant (on va tricoter le jeté et la m glissée ensemble à l'endroit). Bon tricot!
18.09.2018 - 08:56
![]() Hege Hansen wrote:
Hege Hansen wrote:
Hei, det står "1 kast, løft 1 maske løs over på høyre pinne som om den skulle strikkes vrang ", når man løfter over en maske som om den skulle strikkes vrang, skal tråden være foran eller bak da?
13.09.2018 - 07:54DROPS Design answered:
Hei Hege. Tråden har du allerede laget et kast med, så den ligger over pinnen og går ned på baksiden. Når du løfter en maske over som om den skulle strikkes vrang stikker du høyre pinne ned i masken fra oversiden og løfter den over til den høyre pinnen - tråden forblir på baksiden. Når du så skal strikke en vrangmaske går tråden på baksiden av masken du akkurat løftet over. God fornøyelse.
20.09.2018 - 10:15
![]() Claire wrote:
Claire wrote:
Bonjour, en réalisant l'échantillon avec le fil drop air adéquate et avec des aiguille n°5.5, mon échantillon ne fait que 8 à 9 cm (avec point fantaisie et jersey) au lieu de dix. J'ai n'ai pourtant pas tricoté trop serré.. Dois-je prendre une aiguille plus large ou bien plus fine? Merci d'avance,
12.09.2018 - 07:41DROPS Design answered:
Bonjour Claire, si vos 16 m jersey font moins de 10 cm, vous avez alors trop de mailles pour 10 cm et devez utilisez des aiguilles plus grosses - cf aussi ici. Bon tricot!
12.09.2018 - 08:07Oksana wrote:
Please specify following: work 5 stitches in stitch and yarn over as follows: ... before slipping the stitches of the left needle ... - returning this final stitch to the left needle means it is knitted again after for to get back to the worked stiches at the right needle. Correct?
16.08.2018 - 21:02DROPS Design answered:
Dear Oksana, you will work a total of 3 times the same stitch and YO as follows: Knit together the knit stitch (= the slipped st) and the YO, (= 1 st on right needle), *1 YO on right needle, knit together the knit st and the YO one more time*, repeat from *-* one more time = there are now 5 sts on the right needle, slip the knit st and YO off from the left needle and work next st as before. Happy knitting!
17.08.2018 - 10:14
|
||||||||||||||||
Fritid#fritidsweater |
||||||||||||||||
 |
 |
|||||||||||||||
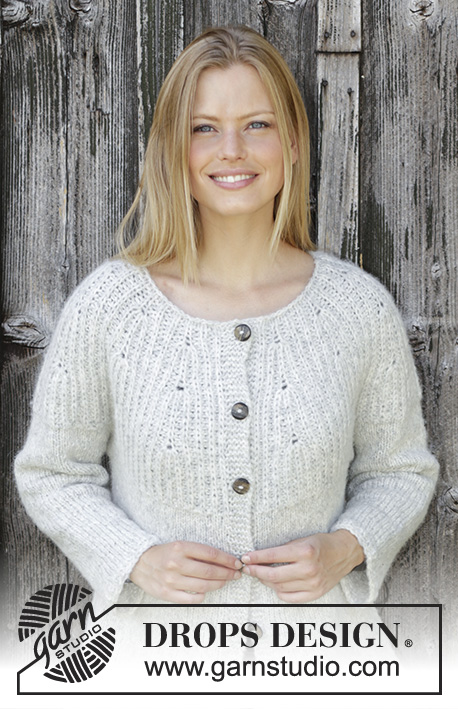
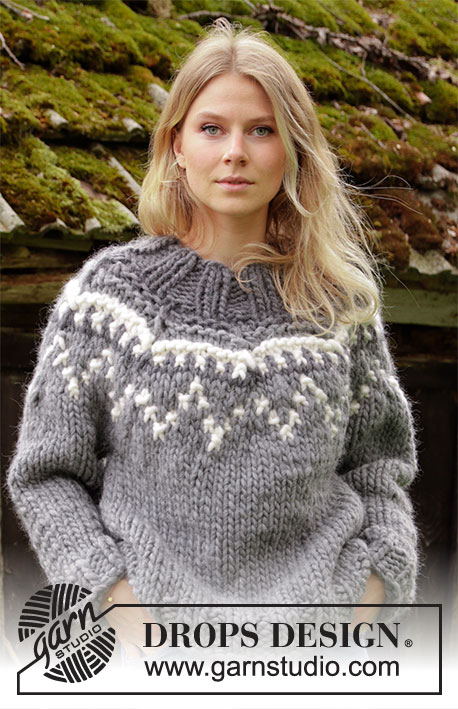
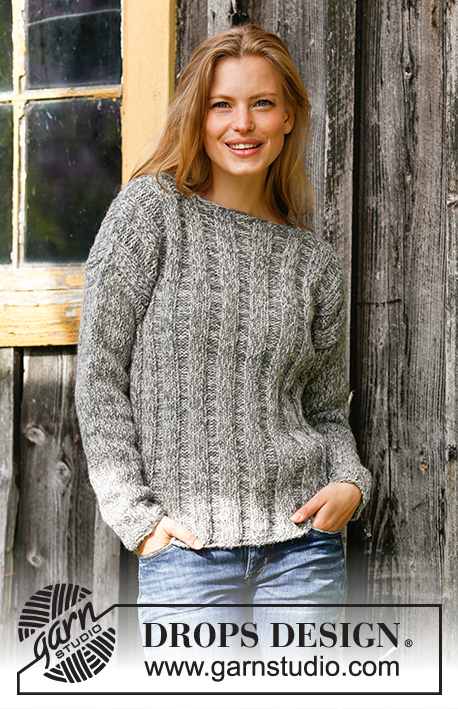
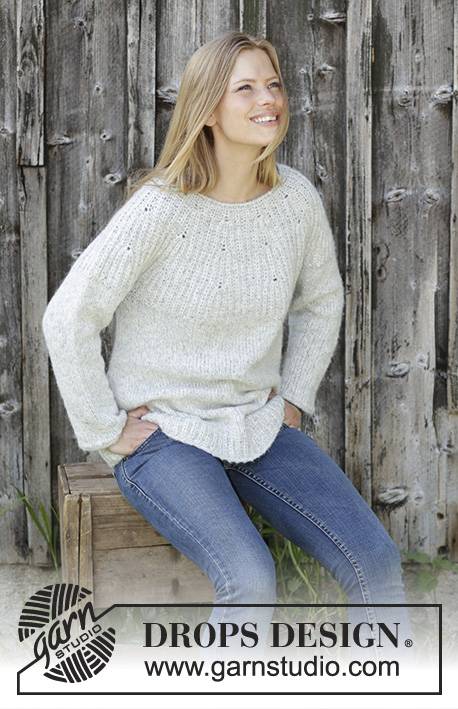
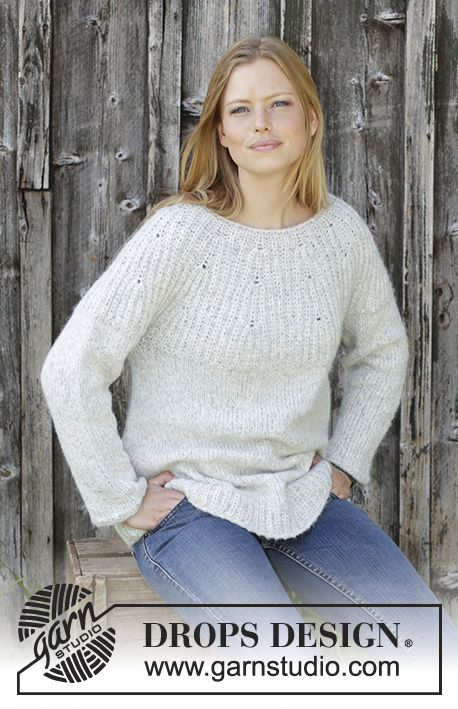
Knitted sweater with round yoke in DROPS Air. The piece is worked top down with false English rib and A-shape. Sizes S - XXXL.
DROPS 195-31 |
||||||||||||||||
|
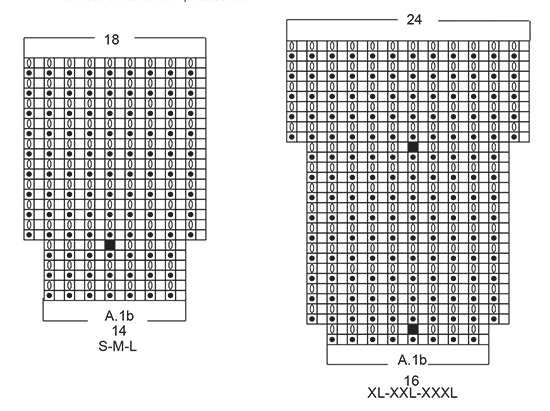
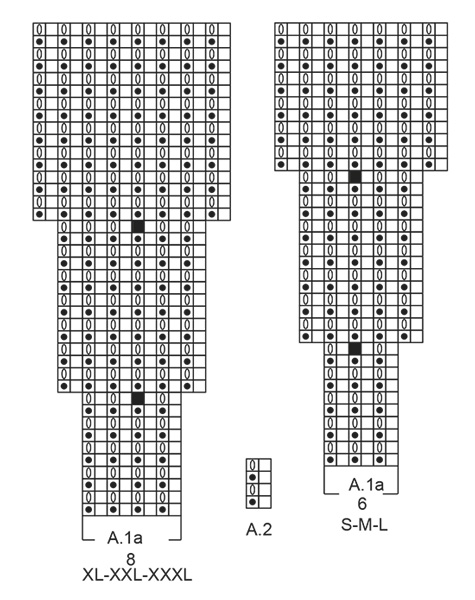
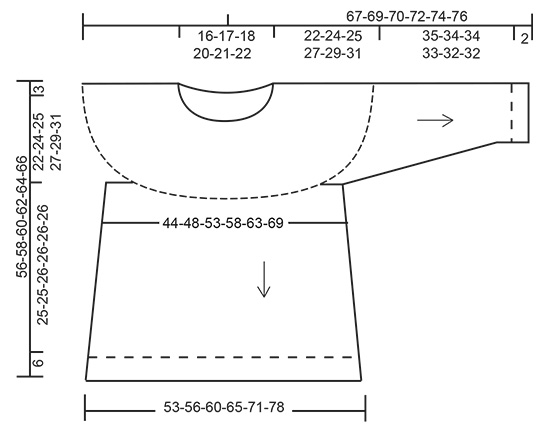
------------------------------------------------------- EXPLANATIONS FOR THE PATTERN: ------------------------------------------------------- PATTERN: See diagrams A.1 and A.2. Choose diagram for your size. The yarn overs in the pattern are not counted as stitches. INCREASE TIP-1 (evenly spaced): To work out how to increase evenly, count the total number of stitches on the needle (e.g. 82 stitches) and divide by the number of increases to be made (e.g. 7) = 11.7. In this example, increase by making 1 yarn over after approx. each 12th stitch. On the next round work the yarn overs twisted to avoid holes. INCREASE TIP-2 (for body): Work until there are 2 stitches left before the marker thread, 1 yarn over (= 1 stitch increased), knit 4 (the marker thread sits in the middle of these 4 stitches), 1 yarn over (= 1 stitch increased). Increase like this at both marker threads (= a total of 4 stitches increased). DECREASE TIP (for sleeves): Work until there are 3 stitches left before the marker thread, knit 2 together, knit 2 (marker thread sits in the middle of these 2 stitches), slip 1 stitch as if to knit, knit 1, pass the slipped stitch over the knitted stitch (= 2 stitches decreased). ------------------------------------------------------- START THE PIECE HERE: ------------------------------------------------------- SWEATER - SHORT OVERVIEW OF THE PIECE: The yoke is worked in the round with circular needle, top down in false English rib. Then the yoke is divided for body and sleeves. The body is continued in the round in stockinette stitch with a false English rib edge. The sleeves are worked in the round with double pointed needles in stockinette stitch and with a false English rib edge. YOKE: Cast on 66-72-78-82-85-91 stitches with circular needle SIZE 5.5 mm/US 9 and Air. Knit 2-2-2-4-4-4 rounds, AT THE SAME TIME on round 3 increase 0-0-0-6-11-13 stitches evenly on round – read INCREASE TIP-1 = 66-72-78-88-96-104 stitches. Work A.1a ( 6-6-6-8-8-8 stitches) a total of 11-12-13-11-12-13 times in width. Continue this pattern. REMEMBER THE GAUGE! Be careful, when increasing in the diagram, that the stitch you increase in is not tightened more than absolutely necessary; there will be a small hole in this stitch. When A.1a has been worked 1 time in height there are 154-168-182-176-192-208 stitches on the needle. Now work A.1b over A.1a. When A.1b has been completed in height there are 198-216-234-264-288-312 stitches on the needle. The piece measures approx. 20-20-20-24-24-24 cm / 7⅞"-7⅞"-7⅞"-9⅜"-9⅜"-9⅜" from the cast-on edge. Repeat the last 2 rounds in A.1b until the piece measures 21-23-24-26-28-30 cm / 8 ¼"-9"-9⅜"-10 ¼"-11"-11 ¾" from the cast-on edge; adjust so that you finish with a round without yarn overs. Knit all stitches and increase 14-20-30-16-12-16 stitches evenly on round = 212-236-264-280-300-328 stitches. On the next round divide for body and sleeves as follows: Knit 31-34-38-41-45-50 stitches (= half back piece), place the next 44-50-56-58-60-64 stitches on a thread for sleeve and cast on 8-8-8-10-10-10 new stitches under the sleeve, knit 62-68-76-82-90-100 stitches (= front piece), place the next 44-50-56-58-60-64 stitches on a thread for sleeve and cast on 8-8-8-10-10-10 new stitches under the sleeve. Finish with knit 31-34-38-41-45-50 stitches (= half back piece) = 140-152-168-184-200-220 stitches. The yoke measures approx. 22-24-25-27-29-31 cm / 8⅝"-9⅜"-9 ¾"-10⅝"-11⅜"-12⅛". BODY: Insert 1 marker thread in the middle of the 8-8-8-10-10-10 new stitches in each side of the piece (= 70-76-84-92-100-110 stitches on both front and back pieces). Continue with stockinette stitch. When the piece measures 3 cm / 1" from where the body was divided from the sleeves, increase 1 stitch on each side of both marker threads – read INCREASE TIP-2! Increase like this every 3-3-4-4-3-3 cm / 1⅛"-1⅛"-1 ½"-1 ½"-1⅛"-1⅛" a total of 7-7-6-6-7-7 times = 168-180-192-208-228-248 stitches. When the piece measures 25-25-26-26-26-26 cm / 9 ¾"-9 ¾"-10 ¼"-10 ¼"-10 ¼"-10 ¼" from where the body was divided from the sleeves work an edge as follows: On the next round increase 10 stitches evenly on round = 178-190-202-218-238-258 stitches. Work A.2 (= 2 stitches) over all stitches. When A.2 has been worked for approx. 6 cm / 2⅜" bind off with knit. The piece measures approx. 56-58-60-62-64-66 cm / 22"-22¾"-23⅝"-24⅜"-25¼"-26" from the shoulder down. SLEEVE: Place the 44-50-56-58-60-64 stitches from the thread on the one side of the piece on double pointed needles SIZE 5.5 mm/US 9 and knit up 1 stitch in each of the 8-8-8-10-10-10 stitches cast on under the sleeve = 52-58-64-68-70-74 stitches. Insert 1 marker thread in the middle of the 8-8-8-10-10-10 new stitches. Work stockinette stitch in the round. When the sleeve measures 3 cm / 1" from where it was divided from the body, decrease 1 stitch on each side of the marker thread – read DECREASE TIP. Decrease like this every 4-3-2½-2-2-1½ cm/1½"-1⅛"-¾"-¾"-½" a total of 7-9-11-13-13-14 times = 38-40-42-42-44-46 stitches. When the sleeve measures 35-34-34-33-32-32 cm / 13 ¾"-13⅜"-13⅜"-13"-12 ½"-12 ½" from where it was divided from the body, work A.2 over all stitches. Bind off with knit when A.2 has been worked 1 time in height. Work the other sleeve in the same way. |
||||||||||||||||
Diagram explanations |
||||||||||||||||
|
||||||||||||||||
 |
||||||||||||||||
 |
||||||||||||||||
 |
||||||||||||||||
Have you finished this pattern?Tag your pictures with #dropspattern #fritidsweater or submit them to the #dropsfan gallery. Do you need help with this pattern?You'll find 23 tutorial videos, a Comments/Questions area and more by visiting the pattern on garnstudio.com. © 1982-2026 DROPS Design A/S. We reserve all rights. This document, including all its sub-sections, has copyrights. Read more about what you can do with our patterns at the bottom of each pattern on our site. |
||||||||||||||||


With over 40 years in knitting and crochet design, DROPS Design offers one of the most extensive collections of free patterns on the internet - translated to 17 languages. As of today we count 324 catalogs and 12290 patterns - 12280 of which are translated into English (US/in).
We work hard to bring you the best knitting and crochet have to offer, inspiration and advice as well as great quality yarns at incredible prices! Would you like to use our patterns for other than personal use? You can read what you are allowed to do in the Copyright text at the bottom of all our patterns. Happy crafting!
Post a comment to pattern DROPS 195-31
We would love to hear what you have to say about this pattern!
If you want to leave a question, please make sure you select the correct category in the form below, to speed up the answering process. Required fields are marked *.