
Popular categories
Looking for a yarn?


Comments / Questions (95)
![]() Twan wrote:
Twan wrote:
Ik snap het patroon niet bij het armsgat... wie helpt me?
20.05.2018 - 15:00
![]() Ilona wrote:
Ilona wrote:
Ich habe jetzt über die Hälfte vom Rückenteil gehäkelt und leider wird die eine Seite immer breiter (schräg) und ich finde den Fehler nicht. Unten waren es 53 cm und jetzt bin ich schon bei 54,5 cm ??
17.05.2018 - 19:24DROPS Design answered:
Liebe Ilona, beachten Sie, daß Ihre Maschenprobe immer stimmt, und daß Sie immer die gleichen Maschenanzahl haben: 80-86-92-104-110-122 Stäbchen bei der 2. und 4. Reihe in A.1-A.3. Viel Spaß beim häkeln!
18.05.2018 - 08:52
![]() Christiane wrote:
Christiane wrote:
Ich finde Eure Aufmachungen und Anleitungen so wenig neu, sondern sehr altmodisch und langweilig. Andere Wollanbieter haben weitaus modernere Anleitungen und nicht immer wieder den 70-90-Jahre Stil. Das gefällt mir nicht an Drops, oder garnstudio.com Ihr müsst in den Anleitungen moderner, ausgefallener und fetziger werden. Dann habt Ihr auch wieder mehr Zulauf.
14.05.2018 - 08:02
![]() Mindy wrote:
Mindy wrote:
How much ease is shown on the model? It's a little hard to tell from the photo.
23.04.2018 - 19:21DROPS Design answered:
Dear Mindy, you will find at the bottom of the page a measurement chart with all measurements in cm for each size, taken flat from side to side. Compare these to a similar garment you have and like the shape to find out the matching size (and the positive ease you like). Happy crocheting!
24.04.2018 - 08:47
![]() Loes wrote:
Loes wrote:
Het duurde even voordat ik de beschrijving van het patroon doorhad. Uiteindelijk een superleuke trui om te haken!
19.04.2018 - 11:09
![]() Virginie wrote:
Virginie wrote:
Bonjour, Je n\'arrive pas à faire les manches. Quand on fait les augmentations, le nombre de mailles ne tombe plus juste pour faire une bride+A2+une bride. Merci pour votre aide.
14.04.2018 - 23:59DROPS Design answered:
Bonjour Virginie, vous pouvez crocheter les augmentations en brides jusqu'à ce que vous ayez augmenté 3 brides de chaque côté et alors vous pourrez crocheter 1/2 motif de A.2 sur ces 3 brides. Bon crochet!
16.04.2018 - 09:27
![]() Anna-Lena wrote:
Anna-Lena wrote:
Jag gjorde sl M och det blev rätt okej, men se upp med är,arnas längd. Mina ärmar blev lite för långa. Mät på dig själv en bit ner på din axel.
14.04.2018 - 11:39
![]() Ute wrote:
Ute wrote:
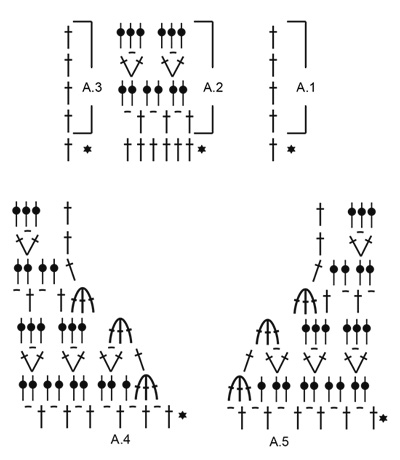
Hallo Bei der Muster A2 wird es in der Anleitung so beschrieben, das man in die Masche einsticht und dann 3 stb zusammen abmascht.Auf dem Bild sind aber drei Stäbchen um die Luftmasche der Vorrunde gehäkelt worden.Es sieht auch so aus das sie nicht zusammen abgemascht wurde. Was ist nun richt.
12.04.2018 - 23:31DROPS Design answered:
Liebe Ute, in A.2 häkeln Sie bei der 4. Reihe 3 Stb um jede Luftmasche (= 3. Symbol), die 3 Stb zusammen (= 5. Symbol) werden in A.4/A.5 gehäkelt. Viel Spaß beim häkeln!
13.04.2018 - 08:15Elena wrote:
Bonjour, question sur le Dos, au debur du 1er rang - Est- ce qu'il faut sauter 1 maille en l'air après la partie de 3 mailles en l'air + 6 premières brides aussi ? Est-ce que à la fin du rang on doit aussi avoir : 6 brides, sauter une maille en l'air, 7 brides ? merci !
25.03.2018 - 19:57DROPS Design answered:
Bonjour Elena, au tout début, on commence par 1 bride dans la 4ème ml à partir du crochet (= les 3 premières ml = 1ère bride), puis 1 bride dans les 5 ml suivantes (= on va avoir: 3 ml pour tourner (= 1ère bride) puis 6 brides) et en fin de rang, on termine par 1 bride dans les 6 ml suivantes, on saute 1 ml et 1 bride dans la dernière ml. Bon crochet!
26.03.2018 - 11:40
![]() Angeli Lidén wrote:
Angeli Lidén wrote:
Har jag uppfattat diagrammet rätt? Börja 1:a varvet från höger med A1, dvs 1 st (som ersätts med 3 lm)+A2 varannan stolpe och luftmaska resten av varvet. Varvet avslutas med A3, dvs en stolpe. Nästa varv börjas från vänster, med A3, dvs en stolpe, A2 med 2 luftmaskor om varje lm, hoppa över stolparna, avsluta med A1, dvs 1 st.
17.03.2018 - 20:25DROPS Design answered:
Hej Angeli, ja 1:a varvet virkar du varannan stolpe och luftmaska varvet ut. 2:a varvet virkar du 2 stolpar om varje lm varvet ut. Lycka till :)
20.03.2018 - 09:53
|
||||||||||||||||
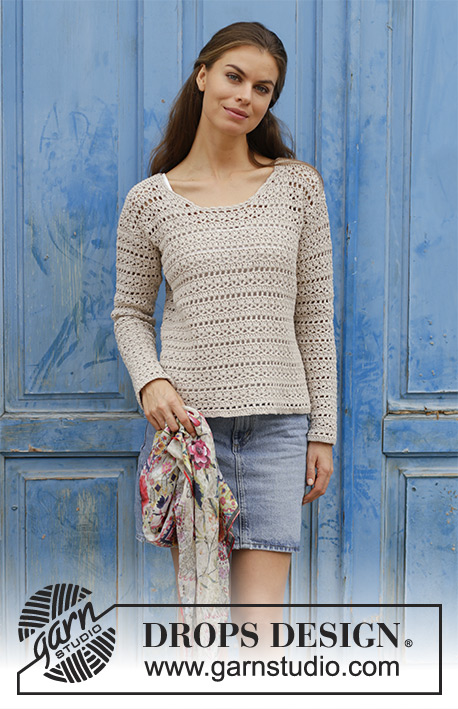
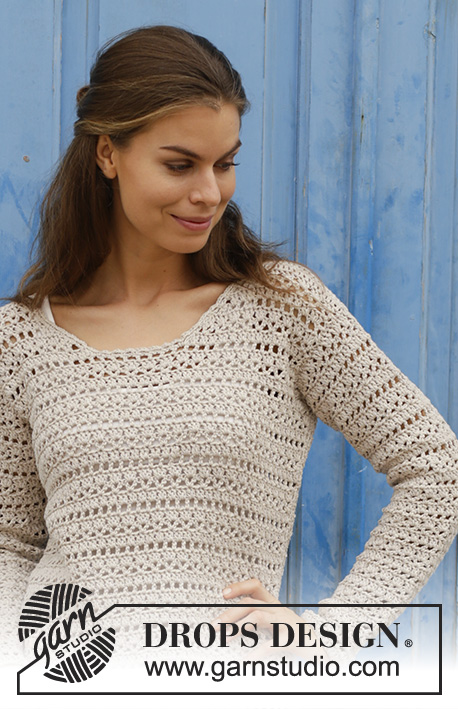
Miles Away#milesawaysweater |
||||||||||||||||
 |
 |
|||||||||||||||
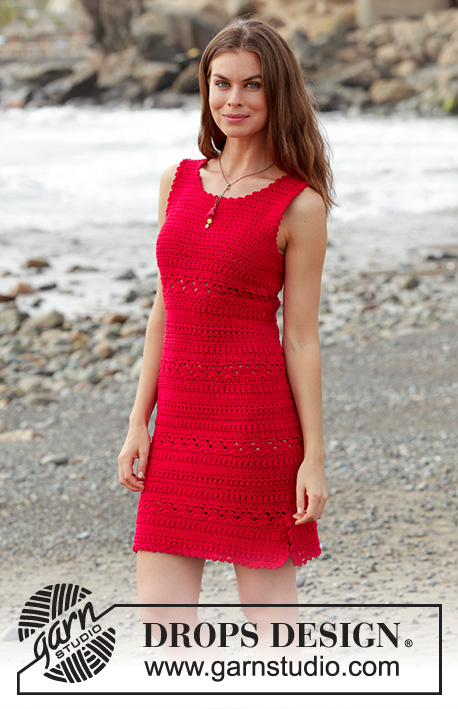
Crocheted sweater with lace pattern. Sizes S - XXXL. The piece is worked in DROPS Cotton Light.
DROPS 187-2 |
||||||||||||||||
|
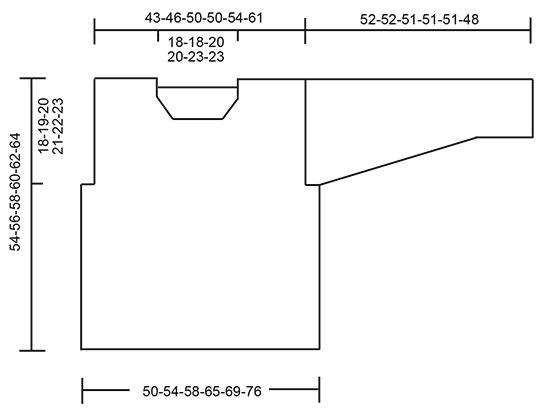
INFORMATION FOR THE PATTERN: PATTERN: See diagrams A.1 to A.5. CROCHET INFO: At the beginning of each row of double crochets, replace the first double crochet with 3 chain stitches. ---------------------------------------------------------- SWEATER: The piece is worked back and forth. First work the back and front pieces separately and then work the sleeves. All pieces are sewn together at the end. To finish, crochet an edge around the neck. BACK PIECE: Work 94-101-108-122-129-143 chain stitches with hook size 4.5 mm/US 7 and Cotton Light. Work 1 double crochet in the 4th chain stitch from the hook (= 2 double crochets), 1 double crochet in each of the next 5 chain stitches, * 1 double crochet in each of the next 6 chain stitches, skip 1 chain stitch *, work from *-* until there is 1 chain stitch left, 1 double crochet in the last chain stitch = 80-86-92-104-110-122 double crochets. Then work as follows from the right side: Work A.1 – read CROCHET INFO, A.2 (= 6 stitches) a total of 13-14-15-17-18-20 times in width and finish with A.3 over the last double crochet. Continue this pattern upwards. REMEMBER THE CROCHET GAUGE! A.1 to A.3 are repeated in height. When the piece measures 36-37-38-39-40-41 cm / 14¼"-14½"-15"-14¼"-15¾"-16⅛", work the armholes as follows: Cut the strand, skip 6-6-6-12-12-12 stitches (= armhole), work 1 slip stitch in the next stitch, 3 chain stitches, A.2 over the next 66-72-78-78-84-96 stitches and finish with A.3 over the next stitch (there are now 6-6-6-12-12-12 stitches left for the other armhole = a total of 68-74-80-80-86-98 stitches on the row. On the next row work A.1 in the last double crochet. Continue the pattern like this. When the piece measures 52-54-56-58-60-62 cm / 20½"-21¼"-22"-22¾"-23⅝"-24⅜", adjust so that the last row was worked from the wrong side, finish each shoulder separately. Work 1 double crochet in each of the first 20-23-24-24-25-31 double crochets (= shoulder). Work 2 rows with 1 double crochet in each. Cut and fasten strand. The piece measures a total of 54-56-58-60-62-64 cm / 21¼"-22"-22¾"-23⅝"-24⅜"-25¼". Skip 28-28-32-32-36-36 stitches for neck, work 1 slip stitch in the next stitch and 3 chain stitches (= 1 double crochet), work 1 double crochet in each of the last 19-22-23-23-24-30 stitches. Finish the shoulder in the same way as the other shoulder. FRONT PIECE: Work as for back piece until piece measures 42-44-44-46-46-48 cm / 16½"-17¼"-17¼"-18"-18"-19", adjust so that the last row worked is the first row of A.2 (the last row is worked from the right side). Now divide the piece and each shoulder is finished separately as follows: RIGHT SHOULDER (when the garment is worn): The first row is worked from the wrong side. Work A.3 over the first 1-1-2-2-3-3 stitches (work around chain stitches and in double crochets), work A.2 over the next 15-18-18-18-18-24 stitches, work A.4 over the next 12 stitches, turn the piece. Continue the pattern and decreases to neck according to diagram A.4. When A.4 has been worked 1 time in height, there are 20-23-24-24-25-31 double crochets on the last row. Work pattern until the piece measures 52-54-56-58-60-62 cm / 20½"-21¼"-22"-22¾"-24½", adjust so that you finish with 1 row of double crochets from the wrong side. Work 1 double crochet in each double crochet until the piece measures 54-56-58-60-62-64 cm / 21¼"-22"-22¾"-23⅝"-24⅜"-25¼". Cut and fasten the strand. LEFT SHOULDER (when the garment is worn): Now work the left shoulder as follows (first row = wrong side): Skip 12-12-16-16-20-20 double crochets from where A.4 was worked (= for neck), work 1 slip stitch in the next stitch, then work A.5 over the same stitch and the next 11 stitches (= a total of 12 stitches), work A.2 over the next 15-18-18-18-18-24 stitches and finish with A.1 over the last 1-1-2-2-3-3 stitches (work around chain stitches and in double crochets). Continue the pattern and decrease according to diagram A.5. When A.5 has been worked 1 time in height, there are 20-23-24-24-25-31 double crochets on the last row. Work pattern until the piece measures 52-54-56-58-60-62 cm / ½"-21¼"-22"-22¾"-24½", adjust to match the right shoulder. Work 1 double crochet in each double crochet until the piece measures 54-56-58-60-62-64 cm / 21¼"-22"-22¾"-23⅝"-24⅜"-25¼". Cut and fasten the strand. SLEEVE: The piece is worked back and forth. Work 45-45-49-49-52-52 chain stitches with hook size 4.5 mm/US 7 and Cotton Light. Work 1 double crochet in the 4th chain stitch from the hook (= 2 double crochets), 1 double crochet in each of the next 5-5-7-7-5-5 chain stitches, * 1 double crochet in each of the next 6 chain stitches, skip 1 chain stitch *, work from *-* until there are 1-1-3-3-1-1 chain stitches left, 1 double crochet in each of the last 1-1-3-3-1-1 chain stitches = 38-38-42-42-44-44 double crochets. Work A.1 over the first 1-1-3-3-1-1 double crochets, A.2 until there are 1-1-3-3-1-1 double crochets left (= 6-6-6-6-7-7 times in width), A.3 over the last 1-1-3-3-1-1 double crochets. Work A.1 to A.3 in height to finished length. When the piece measures 10 cm / 4" increase 1 double crochet in each side of the piece by working 2 double crochets in the first and last double crochet on the row (= 2 double crochets increased). Increase like this every 4-3½-3½-2½-2½-2 cm / 1½"-1¼"-1¼"-⅞"-⅞"-¾" a total of 10-11-11-13-13-15 times = 58-60-64-68-70-74 stitches. The increased stitches are worked into A.2 as you go. NOTE: There is always 1 double crochet (or 3 chain stitches = 1 double crochet) in each side of the piece. When the piece measures 48-48-47-44-44-41 cm / 19"-19"-18½"-17¼"-17¼"-16", insert 1 marker at the beginning of the row; the sleeve seams will later be sewn as far as the marker and the remaining rows sewn together with the 6-6-6-12-12-12 double crochets on the back/front piece which were skipped to make the armhole in each side of the piece (= mid under sleeve). Continue back and forth until the piece measures 52-52-51-51-51-48 cm / 20½"-20½"-20"-20"-20"-19" (shorter measurements in larger sizes due to wider shoulders). Cut and fasten strand. Work 1 more sleeve in the same way. ASSEMBLY: Sew shoulder seams in the outermost loop of the outermost stitch. Sew in the sleeves, the marker on the sleeve marks the side seam on the front and back pieces and the rows worked after the marker are sewn to the 6-6-6-12-12-12 stitches skipped for armholes on front and back pieces. Start at bottom of sleeve and sew sleeve seam in the outermost loop of the outermost stitch, continue with side seam on front and back pieces. Cut and fasten all strands. NECK: Crochet an edge around the neck as follows from mid top of shoulder: Work 1 single crochet, * 3 chain stitches, skip approx. 1 cm / ⅜", 1 single crochet *, work from *-* around the whole neck and finish with 3 chain stitches and 1 slip stitch in the first single crochet at the beginning of the round, make sure the edge is not tight. Cut and fasten the strand. |
||||||||||||||||
Diagram explanations |
||||||||||||||||
|
||||||||||||||||
 |
||||||||||||||||
 |
||||||||||||||||
Have you finished this pattern?Tag your pictures with #dropspattern #milesawaysweater or submit them to the #dropsfan gallery. Do you need help with this pattern?You'll find 8 tutorial videos, a Comments/Questions area and more by visiting the pattern on garnstudio.com. © 1982-2026 DROPS Design A/S. We reserve all rights. This document, including all its sub-sections, has copyrights. Read more about what you can do with our patterns at the bottom of each pattern on our site. |
||||||||||||||||


With over 40 years in knitting and crochet design, DROPS Design offers one of the most extensive collections of free patterns on the internet - translated to 17 languages. As of today we count 324 catalogs and 12290 patterns - 12280 of which are translated into English (US/in).
We work hard to bring you the best knitting and crochet have to offer, inspiration and advice as well as great quality yarns at incredible prices! Would you like to use our patterns for other than personal use? You can read what you are allowed to do in the Copyright text at the bottom of all our patterns. Happy crafting!
Post a comment to pattern DROPS 187-2
We would love to hear what you have to say about this pattern!
If you want to leave a question, please make sure you select the correct category in the form below, to speed up the answering process. Required fields are marked *.